Additional lighting source: ice lighting of the interior of the Lada Vesta car is achieved with LED bulbs. Potential buyers have no idea where the LEDs that provide interior lighting are located. Many people believe that LEDs are built in at the top, on the surface of the ceiling. It's a delusion. In the interior of the Lada Vesta, LED lighting is installed in a recess on the front panel and below, in the area of the feet in front of the driver and passenger. In addition, the manufacturer is trying to keep up with the times and, in addition to standard lighting and standard halogen lamps, supplements cars with LED lighting for certain areas: lighting for rear passengers, license plates, feet. Read the article to the end and you will learn everything about the ice lighting of the machine!
Led interior lighting of the Lada Vesta car includes not only illumination of the interior space.
The vehicle's additional lighting system consists of:
- Lada Vesta number plate illumination;
- dashboard lighting for Lada Vesta;
- lighting in the footwell area of the driver and front passenger.
Illumination of external lighting would come in very handy. This option is only at the development stage; manufacturers are speeding up the implementation process.
If the Lada vesta cross or another model is not equipped with lighting elements, you can equip the car with them yourself.
Connecting the backlight
When installing an additional lamp, the following connection points will be useful:
1. ERA-GLONASS unit (lighting lamp on the ceiling).
- +12V from the battery (permanent): connector A4 of the ISO connector of the radio
- +12V after ignition: connector A7 of the radio ISO connector
- Weight: any point on the body, connector A8 of the radio ISO connector
one of the wires of the block (usually black) is the “ground” limit switch, the other is + 12V.
Standard connection diagram for the rear courtesy light on a Lada Vesta (by Miha062)
How do you feel about this modification of the lighting in the car interior? Let us remind you that other instructions for tuning and modifying cars are in these categories: for Lada Vesta, for Lada XRAY.
Problematic AMT and version 2.0
Six months after the release of the SW and SW Cross station wagons in 2017, the VAZ robot receives new firmware. The first officially reflashed Vesta is a station wagon with a 1.8 engine. At the same time, everyone who bought cars with a slow-witted transmission (some owners complained about delays when starting and shifting gears) cannot update the software in the service network. Why? VAZ people say that the new version is technically not an update. Therefore, reflashing is impossible. AMT now has a “creeping” mode (first gear - 7-8 km/h, second - 14-15 km/h, reverse - 5-6 km/h). The switching speed in automatic mode has increased by 30%. This was achieved by optimizing the servo drive switching algorithm regardless of engine speed.
Equipment Lada Vesta SW Cross “Comfort”
What is included in the Lada Vesta SV Cross “Comfort” package:
Comfort
- Multifunction steering wheel
- Bluetooth, Hands free
- USB connector on the front panel
- Audio input AUX
- 4.3" monochrome audio display
- 4 speakers
- Audio system (FM/AM with RDS function, SD card)
- Speed limiter
- Cruise control
- Cooled glove box
- Air conditioner
- Heated side mirrors
- Electrically adjustable side mirrors
- Heated front seats
- Rear electric windows
- Front electric windows
- Folding ignition key
- Cabin air filter
- Driver's seat with lumbar support
- Driver's seat with height adjustment
- Electric power steering
- 12V socket on the center console
- Gear shift prompt in the instrument cluster
- On-board computer
Safety
- Rear parking sensors
- Central locking control panel in the key
- central locking
- Adjusting the height of the front seat belts
- Engine and engine compartment protection
- Hill Start Assist (HSA)
- Traction control system (TCS)
- Electronic Stability Control (ESC) with shut-off function
- Brake Assist (BAS)
- Brake force distribution (EBD)
- Anti-lock braking system (ABS)
- Rear disc brakes
- Emergency call device "Era-GLONASS"
- Immobilizer
- Automatic door unlocking and hazard warning lights in the event of a collision
- Automatic activation of the hazard warning lights during emergency braking
- Automatic door locking when driving
- Locking the rear doors against opening by children
- ISOFIX child seat anchors
- Rear seat headrests 2 pcs.
- Possibility to disable the front passenger airbag
- Front passenger airbag
- Driver's front airbag
Interior
- Adjusting the steering column reach
- Adjusting the steering column height
- Seat upholstery combined fabric/eco leather, choice of color: orange/gray
- 60/40 split folding rear seat
- Center front armrest with box
- Front passenger sun visor with mirror
- Driver's sun visor with mirror
Exterior
- Turn signal repeaters in exterior mirror housings
- Spare wheel with steel rim
- Spare wheel small size 15-inch
- Light alloy wheels
- Wheels 17 inches
- Decorative exhaust pipe nozzle
- Rear spoiler
- Roof rails
- Exterior door handles in body color
- Exterior mirrors in body color
- Light window tinting
- Fog lights
- Daytime Running Lights
Options, necessary and not so necessary
In the winter of 2016, the most affordable version of the Classic received a driver's airbag, heated front seats and mirrors. And a little later, a new driver’s armrest...
With the advent of the station wagon, other options became available:
- Rear disc brakes (previously drum brakes)
- New dashboard
- Armrest of the second row (in top trim levels)
- External trunk release button
- Lockable fuel filler door
- Antenna in the form of a fin.
- Multi-level heated seats
- Climate control
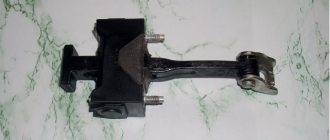
New door stops were introduced in August 2022. The old ones did not perform the function of fixing and holding the door in the desired position. We can say that this (along with the armrest) was the little thing that spoiled the overall impression.
Some changes are difficult to explain by anything other than the desire of marketers to give Vesta the image of a modern car. For example, the smooth opening of the glove compartment lid appeared in the summer of 2022. This also includes the cup holder integrated into this lid. What about the function of atmospheric interior lighting (LEDs in the feet of the driver and passengers)? Is it really needed?
In the near future, Lada Vesta will receive further updates, which will certainly affect the appearance. So welcome to the comments.
- Replacing the low beam light bulb Mazda 3 2008 video
- How to remove a chip from the headlight of an Opel Astra H
- Why do the low beam bulbs on a gazelle business burn out?
- The reason is that the right headlight is brighter than the low beam in the Mitsubishi ASX
- How to replace the low beam light bulb on a Volkswagen Passat B6
Why doesn't the light in the cabin turn off?
This problem is also associated with sensors on the doors; it most often appears in the cold season, when the rubber hardens. In this position, the limit switch sticks and the system “thinks” that the doors are open, and the light in the cabin does not go out.
Way to solve the problem
There are two fairly simple options for dealing with this situation:
- Install an additional spring under the rubber band, which will act on the stiff boot.
- Purchase an alternative Hans Pries 104 035 756 sensor. All you need from it is the rubber band itself, which must be replaced in place of the old one. On analogues this part is softer and more elastic.
The price for solving the problem is from 70 to 100 rubles.
How does “Luxe / Prestige” differ from “Comfort / Winter”
Differences Lada Vesta “Luxe / Prestige”
- Navigation system
- 6 speakers
- 7.0" color touch display
- Single-zone climate control
- Light sensor
- Rain sensor
- Rear View Camera
- Heated rear seats
- Power folding side mirrors
- Enhanced rear window tinting
- Illumination of entry and exit points in the front doors
- Atmospheric interior lighting
- Automatic headlight switch off
- USB port for passengers in the second row of seats
- Case for glasses
- Combined seat upholstery - dark gray or brown fabric/eco leather (optional)
- Center rear armrest
- Fog lights with turning light function
- 3 rear headrests
- Front side airbags
Differences Lada Vesta “Comfort / Winter”
- 4 speakers
- 4.3" monochrome display
- Air conditioner
- Light window tinting
- Seat upholstery - gray or brown fabric (optional)
- Fog lights
- 2 rear headrests
Laser backlight with logo, LEDs and other lighting options
So, what kind of backlights are there, what are their features? Which option is better to choose for your car doors? Of course, additional lighting can be achieved through simple LED bulbs and shades used to illuminate drawers. This is a fairly inexpensive method that does not require much time, effort, or money. True, you shouldn’t expect anything unique from him. The only thing that can surprise you is to install an additional switch - then it will be possible to deactivate this option even with the door open.
A more interesting option is laser illumination for car doors. Its advantages, of course, include originality, because just ten years ago neither the owners nor even the car manufacturers themselves could imagine that such mini-projectors with a logo would appear in the near future. Naturally, in this case, material costs will increase somewhat, because laser technology appeared in the tuning field relatively recently. However, it is not enormous, so if desired, almost every motorist will be able to afford such a lighting device for the door. And laser illumination with a logo should not cause problems with installation; everything can be done with your own hands.
Another type that requires discussion is the installation of LED strip. So, in this case there is no need to cut the trim to hide the tape inside the doors. True, if there is a desire to protect her from negative external influences, then a similar operation can be performed. By installing this type of door tuning yourself, you will get much more light compared to LED bulbs, and it will not fade, even if there is special plastic or silicone protection. But we are not talking about an exquisite image of the logo when exiting the car. The disadvantages include the possibility of damage to this element during car washing, so do not forget to warn the service personnel in advance about its presence.
Childhood diseases
Malfunctions that were eliminated in the first year of sales include:
- Falling lumbar support in luxury versions: the cause was large play in the support rod in the support bushing. In the early stages, the dealer fixed the problem by wrapping tape around the rod. Later the bushing itself was replaced.
- The creaking of the stabilizer struts, which was due to a defective supplier: instead of fluoroplastic bushings of the strut support, vulcanized rubber-metal hinges were installed.
- Poor-quality material of the clutch disc linings (which many perceived as poor AMT performance - jerking at the start and when overheating): later, linings made of a more heat-resistant material began to be used.
- Multimedia glitches: the manufacturer of the multimedia complex has released several firmware that eliminated freezing, screen miscalibration and navigator bugs.
- Scratched glass: At first, the dealer simply cut off part of the edge of the seal. Later, the configuration and material of the seal were changed and the gap was optimized.
Materials
Illumination is realized by installing an LED strip. You can buy it not only in many stationary stores, but also on the Internet. The cost of such a product is low, and therefore such a modification will definitely not hit the budget. The most popular sites with articles and prices are given in the table.
However, before purchasing it is worth clarifying some points - the length of the tape, the color and brightness of its glow. For those who are in no hurry to make a purchase, the option of ordering from Aliexpress is perfect, since products there are generally cheaper, although delivery is much longer.
In addition, you will need an aluminum profile (it is recommended to take the thinnest one) and wiring.
DIY LED lighting installation
In order to get the job done, we will need:
- heat shrink pipe;
- electric wires;
- LED strip and LED lights.
Installation is carried out, as a rule, on the dashboard, in places where lamps and standard lighting elements are located. They can be simply replaced with LEDs if desired. The base of the diode lamp is the same as that of a standard lamp, so replacement is carried out without any difficulties.
Next, you need to install the tape at the bottom in the foot area and around the perimeter of the top of the car. After the necessary measurements, cut off the amount of tape that is needed. Cuts should be made in areas where solder contacts are located.
When measuring, you need to provide some excess wires for reserve. After cutting and soldering to the contacts of the tape, you need to put on the heat-shrinkable tube and heat it with a hair dryer until there is no shrinkage. We process the following fragments in a similar way.
The connection must be made through an RGB block container or in the same way as neon lights. This will ensure that the lights turn on when the car doors are opened.
It is very important to maintain the correct polarity here - this was discussed above
After connecting it yourself, the car door lights will be ready for use - check its operation. If everything is in order, you can be congratulated on your success.
Room lighting
Lighting for the Lada Vesta number is provided by two light bulbs. Lamps often burn out, so drivers must be able to fix this problem themselves and replace the lamps.
The procedure is not complicated and does not require special skills or abilities.
Sequence of events
Use a sharp object to pry the lid of the lantern. Take it out. Remove the lamp and install a new one in its place. A 5V light bulb is built into the lantern. Reinstall the flashlight in reverse order. When removing the flashlight, pry it with a sharp object from the left side.
Front panel illumination
The front panel backlight is activated when external lighting devices are turned on. Car owners note that they experience some inconvenience when reading indicators when exposed to direct sunlight. Car owners are trying to independently improve the LED lighting of Lada instruments. Car enthusiasts should take into account that any intervention, modification or improvement of lighting fixtures will result in loss of warranty coverage. If the owner nevertheless decides to improve the lighting, it is necessary to adhere to the algorithm of actions.
Sequence of events
Remove the glove container. To do this, open it and press out the latches that hold the lid. Apply a little force, pull the cover towards you, it will come off. Remove the glove box light. Using a small screwdriver, press out the lamp and disconnect the wires. Unscrew the five bolts and remove the glove compartment. To improve lighting, purchase two 600 V LEDs. Unscrew the hook and screw securing the body of the pulp and paper machine. In connector c1 you need to cut the dark blue wire. In connector c2, strip the blue-red wires. Connect two diodes. In the received kit, connect the dark blue wire to the end of the wire of the same color in connector C1. The green wire is connected to the end of the dark blue wire, which is located inside the harness. The red wire is connected to the end of the blue-red wire in connector c2. Next, the steps are performed in reverse order. If all steps are followed, the panel illumination will be improved. Switching on will be done by turning the ignition key.
Foot light
If there is no lighting in this area, the driver of the car will be able to install the lighting for the feet independently, if he deems it necessary. To perform such a procedure does not require large expenses. The driver will only need a piece of LED strip. Before purchasing a strip, decide what color and power of light you want.
Stages of implementation
Divide the profile into four parts. Each of them is approximately 25-35 cm in diameter. Degrease the surface of the profile. Attach the LED strip to the parts (use available means - glue, adhesive double-sided tape). Connect the LEDs to the standard lighting lamp, or central lighting unit. If you want to install backlighting for the rear row of seats, it is better to place LEDs under the driver’s and front passenger’s seats.
Non-standard way
Required:
- LED strips (4 pcs, 30 cm each), see AliExpress catalog.
- aluminum profile (the thinnest);
- additional wires.
Installation.
We cut the aluminum profile into 30 cm pieces. Then we glue LED strips to it.
You can attach the footlights for the front passengers to three plastic lugs, which are located at the bottom of the panel (dashboard).
The lighting for the rear passengers is located under the seats on the pipe. If there is a box under the front seat (on Lada XRAY), we attach a profile with an LED strip to the top of the box. We fix it with hot melt glue or construction adhesive.
We put the wiring from the LED strips in a corrugated section underneath along with the seat heating wires, which runs next to the air ducts for the rear passengers. We bring the wires into the central tunnel, and then under the torpedo. We also bring out the lighting wiring for the front passengers there.
New body
It is unlikely that all external body panels of the new Lada will be new. The owners will not give the go-ahead for this. Therefore, most likely, only the 2022 Lada Vesta restyling will be presented. But quite deep, taking into account the “moving” to a new platform.
Start of sales in Russia and competitors
Sales of the Lada Vesta 2022 will start next year. Unless, of course, VAZ postpones the premiere date - and this has happened at the Togliatti plant more than once. A little earlier you will be able to watch the Lada Vesta 2022 test drive video. After all, it’s possible that the factory workers will let journalists ride pre-production copies.
As for the rivals, among them:
- of course, Renault Logan, assembled in the same place - in Togliatti. The “base” costs only 577 thousand, but is extremely modest - one airbag, amplifier, ABS and, in fact, that’s all. The modification for 645 thousand is equipped much more richly. There is also a “crossover” body kit – such a sedan is valued at a minimum of 696 thousand rubles;
- “twins” Kia Rio and Hyundai Solaris – from 775 and 756 thousand, respectively.
Front panel illumination
The front panel backlight is activated when external lighting devices are turned on. Car owners note that they experience some inconvenience when reading indicators when exposed to direct sunlight. Car owners are trying to independently improve the LED lighting of Lada instruments. Car enthusiasts should take into account that any intervention, modification or improvement of lighting fixtures will result in loss of warranty coverage. If the owner nevertheless decides to improve the lighting, it is necessary to adhere to the algorithm of actions.
Sequence of events
Remove the glove container. To do this, open it and press out the latches that hold the lid. Apply a little force, pull the cover towards you, it will come off. Remove the glove box light. Using a small screwdriver, press out the lamp and disconnect the wires. Unscrew the five bolts and remove the glove compartment. To improve lighting, purchase two 600 V LEDs. Unscrew the hook and screw securing the body of the pulp and paper machine. In connector c1 you need to cut the dark blue wire. In connector c2, strip the blue-red wires. Connect two diodes. In the received kit, connect the dark blue wire to the end of the wire of the same color in connector C1. The green wire is connected to the end of the dark blue wire, which is located inside the harness. The red wire is connected to the end of the blue-red wire in connector c2. Next, the steps are performed in reverse order. If all steps are followed, the panel illumination will be improved. Switching on will be done by turning the ignition key.
Foot light
If there is no lighting in this area, the driver of the car will be able to install the lighting for the feet independently, if he deems it necessary. To perform such a procedure does not require large expenses. The driver will only need a piece of LED strip. Before purchasing a strip, decide what color and power of light you want.
Stages of implementation
Divide the profile into four parts. Each of them is approximately 25-35 cm in diameter. Degrease the surface of the profile. Attach the LED strip to the parts (use available means - glue, adhesive double-sided tape). Connect the LEDs to the standard lighting lamp, or central lighting unit. If you want to install backlighting for the rear row of seats, it is better to place LEDs under the driver’s and front passenger’s seats.
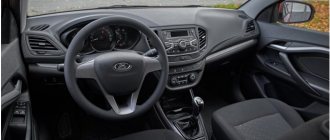
Interior lighting
LED lighting of the Lada's interior is represented by lighting in the recess on the front panel, lighting of the driver's foot area and the passenger sitting next to the driver. A special feature of the backlight is its operating mode in light-music mode.
Standard interior lighting is represented by a lampshade, which is located at the top, above the front panel. There are five control keys on the lampshade. With their help, you can turn on the lights on the driver's, passenger's side and fully turn on, turn off, and set the backlight mode when opening the car doors. In addition, the car is equipped with lighting fixtures at the bottom of the door for the driver and the passenger sitting next to him. The backlight lights up every time the door is opened.
Installation
- Remove the door trims (instructions for Vesta and XRAY).
- Cut a hole in the bottom of the upholstery for the lampshade (using a utility knife or Dremel).
- Install the lamp into the door trim. To prevent moisture from getting on them, we treat the connectors with hot glue.
By the way, instead of a lampshade, you can use an LED strip to illuminate the area around the car. It is attached using double-sided tape, so there is no need to make holes in the door trim (see example on the Lada Granta).
Materials
Illumination is realized by installing an LED strip. You can buy it not only in many stationary stores, but also on the Internet. The cost of such a product is low, and therefore such a modification will definitely not hit the budget. The most popular sites with articles and prices are given in the table.
However, before purchasing it is worth clarifying some points - the length of the tape, the color and brightness of its glow. For those who are in no hurry to make a purchase, the option of ordering from Aliexpress is perfect, since products there are generally cheaper, although delivery is much longer.
In addition, you will need an aluminum profile (it is recommended to take the thinnest one) and wiring.
Main characteristics of the Lux package
Lada Vesta with the Lux package is available with two power units: 1.6 l 5MT (106 hp) and 1.8 l 5AMT (122 hp). This choice exactly meets the requirements of the Russian consumer, where many prefer to choose cars with less powerful engines, but at the same time in top trim levels.
Lada Vesta 1.6 Comfort Multimedia on mechanics: review of equipment
| 1.6MT Luxe | 742 900 ₽ | petrol 1.6, 106 hp | Mechanical 5 |
| 1.8 AMT Comfort Image | 762 900 ₽ | petrol 1.8, 122 hp | Automatic 5 |
| 1.6 AMT Luxe | 767 900 ₽ | petrol 1.6, 106 hp | Automatic 5 |
| 1.6 MT Luxe+Multimedia | 770 900 ₽ | petrol 1.6, 106 hp | Mechanical 5 |
| 1.8MT Luxe | 777 900 ₽ | petrol 1.8, 122 hp | Mechanical 5 |
| 1.6 AMT Luxe Multimedia | 795 900 ₽ | petrol 1.6, 106 hp | Automatic 5 |
| 1.8 MT luxe Multimedia | 805 900 ₽ | petrol 1.8, 122 hp | Mechanical 5 |
For the city, the 1.6 liter engine becomes the optimal unit. Much more important is internal convenience for the driver and passengers, who are often children.
The starting price at the moment is from 740 thousand rubles. There is no reason to consider the cost too high - it is worth familiarizing yourself with the equipment.
Don’t forget about the standard option for all AvtoVAZ products called “ERA-GLONASS”. It costs each buyer an extra thousand rubles. Taking into account modern security requirements, such a sacrifice should be considered inevitable.
There are several Luxury packages:
- Luxe / Multimedia
- Luxe / Prestige
The choice of equipment does not affect the exterior in any way. The Comfort package has similar additions to the Luxury package. 16" wheels with a 15" steel spare wheel. Handles and mirrors are painted to match the body color.
Where did the French gearbox go?
The first Wests received a Renault JH3 manual transmission. The initiator of this decision was Andersson, explaining it by the too high noise level of the Russian analogue. But in 2016, after the departure of Uncle Boo (as Andersson was nicknamed), the VAZ team replaced the French mechanics with the Russian 21807 - this is a reinforced version of the VAZ-2180 gearbox with a cable-driven shift mechanism, which is installed on Grants, Kalinas and Priors. Modification 21807 is designed for greater torque than 2180 and has better consumer properties: new equipment was installed at the plant for the production of parts for the main pair and second gear. But despite the measures taken, our box remained noisier than the French unit. But it allowed us to reduce the cost of production.
At the start of sales, the difference in the cost of gearboxes was about 3,000 rubles in favor of the domestic one. The decisive factor was the fact that the manual with index 21807 was planned to be installed in tandem with the 1.8 engine, which has higher torque compared to the base 1.6-liter engine (170 Nm versus 148 Nm, respectively).
With the transition to VAZ mechanics, the gear ratio of the main pair changed from 3.87 to 3.94. Thanks to this, the acceleration time to 100 km/h has been reduced from 11.2 to 10.2 seconds. The maximum speed also increased to 188 km/h (was 175 km/h). But the power unit has become a little more voracious - 7.5 l/100 km in mixed mode instead of the original 6.9.
Work progress
Installing LED lighting for the interior door handles of the Lada Vesta is not too difficult. You just need to follow the recommendations.
First of all, you should connect the resistance to minus or plus. As Andrey noted, he put it in the positive wire. Resistance is necessary to reduce the brightness of the inscription. Otherwise, it will distract you from the road, especially at night.
The door cards should be removed by unscrewing the bolts and removing the trim from the clips.
You also need to remove the power window control unit on the driver's door. You should work carefully so as not to break the plastic latches of the block.
The next step is to drill a hole in the handle panel. It is better to drill with a 2 mm drill, but it is only suitable if resistance soldering will take place on site, directly during the installation process. Otherwise, a larger diameter drill (4 mm) will be required so that the pre-soldered resistance can be pulled into the hole.
The process of connecting LED lighting for interior door handles of Lada Vesta is easiest on versions with full power accessories. In this case, the connection is made directly to the power window control unit.
Contacts are marked in the photo:
- Black wire – minus;
- The blue wire with a black stripe is a plus.
As for the passenger doors, all the plugs on them are identical. To connect, you will need two contacts:
- Red (5th) – plus;
- Blue (6th) – minus.
The inserts are fixed with a special compound that comes with the kit.
In addition, there are a couple more points.
To protect the inserts, a film is glued to them. It needs to be removed - first tear it a little, and then, after installation is complete, remove it completely. Otherwise it will be difficult to remove it.
If your car has a rear door power window locking function, if you activate it, the inserts will go out. The reason is that in such a situation, “plus” is not supplied to the power windows.
This completes the independent installation of LED lighting for the interior door handles of the Lada Vesta.
The Lada Vesta Prestige car is equipped with additional lighting for the car door handles. The backlight is an LED module, which is attached to the back of the door card and illuminates the handles through a special hole.
However, it is worth noting that not every Lada Vesta Prestige has backlighting, the fact is that they began to be installed only in 2022, but the wiring for the backlight in these trim levels was laid in advance, which greatly facilitates self-installation.
The interior light turns on over bumps and holes
Another trouble that owners of Kalina, Vesta or Granta may encounter is that when driving over sensitive uneven road surfaces, the interior lighting may come on. The problem is solved independently, without visiting a service station.
Way to solve the problem
First you need to find the hood opening sensor; it is located on the right side when you stand facing the car. On the hood itself there is an elastic band that presses on it, it is adjustable, you can twist it and tighten it. In the case when the light turns on in the pits, you need to unscrew the rubber band a little. This will ensure the limit switch is closed and solve the problem.
Photo source: https://www.drive2.com/l/496319000096014965
It should be adjusted so that when the hood is completely closed, the light does not turn on, but when closed by one click, it continues to light.
Connection
In this case, it is necessary to ensure that the floor lighting on the Lada Vesta and X-Ray works in the same way as the rest of the car, that is, it fades out when the doors are closed. Otherwise, the constantly burning backlight will begin to irritate and tire you, especially on a long night journey.
In this case, there are 2 connection options:
- To CBKE;
- To the ERA-GLONASS lamp.
To CBKE
The connection goes to plug P1, contact C4 (the red wire goes into it) - 12V, provided the car is disarmed. Plug P1, contact C6 (a white wire goes into it) – when the door is opened, a “ground” gradually appears.
The location of the electronics box varies depending on the model.
Lada Vesta
In a sedan it is located behind the glove box, and therefore, in order to get to it, the glove compartment must be removed. To do this, you need to open the glove box lid, then release the latches that hold its upper edge. When this is done, the lid pulls towards itself, overcoming the resistance of the 3 fasteners, and snaps off.
Vesta glove box mount
Next you need to remove the glove box light. It is located in the upper left corner and is held in place by a spring-type lock. You need to pry up the lampshade with a knife or screwdriver and snap it off, then disconnect the wiring.
When the ceiling light is removed, you only need to unscrew the 5 mounting screws that secure the glove compartment to the dashboard. This is done using a T20 Torx bit.
Lada X Ray
In this case, everything is simpler, since the electronics unit is located on the left side of the dashboard, at the driver’s feet.
To the ERA-GLONASS lamp
First you need to remove the lampshade itself. Before work, you must reset the negative terminal from the battery.
Next, you need to insert a screwdriver or knife between the roof upholstery and the lampshade, with the help of which you can disengage the latches.
Then unscrew the 2 screws that secure the lampshade to the body, and pry off the spring retainer (also with a knife or screwdriver). In the end, all that remains is to disconnect the plug.
For greater convenience of connecting the floor lighting (and other devices) to the Lada Vesta and X-Ray through the lampshade, the plug is numbered. It is recommended to navigate by the number, since the color of cars of different years of assembly and configuration may differ.
Diagram of the ERA-GLONASS lighting unit
Connection:
- Contacts 11 and 14 (usually white-pink color) - after turning on the main relay (opening the doors, turning the key in the ignition switch), +12 V appears. A few minutes after the key is removed from the ignition switch, the power stops.
- Contact 15 (usually blue-black or black) – ground;
- Contact 17 (usually white) – mass of door limit switches. It occurs only when the doors are open.
The implementation of floor lighting on the Lada Vesta is demonstrated in the video.
Lada Vesta “Luxe / Prestige” equipment
What is included in the Lada Vesta “Lux / Prestige” package:
Comfort
- Navigation system
- USB connector on the front panel
- Multifunction steering wheel
- 6 speakers
- 7.0" color touch display
- Bluetooth, Hands free
- Audio input AUX
- Audio system (FM/AM with RDS function, SD card)
- Speed limiter
- Cruise control
- Cooled glove box
- Single-zone climate control
- Light sensor
- Rain sensor
- Heated windshield
- Heated side mirrors
- Electrically adjustable side mirrors
- Heated rear seats
- Heated front seats 3-level (in “Comfort” for AT and “Winter”)
- Heated steering wheel
- Rear electric windows
- Front electric windows
- Power folding side mirrors
- Folding key
- Cabin air filter
- Driver's seat with lumbar support
- Driver's seat with height adjustment
- Electric power steering
- Automatic headlight switch off
- USB port for passengers in the second row of seats
- 12V socket for second row passengers
- 12V socket for driver and front passenger
- Center rear armrest
- Center front armrest with box
- Gear shift prompt in the instrument cluster
Safety
- Rear View Camera
- Rear parking sensors
- Central locking control panel in the key
- central locking
- Adjusting the height of the front seat belts
- Hill Start Assist (HSA)
- Traction Control System (TCS)
- Electronic Stability Control (ESC) with shut-off function
- Brake Assist (BAS)
- Brake force distribution (EBD)
- Anti-lock braking system (ABS)
- Rear disc brakes (only for 1.8 and AT)
- Emergency call device "Era-GLONASS"
- Immobilizer
- Automatic door unlocking and hazard warning lights in the event of a collision
- Automatic activation of the hazard warning lights during emergency braking
- Automatic door locking when driving
- Locking the rear doors against opening by children
- ISOFIX child seat anchors
- 3 rear headrests
- Front side airbags
- Possibility to disable the front passenger airbag
- Front passenger airbag
- Driver's front airbag
Interior
- Adjusting the steering column reach
- Adjusting the steering column height
- Illumination of entry and exit points in the front doors
- Atmospheric interior lighting
- Case for glasses
- Illumination in the passenger sun visor
- Illuminated driver's sun visor
- Mirror in the front passenger's sun visor
- Driver's sun visor mirror
- Leather steering wheel
- Combined seat upholstery - dark gray or brown fabric/eco leather (optional)
- 60/40 split folding rear seat
- On-board computer
Exterior
- Spare wheel 15-inch temporary use
- Light alloy wheels
- Wheels 16-inch
- Spare wheel with steel rim
- Exterior door handles in body color
- Exterior mirrors in body color
- Exterior mirrors with side direction indicators
- Enhanced rear window tinting
- Engine and engine compartment protection
- Fog lights with turning light function
- Daytime running lights halogen
Installation of rear seat lighting Lada Vesta
To illuminate the rear passengers, you can use an LED strip, which is placed on a pipe under the front row of seats. The neon glow from below will turn on every time the doors are opened. The LEDs are connected to the standard lighting lamp, to the cigarette lighter socket.
For this purpose, the rear courtesy light is used. Installation rules and sequence of events have already been described earlier.
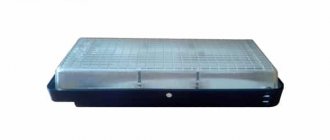
Lada Vesta. INTERIOR LIGHTING
Description of the functions of the interior lighting unit 1 - area where the microphone of the in-vehicle emergency call system is located;
2 — area where the in-vehicle emergency call system loudspeaker is located;
3 — emergency call key for the in-vehicle emergency call system;
4 — status indicator of the in-vehicle emergency call system;
5 — front passenger seat belt unfastened indicator;
6 — indicator of the disabled front passenger airbag;
7 — key for turning the general interior lighting section into “on” mode;
8 — key for turning on the general interior lighting section in the “on when the door is open” mode;
9 — key for turning on the individual driver’s seat lighting;
10 — key for turning on the individual lighting of the front passenger seat;
11- section of individual lighting of the driver’s seat;
12 — section for individual lighting of the front passenger seat;
13 - general lighting section.
The interior lighting unit performs the functions of general interior lighting, illumination of the driver's and front passenger's seats, as well as communication functions with the operator of the ERA GLONASS system.
When you press the icon key, the general lighting mode is turned on. When you press a key with an icon, the “on when the door is open” mode is activated. If both keys are pressed, the key has priority
with pictogram
Each section of individual lighting is activated by a corresponding key with an icon for the driver
or for the front passenger.
Switching operating modes of individual lighting occurs by pressing the corresponding key again.
Signaling devices and indicators as part of BOS
— front passenger airbag deactivated indicator, signal color yellow.
— indicator that the front passenger seat belt is not fastened, the color of the signal is red.
ψ — red in-vehicle emergency call system status indicator. Lights up for 5 seconds each time the ignition is turned on, and then goes out. The indicator also lights up if there is a malfunction in the in-vehicle emergency call system.
Emergency call system
Your vehicle is equipped with an in-vehicle emergency call system (hereinafter referred to as SVES), designed to automatically (in case of an accident) and manually call an operator of the ERA GLONASS system. A microphone and loudspeaker are used to communicate with the operator of the ERA GLONASS system.
SOS - the key to call the operator of the "ERA GLO-NASS" system is located in the interior lighting unit. Push-button switch with non-fixed “on” position. The key press time to initiate an emergency call is 2 seconds.
In standby mode (with the ignition on), SVEOS carries out self-diagnosis, receives signals from the GLONASS and GPS navigation satellite systems, and constantly calculates the time, speed, direction of movement and coordinates of the vehicle's location.
In a variant version, the car is equipped with an interior lighting unit without the function of the ERA GLONASS telecommunications system.
Automatic emergency call
In the event of a road traffic accident (RTA), if the airbags are deployed, SVEOS generates a minimum set of data containing information about the coordinates and parameters of the vehicle at the time of the accident, the time of the accident, the VIN code of the vehicle and other information necessary for emergency response , and transfers it to the operator of the ERA GLONASS system. After transmitting the minimum set of data, the operator is dialed for voice communication. While making a call to the operator,
The SOS key light flashes red. When transmitting a minimum set of data and during voice communication with the operator, the backlight of the “SOS” key lights up continuously in red.
When making voice communication, SVEOS turns off the sound reproduction of the standard (or additionally installed) radio receiver (multimedia system, radio), if sound reproduction was made before the emergency call was made.
SVEOS makes an automatic emergency call only when the ignition is on.
Manual emergency call (SOS key).
A manual call can be made with the ignition on, as well as with the ignition off, if less than 72 hours have passed since the ignition was turned off. To make an emergency call manually, press the “SOS” button on the interior lighting unit and hold it pressed for at least 2 seconds. The operating algorithm of the SVEOS for a manual emergency call is similar to the algorithm described above for an automatic emergency call.
During a call (while the SOS button is flashing red) initiated by pressing the SOS button, if you press the SOS button again and hold for at least 2 seconds, the emergency call will be canceled (the SOS button is illuminated in red will be turned off).
Off mode
The SVEOS is in this mode if no emergency call is made, if the ignition is turned off and at least 72 hours have passed since the ignition was turned off. In the “Off” mode, the “SOS” button is not backlit, and the system status indicator ψ does not light up. In the “Off” mode, the SVEOS does not respond to pressing the “SOS” button. The SVEOS exits the “Off” mode when the ignition is turned on.
Test mode
The testing mode is intended to check the functionality of the SVEOS components. In the testing mode, the functionality of the SVEOS status indicator, the microphone and loudspeaker in the interior lighting unit, the backup battery and other internal components of the SVEOS are checked. If you wish, you can independently check the performance of the SVEOS by running the test mode. To start testing mode you must:
— make sure that the engine is turned off;
— turn the key in the ignition switch (33) to the “Ignition on” position and wait 1 minute;
— from the “Ignition on” position, switch 33 6 times between the “Ignition on” and “+ACC” positions according to the algorithm described below for no more than 5 seconds:
Do you remember what kind of information noise around Vesta in 2015 was created by the team of Bo Andersson (president of AVTOVAZ at that time)? Against this background, it was impossible to shift the start date. Therefore, the improvements of the first year were, rather, those solutions that did not have time to be implemented on the assembly line before the start of production and sales. But it was the malfunctions of the first West that formed the image of a not very reliable model. For many of them, the manufacturer carried out a so-called “soft recall”, when the unit was replaced under warranty without further ado from the dealer.
Motors and gearboxes
About the Lada Vesta 2022, the latest news does not indicate what specific engine sizes will be installed on this car, and what gearboxes they will be combined with. Now the motors are:
- 1600 “cubes” (106 forces of our own design and 113 forces from Renault);
- 8 liters (122 horsepower, developed by VAZ, country of assembly – also Russia).
An alternative to the five-speed “mechanics” (only for the 113-horsepower engine) is a CVT, which was replaced by a “robot”. By the way, CVT cars began to be produced only last fall.
Gas cars have been discontinued. And fuel consumption has nothing to do with it. It’s just that the state stopped providing subsidies (115 thousand), and without it, the car became, in fact, useless to anyone.
The long-awaited 1.8 engine
In October 2016, sedans with a 1.8-liter engine with a power of 122 hp entered the showrooms of official dealers. The first cars with a more powerful engine were equipped with AMT, the same robot that caused a lot of criticism from car enthusiasts.
The new engine provided a decent level of traction at the “bottoms”. At the same time, the acceleration time to 100 km/h with the manual was the same 10.2 seconds, and with the robot - 12.1. Claimed fuel consumption: 7.4 liters per 100 km combined cycle.
Major changes were introduced in 2022 and 2022:
- New engine calibration in terms of adjusting the intake of the gas distribution system.
- Improving the surface quality of the valve stems, which avoided premature wear.
- The manufacturing process of the valve stem seal has been changed, namely: a different material has been used, which has made the part more elastic. The surface fits the valve stem more tightly.
- The design of the oil deflector has been changed. Oil separation occurs more efficiently.
- We used oil with a higher viscosity index - 5W40.
One of the main problems of the new engine was increased oil consumption. It was noted by almost all owners of West 1.8. There was a poll on this topic on the Lada Vesta community page on VK. One of the owners says that he was forced to add about four liters of oil before the mileage of 15,000 km. Of course, most car owners give more modest figures, considering this expense acceptable. Today the problem is not widespread.