For normal engine operation, after a certain time the valves are adjusted. Chevrolet Niv is no exception. Of course, the manufacturer has provided everything to ensure that the engine works well, but the main task remains with the driver to ensure that the clearances between the valves are correct. The question may arise why it is necessary to maintain the correct gaps, and what will happen if they do not meet the standard.
- The first thing that will appear is an unpleasant noise that will come from the engine.
- If the valves are too tight, the engine will not be able to produce maximum speed, and fuel consumption will increase.
Do-it-yourself Chevrolet Niva valve adjustment
Quite often, VAZ 2123 owners refuse to change the hydraulic thermal gap compensators when they fail, preferring to install the adjusting bolts used in all lines of the classic VAZ family. This approach requires manual adjustment of the Chevrolet Niva valves. This type of adjustment has two significant drawbacks:
- The need to carry out work every 15 thousand km;
- Having a certain skill.
If we compare the cost of one hydraulic compensator with the cost of the adjusting mechanism, then the benefit in favor of the latter differs by an order of magnitude.
Chevrolet Niva valves should be adjusted not only when a characteristic knocking sound occurs. Every 10 - 15 thousand kilometers it is necessary to diagnose gaps that appear due to wear of the camshaft eccentric, rocker or the valve itself. The entire valve mechanism has a fairly simple structure. The valve is driven by a rocker, which is exerted by the camshaft eccentric. The rocker is made in the form of a lever, to one of the ends of which a pusher is attached. Niva Chevrolet valve clearances are measured between the camshaft and the rocker with the valves closed using a special set of feeler gauges. You can find a video at the end of the article.
Valve adjustment procedure
You can watch the video to clearly see how the Chevrolet Niva valves are adjusted.
All motorists who carry out adjustments themselves are divided into two categories. The first ones carry out all the work with understanding. They understand why the clearance diagnosis is currently being carried out on a particular valve. The latter do an excellent job of the task, having learned the adjustment scheme by heart, without even delving into the operation of the internal combustion engine at different cycles.
At the preparatory stage, the valve cover is removed, having previously freed access to it. First you need to set the 4th cylinder to top dead center, corresponding to the end of the compression stroke. To do this, the crankshaft is rotated clockwise until the mark on the sprocket aligns with the casting on the camshaft housing.
With this position of the timing belt, the gaps in the 8th and 6th valves are set.
The valves are adjusted with a 13mm wrench, but first you need to loosen the locknut with a 17mm wrench.
This requires some skill, since when the locknut is tightened, the gap decreases slightly. After turning the crankshaft half a turn, the clearances on the 4th and 7th valves are checked and subsequently adjusted. After the next rotation by 180 degrees, the 1st and 3rd valves are adjusted and the final position of the timing belt, which differs from the previous one by turning the crankshaft by 540 degrees, is intended for adjusting the 2nd and 5th valves.
Before reassembling, you should check the clearances again. It is important to remember that one revolution of the camshaft corresponds to two revolutions of the crankshaft.
Website about auto electrics
Installation of ignition Niva Chevrolet injector 8 valves. Niva Chevrolet ignition marks
Ignition installation Niva Chevrolet injector 8 valves
Chevrolet Niva timing belt replacement
Adjusting the valves of the VAZ 2121 NIVA injector. Adjustment valves of VAZ 2121 NIVA injector
How do I adjust the VALVE? injector vaz 2107
How to mark a VAZ timing chain. Do it yourself!
split for Chevrolet Niva
Installation of camshaft, chain, ignition, according to marks, VAZ (classic). Do it yourself!
We spread the ignition wires
VAZ21213 repair and assembly of Niva injector head
We wash the throttle assembly. Installation and adjustment of IAC.
- How to remove the airbag from the steering wheel of a Skoda Octavia
- Steering cardan Lexus EC 330
- Ford transit spare parts Ford Transit
- Volvo XC70 which engine is better
- Kia introduced an updated version of the sportage
- Rear left fog lamp Peugeot 4007
- Where is the oil pressure sensor located on the Niva Chevrolet?
- Spoiler for rear window of BMW E46
- Replacing LEDs in the Peugeot dashboard
- Ford Focus 3 where is the gearbox control unit located?
How to install the ignition on a Chevrolet Niva video
How to mark a VAZ timing chain. Do it yourself!
Installation of camshaft, chain, ignition, according to marks, VAZ (classic). Do it yourself!
ICE theory: Motor 2103 with head 21214 with reg. star (modern)
Installing narrow armrests on a Chevrolet Niva (Shniva, Chevrolet Niva)
Ignition installation according to any requirement. cylinder (with plug)
Setting the valve timing according to marks on the VAZ 2101-VAZ 2107
HOW TO INSTALL PARKTRONIC ON A CHEVROLET NIVA
Tightening the cylinder head. Do it yourself!
Registration of the remote control key for Lada, Datsun, Shniva and UAZ
Installing a START/STOP button instead of the ignition key on a Niva
- Remove headlight on Kia Sorento 2010 video
- Channel honest test drive
- Crash test Rav 4 1995
Niva Chevrolet how to install the ignition by marks
Timing marks VAZ(LADA) 21214 NIVA
Part 2. Valve + piston = repair Niva Chevrolet NIVA Chevrolet 4+4
Chevrolet Niva timing belt replacement
How to mark a VAZ timing chain. Do it yourself!
Installation of camshaft, chain, ignition, according to marks, VAZ (classic). Do it yourself!
Batyushkin Niva Chevrolet NIVA Chevrolet 4+4 is under repair again
split for Chevrolet Niva
ICE theory: Motor 2103 with head 21214 with reg. star (modern)
VAZ21213 repair and assembly of Niva injector head
Setting the valve timing according to marks on the VAZ 2101-VAZ 2107
- Search for spare parts by vin Peugeot
- Bumper skirt for BMW 320i f30
- Chevrolet Niva speed does not turn off
- Climate control damper Citroen c5
- Replacing the right headlight for Ford Fiesta
- Mercedes Benz and 180 opinie
- Skoda Fabia reliability 3rd generation
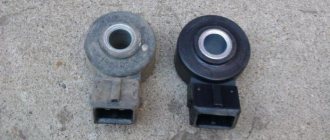
- What does the Chevrolet Niva crankshaft sensor affect?
- Video disassembly and assembly of a Volkswagen engine
- BMW x5 2005 all-wheel drive system
- Headlights for Mitsubishi ASX
- Trunk volume Peugeot 3008 2014
- When will the 2011 Ford Focus be released?
- Put the arrow on Subaru video
- Toyota Mark 2 1987
Ignition installation marks on Niva Chevrolet
Part 2. Valve + piston = repair Niva Chevrolet NIVA Chevrolet 4+4
Timing marks VAZ(LADA) 21214 NIVA
Chevrolet Niva timing belt replacement
Batyushkin Niva Chevrolet NIVA Chevrolet 4+4 is under repair again
Late ignition on an injection Niva
How to mark a VAZ timing chain. Do it yourself!
Installation of camshaft, chain, ignition, according to marks, VAZ (classic). Do it yourself!
split for Chevrolet Niva
Part 1. Valve + piston = repair Niva Chevrolet NIVA Chevrolet 4+4
how to replace a belt on a Chevy Niva
- What kind of oil to pour into the Kia sorento transfer case
- Rear fog lights Mitsubishi Outlander
- Removing the throttle body Skoda Octavia 1 6 video
- Original oil Volkswagen Polo sedan article number
- Radiator screen for Skoda Superb
- Removing the floor carpet of a Chevrolet Niva
- Opel omega b tire size
- San Yong Action test drive video 2014
- Where is the Ford Transit power steering reservoir located?
- Suzuki Swift length width height
- Kia spectra or chevrolet lanos
- Wheel caps 16 Volkswagen Sharan
- Replacing windshield wiper blades for Kia sportage
- Tire pressure ford transit bus
- How to remove the radiator grille on a Kia Sorento 2015
Valve clearances on a Chevrolet Niva. Adjusting valve clearances in the field with your own hands
Every experienced Niva car owner probably had to independently perform such a procedure as adjusting valve clearances. The quality of this procedure directly determines how well the engine of your car will work. After all, if the gap is less than required, then, of course, the valves will be clamped and the engine will not develop maximum power, and this will affect the dynamic characteristics of the car. On the other hand, if the gap, on the contrary, is larger than permissible, then a rather unpleasant knock will be heard when the Niva’s internal combustion engine is operating.
Daniel had a hard time changing the cabin filter because the entire box and glove box lid have to be removed, which requires careful removal as there are 6 screws and several plastic clips and clips. But after removing the assembly, access to the filter element becomes quiet.
Lowering the fuel tank is an operation that must be performed with great care, and this creates time and additional labor costs for customers. And Clovis adds: It is a mistake to import a car that only runs on premium high-octane gasoline for Brazil. We must adapt it to our reality.
To carry out this procedure yourself, you will not need many tools. I will list everything you need below:
- Open-end wrenches for 17 and 13
- Set of styli or one stylus 0.15 mm thick
About engines for VAZ 2121 Niva
The most popular domestic SUV, the VAZ 2121 Niva, was developed on the basis of the VAZ six. The engine also remained from the VAZ 2106, but received cosmetic improvements. Later, the 213 1.7-liter engine and the 2130 1.8-liter engine were created. Along with the regular Niva, the Chevrolet Niva is also produced, which is equipped with a slightly modified 213 engine.
Engine VAZ 2106
The basic unit for the Niva is an evolution of the engine from the Troika, and it is distinguished from the 2103 engine by a piston increased to 79 mm, with the same cylinder block.
Also relevant is the injection unit 21067, which is covered by the cylinder head from the injection unit 21214. During operation, it turned out that it is the carburetor version that is distinguished by stability.
The in-line engine 2106, both carburetor and injection, received 4 cylinders with a camshaft located at the top and a timing chain drive.
The engine should be classified as a classic high-block unit.
With careful operation and regular maintenance, the engine will exceed its factory service life of 125 thousand km and sometimes reach 200 thousand. At the same time, you can hardly call it more reliable than the 2103.
Before setting off, the 2106 engine needs to be warmed up, and in winter this procedure takes about 5 minutes. You can start moving when the engine starts idling.
You should not skimp on high-quality motor oil, since with low-quality consumables, after 60 thousand mileage, the cylinder diameter will expand by 0.15 mm.
If increased oil consumption is noted, the compression should be measured.
The “disease” of the VAZ 2106 is called premature wear of the camshaft.
The absence of a hydraulic compensator forces valve clearances to be adjusted every 7-10 thousand kilometers.
Also, driving a car with a six-engine engine is filled with noise, knocking and other extraneous sounds. For example, the engine knocks when running on low-octane gasoline, but the problem disappears with normal fuel.
Metallic knocks are produced by piston pins and connecting rod bearings.
From the bottom of the engines, simultaneously with a drop in the oil level, sounds are heard when there are problems with the main bearings. In this case, it is better to turn off the car and tow it to a service station.
Unstable operation of the VAZ-2106 engine is caused by clogged jets.
If it stalls at idle, you need to adjust the speed or the air damper. If it stalls while driving, the reason lies in the power supply or ignition.
Excessive temperature or engine boiling is associated with air in the cooling system.
Engine trouble is caused by misadjusted or burnt-out valves, a failed cylinder head gasket, or low-octane fuel.
Engine vibrations usually occur when the cushions wear out, as well as when the crankshaft or cardan is unbalanced.
Engine VAZ 2130 Niva 1.8
The 2130 power unit for the VAZ Niva received four cylinders with an overhead camshaft and a timing chain drive.
The engine should be classified as a traditional representative of the high-block motor series.
If we compare the 213th and 2130, the second is 1.3 mm higher, which made it possible to install a crankshaft with an 84 mm piston stroke on the engine and increase the engine capacity to 1.8 liters.
To the above disadvantages, inherent to both the VAZ 2106 and 2130, one can add increased wear of the camshaft and the need for regular adjustment of valve clearances, which will be signaled by a knocking sound when the engine is running at idle.
Engine VAZ 21213 / 21214 Niva
Based on the VAZ 21214 engine, the engine for the Niva Chevrolet was also assembled, and the differences consist only in the adaptation of the BC for installation in the Chevy engine compartment and fastening of attached parts and assemblies.
In general, the carburetor and injection version of the VAZ 21213/21214 in-line unit received four cylinders and an overhead camshaft.
Instructions for adjusting valves on Niva
Please note that this procedure is performed only on a cold engine, that is, its approximate temperature should be about 20 degrees.
Daniel approves of Clovis's opinion and comments that his shop is repeating the Captives' transition with problems in the fuel pump and comments: Most cases are due to a clogged pre-filter, and we end up replacing a model with a more reliable and efficient one that solves the problem well. The point is that it may be a simple, quick and cheap service, but it becomes slow, time consuming and expensive for the customer because someone has the idea of removing the access cover and inspecting the pump.
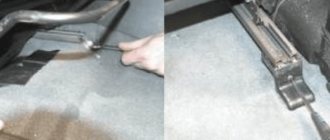
The first step is to remove the valve cover from the engine. After this, you will need to align the crankshaft and camshaft to the marks so that the 4th cylinder is at top dead center. To do this, combine the mark on the crankshaft pulley with the central mark on the front engine cover. For clarity, all this is shown in the photo below:
In the trunk, Daniel draws the attention of fellow repairmen to the presence of a fuel pump module that he once had to replace, and explains: Its job is to control the pump pressure on demand. Typically, when line pressure drops, the problem is in the pump. But in one case we caught, it was a module that was in trouble, unreasonably reducing the pressure on the line.
But when the "error hits", we still don't have the information we need. This partnership should be encouraged because if everyone cooperates, the outcome is great for the client. Edison makes a similar assessment and reports: Today, in my opinion, the amount of technical information provided by the automaker is still slightly behind our needs. But over time everything gets better. Even though you know that the parts are from Mexico, and that there are import taxes and other costs, how do you explain to the customer that the real engine mount costs 600 reais, and also the parallel 500 reais?
You can rotate the shaft either using a suitable wrench using the ratchet, with both hands, grasping it tightly (with the spark plugs unscrewed). We set the position of the camshaft in the same way so that the mark on the sprocket aligns with the protrusion on the body:
Photos of timing marks Niva Chevrolet
We independently set the timing marks on the Chevrolet Niva
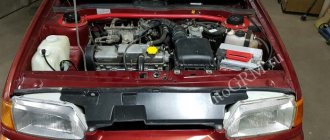
The car hood is opened, unscrewed and the fan is removed. The radiator also unscrews and is carefully moved to the side; there is no need to drain the coolant from there. Access to the engine valve cover is provided.
Its fastenings are unscrewed with an open-end wrench, then it is carefully removed.
Chevrolet Niva timing marks
There is access to the timing chain and the upper camshaft sprocket. The shaft pulley is rotated with a special wrench until the mark on the camshaft sprocket aligns with the protrusion on the timing case.
The mark on the timing case is aligned with the mark on the camshaft sprocket. If the chain adjustment has not been disturbed, then after the previous step the lower mark located on the crankshaft pulley also coincides with the oblong mark on the timing case.
If this does not happen, there is desynchronization of the tags, and regulation continues.
The lock washer holding the camshaft sprocket unbends. After this, the car is put in 1st gear; this will not allow the shafts to rotate when the fastening bolts on the sprockets are unscrewed.
We open the hood on the Chevrolet Niva and remove the following elements: There is no need to remove the pipes and drain the liquid; setting the timing marks for the Chevrolet Niva injector, the air duct pipe is removed. Having reached the valve cover, you need to unscrew its fasteners and carefully remove it to prevent dirt and other objects from getting inside.
Installation
After removing the hydraulics, carefully remove any remaining oil and coke from the wells. Degrease the internal threads with something decent (gasoline, acetone, white spirit). Mount the screws into the cylinder head (tightening torque is about 7-8 kg). We kindly request. Technologies do not stand still. Use a medium-strength thread locker for this operation. The price list includes a product that I use during assembly, manufactured by Febi (Germany). There is nothing more disgusting than the moment when you start the operation - “adjusting the field valves”, and suddenly you see that the screw is rotating along with the lock nut. I'll tell you a secret, everything will have to be disassembled and reassembled)). After this operation, I recommend taking a short break; there will be enough time for lunch for the thread locker to polymerize. After this you can install everything else. Don't forget a few drops of motor oil or mounting paste on the working surface of the rocker and the soldier's ball.
Tool
There are two ways to adjust according to the type of tool. By probes and by a dial indicator. For semi-professional use, the first option is suitable. The Fiat manual recommended the following clearances at an engine temperature of 20 degrees (that is, normal). Intake valves 0.15 mm. Graduation is slightly more than 0.17-0.20 mm. My personal opinion after 20 years of practice is the following. The set gap very much depends on the manufacturer and valve material . If this is a valve of average quality, then the gaps can be made according to the manual. If there are Kolbenschmidt valves on both the inlet and outlet, then you can do 0.15 in a circle. Now on to the probes. Of course, everything is determined by the word experience, and the first two or three times you can adjust this... “what you can’t say in a fairy tale, you can’t describe with a pen.” Therefore, I remembered one wonderful thing for mechanics, turners and milling operators, which was made in the USSR, for technical control. It was called a plug gauge. That is, it is a calibrated tool, with two “tails”, one passable, the other non-passable. By analogy with this miracle, I offer two tools. The first is a 0.15 mm gap adjustment gauge and a set of gauges that contains a 0.2 mm gauge. Now all the “miracles” of adjustment come down to a simple thing. One should get through, the other shouldn't. This way we get into the required tolerance range.
set of probes, “fan”
Question answer
How often are the Niva valves adjusted? I recommend carrying out the second adjustment, which I call final, after 500-700 km, after installing the kit and the first adjustment. As a rule, 2-3 valves “run away”. According to Soviet books and training manuals, it was recommended to CHECK the gaps once every 12-20 thousand km, that is, about once a year. Operational practice has shown that engines run without adjustment for 50 and 80 thousand km. Therefore, the following recommendation is factual.
A series of articles devoted to hydraulic compensators and bolts:
Part 4. Installing the “death to hydraulics” kit and adjusting the gaps
Valve adjustment: Niva 2123/2121. How, with what and for what?
- home
- Valve adjustment: Niva 2123/2121. How, with what and for what?
Valve adjustment: Niva 2123/2121. How, with what and for what?
Every self-respecting driver should know how valves are adjusted. The Niva has a simple engine that has not changed for more than 40 years. Therefore, the procedure is the same for any modification.
Adjusting valves on Niva Chevrolet
For normal engine operation, after a certain time the valves are adjusted. Chevrolet Niv is no exception. Of course, the manufacturer has provided everything to ensure that the engine works well, but the main task remains with the driver to ensure that the clearances between the valves are correct. The question may arise why it is necessary to maintain the correct gaps, and what will happen if they do not meet the standard.
- The first thing that will appear is an unpleasant noise that will come from the engine.
- If the valves are too tight, the engine will not be able to produce maximum speed, and fuel consumption will increase.
Why is adjustment needed?
When the distance between them deviates from the permissible norm, an unpleasant noise can be heard inside the cabin, which comes from the engine. And if the valves are tightly clamped, the injection engine will not produce maximum speed, and fuel consumption will increase significantly.
As practice shows, correct setting of gaps on a Chevrolet Niva car lasts for 20 thousand mileage, after which noises, squeals and other sounds appear, which intensify at medium and low speeds. To independently adjust the gaps on a Chevrolet Niva, you will need:
- set of probes;
- key 13 and 17;
- dry rags.
Adjustment of the gaps should be carried out on a cold engine, the temperature of which does not exceed 20-25 ºC.
What is required for adjustment
In practice, correctly set gaps pass about twenty thousand, after which extraneous sounds appear, which become stronger at lower speeds, and in order to re-adjust the gaps the following set of tools is needed:
- Any rags preferably dry
- A set of keys containing a key for thirteen and seventeen
- Dipstick
This adjustment must be made when the engine has cooled down and the temperature does not exceed 25 degrees.
How to adjust valves yourself
After the engine has cooled down and all the necessary tools are at hand, you can start working:
- The first thing you need to do is disconnect the terminal from the battery.
- After the car is de-energized, unscrew the cylinder head cover and remove the distributor cap and unscrew the existing spark plugs
- Having gained access to the crankshaft, we begin to turn it as it rotates until the marks that are located on the bearing housing and the camshaft itself match; the shaft should be rotated with both hands, holding a ratchet, or with a special wrench
- Having set the marks, aligning them between the star and the protrusion on the body, we begin the adjustment on the sixth and eighth valves, take a feeler gauge, the thickness of which is 0.15 millimeters, and insert it between the rocker and the camshaft cam.
- If the dipstick comes out with little effort, then the work was done correctly. To begin the adjustment, you need to unscrew the lock nut with a 17 wrench, and the adjustment itself will be done with a 13 wrench
- After the adjustment has been made and everything is adjusted according to the standards, we fix the adjustment bolt and tighten the locknut.
- Once everything is fixed, we turn the crankshaft one hundred and eighty degrees and adjust the next pair four and seven, and then one and three.
Replacing the cylinder head
To make the replacement you need the following tools:
- Screwdrivers
- Hammer
- Standard set of wrenches including torque wrench
During replacement, it is better to remove the motor, but if for some reason it is not possible to remove it, then the repair can be done the same way, but then it is better to free up the working space. To change it, do the following:
- Removing the cylinder head cover
- Drain the coolant
- Disconnect the throttle drive cable from the receiver and throttle assembly
- Remove the camshaft and bearings
- We dismantle the hydraulic supports of the levers by first removing the valve drive levers
- We remove the ramp that supplies oil to the hydraulic supports
- Disconnect the block with power wires from the throttle position sensor
- Disconnect the power wires from the coolant temperature sensor and idle speed control
- Disconnect the connector of the wires that supply power to the injectors
- Disconnect the wires from the knock sensor
- We move the wires of the engine harness to the side
- Disconnect the wires from the spark plugs
- We disconnect the power wires from the temperature sensor
- Disconnect the receiving pipe from the exhaust manifold
- Unscrew the top bolt that secures the inlet pipe
- Disconnect the adsorber purge hose from the clamp
- In the cooling system, disconnect the clamps from the block head
- Disconnect the hose that supplies coolant from the side thermostat pipe
- We disconnect the fuel supply pipes from the fuel lines
- Unscrew the nuts from the heat shield
- Removing the chain tensioner
- We dismantle the brackets that secure the hydraulic power steering drive
- We dismantle the chain and camshaft sprocket so that it does not move from the oil pump sprocket
- Unscrew the bolts that secure the block and remove the head
- We take out the sealing gasket
At this point, the work on replacing the gasket can be considered complete.
Adjustment of valves
Also, in order for the engine to work normally, it may be necessary to adjust the Niva Chevrolet valves. In this case, you need to maintain all the gaps, otherwise the following problems may appear:
- The engine may become noisy
- The engine will not produce maximum speed
To make the adjustment you need to prepare the following tool:
Before starting work, wait until the engine cools down, then do the following:
- Disconnect the terminals from the battery
- Remove the cylinder head cover and distributor cap and unscrew the spark plugs
- We begin to turn the crankshaft until the marks on the camshaft and bearing housing coincide
- After the marks coincide, we make adjustments on the eighth and sixth valves; to do this, we insert a feeler gauge (the thickness of which should be 0.15 millimeters) between the camshaft cam and the rocker.
- If everything is done correctly, the dipstick will move with little effort, after which we begin the adjustment; to do this, use a seventeen key and unscrew the control nut
- When everything is adjusted, we fix the adjustment bolt and tighten the locknut
- Rotate the crankshaft 180 degrees and adjust the following pairs 4 and 7 and then 1 and 3
When all the adjustment work has been completed, we check whether the gap is set correctly; to do this, take a 0.20 feeler gauge and insert it between the lever and the camshaft cam; if it passes with little effort, then everything has been done correctly.
How to determine the upper compression point
The easiest way to identify it is by the position of the candle. It would be better to unscrew the spark plug and install a long screwdriver in its place as a guide.
You need to set the fifth gear and start rotating the raised wheel. With the help of this, not the most tricky, trick, it will be easy to determine the upper compression point. The top point will become clearly visible from the protruding screwdriver. Then you can stop.
The same is done with the remaining cylinders. When the cylinder is in the desired position, use the locknut to adjust the play so that the feeler gauge passes into it with slight pressure. It is worth considering that after changing the position of the mechanisms, the size of the Niva valve clearance may also change.
Next, you need to adjust the position of the valves of the remaining dummies. The Niva valves are adjusted according to the order of operation of the dummies. You can determine it by turning the crankshaft with the starting handle.
It is necessary to turn strictly clockwise, half a turn. Next, rotate the crankshaft clockwise until the mark on the gear matches the mark on the bearing housing exactly. It is now possible to adjust the clearances of the Niva valves that release exhaust gases, the fourth dummy, which allows access of flammable substances to the third cylinder.
While holding the adjustment bolt, it is necessary to loosen the locknut. By adjusting the position of this bolt, adjust the play to the required requirements. The criterion is still the same. The feeler gauge should not fit into the gap too easily, but not too hard either. The purpose of the adjustment is the harmonious operation of the motor.
Upon completion of the actions, you need to check how correctly the adjustment was made. To do this, you need to start the engine, warm it up, and listen to how it works. It is important that there is no unnecessary noise or hum. These symptoms indicate that parts in some places may be incorrectly adjusted, broken, or that the gap width does not correspond to the standard.
Do-it-yourself valve clearance adjustment on Niva
Every experienced Niva car owner probably had to independently perform such a procedure as adjusting valve clearances. The quality of this procedure directly determines how well the engine of your car will work. After all, if the gap is less than required, then, of course, the valves will be clamped and the engine will not develop maximum power, and this will affect the dynamic characteristics of the car. On the other hand, if the gap, on the contrary, is larger than permissible, then a rather unpleasant knock will be heard when the Niva’s internal combustion engine is operating.
To carry out this procedure yourself, you will not need many tools. I will list everything you need below:
- Open-end wrenches for 17 and 13
- Set of styli or one stylus 0.15 mm thick
Why do you need to adjust valves?
Valves ensure the tightness of the combustion chamber. The compression ratio in the engine depends on their operation. If the valves are set incorrectly, this leads to problems with the engine and its rapid wear.
2 - the same thermal gap
As long as the engine is stock, there should be a gap between the rocker and the camshaft cam. As the engine warms up, the metal expands and the gap becomes smaller. That is why while the engine is cold, you can hear the characteristic knocking of the valves “ta-ta-ta”.
Settings will be needed in two cases:
- The gap is big. A shock load appears on the valves. It reduces the service life of parts.
- The gap is less than required. The valve is left open too long and compression is lost. Engine power decreases. The exhaust valve can quickly burn out.
The gap in the Niva valve mechanism should be 0.15 mm.