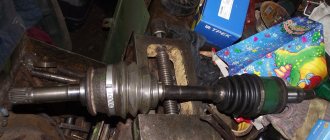
The outer CV joint on a Lada Priora car needed to be replaced after it began to crackle. I had to crawl under the car and there it was discovered that the boot was torn. And because of this, the CV joint failed. Replacing the boot requires removing the CV joint. But if the CV joint starts to crunch. It will also have to be changed.
Because dust and sand got into it. The rolling surface of the balls is worn. Simply replacing the grease and boot will not solve the problem. The CV joint will still crunch. And eventually it will jam.
How to replace a grenade on a Lada Priora car?
According to the manufacturer's recommendation, replacing a grenade on a Priora means installing a new front wheel drive assembly - 2 CV joints and an axle shaft on each side. Since a new unit costs a lot of money, the cost of the work is too large. Therefore, in practice, only the worn part of a given unit is replaced - the outer or inner grenade, or even both at once. If you know how to change these parts yourself, you can save a lot on car service costs.
When is replacement required?
The hinge mechanisms of the Lada Priora, which transmit rotation from the engine to the front wheels, are considered quite reliable and in some cases last 100-150 thousand km. Grenades should be replaced in the following cases:
- The car's mileage is more than 100 thousand km;
- the parts of the unit have become unusable, as evidenced by crunching sounds when turning the front wheels.
The first type of replacement is preventative. Recommended for motorists for whom a car is a tool for making money, which must be constantly in combat readiness and serve without fail. Replacement due to wear is a more common option; it is practiced by most Priora owners.
In order to change expensive CV joint parts as rarely as possible, it is important to promptly detect torn boots, through which dirt and dust enter the mechanism. Grenades cannot be repaired; they only need to be replaced. It is much easier and cheaper to replace leaky anthers so that the assembly lasts as long as possible.
Preparing for work
To replace the grenades, you need a car lift or an inspection ditch, since some of the disassembly work is performed from below. The following tools and devices will be required:
- standard set of socket heads with a knob;
- mount;
- open-end wrenches;
- metalworking tools, which include screwdrivers, hammer and pliers;
- a device that helps press the steering rod ball pin out of its socket in the strut.
If you don’t have a steering rod puller, then it’s easy to find one from fellow car enthusiasts or just buy one; it’s inexpensive. This is a steel cylinder with a slot and a bottom into which an extrusion bolt is screwed. To carry out the replacement in the inspection hole, you will also need a jack with a wheel wrench to lift the car. To completely disassemble the unit, it is advisable to have a vice and purchase CV joint-4 thick lubricant.
How to independently replace the internal grenade on VAZ cars
CV joint (constant velocity joint) is a mechanism that allows you to transmit torque between misaligned shafts. The device is actively used on front-wheel drive vehicles. On each shaft coming out of the gearbox there are two of them - internal and external. Repair is impossible; if the unit breaks down, it is replaced as an assembly.
In what cases is it necessary to replace the inner CV joint?
Replacing the internal CV joint on front-wheel drive VAZ vehicles is required if the following symptoms are present:
- Crunching and knocking noises when driving and accelerating in a straight line;
- Vibration and shock when changing gears;
- Significant play when testing by hand;
- If the “grenade” fails completely, the vehicle cannot move further.
The main reason for the malfunction of the VAZ grenade is the entry of water and dirt through the hole in the torn boot. The second possible cause of failure is a sharp press on the gas with the wheels fully turned, although in this case you risk killing the external rather than the internal grenade.
In addition to the above, replacing the internal CV joint on VAZ-2110 and other models may be necessary if the quality of the previously installed joint is poor.
Replacing the inner CV joint with your own hands
The procedure for replacing a “grenade” is the same for the entire front-wheel drive VAZ line, starting with 2108 and ending with VAZ-2115, “Kalina”, “Priora”, “Grant”. Before removing the inner CV joint, the oil is drained from the gearbox. Then proceed according to the following algorithm:
- Unlock and unscrew the hub nut. To make the work easier, a piece of pipe about 1 meter long should be put on the key.
- The desired side of the car is hung on a jack or lift.
- Remove the wheel.
- Remove the washer located under the hub nut installation site.
- Disconnect the steering tip.
- The CV joint is removed from the hub.
- Using a pry bar, remove the drive and internal joint from the gearbox.
Note: when removing both drives at the same time, a suitable mandrel should be installed in their place.
How to change the “grenade” with the drive removed? To do this, clamp the shaft in a vice, loosen the clamps and remove the boot. After this, the hinge is knocked off the splines with hammer blows.
The new CV joint should be hammered by applying light blows to its end with a hammer. For this it is better to use a wooden mallet. The “grenade” is first filled with a special lubricant.
Before installing a new constant velocity joint, it is necessary to clean its seat from old grease and install a new boot. Assembly is carried out in reverse order.
The repair is considered complete after successful sea trials. In this case, there should be no extraneous sounds from the drive side in all modes of vehicle movement.
Boot replacement and repair
The boot can be changed without removing the grenade if you have special equipment. His work is demonstrated on video.
If you do not have such a device, to remove and replace it, you must perform the above procedure for removing the drive and dismantling the hinge. The procedure is necessary if there is even minor through damage on the boot.
Temporary repairs to the CV joint boot can be made without removing it from the vehicle. To do this, you need to thoroughly clean and degrease the damage, then seal it with a piece of rubber and cyanoacrylate-based glue (superglue).
An alternative repair method is to seal the holes with silicone caulk. It should be remembered that it takes a day to completely polymerize.
Note: express repair is a temporary measure. Replacing the inner joint boot may be delayed for a short time, but not completely cancelled. Typically, these types of repair methods are used to get to the point of repair.
CV joint repair
As mentioned above, the hinge cannot be repaired. Conventionally, one of the repair measures includes washing the “grenade” after driving with a damaged boot.
Washing is carried out at the same time when the damaged boot on the pomegranate is replaced. The hinge is carefully knocked off the shaft, inspected for damage and thoroughly washed to remove any dirt and grease in gasoline or kerosene.
After washing, the assembly is filled with lubricant and mounted in place, having previously installed the boot. The procedure makes sense only if there are no obvious signs of a joint malfunction.
A crunchy or knocking part definitely needs to be replaced, since wear forms on the working surfaces of the inner race, and it is no longer possible to stop the destruction. Continued operation of the vehicle may be dangerous for the driver and other road users.
Source: https://ZnanieAvto.ru/uzly/zamena-pylnika-i-vnutrennego-shrusa-na-vaz.html
Garage repair
Now let's get straight to replacing the boot without removing the hinge itself, that is, the CV joint.
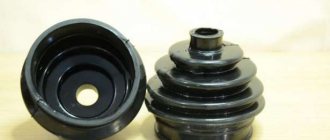
It is quite possible to replace the anthers without dismantling the drive. After all, the main task is to release the outer end from the hub. Then all that remains is to simply pull the new seal, like a contraceptive (condom), across the entire shaft.
Before tightening, be sure to turn the boot inside out correctly.
After this, you will need to cut the old element, install new clamps, and add high-quality lubricant. Since the new boots are highly elastic, you can tighten them without any problems. In this case, reliability will not be affected.
Step-by-step instruction
If you decide to do everything yourself, then you need to follow a certain sequence and follow the instructions.
The whole process roughly looks like this. Here it is worth making allowances for design differences between different cars.
- First, place the car on a pit or lift. The vehicle must be securely secured and prepared for work;
- Unscrew the drive nut first. There is a possibility that it will have to be changed;
- If you have a MacPherson type suspension, you will need to unscrew the ball joint nut;
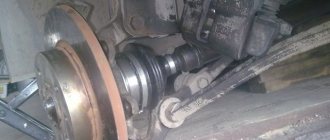
- After this, you can pull the hub to the side. This will allow you to pull out the outer part of the drive;
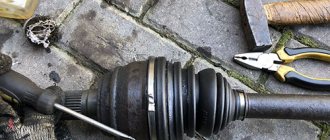
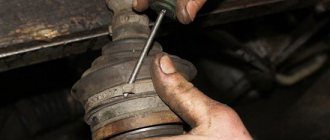
- Armed with a pry bar or large screwdriver, pry up the inner CV joint and pull out the drive;
- The drive is in front of you. Place it where it is convenient for you. Dismantle the old clamps, remove the retaining ring;
- Now carefully pull on the new boot;
- Connect the 2 parts of the drive until you hear a characteristic click;
- Return the locking ring to its place and fully tighten the fresh boot;
- All that remains is to tighten the clamp and return everything to its place.
The only problem is that this method is not suitable for everyone and not always. First you will need to purchase a special elastic boot. Many commercially available parts are extremely hard.
Therefore, in the case of their use, there is no need to talk about any possibilities of twisting and pulling, like a condom.
Special devices are also used to tighten the anthers. But they are not so easy to get, plus the price is high.
Replacing the CV joint on a Priora fret with your own hands: video instructions
Replacing the internal CV joint on front-wheel drive VAZ vehicles is required if the following symptoms are present:
- Crunching and knocking noises when driving and accelerating in a straight line;
- Vibration and shock when changing gears;
- Significant play when testing by hand;
- If the “grenade” fails completely, the vehicle cannot move further.
The main reason for the malfunction of the VAZ grenade is the entry of water and dirt through the hole in the torn boot. The second possible cause of failure is a sharp press on the gas with the wheels fully turned, although in this case you risk killing the external rather than the internal grenade.
How to remove the internal grenade of a Priora
Do you hear a characteristic crunch when turning? It's time to change the constant velocity joint(s) (CV joints, aka "grenades").
When performing any maintenance or during repair work on elements of the chassis, steering, as well as during a routine inspection, cracks were discovered on the boot of the outer CV joint (constant velocity joint, in everyday life - a “grenade”). After cracks, usually the boot breaks and dust and dirt gets into the CV joint housing, and this is a direct path to replacing the joint assembly, which is expensive and not justified. Therefore, to avoid this circumstance, it is necessary to replace the boot(s) in a timely manner.
To perform this operation you will need the following tools: a 17 mm wrench, a 30 mm wrench, a pry bar and a wheel wrench.
For clarity, as well as for simplicity, we replace the boot on the removed drive shaft. For this:
1. Install wheel chocks under the rear wheels and tighten the parking brake lever. We tear off the wheel mounting bolts, jack up the desired side and place a special support stand under the car. Finally unscrew the mounting bolts and remove the wheel.
How to replace a grenade on a Lada Priora car?
According to the manufacturer's recommendation, replacing a grenade on a Priora means installing a new front wheel drive assembly - 2 CV joints and an axle shaft on each side. Since a new unit costs a lot of money, the cost of the work is too large. Therefore, in practice, only the worn part of a given unit is replaced - the outer or inner grenade, or even both at once. If you know how to change these parts yourself, you can save a lot on car service costs.
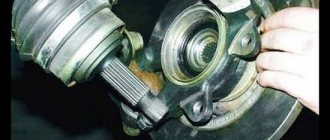
Preparing to remove the outer CV joint
In order to remove the CV joint, you need to do a little preparatory work. This work consists of unscrewing the CV joint nut from the wheel side.
As you can see in the photo, the nut is covered by a cap; it must be removed, but this requires removing the wheel.
The car needs to be jacked up. And set additional stops so that the car rests on these stops and not on the jack.
Hanging the car is the most important procedure in all repairs. The car must be positioned in such a way that you can live under it. Drink coffee and watch TV. And you don’t worry about something falling on you from above. The jack is intended exclusively for raising and lowering the car. And if only the jack is under the raised car, it cannot be used.
If there are no factory stops installed with the jack. Wooden blocks or boards will do. You cannot lay bricks. They split and the car falls. In general, even if you spend the whole day securing a lifted car safely, it’s not a big deal. And much better than remaining crippled. Sorry for the digression. But we can't rush.
After hanging the car, you need to remove the wheel. to remove the protective cap. Then the wheel must be installed back. And lower the car until it makes full contact with the floor. This must be done in order to unscrew the CV joint nut. It tightens with great effort. And stalled. In the groove of the CV joint.
To unscrew it, you will need a powerful wrench. On which you can put the pipe as an extension. This is why you have to put the car on the floor so that there is support. And the gearbox did not turn over due to the applied effort. After the nut is unscrewed, the car must be returned to its jacked state and the safety stop must be securely positioned. And remove the wheel.
Replacing the boot of the outer CV joint - how to replace it yourself, instructions with photos
To transmit torque to the drive wheels, special shafts are used. hinges protected by rubber parts. When they collapse, the lubricant is washed out and dust gets onto the rubbing surfaces. Timely replacement of these parts reduces repair costs, extending the service life of the hinge. Its design is quite complex, and the abrasive particles inside will inevitably lead to failure. External elements break more often.
Diagnostics can be carried out without removing the wheels. Turn the part all the way and illuminate the area of interest with a flashlight.
Also, breaks are easy to detect by touch. It is optimal to check with the wheel removed - this can be combined with a seasonal tire change or when repairing tires. It is also convenient to carry out diagnostics when the car is located on an overpass (while adjusting the handbrake, replacing the working fluid, etc.)
Find out the cost of replacing the outer CV joint boot online in 3 minutes
Don't waste your time - use the Uremont search and get offers from nearby services with specific prices!Get prices
How to replace a CV joint boot with your own hands
The rupture occurs for the following reasons:
- overload during twisting (sharp turns);
- driving on a washed out road;
- errors when repairing suspension elements.
Experienced car owners are advised to check mechanical defects once every two weeks.
The price list for replacing the outer CV joint boot includes labor and the price tag of the part. The amount ranges from 150-1000 rubles. The final price tag is determined by the car make and brand status. Replicas, as usual, are cheaper. In some situations, the cost is high due to the “loud” name and can reach 8,000 rubles. If you wish, you can find a suitable option of decent quality from other cars (make sure that it is suitable for your “iron horse”).
To replace the CV boot with your own hands, you will need stops, a jack, a pry bar, a hammer, a metal brush, lubricant, wrenches (with a swivel head or standard), fuel (for flushing). Make sure there is an inspection hole. It would be a good idea to find a video with a detailed description of the process.
How to change the boot on a Priora grenade?
CV joint (constant velocity joint) is a mechanism that allows you to transmit torque between misaligned shafts. The device is actively used on front-wheel drive vehicles. On each shaft coming out of the gearbox there are two of them - internal and external. Repair is impossible; if the unit breaks down, it is replaced as an assembly.
Replacing the outer CV joint boot of VAZ 2109, 2110, 2114, photo, video
For front-wheel drive cars of the VAZ family, from model 2108 to model 2115, as well as more modern Kalina and Priora cars, maintenance of the drive wheels comes down to periodically checking the condition of the CV joint boots, both external and internal.
Otherwise, the ball-type constant velocity joints with guide grooves used on these machines do not require maintenance.
Reasons for replacing the boot
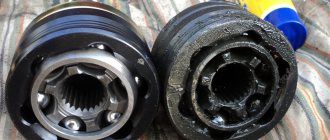
The service life of CV joints can be reduced very quickly due to damaged boots. Dirt and dust that gets inside the “grenade” act as an abrasive.
And since the hinge elements are heavily loaded and are constantly in contact with each other, the trapped dirt very quickly damages them and the “grenade” fails.
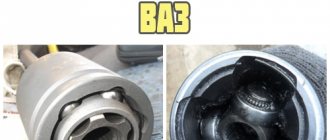
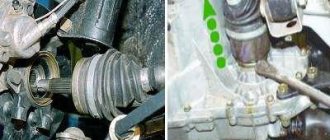
Even if you do not check the condition of the boot, the hinge itself will signal that it is damaged.
For example, as shown in the photo below, the CV joint turned.
When making turns, the CV joint with dirt trapped in it will begin to crack loudly. If the damage is not quickly repaired, the “grenade” will soon simply disintegrate and will have to be completely replaced.
But replacing a CV joint will cost much more than a boot. Therefore, upon discovering damage to the boot, or hearing a cracking sound from the CV joint, it is better to immediately begin troubleshooting the problem.
And such a malfunction is eliminated by replacing the boot, washing the CV joint and adding new lubricant to it.
Next, we will consider the sequence of actions for replacing the external CV joint boot of front-wheel drive VAZs using model 2199 as an example.
We choose the outer boot because it is damaged much more often than the inner one, since it is located near the wheel hub and the impact on it is more intense, therefore the chance of a crack appearing on it is greater.
Preparation
So, damage to the boot on the VAZ 2199 has been identified. You can replace it and wash the CV joint itself in the garage, the main thing is that there is an inspection hole.
Tools you will need:
- Set of wrenches (socket wrenches, open-end wrenches);
- Set of heads and collars;
- Metal brush;
- WD-40;
- Mount;
- Hammer;
- Jack;
- Wheel chocks;
- Wooden coasters.
You will also need a new boot, CV joint grease-4, a container for collecting oil, a container with gasoline for washing the CV joint, and rags.
It is better to do all work together with an assistant.
For convenience, we will describe the process of replacing the external boot on the left side. The replacement work on the right side is identical.
What to do if the boot ruptures on the road
It is absolutely unacceptable to move with a torn boot. The hinge will not tolerate even the slightest contamination. Mixed with lubricant, these abrasives will quickly wear out its precision-made and polished grooves and render the CV joint unusable. But it is not always possible or willing to use a tow truck or carry out road repairs.
Temporary protection can be provided in a variety of ways, from wrapping the remaining boot with tape to cold vulcanizing holes and cracks.
Even a simple cloth wrapped and secured around the cover will help filter out dust. The main thing is to do this reliably and control the condition of the patch to the point of repair. And when replacing the cover, be sure to disassemble the hinge, rinse it thoroughly and fill it with new grease as required.
Dust will definitely get there, even if it is not visible. During operation, the temperature of the unit changes; it literally works like a pump for dirty air under the car. It is easy to check the tightness by simply squeezing the case with your hand. You can also check the condition in doubtful cases of the presence of surface cracks, although usually the problem area is immediately noticeable by the grease protruding outward.