Valve adjustment washers
Engines of VAZ 2108, 21081, 21083, 2109, 21091, 21093, 21099 cars have washers in their valve mechanism to adjust the thermal gap between the pusher and the camshaft cam.
Washers for adjusting valves of engines 2108, 21081, 21083
What is a valve adjustment washer?
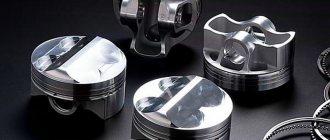
The washer is a disk made of high-strength steel with a marking (value) printed on it.
Valve adjustment washers
What are valve adjustment washers used for?
Valve adjustment washers are needed to change the clearance between the pushrod mounted on the valve and the camshaft cam. The gap is changed by installing washers of different thicknesses into the pusher.
Measuring the thermal gap using a feeler gauge
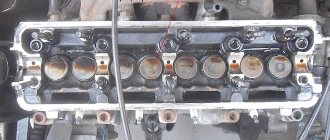
Where are the shims installed?
Adjusting washers are inserted into the pusher. The pusher is installed in a round well in the engine cylinder head on top of the valve stem with springs. There are eight pushers in total (according to the number of valves) and eight adjusting washers. The pusher has a slot for removing the washer.
Adjusting washer between camshaft cam and tappet
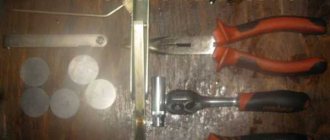
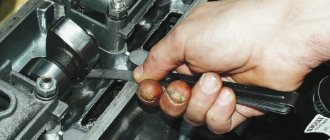
How to replace valve adjuster
To replace the washers, you need a valve adjuster and tweezers. Or a pair of screwdrivers - one larger, the other smaller. More details on “Adjusting valves of VAZ 2108, 2109, 21099”.
How to select shims
The washers are selected after checking the thermal gap using a feeler gauge, according to the rating indicated on them. The following formulas are used for calculation: Z=Y+X-0.2 mm (for intake valves). Z=Y+X-0.35 mm. Z is the calculated thickness of the new adjusting washer, Y is the thickness of the removed washer, X is the gap determined from the feeler gauge.
If the markings on the washer are erased, then its thickness can be determined by using a micrometer.
Measuring the thickness of washers with a micrometer
Applicability of shims
On engines 2108 (1.3 l), 21081 (1.1 l), 21083 (1.5 l), 2111 (1.5 l), washers are used to adjust valves in increments of 0.05 mm having the following catalog numbers:
3.00 mm 2108-1007056 3.05 mm 2108-1007056-10 3.10 mm 2108-1007056-11 3.15 mm 2108-1007056-12 3.20 mm 2108-1007056-13 3.25 mm 2108-10070 56 -14 3.30 mm 2108-1007056-15 3.35 mm 2108-1007056-16 3.40 mm 2108-1007056-18 3.45 mm 2108-1007056-20 3.50 mm 2108-1007056-22 3.55 mm 2108-1007056-24 3.60 mm 2108-1007056-26 3.65 mm 2108-1007056-38 3.70 mm 2108-1007056-30 3.75 mm 2108-1007056-32 3.80 mm 2108-1007056 - 34 3.85 mm 2108-1007056-36 3.90 mm 2108-1007056-38 3.95 mm 2108-1007056-40 4.00 mm 2108-1007056-42 4.05 mm 2108-1007056-44 4.10 mm 2108-1007056-46 4.15 mm 2108-1007056-48 4.20 mm 2108-1007056-50 4.25 mm 2108-1007056-52 4.30 mm 2108-1007056-54 4.35 mm 2108-1007056- 56 4.40 mm 2108-1007056-58 4.45 mm 2108-1007056-60 4.50 mm 2108-1007056-62
In addition to the given denominations, there may be others from different manufacturers.
Notes and additions
— What is a thermal gap? As the engine warms up, the valve stem lengthens as the metal expands when heated. A certain amount of clearance is required between the end of the valve stem and the camshaft cam pressing on it to compensate for this thermal expansion.
On engines 2108, 21081, 21083, 2111 of VAZ 2108, 21081, 21083, 2109, 21091, 21093, 21099 cars it is 0.2 mm for intake valves and 0.35 mm for exhaust valves.
If it is less than normal, accelerated wear of the valve stems occurs; if it is more, the edges of the valve plate that is not tightly covered are burned. With large gaps, a “chirping” sound is heard from the valve cover - a frequent, high-pitched metallic knock.
Source
Main signs of failure
When thermal clearances decrease or increase, the driver may observe a number of symptoms. The car may even stall after warming up to operating temperature (metal expands when heated). Adjusting the valve clearances of the VAZ-2114 is necessary in the following cases:
- Extraneous noise appears from the engine valve mechanism.
- When power decreases significantly, which is especially noticeable at high loads.
- The engine is running unstable.
- Sometimes it shoots and slams into the silencer.
- Gasoline consumption increases significantly, despite the fact that all sensors are in good condition and the power system is functioning normally.
If you notice one or more signs, then you definitely need to check the condition of the valves.
Drawing conclusions
Before drawing any conclusions, for ease of perception, all the obtained measurement results were entered into a comparative table.
Below we will look at all the given indicators, but first we will answer the question: why did I use exactly 16 shims in my measurements, and not 20 or 10? Everything is very simple. The washers in the table are divided into two groups:
- Washers installed from the factory. Since there are 8 valves in the engine, there are also 8 adjusting washers;
- Washers bought in a store. There are also 8 of them, since they were purchased to replace the old one installed from the factory.
Let's move on. In the “Marking” column, I wrote down the nominal size of the shims, which is indicated on the washer.
And in the next column “Actual thickness” I wrote down the actual thickness of each of the adjusting washers.
In the last column “Deviation” I recorded the deviation of the adjusting washer from the nominal size or the so-called error.
Conclusion one: there are no perfect washers
Please note that the deviations of washers installed from the factory are almost the same as those of washers purchased in a store. This means that all shims have errors, and this is normal. The factory does not install any “super washers” with zero deviation from the nominal value.
Conclusion two: the tolerance ± 0.05 mm is due to the error of the adjusting washers
Why can we conclude that the tolerance of ± 5 acres indicated by the manufacturer is due to an error in the actual thickness of the adjusting washers? If you pay attention to the table, everything will become clear.
As you noticed, the largest deviation from the “norm” was only 3.5 acres. And if we take the average deviation, it is even less.
On average, the deviations or errors of the adjusting washers are only 1.5 hundred parts. What's all this for?
Conclusion three: shims don’t need to be measured
There are two approaches to adjusting valves and each of them has a right to life. How to use it is up to you to decide. A little more detail.
- Selecting washers using a micrometer. A more accurate but also more labor-intensive process because the thickness of each washer is determined by measuring it with a micrometer rather than marking it. The size of the washer will need to be marked and recorded separately to avoid confusion.
- Selection of washers without a micrometer. If you don’t have this device or don’t know how to use it, it doesn’t matter. Focusing only on the markings of the washers, you can accurately adjust the valves. In this case, the thermal clearances of the valves will still be within the “tolerance” of 5 acres. The only disadvantage of this method is that you will be forced to buy shims only from a trusted supplier. The desire to find something cheaper, via the Internet or in a “neighbor’s garage,” will be associated with certain risks, because now everything is counterfeited!
The first method is certainly better and more reliable, but if you nevertheless installed washers that were not checked with a micrometer, focusing only on the markings, do not worry, nothing will happen to your engine. He will definitely “live” until the next adjustment.
Does the marking correspond to the actual thickness?
There is an opinion that the actual thickness of the adjusting washers is far from the nominal value. In other words, its actual size does not always correspond to the indicated one. Therefore, before buying a washer, you must measure it with a micrometer. So I decided to figure out how reliable this information is and whether a control measurement of the adjusting washer before measurement is of fundamental importance.
I did not conduct large-scale research, so my conclusions should not be taken as the “ultimate truth,” but, nevertheless, certain conclusions can be drawn.
Micrometer Caliber MK-25
As a measuring instrument, I used the Caliber MK-25 micrometer, produced in 1964 by the instrumentation plant of Kalibr OJSC. The instrument was preserved in perfect condition, since it lay idle for decades in the garage of one “enterprising” grandfather, who, even in his youth, worked to make this instrument his personal property. By the way, this grandpa still doesn’t know what kind of tool this is and what it’s needed for :)).
In short, I purchased this useful “device” for a symbolic 1,500 rubles and began measuring the shims. At one time, I myself worked at a factory for several years as a machine operator, so I am familiar with measuring tools firsthand. My point is not to tempt anyone to write any nonsense in the comments regarding the preliminary check of the measuring device for accuracy (calibration, etc.). I took care of everything before taking measurements. So let's get started.
Adjusting washer No. 1 marked 3.55 mm
The thickness of the first washer in fact turned out to be 2 acres greater than indicated by the marking. Let's move on to measuring the next washer.
Adjusting washer No. 2 marked 3.45 mm
The thickness of the second washer in fact turned out to be greater than indicated by the marking by 2 hundred parts, just like the first. Let's move on to measuring the next washer.
Adjusting washer No. 3 marked 3.57 mm
The thickness of the third washer in fact turned out to be 1.5 hundred parts greater than indicated by the marking. Let's move on to measuring the next washer.
Adjusting washer No. 4 marked 3.75 mm
The thickness of the fourth washer in fact turned out to be 2 acres greater than indicated by the marking. Let's move on to measuring the next washer.
Adjusting washer No. 5 marked 3.70 mm
The thickness of the fifth washer in fact turned out to be 1.5 hundred parts greater than indicated by the marking. Let's move on to measuring the next washer.
Adjusting washer No. 6 marked 3.60 mm
The thickness of the sixth washer in fact turned out to be greater than indicated by the marking by 1 hundred square meters. Let's move on to measuring the next washer.
Adjusting washer No. 7 marked 3.42 mm
The thickness of the seventh washer in fact turned out to be 3 acres greater than indicated by the marking. Let's move on to measuring the next washer.
Adjusting washer No. 8 marked 3.55 mm
The thickness of the eighth washer in fact turned out to be 2 acres greater than indicated by the marking. Let's move on to measuring the next washer.
Adjusting washer No. 9 marked 3.85 mm
The thickness of the ninth washer actually coincided with the marking. There are no deviations. Let's move on to measuring the next washer.
Adjusting washer No. 10 marked 3.65 mm
The thickness of the tenth washer in fact turned out to be 2 hundred parts greater than indicated by the marking. Let's move on to measuring the next washer.
Adjusting washer No. 11 marked 3.47 mm
The thickness of the eleventh washer in fact turned out to be 3.5 acres greater than indicated by the marking. This is an anti-record :)). Let's move on to measuring the next washer.
Adjusting washer No. 12 marked 3.62 mm
The thickness of the twelfth washer in fact turned out to be greater than indicated by the marking by 1 hundred square meters. Let's move on to measuring the next washer.
Adjusting washer No. 13 marked 3.80 mm
The thickness of the thirteenth washer actually coincided with the marking. There are no deviations. Let's move on to measuring the next washer.
Adjusting washer No. 14 marked 3.52 mm
The thickness of the fourteenth washer in fact turned out to be greater than indicated by the marking by 1 hundred square meters. Let's move on to measuring the next washer.
Adjusting washer No. 15 marked 3.52 mm
The thickness of the fifteenth washer actually coincided with the marking. There are no deviations. Let's move on to measuring the next washer.
Adjusting washer No. 16 marked 3.87 mm
The thickness of the sixteenth washer in fact turned out to be 0.5 hundred parts greater than indicated by the marking. This completes the measurements.
Checking clearances
To check the clearances, you need to set the first cylinder to top dead center. The check should be carried out according to the following scheme:
Crankshaft position
Camshaft position
First you need to check the gap size in the 6th and 8th valves; they are located on the third and fourth cylinders. The feeler gauges should pass with little resistance between the cam and the tappet. If the probe does not fit or freely penetrates into the gap, it is necessary to make adjustments. This is done using washers of different thicknesses.
Article: 2108-1007056-*2.85, additional articles: 2108-1007056
Order code: 029170
- You may need
- show more
- Passenger cars / VAZ / VAZ-21091 drawing
- » href=»/catalog/vaz-3/legkovye_avtomobili-30/vaz_2109-9/mehanizm_gazoraspredelitelnyiy-81/#part32142″>Adjusting washerEngine / Gas distribution mechanism
- Passenger cars / VAZ / VAZ-21101 drawing
There are no reviews for this product yet.
Welcome to the blog.
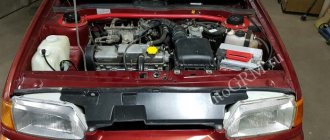
A client came in for an adjustment. Previously, we measured the compression in the 3rd cylinder; the compression was low, so we decided to start with adjustment.
1. Remove the head cover 2. Remove the front timing belt cover 3. Use a syringe or rubber bulb to remove any remaining oil around the valve tappets.
a) for intake valves Z = Y + X - 0.2 mm;
b) for exhaust valves Z = Y + X - 0.35 mm;
where Ζ is the calculated thickness of the new adjusting washer; Υ is the thickness of the removed washer; X is the gap determined by the feeler gauge. Adjustment table
15. Having removed the device for adjusting the valves, install the parts in the reverse order of removal.
After the adjustment, I measured the compression, namely, I focused on the 3rd cylinder, the compression increased, became the same as in all pots, the engine began to run noticeably quieter and smoother)))
P.S. Sorry for the pictures, after the first steps, my hands were clean, when it came to the pucks, my hands were just covered in oil, I didn’t feel like taking pictures, I didn’t want to get the camera dirty.
Thank you for attention! Stay tuned, stay true!