17 June 2016 25,383
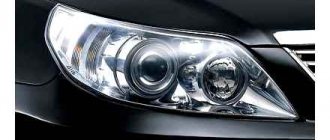
Disassembling the Priora headlight may be required in case of modification or tuning (paint masks, install lenses, etc.), or for repairs (use new glass, or glue the old one well so that the headlight does not sweat). Let's look at the process of removing glass from a headlight in detail.
The process of disassembling a Priora headlight can vary greatly, and it depends on the manufacturer of the optics. Removing glass from a Bosch headlight is much easier than from a Kirzhach headlight.
General procedure for disassembling the headlight:
- Remove the light bulbs from the headlight;
- Heat the sealant until it goes from hard to soft, like chewing gum;
- Separate the headlight housing and glass using a utility knife.
In the case of Bosch, a household hair dryer will be enough for heating. It will be very difficult to melt the sealant on Kirzhach headlights, so here are some tips:
1. To bring the sealant to the desired state, use an industrial hair dryer (set the temperature to about 200..250 degrees). The melting temperature of the sealant is very close to the melting temperature of plastic, be careful not to damage the headlight housing!
2. To heat the glue evenly, the headlight unit can be wrapped in cloth and placed in the oven for 15 minutes at a temperature of about 170 degrees. More details about this in the video:
3. Instead of an oven, you can use a box with a hole into which you insert a technical hair dryer.
4. The junction of the glass and the body is covered along the entire perimeter by a plastic side. It will have to be carefully bent (by heating), or, in extreme cases, cut off.
5. If all else fails, you can cut off the headlight glass using a Dremel. Glue it back together using quick-drying epoxy glue, such as Contact. It is worth considering that after cutting out the glass it will become 1-2 millimeters smaller.
Attention!
You can remove the headlight sealant using a special product, sold on AliExpress (see selection of products from Ali). Instructions using Vesta headlights as an example.
Have you dismantled the Priora headlights yourself? What recommendations can you leave for future auto tuning enthusiasts? Let us remind you that some modifications can be made without disassembling the optics, for example, installing eyelashes or buying already tuning headlights for the Priora.
Where can I buy
: in our online store (Priora Headlights category).
Photo: 7ski in-flight magazine
Key words: Lada Priora headlights
Share on social networks:
Found an error? Select it and press Ctrl+Enter..
Do-it-yourself headlight adjustment
It is recommended to adjust the vehicle's front lighting devices annually; the headlights should also be adjusted if:
- new front optics are installed on the car;
- wheels of a different radius are installed;
- there was a minor accident;
- The front suspension has been repaired.
There are several options for adjusting the front optics; the work can be done:
- in a car service center at a special stand;
- independently, using a flat area and a building wall with a smooth, level surface.
You can adjust the headlights yourself either at the stand or without using special equipment. Let’s consider the second option, it is constantly used by car enthusiasts.
For example, let's take the adjustment of the headlights on a Ford Fusion car. It is convenient to carry out work on the street in the dark; first of all, we choose a flat area as possible and find a place where there is a white, flat wall nearby:
- drive close to the wall, mark the center of the car with colored chalk, mark the center of each headlight;
- we drive away from the wall at a distance of 5 meters;
- Next we need a laser level, we install it next to the rear wheel - we direct its beam so that it passes along the front wheel, at its very bottom;
- further it passes better onto the wall, a laser dot is visible on it;
- the point from the laser on the wall will be the level for one headlight (in this case, on the right side), we also set the level for the left headlight in the same way;
- installation of points is necessary for correct leveling - the platform and the wall may be uneven;
- take a measuring tool (tape measure), measure the distance from the ground to the center of the headlight (the place where the lamp is located). For Ford Fusion, the height is approximately 0.7 m;
- in the area of the points obtained by the laser, we measure on the wall the distance from the ground upward by 0.7 m on each side;
- draw three lines - two vertical (at the laser points) and one horizontal (at a height of 70 cm), then another horizontal strip 5 cm lower.
Why is the second horizontal line needed? On a Ford Fusion, the angle of incidence of the low beam headlights is one percent. If the car moves 1 meter from the wall, then the headlights tilt down by 1 cm, respectively, at a distance of 5 m - by 5 cm.
Let’s say if the car was 7 m from the wall, then the headlights should be lowered 7 cm from the horizontal level.
Each car model has its own low beam angle; there is always a sticker or designation in the front of the car under the hood.
With adjusted optics, the light from the headlights follows the bottom line; the refraction of light at an upward angle on each headlight should be at the point of intersection of the bottom horizontal line with the vertical line.
A correctly adjusted headlight should shine as shown in the figure below; here the refraction of light begins precisely at the intersection point, but in this case the light can be raised a little higher.
To adjust the headlights on a Ford Fusion, we use a screwdriver or wrench with a 13 mm head. The light is adjusted by two nuts located on top of the optics:
- one of them is closer to the front wing;
- the other nut is almost in the center of the headlight.
The nut located in the center of the optics adjusts the height of the illumination; using the lateral adjustment (closer to the wing), the light is shifted to the right or left.
Before you begin adjusting the headlights, you must:
- set the same tire pressure;
- rock the front of the car up and down several times until the suspension returns to its normal position;
- switch the electric corrector to position “0” (right lever in the figure below).
Various videos are posted on the channel; they discuss in detail the issues of adjusting headlights with visual examples.
Source
Do-it-yourself Lada Priora headlight adjustment video instructions
Any car must have its headlights adjusted correctly. If a car has problems with its headlights, it can blind the driver driving oncoming vehicles, leading to serious traffic accidents. At best, such a problem will significantly reduce visibility on the road.
It is recommended to check the correct adjustment of the headlights once a year or every time when replacing a light bulb or repairing the front body part. It is worth noting that self-adjustment of the car’s headlights is considered temporary and can be carried out until the car is serviced in a specially equipped workshop.
If your vehicle's headlights are not adjusted correctly, this can pose a serious safety hazard at night.
This especially applies to cars that have xenon installed. In order to prevent an emergency and not disturb other road users, the headlights should be adjusted correctly in a timely manner. Let’s look at how to do this yourself using the Lada Priora car as an example.
Necessary tool
To adjust the headlights on a Lada Priora you will need:
- hex bit 6 mm;
- plywood;
- chalk;
- roulette;
- pressure gauge
Progress
- First of all, we park the Priora car on a flat area five meters from a flat wall. Fill the tank with fuel until it is full and use a pressure gauge to equalize the pressure in the wheels. After inspecting the headlights, thoroughly wash them from contamination. We check that the headlight bulbs are working properly. If necessary, we install new ones.
- After the preparatory procedures, we proceed to adjustment. We move the lighting width control lever to position “0”. This position corresponds to the load of the vehicle with the driver. Turn off the lights and rock the car from side to side. Thanks to the rocking, all suspension elements will take a standard position. We ask a colleague (about the same weight as you) to sit in the driver’s seat of the car.
- For further adjustment, draw a special marking on a flat wall. The center line should be drawn so that the distance from the center of each headlight to the axle is identical. We mark the centers of each headlight with dots on the wall and draw two lines vertically through them. Draw a straight line between the lines and mark it with the letter “A”. Below, at a distance of 12 and 22 centimeters, draw two more lines in parallel.
- With the low beam on, close one of the headlights. The top point of the light spot from the headlight should coincide no higher than the horizontal center line. Also, the boundaries of the light beam of the fog lights are located along the same line.
- We make sure that the intersection of the inclined and horizontal sections of the boundaries of the light fluxes (at the point where the light beam breaks) coincides with a line that is drawn vertically and passes through the point marked as the center of the headlight. If deviations in the luminous flux are detected, we adjust the headlights with a hexagon of 6 millimeters by rotating the horizontal and vertical position screws. These screws are located under the hood in the headlights.
Adjusting Priora headlights using a corrector
- cracks and breaks in the body;
- breakdown in the electrical connectors of the headlight;
- damage to reflectors;
- defects in fasteners;
- clouding of the optics (the headlight sweats or becomes dirty).
Replacing a headlight is one of the activities after which it is impossible to do without adjusting the lighting fixtures, since the light must be properly dispersed. Headlight leveling plays a decisive role in improving driving safety. Therefore, knowing how to replace front or rear lights is only half of the whole replacement process, where an important role is also played by how to adjust new headlights correctly.
With the right approach, the process of replacing headlights is not difficult.
It is important to follow the exact sequence of actions when disassembling and assembling the flashlight
At the level of the middle of the headlights, draw a horizontal line on the wall (L. 1), approximately 65-75mm. Below we draw a line (l. 2). Two vertical lines in the middle of each headlight (l. A) (l. B), another vertical line strictly in the middle between them. There should be 1 person in the car, the tire pressure should be within normal limits and be the same everywhere.
- Phillips screwdriver;
- round screwdriver;
- screwdriver;
- ruler;
- pencil.
To adjust the headlights, you need to park the car close to the wall and turn on the low beam mode. After this, you should alternately mark the centers of the traces of the two headlights and the centers of their symmetry. Connect the dots to form a straight horizontal line. The second line should be drawn parallel to the first, but with an interval of 5-12 cm, and the third - at a distance of 22 cm from the first. In addition to horizontal lines, it is necessary to draw a strictly vertical line through the center points of the headlights and the car.
Removing the front headlight units on a Lada Priora car is carried out to repair or replace them if restoration is impossible, as well as when carrying out other work in which the presence of headlights will interfere with the progress of their implementation. To carry out repair work, prepare a standard set of tools and perform the following sequence of actions:
- De-energize the vehicle by disconnecting the negative terminal from the battery.
- Dismantle the front bumper, as it will interfere with further work.
- We press out the plastic clips and disconnect the block with power wires from the headlight unit.
- Next, use a spanner wrench to unscrew the front lower and side bolts securing the headlight to the car body.
Now you need to remove the decorative headlight cover. To do this, use a Phillips screwdriver to unscrew the four screws that secure it.
- We unscrew the remaining upper mounting bolts and remove the headlight unit from the car.
- Make any necessary repairs or replacements, then perform installation in reverse order.
At this point, the repair work to remove the front headlight unit on the Lada Priora car has been completed.
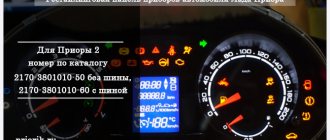
Instrument cluster block diagram
| № | Decoding |
| 1 | Electric power steering |
| 2 | Emergency gang control VAZ-2170 |
| 3 | Connection to oil pressure sensor |
| 4 | Parking brake indicator light |
| 5 | Electronic anti-theft device |
| 6 | Airbag control module |
| 7 | External lighting switch |
| 8 | Right turn signal indicator and doubler |
| 9 | Left turn signal indicator and backup |
| 10 | Engine control unit |
| 11 | Disabling the passenger's front airbag |
| 12 | Seat belt warning light |
| 13 | ABS brake system unit |
| 14 | Steering column switch button |
| 15 | Brake expansion tank indicator |
| 16 | ABS safety control module |
| 17 | Main beam headlight control unit |
| 18 | Shield backlight module |
| 19 | General disadvantage of the device |
| 20 | Constant positive battery terminals |
| 21 | Ignition switch contact |
| 22 | Fuel flow meter |
| 23, 24 | Steering wheel turn switches |
| 25,26 | Overboard temperature sensors |
| 27 | Fuel sensor VAZ-2170 |
| 28 | Speed sensor |
| 29 | Coolant temperature sensor |
| 30 | Tachometer signal |
| 31 | Shield diagnostics |
| 32 | Generator Regulator Relay Terminal |
Electrical connection diagram for heater wiring harness PRIORA 21723
- heater wiring harness block to the front wiring harness block;
- air mixing gearmotor;
- evaporator temperature sensor;
- electric fan 2172;
- speed controller;
- recirculation gearmotor.
Parking system sensor diagram 2172-3724248
1,2,3 – parking system sensors; 4 – block of the wiring harness of the parking system sensors to the block of the rear wiring harness.
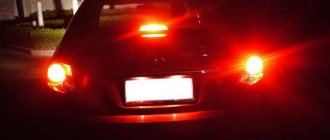
Rear license plate light pinout
1. Supply voltage to the lights illuminating the rear number 2,3. Priora 4 license plate lamps. Electric trunk lid locking motor
How to adjust headlights on a VAZ-2110? Do-it-yourself adjustment of VAZ-2110 headlights
From 365news.biz
On
May 14, 2019
To ensure safe driving, the headlights must be adjusted correctly. Every car owner should know how to adjust the headlights on a VAZ-2110. You can make the adjustment without removing the element from the machine - for this there are special screws with which the light beam is adjusted in the vertical plane. The beam is adjusted in a similar way on models 2111, 2112. Even more modern models LADA Granta and LADA Priora have such settings.
How to disassemble a headlight
In order to adjust the VAZ-2110 headlights with your own hands, you need to get rid of all defects in them: repair, replace glass, lamp, reflector. The disassembly procedure is as follows:
- Disconnect the negative terminal from the battery. If the battery is in the way, you can remove it completely.
- Remove the glass by heating it with a hairdryer. This way you will be able to melt the adhesive that is underneath.
- Cut a small U-shaped profile on the lens.
- Remove the reflector made of paper. To do this, you will need to unscrew three bolts from the back side.
- There is a spring near the hydraulic corrector; it needs to be removed. Together with it, the “roses” are dismantled - plastic clips attached to the reflector.
- Snap the ball onto the edge of the reflector.
- Snap the metal spool to prevent the regulator from unscrewing.
If the hydraulic corrector is tightened too much, this will simply cause the limiter to become deformed. In this case, a ball will come out of the plastic holder, and the entire optical system will fall down.
Features of removing headlights
It is necessary to take into account that if you twist the corrector, you will have to replace the steel part with a rubber gasket. The problem is that the steel element of the corrector breaks and becomes deformed, which affects the work. This is not the best option, since when installing the rubber gasket it is difficult to understand when the headlights are in their extreme positions.
To prevent light loss, you will need to re-twist the corrector. Therefore, when adjusting the VAZ-2110 headlights with your own hands, you will need to install an additional lock. A wire cotter pin is ideal. It is placed in the petals of a plastic “rose”. Be sure to be careful when disassembling the headlight unit. Before using for the first time, clean all surfaces of excess sealant. If necessary, coat the glass around the entire perimeter with sealant.
How to disassemble a headlight, rules for performing the procedure
Pinout of Lada Priora comfort block
No matter what car the headlight on is broken (on Kalina, on Priora or another vehicle), the rules for disassembling the mentioned device look like this:
- The sealing compound should be heated evenly, relative to the entire perimeter of the lighting fixture. At the same time, the maximum heating temperature of the sealant is 3000 degrees. Otherwise, the device may be damaged.
The distance between the hair dryer and the headlight housing should be 20 millimeters. This value is considered optimal.
Avoid applying significant force when working with a car light. This is due to the comparative fragility of the material from which the device is made. When removing the headlight, you must turn off the power supply to the vehicle. Such actions will prevent a short circuit.
At the same time, you should be guided by the information contained in the instructions for the vehicle.
Painting headlights
Tuning the front and rear lights on a Priora is not limited to increasing the aperture ratio. They can be tinted. But this does not mean that you need to paint the glass - the light will simply become cloudy. The tinting effect is obtained due to a change in the color of the substrate. This is done using high temperature paint.
This is done in the following order:
- The entire block is removed and the backing is removed;
- Wipe off the chrome from the substrate (zero polish will help). Cover the substrate with two or three layers of primer and wait about an hour;
- Apply 4-5 layers of paint over the primer, wait for each layer to dry;
- Assemble the block lights, close all the cracks to prevent fogging;
- After painting, all that remains is to adjust them. The main thing is that the light is not too dim and does not cause inconvenience when driving.
Adjustment after any modification of the optics is performed as follows:
- Place the car at a distance of 5 m from a flat wall (for example, opposite the garage);
- Set the adjusting screws under the hood to “0”. Put a person of similar height behind the wheel;
- The headlights are adjusted one by one; while one is being adjusted, the second one is closed;
- The clear edge of the light should be 10 mm below the top edge of the headlight.
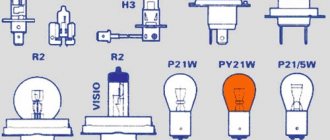
Lamp type
The lamps installed in the headlights of Priora 1 and 2 differ due to the DRLs in the newer Lada model. Below is a table with lamp types.
| Vehicle model year | Lamp type | |||
| Low beam | High beam | Turn signal | Dimensions | |
| Headlight Priora until 2013 | H7 | H1 | PY21W | W5W |
| Headlight Priora After 2013 (with DRL) | H7 | H15 | PY21W | W5W |
Replacing Priora headlight glass
In the previous post: Polishing headlights: the first damn thing is lumpy. I coated the headlights with varnish and polished them. The right headlight was left without a protective coating and cracked under the influence of solvent from a can.
In general, I recently noticed that the headlight, which was left without a protective coating, began to turn yellow. Not only is it cracked, but also yellowed
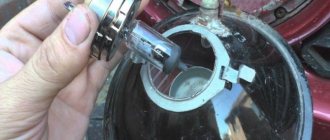
This won’t work. I looked for used headlights on Avito, but found nothing. There were options, but for 2500, which is expensive for a used one, in my opinion. Therefore, I decided to change the glass. This is the cheapest option. I removed the headlight. I found a suitable cardboard box and placed the headlight in it. I made a hole in the box and put a soldering gun in it. You can use construction. It turned out to be an improvised oven.
I closed the box and sealed it with masking tape. Turned on the hairdryer. I found experimentally that a temperature of at least 100 degrees must be created inside the box, otherwise nothing will come off. First, I removed the rubber plugs and pulled out the bulbs.
We will show you how to quickly and easily disassemble the headlight and replace the glass in a LADA Priora car with your own hands. The reason for this repair is that the headlight is sweating, most likely water is getting in from somewhere. Ideally, a hair dryer is needed for this work, but since we do everything at home, we will make do with improvised means.
READ Where is the cabin filter on a gazelle?
The headlight needs to be wrapped in some kind of cotton fabric, in the video this role is played by ordinary underpants, and put it in an oven preheated to 170 degrees for 15 minutes. First, we take out the staples and cover the glass with masking tape so as not to scratch it. We take the headlamp out of the oven using gloves, as it is very hot. Then, using a regular flat-head screwdriver, we begin to dismantle the glass. As you can see in the video, it can be removed quite easily. Then we will put the same glass on the sealant.
Backup video: analysis of the Lada Priora headlight block, glass replacement:
The headlights on the Lada Priora are non-separable, so to replace glass or a light bulb you need to buy a new one or somehow disassemble the old one. The second option requires effort, time, and some experience. Headlights for these cars are also manufactured by Bosch.
The headlight block consists of 2 parts, held together with strong sealant or glue. To disassemble the Priora headlight, you will need a household hair dryer, which can be used to heat the glued joint and melt the sealant. Thanks to this, you will be able to separate the 2 parts of the headlight unit.
Removing the headlight to replace the glass
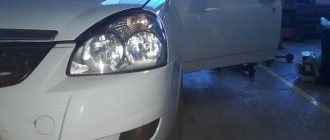
On top of the front light there is a plate covering it - a casing. It is secured with 3 screws to the upper cross member of the engine compartment. After removing it, you will have access to the upper mounting bolt of the Priora headlight. Since the bumper has already been removed, all that remains is to unscrew the top and 2 bottom screws. That's it, you can carefully move the headlight forward and disconnect the control wire harness from the connector. The Priora headlight has been removed. You can disassemble and replace the glass.
Engine turbocharger
TDI engines use a turbocharger with variable geometry, which allows the air that is absorbed to be compressed. Due to this, the volume of absorbed air in the chamber increases. As a result, engine power increases at the same volume and at the same speed.
Two turbines form the turbocharger device. The turbine located in the exhaust tract begins to rotate from the outgoing mass of exhaust gases. It begins to move the compressor wheel, which compresses the air directly at the inlet. The air heated during compression is cooled and then enters the chamber. Since when the temperature decreases, the volume of air also decreases, there is more of it in the chamber.
Why do Priora headlights sweat?
The most common problem with the optics of domestic cars is moisture getting inside. The headlight sweats due to loss of sealing of the unit. The back cover has lost its tight fit relative to the surface of the case. To fix the problem, it is better to remove it entirely. Open all existing plugs and dry thoroughly in a warm, dry room. Seal the gaps between the covers and the body (use different types of seals, silicones, sealants). Some car enthusiasts advise spraying a small amount of alcohol inside. After drying, reassemble and install on board your car.
How can you improve the performance and appearance of flashlights?
Taillights and headlights on Priora are the devices that are most frequently subject to changes. The goal is to give the car individuality and expand the functionality of standard optical devices. Tuning options:
- Eyelashes are linings that visually change the shape of the front optics and the appearance of the car. Automotive eyelashes are made of plastic, tint film or seclomat (fiberglass) with epoxy resin.
- Angel eyes are luminous rings, placed in reflectors, installed in car optics, and emit light that is pleasant to the eye. Clearly visible during the day, they can be used as DRLs or as markers. Available in LED, neon or cluster versions.
- Rear diode lights with a plastic lens duplicate all the functions of factory products - LED dimensions, brake light, turn signal, PTF. Changing them is not difficult - a standard connection connector and 4 fastening nuts.
- Xenon on Priora. Its advantages are best demonstrated when there are bi-xenon lenses on the car. Lensed glass will help avoid dazzling oncoming cars and ensures the formation of the correct beam of light. Bi-xenon lenses with angel eyes look impressive and modern. They are suitable for all types of car lamp sockets. Installation in a standard base without changing the design of the reflector is acceptable. To install, remove the outer glass of the headlight and replace the lens.
- Tinting. This is done using a tint film or varnish. Using the first one, you can carry out partial tinting of individual elements.
A large assortment of lights for Priora allows each car owner to choose what best suits his taste. Modern external vehicle lighting perfectly illuminates the road day and night in any weather, demonstrating a truly high level of quality and reliability. In the event of a malfunction, most of the work can be done on your own if you have the knowledge, but to maintain the warranty, you should contact a service station.
The main reasons for replacing and adjusting headlights
- cracks and breaks in the body;
- breakdown in the electrical connectors of the headlight;
- damage to reflectors;
- defects in fasteners;
- clouding of the optics (the headlight sweats or becomes dirty).
Replacing a headlight is one of the activities after which it is impossible to do without adjusting the lighting fixtures, since the light must be properly dispersed. Headlight leveling plays a decisive role in improving driving safety. Therefore, knowing how to replace front or rear lights is only half of the whole replacement process, where an important role is also played by how to adjust new headlights correctly.
With the right approach, the process of replacing headlights is not difficult.
It is important to follow the exact sequence of actions when disassembling and assembling the flashlight
The front headlights on the VAZ Lada Priora cause a lot of inconvenience to the owners of these domestic cars. The fact is that in the event of any breakdown (the headlight glass bursts, the light bulb burns out, the headlight reflector becomes dirty), you will need to replace the entire headlight, and not just the failed part - the Lada Priora has non-separable headlights.
If necessary, and if you feel like a real craftsman, the “non-separable” headlights of the Lada Priora can still be disassembled. The following is step-by-step instructions on how to remove the headlight of a Lada Priora and how to disassemble it. Although it will take a lot of time and effort, you can save a lot on repairs. There is almost nothing in minor car repairs that, with some experience, cannot be done at home.
The first thing you need to know on the topic of “Lada Priora headlights” is that they are mainly installed in two places in Kirzhach and German. Disassembling autosfet headlights is somewhat more complicated, but the process is approximately the same. Lada Priora fog lights and taillights of Lada Priora are not so expensive that you need to spend time opening and repairing them. It's easier to go out and buy new headlights. But still, almost any headlight can be opened using the method described below.
The front headlights themselves of the Lada Priora structurally consist of two parts - the body (with a light bulb and a reflector) and the headlight glass, which is attached to the body using a special sealant (glue). When disassembling the headlight, the most difficult stage is melting the glue and removing the glass cover from the headlight. A construction hair dryer is used to heat and melt the glued joint. Under the influence of high temperature, the sealant turns into a liquid state and can be separated.
To work you need:
- Phillips screwdriver and 10mm wrench;
- construction hair dryer;
- sandpaper, stationery knife;
- tape and cling film;
- new headlight parts.
Why film
The main reason is failure, failure to perform the direct functions of the device. There may be a lot of reasons for replacing the headlights on a Prior. Broken outer glass, loss of tightness, fogging of lenses from the inside, deterioration of the reflector itself, breakdown of fixing elements. Replacement, repair of old contacts, installation of a new type of light bulbs. To solve them, you will have to unscrew the entire module from the car body, which will make it more convenient to repair and modernize optical devices. The block is not completely dismountable: to separate the glass from the body, it is better to heat the joint with a hair dryer until the sealant softens. Next, remove the melted sealant as much as possible using improvised means. We try to separate the glass with a screwdriver, clean all the separated parts from the old glue with a knife and sandpaper. The glass is seated back onto the sealant.
Downloading a book
After successfully completing the payment (by any method) and returning to the KrutilVertel store from the payment system website, you will be taken to the successful payment page:
The book you purchased will be in your personal account, from where you can always download it.
Please note that after making the payment, you need to return back from the payment system website to the KrutilVertel website. If for some reason you did not return back to the site and closed the payment system tab with a message about the successful completion of the payment, please let us know - we will send you a letter indicating access to download the book
If for some reason you did not return back to the site and closed the payment system tab with a message about the successful completion of the payment, please let us know - we will send you a letter indicating access to download the book.
We learn to change headlights and adjust their light on a Priora without outside help
Optics on a car is one of the components of the safety of the driver and passengers; visibility on the road depends on its quality. Like any car part, the optics on a Lada Priora car sometimes require replacement. The article describes the reasons for replacing optics, how to properly replace and adjust the headlights on a Priora.
The main reason why optics are replaced is their failure and the inability to perform their functions: high-quality road lighting. In addition, the lamps in the lanterns are changed. Bosch lamps are in demand. Bosch brand xenon produces better quality light and has a longer service life.
Bosch xenon lamps
Optics should be changed for the following reasons:
- the headlight sweats, its ventilation is impaired;
- cracks, chips on glass;
- reflector malfunction;
- faults in electrical connectors;
- defects in fasteners;
- tuning
During the replacement process, you can not only restore the functionality of the flashlight, but also improve its performance characteristics by replacing halogens with xenon. Using xenon in lamps, the driver receives better lighting. At the same time, tuning of the headlights is also carried out: lens glass is installed, black headlights look impressive. LED lamps are installed in the parking lamps, as well as in fog lamps.
Front lights with lenses
To make your car tuned, you need to know how to remove the front and rear optics.
Replacing headlights from A to Z
The toolkit for the procedure for replacing headlights on a car consists of:
- socket wrench to “10”;
- Phillips screwdriver;
- flat screwdriver.
Replacing a headlight on a Priora begins with disconnecting the negative terminal of the battery (the author of the video is the channel In Sandro's Garage).
Before removing the headlight on a Priora, you need to remove the bumper. Then you need to remove the headlight covers from above. Next, pressing the latch, the block with wires is disconnected. When the headlights are removed, you can change the bulbs, for example, with Bosch xenon ones. The glass version of the optics can be replaced with a lens one.
The rear lights of Priora 2 are removed in the same way. The upholstery is dismantled and the wires are disconnected. Now you can remove the rear lights of Priora 2.
Tail lights on Priora
To disassemble and replace the headlight glass, you will need the following materials and tools:
- industrial dryer;
- thin screwdriver;
- new glass;
- new lamp;
- sealant.
Before disassembling the headlights on the Priora, you need to place them on a clean, dry surface. Then heat the glass until the sealant begins to melt. Next, the glass should be pryed off with a screwdriver and separated from the body. The next step is to remove the old sealant.
Before changing the light bulb and replacing the headlight glass, the seat must be lubricated with a fresh layer of sealant. Then the glass is carefully placed and pressed firmly. After 12 hours you can assemble the lantern.
Features of headlight adjustment
To adjust the optics, the machine must be placed on a flat horizontal surface.
It is advisable to place an assistant in the driver's seat or place a load weighing about 75 kg. The vehicle's tires should be well inflated and the tank at least half full to bring its weight closer to the weight at which it is driven daily.
The adjustment is carried out on a vertical wall or stand on which markings are applied. To correctly adjust the optics, it should be possible to move away from the wall at a distance of 5-10 meters. This makes it possible to create an imitation of lighting on the road.
Wall marking scheme
To apply markings, you need to place the car closer to the wall and turn on the low beam. Then you need to alternately mark the center of the trace from each headlight and the centers of their symmetry. By connecting these points, we get a horizontal line. Then, below, two more lines should be drawn in parallel. The second is at a distance of 5-12 cm, and the third is at a distance of 22 cm from the first. In addition, you need to draw vertical lines through the center points of the car and the lights.
After turning on the light, you need to ensure that the top point of the light is on the second line. The adjustment is made using an electric headlight adjuster. The adjusted light will illuminate the road well and will not blind oncoming drivers.
By learning how to remove, disassemble and adjust optics, you can save on maintenance at a car service center.
Video “Universal headlight adjustment”
This video demonstrates how to adjust the headlights on a car with your own hands (the author of the video is an inquisitive person).
avtozam.com
Selecting and purchasing an installation kit
Minimum installation kit:
- 2 servos;
- Control block;
- switch;
- wiring, connectors of gear motors, control unit.
Nowadays, it is very difficult to find a car that is not equipped with headlight range control from the factory. Therefore, you can assemble all the necessary elements from new or used parts. For many cars, there are unified installation kits on sale (for example, EMKF 11 for VAZ 2110, 2111, 2112).
For installation, you can select parts from another car. The only important parameter is the overhang of the servo rod. Each headlight model has a certain range of adjustment of the reflector angle, so a “non-original” servo drive with a large rod overhang can damage the headlight. In some cases, the extension of the rod can be adjusted by selecting resistors of a certain value, so everything depends on the design features of the control unit.
Unlike a manual corrector, not every car is equipped with a system for automatically adjusting the cut-off line of low beam headlights. By and large, systems are classified according to the type of body position sensor, which allows the autocorrector to automatically change the angle of the headlight unit.
Automatic headlight leveling
Main types of systems:
- using one tilt angle sensor. Similar sensors are used in smartphones to determine the position of the device in space. The sensor is installed on a horizontal surface at the rear of the car. The system is the easiest to install, so it is often included in kits for self-installation of xenon together with a headlight washer. Autocorrectors with an ultrasonic tilt angle sensor, which is installed on a hinged suspension in the rear part of the body, are the best solution among similar systems. If an electric corrector is already installed on your car, then you can implement automatic control by purchasing a kit consisting only of a control unit, a sensor, an adjustment device, the necessary connectors and wires (for example, automatic headlight corrector ALS-1);
- using several ride height sensors based on the Hall effect. The sensor consists of a moving part, in which a permanent magnet is built, and a stationary part - a Hall sensor. One part of the meter is installed on a stationary part of the body, the second is attached to the suspension elements. The change in body position is transmitted to the sensor through the rod. This is exactly the system that cars are equipped with at the factory. If an automatic headlight leveler is installed on your car model in expensive configurations, then most likely there will be ready-made holes in the body for mounting sensors, which greatly simplifies installing the system yourself. If desired, you can install a universal automatic corrector of this type on each car.
Electromechanical system instead of hydraulic corrector
Let's consider installing a standard electromechanical corrector instead of a hydraulic corrector using the example of a VAZ 2110.
- Disconnect the negative terminal of the battery. Remove the headlight hydraulic corrector. The removal procedure is described in detail in the article “Why the headlight range control does not work.”
- Instead of hydraulic corrector actuators, install gearmotors.
- Connect the connectors of the servo drives, lay the wiring along the places where the hydraulic corrector tubes run. The tubes enter the interior through a special seal. After cutting off the tubes, make a hole in it of sufficient diameter for the passage of the wiring harness.
- Instead of the main cylinder of the hydraulic corrector, install an electronic control unit for the electric headlight corrector. Connect the positive wire of the ECU to the pin on which “+” appears after turning on the low beam headlights (in the VAZ 2110 mounting block this is pin 20 of the Ш2 block). The negative terminal can be secured with a bolt terminal to one of the body studs under the instrument panel.
After installing the switch knob, the autocorrector is ready for testing.
Installation of non-standard systems
As an alternative to universal kits, many VAZ owners prefer to assemble an installation kit from parts from GAZ, complaining that in the event of a breakdown it is much easier to find spare parts. But the installation itself has a number of features.
For example, the VAZ 2110 headlight range control gear motor should have a rod reach of 34 mm and a stroke of 2 mm (for the VAZ 2111 the rod reach is 34 mm and stroke of 3.63 mm), whereas the stem reach of the original system based on BUK02-01 for GAZ cars are 38.8 mm, and the stroke is 7 mm. The system can be installed without modifications, but the corrector will only work in a few positions, and the adjustment steps will be too large to correctly adjust the headlights.
EPK 02 servo drives operate in tandem with the BUK02-01 control unit. As is the case with standard systems, power must be supplied to the control unit only after the low beam headlights are turned on.
Please note that control units designed for 3-wire servos are not suitable for controlling 5-wire actuators.
Do-it-yourself modification
For fitting you need:
- briefly apply 12 V to the power contacts of the servo drive so that the rod extends to the maximum position;
- cut off the tip of the rod at the indicated location to grind off the base of the rod;
- adjust the length of the rod to the reach required for your headlight, then glue the tip of the rod back (you can use dichloroethane or solder the two parts with a soldering iron);
- replace resistor R1 with a nominal value of 2.43 kOhm in the voltage divider (a resistor with a nominal value of 4.3 kOhm is suitable for installation on a VAZ 2110). The rod itself is hollow inside, and its extension and retraction is achieved by unscrewing or tightening the thread. Due to the reduction in length, when retracted, the rod will rest against the end of the screw, which can result in burnout of the gearmotor. By increasing the value of the resistor, we reduce the stroke of the rod to the value we need.
An alternative method for adjusting the reach is to select the desired resistor value for the maximum extended state. The value of the resistors is selected experimentally, but for many VAZ models you can easily find ready-made solutions on the Internet. In this case, it is not at all necessary to use SMD components.
Danger of fogging
If the headlights sweat from the inside, the danger for the driver and pedestrians is obvious: the illumination of the road is distorted. In addition to safety issues, the defect will not allow the driver to pass inspection. According to traffic regulations, any malfunctions in the lighting system are excluded. In addition, a sweating part will lead to the following problems:
- Corrosion of the internal parts of the block.
- A halogen lamp may burst if a drop of moisture falls on its heated surface.
- The electrical wiring contacts will short out if a large amount of condensate systematically accumulates in the part.
- The appearance of the car suffers: foggy optics are simply ugly.
Today there are enough ways to dry a headlight in the garage without removing it or with dismantling and complete self-diagnosis of the glass and housing. In 70 cases out of 100, simply re-gluing the structure is enough to restore the insulation. If the unit is damaged after a strong impact, it is better to replace the optics with a new one.
Also check out
- After disassembling the headlight, you need to clean the surface from sealant and other foreign components. To do this, use a utility knife and fine-grained sandpaper.
- Upon completion of the repair (replacement of headlight glass, light bulb, reflector), reassemble.
- Cover both parts of the headlight with sealant.
- Fix the position of the headlight so that the sealant polymerizes. You can wrap the headlight with cling film and tape to make gluing more effective. You can’t just wrap it with tape, as later there will be problems with removing it.
We learn to change headlights and adjust their light on a Priora without outside help
Optics on a car is one of the components of the safety of the driver and passengers; visibility on the road depends on its quality. Like any car part, the optics on a Lada Priora car sometimes require replacement. The article describes the reasons for replacing optics, how to properly replace and adjust the headlights on a Priora.
The main reason why optics are replaced is their failure and the inability to perform their functions: high-quality road lighting. In addition, the lamps in the lanterns are changed. Bosch lamps are in demand. Bosch brand xenon produces better quality light and has a longer service life.
Bosch xenon lamps
Optics should be changed for the following reasons:
- the headlight sweats, its ventilation is impaired;
- cracks, chips on glass;
- reflector malfunction;
- faults in electrical connectors;
- defects in fasteners;
- tuning
During the replacement process, you can not only restore the functionality of the flashlight, but also improve its performance characteristics by replacing halogens with xenon. Using xenon in lamps, the driver receives better lighting. At the same time, tuning of the headlights is also carried out: lens glass is installed, black headlights look impressive. LED lamps are installed in the parking lamps, as well as in fog lamps.
Front lights with lenses
To make your car tuned, you need to know how to remove the front and rear optics.
Replacing headlights from A to Z
The toolkit for the procedure for replacing headlights on a car consists of:
- socket wrench to “10”;
- Phillips screwdriver;
- flat screwdriver.
Replacing a headlight on a Priora begins with disconnecting the negative terminal of the battery (the author of the video is the channel In Sandro's Garage).
Before removing the headlight on a Priora, you need to remove the bumper. Then you need to remove the headlight covers from above. Next, pressing the latch, the block with wires is disconnected. When the headlights are removed, you can change the bulbs, for example, with Bosch xenon ones. The glass version of the optics can be replaced with a lens one.
The rear lights of Priora 2 are removed in the same way. The upholstery is dismantled and the wires are disconnected. Now you can remove the rear lights of Priora 2.
Tail lights on Priora
To disassemble and replace the headlight glass, you will need the following materials and tools:
- industrial dryer;
- thin screwdriver;
- new glass;
- new lamp;
- sealant.
Before disassembling the headlights on the Priora, you need to place them on a clean, dry surface. Then heat the glass until the sealant begins to melt. Next, the glass should be pryed off with a screwdriver and separated from the body. The next step is to remove the old sealant.
Before changing the light bulb and replacing the headlight glass, the seat must be lubricated with a fresh layer of sealant. Then the glass is carefully placed and pressed firmly. After 12 hours you can assemble the lantern.
Features of headlight adjustment
To adjust the optics, the machine must be placed on a flat horizontal surface.
It is advisable to place an assistant in the driver's seat or place a load weighing about 75 kg. The vehicle's tires should be well inflated and the tank at least half full to bring its weight closer to the weight at which it is driven daily.
The adjustment is carried out on a vertical wall or stand on which markings are applied. To correctly adjust the optics, it should be possible to move away from the wall at a distance of 5-10 meters. This makes it possible to create an imitation of lighting on the road.
Wall marking scheme
To apply markings, you need to place the car closer to the wall and turn on the low beam. Then you need to alternately mark the center of the trace from each headlight and the centers of their symmetry. By connecting these points, we get a horizontal line. Then, below, two more lines should be drawn in parallel. The second is at a distance of 5-12 cm, and the third is at a distance of 22 cm from the first. In addition, you need to draw vertical lines through the center points of the car and the lights.
After turning on the light, you need to ensure that the top point of the light is on the second line. The adjustment is made using an electric headlight adjuster. The adjusted light will illuminate the road well and will not blind oncoming drivers.
By learning how to remove, disassemble and adjust optics, you can save on maintenance at a car service center.