Many drivers are interested in the question of why antifreeze boils in a VAZ 2110. Antifreeze has become widespread and highly popular due to its excellent technical characteristics and low cost. It contains antifreeze, so it can be used both in summer and winter. Each coolant has its own color, which is created by the dyes added to it. The driver can determine the brand of coolant by color, even if there is no label.
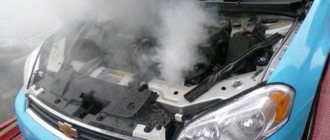
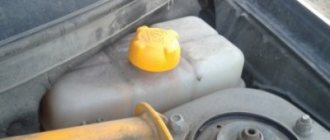
The expansion tank is made of fairly transparent plastic, so the colored liquid is clearly visible. You can instantly determine the amount of liquid in the tank. When the original color is lost, it means that the working life of the liquid is completely exhausted and it needs to be replaced. Sometimes you can see a car on the road with the hood raised and steam coming out from under it. The cause of the accident was boiling antifreeze. To understand why this happens, you need to study the cooling mechanism of the car more deeply.
When does antifreeze boil on a VAZ-2110?
As is known, the boiling point of distilled water strongly depends on pressure.
We are accustomed to the fact that the normal boiling point of water is 100 degrees. However, at atmospheric pressure below normal, for example, 530 mm. rt. Art., water will boil at a temperature of 90 degrees, and when heated to 70 degrees, water will boil under conditions of atmospheric pressure of 250 mm. rt. Art.. How does this relate to the VAZ-2110 engine and antifreeze?
One of the reasons for antifreeze boiling in the expansion tank is low pressure in the cooling system.
Directly. The fact is that the tens cooling system must be sealed and withstand a certain pressure . This pressure is pumped up by a water pump and controlled by a banal expansion tank cap. There are no other methods for controlling pressure in the system. We have smoothly approached the first reason for antifreeze boiling in the expansion tank - low pressure in the system.
Main reasons
Assuming that the cooling system is working properly, there may be several options:
- The pressure drop in the system led to antifreeze boiling at a real temperature of 90 degrees. Leaking of the system can be caused by fluid leakage or, most often, by failure of the expansion tank plug valve. The plug costs a penny and can be easily replaced, and fluid leakage is visible to the naked eye.
Antifreeze may boil due to the quality of the liquid.
- Antifreeze quality . Modern coolants boil at a temperature of +130–160 degrees. It is important to maintain the correct proportion of distilled water and concentrate when pouring.
Preparation of the concentrate
- Typically, the concentrate is diluted with distilled water in a 50/50 . In this case, the antifreeze will freeze at a temperature of -37 degrees and boil at a temperature of +105 degrees .
- A proportion of 65/35 will provide a low freezing point (-70) and a boiling point of +110 degrees.
- The maximum boiling point of the liquid will be reached at a proportion of 80/20 ; in this proportion, the liquid will freeze at -44 degrees and boil at +125–130 degrees.
Video on how to properly dilute antifreeze concentrate
Why does it boil at 90 degrees?
Therefore, if the temperature sensor is working properly, but boiling at 90 degrees continues, pay attention to the valve of the expansion tank plug and the proportion of the mixture of concentrate and water.
Maximum boiling point
The liquid begins to boil when it reaches a maximum temperature of 120 °C. It can begin to boil at a lower temperature; the main factors in this matter are:
- liquid composition;
- air entry.
However, the expression “antifreeze is boiling” always raises many different questions. Why does the liquid boil, because it was poured in to cool the engine? Of course, there should not be any boiling in the car. Each case requires specific proceedings.
When the radiator itself is found to be boiling, the cause may lie in the pump. It must ensure complete circulation of liquid. If there is no proper circulation, coolant stagnation occurs. It cannot cool quickly, and as a result, it begins to boil.
Previously, the pump was called a water pump. Often the liquid begins to boil in cars in which the pump axis rotates separately from the gas distribution mechanism. If the belt tension weakens, it begins to slip, the speed of rotation of the shaft decreases and the speed of fluid circulation in the system decreases, it overheats and boils.
To fix such a breakdown, the pump will need to be replaced. To carry out work, VAZ antifreeze is sometimes replaced. If the pump is not replaced, serious engine damage may occur. When antifreeze boils and the radiator remains cold, an air lock may have formed, interfering with normal fluid circulation.
This problem can be solved by purging the system, for which special equipment is used. Many drivers do this work themselves. The result is not always positive; other problems arise. Of course, it is better to entrust such work to professionals.
Pump malfunction
- If the pump malfunctions, the coolant stops circulating through the cooling system, therefore the liquid does not pass in a large circle and is not cooled.
If you own a VAZ 2110 or a similar domestically produced car, then you can write below in the comments about the problems that you have encountered, and perhaps this will help to more fully answer the question: “Why does the VAZ 2110 get hot?”
Similar articles:
- Replacing the windshield wiper motor and trapezoid
- The stove doesn't heat well
- Replacing the stove radiator
- Replacing coolant (antifreeze or antifreeze)
- Why does the car stall?
Why and why engine oil leaks from under the oil filter after replacing it
Incorrect installation of the filter element
The main reason for oil leakage from under the oil filter on a new engine is failure to comply with the torque limit requirements. The lubricant is pressed both when under-tightening and when over-tightening. In the first case, the rubber simply does not fulfill the task of sealing, since it is not clamped between the ends; in the second, its shape is deformed or the rubber product completely breaks.
Initially, they start from a less critical point of view: it is assumed that the filter element is not tightened enough. A component that is clamped to capacity will not rotate, but a component that is not tightened will make an extra 1/2-3/4 of a turn, which is sometimes quite enough. Among the icons on the side panel of the filter, another one is important; it requires you to lubricate its rubber ring with oil before installing the cleaning module. New or old - it doesn’t matter, the fact that the oil composition is located on the outer end of the seal is significant:
- The lubricant prevents the rubber product from cracking when tightened tightly.
- The viscous layer promotes a tight fit of the ring to the mating end on the cylinder block.
- A layer of emulsion between the rubber and metal prevents the ring from sticking to the engine body.
Low quality filter
Poor quality paper or a defective bypass valve in the purifier body creates noticeable resistance to the flow of oil, and it begins to look for alternative ways to exit the defective component
General advice is not to take into account products from little-known manufacturers that have an affordable price, and beware of counterfeits of well-known brands
Exceeding the recommended amount of lubricant in the engine crankcase
At a level above MAX, it is clear why oil leaks from under the engine oil filter. Due to the increase in pressure, even a small overflow of oil into the engine leads to squeezing it out through all kinds of oil seals. There is only one recommendation - to bleed off the excess volume as soon as possible.
Unsuitable oil
The optimal viscosity of the oil emulsion is calculated based on many factors, the main ones being the clearances in the cylinder-piston group and the ambient temperature. What the engineers calculated is displayed in the operating book in the form of a list of recommended viscosity characteristics of the composition.
Deviation in favor of unspecified viscous or liquid categories leads to leakage at the points where the sealing elements are attached. Choosing without taking into account the average winter temperature is also illiterate - in the cold the lubricant thickens and may not pass through the filter. In the event of a strong difference in summer and winter temperatures, it is useful to know how to heat the oil in the crankcase of a car engine.
Complying with the instructions is a surefire way to properly operate a car, but no one is safe from counterfeits. Fake lubricant can be squeezed out and the only way to identify the cause is to understand the differences between the canisters of the original and the “basement” product.
Reasons that can cause overheating
There may also be other reasons - one of which is from the category “you can’t invent it on purpose.” For example, the parking brake is not fully weakened, which leads to the car slowing down, increasing the load on the engine, and overheating. The handbrake cable may get stuck - there was such a case. The car slows down slightly, but this is enough in the heat.
And some people also blame the air conditioner on. By and large, this is rather a far-fetched reason. Of course, the air conditioner creates additional load on the engine, but this was taken into account during the development. If the engine is really bad - complete wear and tear - then this can happen. What to do - turn off the miracle of modern automobile manufacturing.
Perhaps we'll stop there. The only thing we'll talk about at the end is overheating in a traffic jam. No one is immune from this.
Signs, causes and consequences of car engine overheating
One of the most dangerous and common problems that entails serious consequences in the form of a major overhaul of the internal combustion engine or its replacement is engine overheating. This problem mainly occurs in the summer, but some faults can cause this problem in cooler periods. It is easier to avoid overheating of the car's heart than to later eliminate the serious consequences of even a single excess of operating temperature. To do this, you need to know the symptoms and ways to quickly eliminate such a problem.
What to do?
Some useful tips:
- any increase in temperature will indicate a decrease in the efficiency of the antifreeze supply devices - here it is important to be able to properly cool the installation;
- the simplest solution to lower the temperature is to turn on the cabin stove at full power;
- If a low level of anti-freeze is detected, it needs to be replenished - this is only allowed when the engine has cooled down.
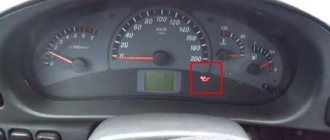
First of all, the engine’s ability to overheat is indicated by the temperature arrow on the instrument panel approaching or moving into the red zone.
Temperature gauge on the dashboard
If the refrigerant temperature rises, the owner needs to act quickly. First of all, you need to stop the car. Then turn on the heater to maximum, which will make it possible to remove some of the engine heat into the cabin. Next, let the engine idle for a few minutes, then turn it off.
However, such instructions are not always useful - especially if smoke is constantly pouring out from under the hood and the stove is blowing cold air. Here you will have to dismantle the thermoelement. You can drive like this, but you shouldn’t delay with qualified repairs. In the cold season, the absence of a part will not allow the engine to warm up to operating standards.
On the other hand, temperature fluctuations are also observed. It can change while idle in summer in traffic jams and when traveling at low speeds.
Normally, a fan should handle the increased heat. Therefore, the scale needle will first rise, and then, after turning on the cooler blades, it will automatically fall again.
Insufficient coolant level
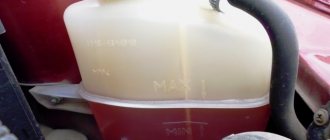
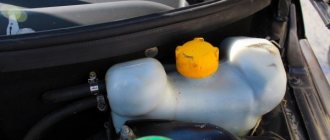
In the expansion tank of your car, the level of coolant should be almost equal to the half of the tank. If you look at the mark, it turns out to be the top mark on the tank body with the MAX mark. If there is no such mark, then most likely it will be located along the upper edge of the clamp.
If necessary, add antifreeze or antifreeze to the required level. It is worth noting another fact that in winter, if its level is insufficient, the stove may not work efficiently, that is, the air will not blow as hot as during normal operation of the heater.
What to do if coolant gets into the oil?
So, having determined the cause of the problem, you can begin repairs. The easiest option is to replace the head gasket. But this is only done if it burns out. To do this, the cylinder head is removed, the area is cleared of the old gasket, a new one is installed and the bolts are tightened to the appropriate torque. As practice shows, antifreeze no longer gets into the oil. In this case, repair costs will be minimal.
But the most difficult stage in the work is the removal and subsequent installation of the cylinder head. In this case, you will need a torque wrench. The bolts must be tightened in accordance with the diagram (usually crosswise). The tightening torque is individual for each vehicle.
It would be useful to troubleshoot the head. If there are imperfections on the surface, sanding will be required. But it is performed only on specialized equipment. You can’t do this without the help of a master. If the head is “worried” (for example, due to severe overheating), then grinding may not help. In such a situation, you only need to install a new head. The same goes for the block. If there are cracks on it, the block needs to be replaced.
Thermostat failure
If the thermostat valve is stuck in the closed position, the coolant will circulate in a small circle, thereby the engine will overheat very quickly. To solve this problem, you need to replace the thermostat with a new one.
If suddenly this problem turns out to be on the way, and you need to travel quite a distance to the repair site, then you can try knocking on the thermostat housing, perhaps this will lead to its normal, albeit temporary, functioning.
Car oil in antifreeze
The opposite also happens. When motorists see traces of grease on the walls of the expansion tank, they ask themselves the question: “Why is there oil in the antifreeze?” The car oil from the lubricating complex somehow ends up in the cooling system, but everything is fine with the oil liquid. Its volume, shade, viscosity do not change.
Experienced drivers in such situations say: “The end of the cylinder block.” Usually these words are true. Through a crack in the block, part of the lubricant enters the cooling complex and curls up there. An emulsion is formed. It is almost impossible to replace the cylinder block on your own. You must contact a specialized service center.
Common Causes
As you know, the VAZ 2110 is equipped with two types of engines - with 8 and 16 valves. There are several main, most common reasons that cause this overheating of power units.
Let's look at each of the reasons and ways to resolve these problems separately.
Tens engine
Low coolant level
Coolant plays a huge role in the operation of the cooling system. A special substance, namely antifreeze or antifreeze, is poured into the expansion tank.
Related material:
In a normal situation, the level of the coolant solution should be at the level of, or rather the MAX marks on the tank body. This indicates that the container is approximately 50-60 percent full.
If there is no such mark on the tank, refer to the clamp. The liquid should reach its upper edge.
- If the engine overheats, try simply adding the missing amount of coolant so that it is at the optimal filling level.
- If you have not changed the coolant for a long time, it is better not to add new coolant, but simply replace it completely with new coolant.
- When choosing between antifreeze and antifreeze, most VAZ 2110 owners prefer the first. And mainly due to the financial availability of antifreeze. But in practice, antifreeze is better . One of its most important advantages is that the substance does not freeze in severe frosts. For individual regions of our country, this is a key factor in the choice of coolant.
Another reason for engine overheating is a stuck thermostat valve. If it remains in the closed position and does not open, the coolant will move only along a small circuit. As a result, this will lead to strong heating of the power plant. Overheating itself threatens with very, very serious consequences.
Such a malfunction can manifest itself at the most inopportune moment - on the road. You are unlikely to be able to carry out high-quality repairs on the side of the road. But you can try one method - knock on the thermostat housing. Often this allows you to return the device to its functionality for a while. This way you can get to your own garage or the nearest service station. There the thermostat has already been replaced with a new one. There is no point in repairing it. If he failed once, the situation will certainly repeat itself soon.
Related material:
Thermostat in the engine
temperature sensor
A temperature sensor is necessary in order to respond to changes in engine heating. When a preset point is reached, the sensor is triggered and turns on the cooling fan.
If this device malfunctions, the power unit overheats because the fan does not activate. Consequently, the temperature does not fall below critical levels, but continues to gradually rise.
Related material:
If you encounter such a problem on the road (most often the engine overheats while stuck in traffic jams, since the engine is running but there is no flow of cooling oncoming air), try to get out of the jam as quickly as possible and find a free section of the road.
Accelerate during the free stretch and then begin engine braking. This will lower the temperature and prevent overheating. Under no circumstances should you regularly operate your car this way. But this is a great way to get to a garage or auto repair shop, determine the cause of the sensor failure, and then replace it.
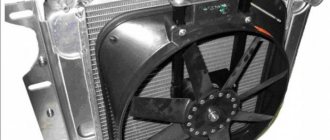
Cooling Fan
The symptoms of fan malfunctions are similar to a non-working temperature sensor. That is, the engine will heat up, the indicator on the dashboard will be in the red zone.
Related material:
Again, while on the road, we recommend using the engine braking method. Next, head to the garage. Let the car cool down. In the meantime, go to the store for a new fan. This device for the VAZ 2110 costs about 600 rubles.
Fan problems
Other reasons
There are other equally popular reasons for engine overheating. Therefore, we invite you to familiarize yourself with all of them in our table.
Cause of overheating
Remedy
Coolant level too low
Add coolant to the required level, following the marks or clamp on the expansion tank
The radiator is clogged or blocked
Flush the radiator. If this does not help, the unit must be replaced
The cooling system pump has failed (the impeller slips on its internal shaft)
It's best to replace the pump
The oil level in the lubrication system is critical
Replacement procedure
So, we got to the most important thing - replacing the antifreeze in your VAZ 2110. The process consists of several successive stages.
- Put on protective equipment - glasses for your eyes, gloves for your hands. When the engine is boiling, never touch the reservoir cap with your hands.
- Place the car on a level surface. Although if you raise the front of the car a little, this will allow you to drain more coolant.
- Remove the negative cable from the battery.
- Remove the bracket and ignition module. This will allow you to get to the cylinder block.
- Place a container under the drain plug to catch the old coolant.
- Remove the plug located on the expansion tank. This will create pressure in the system, which will allow the liquid to drain faster. Let the antifreeze drain until the liquid flow stops on its own.
- Next, place the container under the radiator, unscrew the cap and allow the liquid to drain from there. Be patient if coolant flows out slowly. The more you drain it, the better for your car.
- When the flow stops, check the condition of the pipes, plugs, and fasteners. If there are defects, damage or cracks, be sure to replace the elements.
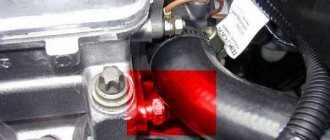
- To prevent an air lock from forming on the injection engine, be sure to remove the hose where it connects to the fitting for heating the throttle pipe. If the engine is carburetor, a similar connection is dismantled, only this time the carburetor is heated.
- Try to measure the volume of drained antifreeze. It is the same amount of new coolant that should be poured into the system. One way or another, the CO must be completely filled with coolant. In this case, antifreeze.
- After completing the replacement procedure, close the expansion tank cap as tightly as possible. Reinstall all the hoses, install the ignition module in its mounting socket, and connect the wire to the battery.
- Only after this can the engine be started. Let it warm up a bit. During this time, the liquid level may drop. This indicates that an air plug has formed in the system, which was pushed through. Of course, leakage can also occur if you have not secured the hoses and clamps well. It's okay if the coolant level drops a little if there are no leaks. Just add the missing amount, bringing the volume of antifreeze in the tank to the optimal level.
Successful replacement of antifreeze depends on just a few factors:
- Use of high-quality coolant;
- Accurate and consistent work;
- Check all connections for integrity and absence of leaks.
As you can see, replacing the coolant in the coolant system of a VAZ 2110 car is not a complicated procedure. To do this, it is not at all necessary to resort to the help of professionals.
How to change the gasket?
Let's consider the replacement procedure using the example of a VAZ-2109 car. To do this we need:
- Remove the air filter housing.
- Disconnect all fuel supply hoses and power wires.
- Drain the coolant.
- Unscrew the manifold.
- Disconnect high-voltage wires.
In this way, we free the head from everything unnecessary, so that nothing gets in the way when removing. To unscrew the head itself you need a powerful wrench and a hexagon. A total of ten bolts need to be unscrewed. The latter are removed along with the washers. Next, the head gently rises up
It is important not to distort it. The gasket itself may remain on the head or stick to the block
You can remove it with your own hands or pry it off with a negative screwdriver. The surface of the cylinder head is inspected for corrosion. If there is rust, it will need to be milled and sanded. If all is well, you need to remove traces of the old gasket. Having cleared the surface of its residues, degrease the area.