A classic of the genre, VAZ 2106 '97. This is the second time the timing chain has been replaced on this car in a month, since the first time the client brought an “original VAZ” chain produced in a nearby basement. A month later it stretched and hello again. But we have all been praising the quality of our spare parts for a long time, so we had to consult with experts in the car market and choose the chain that received the least number of complaints. Operation will show!
In addition to the timing chain, we will change the air filter, the alternator belt, the tensioner shoe, the damper and all the sprockets, so the song goes away.
The client went on foot to get the tensioner, damper and alternator belt, since he did not immediately take care of the purchase.
Design of the VAZ 2106, 2107 chain drive
To drive the VAZ 2106/2107 with a carburetor, a double-row roller chain is used. It transmits force from a sprocket mounted on the crankshaft to another sprocket mounted on the end of the camshaft. The chain is a structure that develops large inertia, so a chain drive requires vibration damping. Even if the chain is well tensioned, it retains the property of “playing” in those places where there are no sprockets or tensioners.
The chain has virtually zero ability to stretch and compress, and fairly limited flexibility. Therefore, in order to provide it with constant tension while working in its place at any speed, it has to be literally shackled, using a system of tensioners and dampers.
This problem on the VAZ 2106/2107 is solved by a damper - an additional spring-loaded clamping bar. It has a steel frame covered with a layer of durable rubber. Tensioners and dampers dampen vibration and noise quite effectively . The chain is prevented from falling off by a stop pin that is screwed into the block or cylinder head. During normal operation the chain does not touch it.
Main elements of the timing chain tensioning system
The timing chain in the engine is supported not only by the three sprockets mentioned above. It is supported by several other important devices.
Let's look at them in more detail.
Timing chain stop pin
The timing chain in the VAZ 2107 engine is supported by a complex tensioning system. One of the elements of this system is the limiting finger. This is a small cylindrical part screwed into the wall of the cylinder block. The pin is located next to the crankshaft sprocket. The purpose of the pin is as follows: if the timing chain tension suddenly weakens, the pin will prevent the chain from jumping off the crankshaft sprocket.
At the same time, the chain will begin to touch the limiter with a characteristic ringing sound, which will certainly attract the driver’s attention, since this sound will be heard even in the cabin. If the chain breaks, the limiter will not allow it to completely fly off the sprocket and break the nearby oil pump and timing shaft sprockets. If the timing chain is tensioned normally, it does not touch the limiting pin, since in this case there is a constant gap of about 1.5 cm between it and the pin.
About timing chain tensioners
The purpose of the timing chain tensioner is easy to guess from its name. He must constantly tension the chain, preventing it from sagging. If the chain sags by even half a centimeter, it may fly off one of the sprockets (although this happens quite rarely, much more often there are situations when the chain remains on the sprocket, but at the same time jumps several teeth forward, as a result of which the uniformity of its tension is completely disrupted , and the sagging increases even more). At different times, different types of tensioners were installed on the VAZ 2107.
Mechanical tensioners
In a mechanical tensioner, the force required for the tension shoe to press on the chain is created by a conventional spring. It presses on the rod, it moves out of the body and presses on the shoe. And the shoe, in turn, puts pressure on the chain, constantly dampening its vibrations.
The spring in such a tensioner is adjusted with a conventional plunger nut. If the driver needs to tighten the chain a little, he simply tightens the nut slightly, eliminating any slack.
Automatic tensioners
Automatic tensioners were installed on later models of the VAZ 2107. Unlike mechanical devices, the design of this tensioner includes a toothed bar with a ratchet.
The plunger spring presses on this bar, and the bar transmits this force to the shoe. The ratchet prevents the bar from returning to its original position. This keeps the timing chain tension constant.
Hydraulic tensioners
These tensioners were installed in the latest VAZ 2107 models. The main difference between these devices is the principle of their operation. The force in the hydraulic tensioner is created not by a spring, but by oil pressure. It is supplied to the tensioner through a reinforced high-pressure hose.
Timing chain tensioner
The timing chain tensioner is another indispensable element of the tension system, without which uniform operation of the timing chain is impossible. The damper is a metal plate that is attached to the wall of the cylinder block.
This plate is located opposite the tensioner, that is, the damper acts on the second half of the chain. Since the tensioner presses the chain very sharply, the opposite side of the chain inevitably begins to vibrate. To dampen this vibration, a damper is needed. The chain, touching the damper plate, loses some of its energy and the amplitude of its oscillations decreases significantly. Without the restraining effect of the guide, the chain will stretch much faster.
Reasons for replacing the timing chain drive on a VAZ 2106, 2107
The performance and durability of the timing chain drive depends on the material and quality of heat treatment of the chain and sprockets themselves. Manufacturing accuracy and cleanliness of working surfaces are of great importance. A broken circuit is a rare occurrence. The deterioration of its condition can be monitored by increased noise when the engine is running.
For engines 2101 and 21011, where the block is lower, the number of chain links is 114, and for 2103/2106 the number of links is 116.
A method on how to replace the timing chain on a VAZ 2106 may be required when its critical wear has occurred, its resource has been exhausted, and tightening it with all sorts of “cunning” methods no longer gives results. These methods include:
- increasing the length of the working part of the tensioner by pressing on a piece of tube of a suitable diameter;
- “addition” of an additional bracket to the shoe and other “bullying” of the engine.
An extended timing chain no longer ensures accurate valve timing, which negatively affects engine performance. In addition, she wears out the shoe and constantly “beats the head off” the pacifier. In addition, engine noise increases, fuel consumption increases and engine starting becomes worse. It is also worth saying that the chain sometimes breaks with all that it entails.
To remove the timing chain, you do not need to remove the crankshaft sprocket!
For work we will need: keys “10”, “13”, “17”, a special wrench for the crankshaft pulley nut (or a head “36”), a screwdriver, a mounting blade, a hammer, and a bit.
After removing the sprocket, do not turn the drive shaft, because this may disrupt the initial ignition setting!
When to change the timing chain
The chain drive on VAZ family engines has a longer service life. The life of the chain ranges from 100 to 200 thousand kilometers .
If high-quality materials were used in the manufacture of components, and proper tension and abundant lubrication of the drive were ensured during operation, then the chain will last no less than the engine itself.
The optimal frequency for changing is every 200 thousand km.
External signs of malfunction
When wear is critical, the chain begins to rattle; the noise does not disappear as the power unit warms up. With further lengthening of the chain, the beating of the branches increases, which leads to an increase in acoustic noise. Since the design does not have a hydraulic tensioner, attempts to compensate for chain wear by rotating the adjustment bolt do not lead to restoration of functionality. Further operation of the vehicle with a stretched chain is not recommended due to the risk of irreversible damage to the cylinder-piston group.
Which timing chain and tensioner should I install on the VAZ 2106, VAZ 2107?
timing chain number is 2103-1006040, the average price is 380 rubles.
Analogues:
- Fenox PC2103C3 — 519 rub.
- Kraft KT 017736 — 620 rub.
The original number of the timing chain tensioner is 2101-1006060, the average price is 364 rubles.
Analogues:
- TSN 671 — 254 rub.
- Riginal RG2101-1006060 — 230 rub.
- Trialli MT 151 — 407 rub.
Prices are current for 2022, although the cost has not changed much in three years.
About replacing a single-row chain with a double-row one
In early VAZ 2107 models, predominantly double-row timing chains were installed. This technical solution had its advantages:
The main disadvantage of the double-row chain was its heavy weight. It is for this reason that in later VAZ 2107 models they decided to abandon it. However, drivers concerned about engine safety and reliability can always return the double-row chain back. To do this, you will need to replace not only the chain itself, but also the entire tensioning mechanism, from the sprockets to the damper and tension shoe. The shoe, as you might guess, should be wider, i.e., designed for two rows of links. The shaft sprockets must also be double-rowed.
Previously, all these parts could be purchased in a single set. Nowadays, such kits are becoming increasingly rare, so drivers have to buy everything separately. Products are in great demand. This manufacturer produces not only chains, but also double-row sprockets.
The sequence of installing a double-row chain on a VAZ 2107 is no different from the above. There is only one peculiarity: instead of single-row sprockets, double-row sprockets are installed. The same goes for the tension shoe. The procedure for installing a double-row chain using marks is no different from that described above.
So, the timing chain is the most important part of the engine. The consequences of failure of this part can be catastrophic. In especially severe cases, a seized engine cannot be restored at all. It is for this reason that the car owner must carefully monitor the condition of the circuit and change it at the slightest suspicion of a malfunction. Even a novice car owner can replace the chain. Despite the apparent complexity of this procedure, there is nothing terrible about it. The main thing is to correctly install the chain according to the marks, and no problems with its further operation will arise.
Source
Replacing the VAZ 2106 timing chain without disassembling
Replacing the timing chain without disassembling
There is a simple way to replace the timing chain of a VAZ 2106 without removing the front cover. To do this, you only need to remove the valve covers and prepare a new chain.
The principle of how to change the timing chain on a VAZ 2106 is as follows: you need to disconnect one link of the old chain, as well as one link of the new one. After this, the edges of the old and new chains must be connected by making a corresponding mark at the junction with chalk or a corrector. Then you need to take the second end of the old chain and pull it out of the mechanism, while the new chain will gradually be put on the sprockets.
When the old chain comes out completely, it must be disconnected from the new one, and carefully rivet the links of the replaced chain.
How to change the timing chain on a VAZ 2107 with an injector
Replacing the timing chain on a VAZ 2107 injector is carried out according to the same principle as on a Zhiguli 2106. Moreover, you can install a new element either in the standard way by removing the front cover, or in a simpler way.
Checking the timing chain quality
Before changing the timing chain on a VAZ-2107, you should decide on the manufacturer and quality of the chain.
The reliability of a new product can be roughly checked by taking the chain by one end and lifting it horizontally. Holding the chain edge up, its second end will bend down slightly - the smoother this bend is, the stronger and more reliable the product!
Prepare the necessary keys and be sure to put proofreader or chalk somewhere nearby.
About assembling the timing belt and installing the chain according to the marks
As mentioned above, the timing system has a marking system that allows you to correctly install the guide sprockets and timing chain after replacement.
- If the timing chain was changed on a carburetor “seven”, then the oil pump sprocket, which was loosened above, is tightened first. In this case, the mark on the sprocket is aligned with the protrusion on the body (and if the “seven” is injection, this point does not play a big role).
- The chain guide and tension shoe are returned to their place.
- Now the crankshaft sprocket is put in place. It also has a recessed mark, which also needs to be aligned with the protrusion on the timing case, and only after that tighten the fastening nut on the sprocket and install the cotter pin in place.
- After aligning the crankshaft sprocket according to the marks, a new timing chain is put on it.
- Now all that remains is to install the camshaft sprocket in place. The asterisk does not tighten. The timing chain is put on it. In this case, the sprocket must be turned so that the mark on it coincides with the mark on the cylinder block. If there is no match, the chain should be removed from the teeth and the sprocket should be turned in the desired direction until the marks completely coincide.
Before tightening the sprocket on the camshaft, the marks must be carefully aligned - When the risks coincide, it is necessary to check the coincidence of the marks on the remaining sprockets. If there is no discrepancy between the marks, you can tighten the camshaft sprocket and install a cotter pin on it.
- Now all that remains is to return the timing cover to its place, and then replace the previously removed radiator.
More about the design and replacement of the timing chain damper: https://bumper.guru/klassicheskie-modeli-vaz/grm/grm-2107/uspokoitel-tsepi-vaz-2107.html
Video: how to install the timing chain according to the marks on a “classic”
Description of the chain drive on the carburetor
VAZ cars with rear-wheel drive use gasoline engines with a similar gas distribution mechanism. The camshaft is installed in the block head; a 2-row fine-link chain is used to transmit torque from the crankshaft. The drive design uses a damper that reduces chain vibrations at high speeds. The chain tensioner boot on a VAZ {moves} using a bolt (the factory advises tightening the drive after any 15 thousand kilometers).
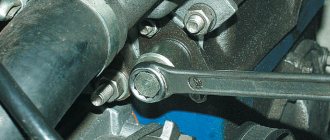
Tightening the chain on VAZ 2107 cars is quite simple. To do this, you need to loosen the collet clamp of the tensioner with a key set to “13”. Then we turn the crankshaft two to three turns and tighten the clamp again.
The chain drive rotates the oil pump sprocket and the ignition distributor. During use, parts of the chain are pulled out and the teeth of the sprockets naturally wear out, which leads to sagging of the chain. When lengthening, the chain jumps over the sprockets by 1 or 2 teeth, which disrupts the valve timing. Since there are no recesses on the pistons (not counting the small-scale 1.2-liter VAZ 2105 engine with a timing belt drive), the bottom collides with the valves, which causes destruction of parts.
Cost of work and parts
The cost of replacing a chain at a service center is around 700 rubles, and the price of complex replacement of a chain, sprockets, tensioner and chain guide is about 1,800 rubles.
The cost of a chain is from 350 to 600 rubles, a set of sprockets (crankshaft sprocket, camshaft and oil pump) is about 400 rubles, a classic tensioner shoe (with a rubber lining) is about 100 rubles, a modernized one with a sprocket on a bearing is about 1,400 rubles, a chain guide is about 80 rubles.
When buying a chain, carefully inspect its rivets ; they should all be well flattened so that not a single pin pops out and the chain does not come apart.
It is recommended to buy a new chain tensioner with a sprocket on a bearing, even despite its high cost. It increases the life of the chain and the noise level with it is much lower than with a classic “shoe”.
In addition, while the engine is running, the rubber pad on the shoe wears off, and all the chips fly into the oil, for this reason the chain needs to be tightened more often. A tensioner with a bearing does not have these problems, and its service life is much longer.
Possible faults
In the family of cars of the Volzhsky Automobile Plant, which are called “classics”, the timing drive is made in a chain version. The service life of a good double-row chain is longer than any belt, and the chain is better protected from any external influences while being inside the engine block. Instant stretching of the chain is excluded; moreover, the chain, unlike the belt, will not slip when the engine is suddenly revved up. The downside: noise and some cumbersomeness are not so noticeable when operating the VAZ-2107.
With my own hands: I changed the sprockets and timing chain after 220 thousand km
Hi all! As you understand, the car has already covered 200 thousand km, so I decided to do a mini-overhaul, independently replacing almost 100% of the timing mechanism. I decided not to touch the rocker with the camshaft for now and work on the chain with sprockets that have been there since the factory. Various sources write that the life of the chain is somewhere around 100-150 thousand, although even at 220 thousand it was tensioned perfectly with the tensioner, and I didn’t notice much noise, maybe due to timely maintenance and good oil. But, during diagnostics at the service center, the technician said that the valve timing angles had already improved a little, so it was better to change it. I decided to play it safe and change together with the stars, as is done by the brain.
I bought a set of sprockets, a chain, the latest guide and boot, a front cover gasket, a front crankshaft oil seal, nuts, sealant, etc. from a trusted store.
First, let's provide access to the front cover - remove the cooling fan, radiator, drain the antifreeze from it, and decorative mesh.
Then the engine protection and mudguard to provide access to the three cover mounting bolts from below. We will change the mudguard because it was rotten through and through and the generator was flooding in the puddles.
Now we are unscrewing the crankshaft pulley nut (ratchet), we need a 36 wrench, or better yet a head, but we couldn’t find one, and the usual stamped wrench was bent and did not want to unscrew the nut.
I also had to weld pipes from it for a 40 key, of sufficient length to rest against the right side member.
It was not possible to unscrew it manually; I had to tear it off with the starter, resting it on the spar.
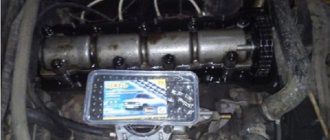
Next, remove the PCV sensor, alternator belt, valve cover and set the timing marks on the crankshaft pulley and camshaft sprocket at TDC of the 4th cylinder. Surprisingly, they completely coincided.
Then we remove the crankshaft pulley and the front cover, dismantle the boot, damper, limiter and gears with the chain. Let's make sure the marks don't get lost.
When comparing the old and new parts on the stars, I didn’t see any special workmanship, not counting the polishing on the sides.
The chain on the outside is also intact. The boot and damper have the least wear, because they were replaced relatively recently.
But, the ancient chain turned out to be 4-5 mm longer than the newest one, which, according to the same data from the Internet, is already above the tolerance of 4 mm and requires its replacement.
Before installing the new parts on the new camshaft sprocket and crankshaft pulley, I made additional marks at 90 and 180 degrees with a center punch for convenience when adjusting the valves the next time.
We put them in reverse order according to the marks and keys: first the boot with the damper, then the top sprocket with the chain, then the small sprocket and the middle one, check the marks again and tighten the chain.
We carefully double-check everything and lock the retaining rings.
During assembly, due to inattention, I placed the small crankshaft gear with the “skirt” outward instead of inward, because of which, when tightening the ratchet nut, the crankshaft was blocked - I had to remove the cover again and rearrange it.
The marks coincided exactly again, as if nothing had changed, hmm..
Seal the front cover seal and gasket with sealant.
Also, instead of the usual nuts with engravers, the front cover was tightened with nuts with a nylon ring, in other words, they have the property of being unscrewed and leaking oil).
Well, at the end I installed a new engine mudguard.
- Set of stars – 680r
- Chain – 630r
- Calmizer – 70 rub.
- Boot – 90 rub.
- Oil seal – 110 rub.
- Nuts, washers, gasket – 200 RUR
- Engine splash guard – 400 RUR
- Ratchet key – 150 RUR
Everything took a couple of days, although it could have been done in one. After the replacement, I did not see any significant changes in the operation of the motor. After a couple of thousand, after grinding in the parts, you will need to tighten the chain again. But later you can sleep relaxed after another couple of hundred thousand mileage).
DIY chain replacement
To replace the chain and gears from the car, you will need to drain the coolant and remove the radiator. Loosen the generator and remove the drive belt.
Remove the valve cover and align the marks on the crankshaft and camshaft with the marks on the engine, to do this, align the mark on the crankshaft pulley with the largest mark on the front timing cover.
Having engaged fifth gear and the parking brake, use a 38 key to break off the ratchet (fastening bolt) of the crankshaft pulley.
Remove the crankshaft position sensor (for injection engines) and the front engine cover.
ATTENTION! In addition to the 9 bolts at the top of the cover, there are 3 more that are screwed in from the side of the pallet.
If the car has a carburetor, then the oil pump gear drives the ignition distributor (distributor), and to make work easier, it is recommended to put a mark on the block and on the gear so as not to additionally adjust the ignition.
After removing the cover, bend the locking pins on the oil pump gear (if it needs to be removed) and loosen the locking nuts.
Remove the camshaft gear cotter pin and loosen the nut.
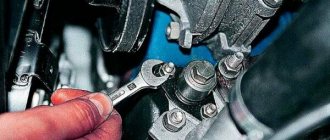
Unscrew the chain tensioner nuts and remove it.
After removing the tensioner, the chain will weaken and it will be possible to easily remove the gears, and behind them the entire chain.
Check the condition of the crankshaft gear, tensioner shoe and chain guide, replace if necessary.
Reassemble everything in reverse order, but with some special features:
- if the oil pump gear is changed on a carburetor engine, put a mark on the new one in the same way as on the old one;
- First, the damper and chain tensioner shoe are installed;
- next is the crankshaft gear, onto which a new chain is thrown;
- the chain is passed from top to bottom, after which it is wound onto the crankshaft gear;
- then the oil pump gear is inserted into the chain and seated on the shaft (for a carburetor engine according to preset marks);
- last of all, the camshaft gear is inserted into the chain and installed on the camshaft;
- when installing the camshaft gear, the marks on the crankshaft and camshaft gears must coincide with the marks on the block and the canister; if this does not happen, you need to rearrange the chain by teeth until they match; A slight deviation is allowed, because on new gears during manufacturing, the marks are not always accurately marked;
- after aligning the marks, install the chain tensioner, first pushing it all the way and fixing it in this position by unscrewing and tightening its lock;
- After installing the chain tensioner, tighten it by releasing the tensioner lock and turning the crankshaft 2 turns, then tighten the lock;
- after the chain is tensioned, use a torque wrench to tighten the camshaft and oil pump gear bolts with a force of 4-5 kgf∙m and bend the tongues of the cotter pins;
- install the front cover with a new gasket and, if necessary, replace the front crankshaft oil seal, install the pulley and tighten its bolt (ratchet) with a force of 10-12 kgf∙m.
Everything else is assembled in reverse order.
As a result of replacing the chain, the phases of the gas distribution mechanism return to their limits, engine operation is stabilized and extraneous noise disappears from its front part.
If tensioning the chain does not help, and the noise continues to bother you, do not delay replacing it, because... when beating, it will break adjacent parts and disrupt engine operation.
What is timing belt?
The timing belt is the gas distribution mechanism of the engine, which controls the launch of fuel mixed with air into it and the release of burnt gases. It is based on a mechanism for opening and closing the intake and exhaust valves of cylinders driven by a cam mechanism and a camshaft. That is, the fuel-air mixture ends up in the cylinders thanks to the open intake valves, and, having burned, is removed in the form of gases through the exhaust valves. The camshafts are responsible for the actions of these valves.
To enable them to rotate, a special drive was created, operating using a chain or belt.
Timing belt - timing chain;
Valves – intake valves;
Camshafts - camshafts.
Timing shaft diagnostics
In the removed state, you can easily assess what defects are on the shaft. Visually, you can detect damage such as scuffs and scratches, as well as wear on the cut on the cams and coating of the aluminum word on the necks.
Even if minor traces of deformation were noticed, the camshaft on the VAZ 2107 must be replaced.
We present a table that shows the permissible values of the dimensions of the shaft journals for its further use.
| Part number (report starts at the front) | Threshold of permissible size values, mm | |
| Minimum | Maximum | |
| Shakey | ||
| 1 | 45,91 | 45,93 |
| 2 | 45,61 | 45,63 |
| 3 | 45,31 | 45,33 |
| 4 | 45,01 | 45,03 |
| 5 | 43,41 | 43,43 |
| Supports | ||
| 1 | 46,00 | 46,02 |
| 2 | 45,70 | 45,72 |
| 3 | 45,40 | 45,42 |
| 4 | 45,10 | 45,12 |
| 5 | 43,50 | 43,52 |
If these values are not met, it is important to replace the “bed” or timing shaft
DIY chain replacement
To replace the chain and gears from the car, you will need to drain the coolant and remove the radiator. Loosen the generator and remove the drive belt.
Remove the valve cover and align the marks on the crankshaft and camshaft with the marks on the engine, to do this, align the mark on the crankshaft pulley with the largest mark on the front timing cover.
Having engaged fifth gear and the parking brake, use a 38 key to break off the ratchet (fastening bolt) of the crankshaft pulley.
Remove the crankshaft position sensor (for injection engines) and the front engine cover.
ATTENTION! In addition to the 9 bolts at the top of the cover, there are 3 more that are screwed in from the side of the pallet.
If the car has a carburetor, then the oil pump gear drives the ignition distributor (distributor), and to make work easier, it is recommended to put a mark on the block and on the gear so as not to additionally adjust the ignition.
After removing the cover, bend the locking pins on the oil pump gear (if it needs to be removed) and loosen the locking nuts.
Remove the camshaft gear cotter pin and loosen the nut.
Unscrew the chain tensioner nuts and remove it.
After removing the tensioner, the chain will weaken and it will be possible to easily remove the gears, and behind them the entire chain.
Check the condition of the crankshaft gear, tensioner shoe and chain guide, replace if necessary.
Reassemble everything in reverse order, but with some special features:
- if the oil pump gear is changed on a carburetor engine, put a mark on the new one in the same way as on the old one;
- First, the damper and chain tensioner shoe are installed;
- next is the crankshaft gear, onto which a new chain is thrown;
- the chain is passed from top to bottom, after which it is wound onto the crankshaft gear;
- then the oil pump gear is inserted into the chain and seated on the shaft (for a carburetor engine according to preset marks);
- last of all, the camshaft gear is inserted into the chain and installed on the camshaft;
- when installing the camshaft gear, the marks on the crankshaft and camshaft gears must coincide with the marks on the block and the canister; if this does not happen, you need to rearrange the chain by teeth until they match; A slight deviation is allowed, because on new gears during manufacturing, the marks are not always accurately marked;
- after aligning the marks, install the chain tensioner, first pushing it all the way and fixing it in this position by unscrewing and tightening its lock;
- After installing the chain tensioner, tighten it by releasing the tensioner lock and turning the crankshaft 2 turns, then tighten the lock;
- after the chain is tensioned, use a torque wrench to tighten the camshaft and oil pump gear bolts with a force of 4-5 kgf∙m and bend the tongues of the cotter pins;
- install the front cover with a new gasket and, if necessary, replace the front crankshaft oil seal, install the pulley and tighten its bolt (ratchet) with a force of 10-12 kgf∙m.
Everything else is assembled in reverse order.
As a result of replacing the chain, the phases of the gas distribution mechanism return to their limits, engine operation is stabilized and extraneous noise disappears from its front part.
If tensioning the chain does not help, and the noise continues to bother you, do not delay replacing it, because... when beating, it will break adjacent parts and disrupt engine operation.
Replacing the camshaft oil seal VAZ 2101-2107
Replacing the camshaft oil seal on a VAZ 2101-2107 is required in two cases - when the camshaft is removed and installed, or the oil seal wears out and begins to leak oil.
The fact that the oil seal is starting to poison can be determined by increased oil consumption (although there may be other reasons) and visually, by oil drips coming from the oil seal. Before you start replacing the oil seal, it is a good idea to stock up on a cylinder head gasket - it is not always preserved when the cover is removed.
In order to replace the camshaft oil seal on a VAZ 2101-2107, it is necessary to remove the pulley and, accordingly, the timing chain. To do this, you first need to remove the alternator belt. The generator is attached to the adjustment bar with a nut that needs to be loosened.
After this, move the generator and remove the belt from it. Now the belt will not interfere with the removal of the timing chain. In order to get to the camshaft pulley, you need to remove the cylinder head cover.
First of all, you need to disconnect the exhaust hose from the air filter housing. We unscrew the casing (it is not necessary to remove the air pipe, we just need to move the air filter casing to the side).
The carburetor fuel hose interferes with removing the cylinder block cover - you just need to remove it from the bracket and move it to the side. Now you can unscrew the nuts and remove the cover.
Next we need to remove the camshaft cover (it is attached to the engine with six bolts). There are marks on the camshaft pulley that correspond to marks on the engine. In order to avoid problems when installing the pulley, they need to be combined with each other.
Once this is done, you can remove the chain tensioner by unscrewing the two nuts. The chain is now loose and can be removed from the camshaft pulley. After this, using two screwdrivers, remove the camshaft pulley, take out the cotter pin and can get to the oil seal.
You just need to pry it out with a screwdriver and install a new one in the groove. When installing a new oil seal, it is best to lubricate it around the perimeter with engine oil.
After the oil seal is installed, we put the VAZ 2101-2107 camshaft pulley in place, the timing chain and fasten the tensioner. We close the mechanism with the lid, screw the cylinder head cover into place (if necessary, you need to install a new head gasket, having first cleaned off the remains of the old one).
We return the hoses to their place, install and fix the air filter housing and connect the gas exhaust hose. Now you can put on the generator belt and secure the generator.
In this case, it is worth installing it in such a way that the deflection of the belt in front of the generator is not more than one centimeter when pressed firmly.
In practice, such work will not take more than an hour, but its cost at a service station is quite high. Therefore, by doing the procedure yourself, you can save a lot.
The editors warn: in order to replace the camshaft on a classic without errors, you need to watch the video from start to finish with sound.
The author recommends pulling out the chain after tightening the engine head. This can be done either immediately or during the process. However, you should not delay this process.
He then tells you how to find the necessary marks to install the shaft. This is done in two ways - either on the cylinder or along the engine guide. The mechanic then demonstrates the bolts that need to be tightened. He calls on you to measure your strength so as not to break the fastening.
The next step is installing the sprocket. The author clearly indicates where the mark on it should point. After installation, it must be tightened so that it does not loosen. It is very good if the marks on the cylinder and sprocket match.
Next, the author moves on to adjusting the engine valves. This process is not shown in the video; the narrator invites viewers to his channel, where there is a detailed video instruction on this topic. Later, the video takes us to the moment when the valves are adjusted to the four mark. The process of connecting the ignition begins.
The author reports that you need to remove the toner cap and coat it with sealant. This measure will help avoid oil siphoning. The fuel supply hoses are then shown. The hose numbers correspond to the cylinders. They cannot be confused. This became the final chord of the video.
We hope that after watching the video of replacing the camshaft of VAZ 2105, 2106 and 2107, you will complete it without problems and teach others.
Sources
- https://remont-vaz2106.ru/vaz-2105-zamena-raspredvala-i-rychagov-klapanov
- https://tuningvaz.in/zamena-salnika-raspredvala-2101-2107/
- https://image-auto.ru/remont_auto/258-zamena-raspredvala-vaz-2105-2106-2107.html
Cost of work and parts
The cost of replacing a chain at a service center is around 700 rubles, and the price of complex replacement of a chain, sprockets, tensioner and chain guide is about 1,800 rubles.
The cost of a chain is from 350 to 600 rubles, a set of sprockets (crankshaft sprocket, camshaft and oil pump) is about 400 rubles, a classic tensioner shoe (with a rubber lining) is about 100 rubles, a modernized one with a sprocket on a bearing is about 1,400 rubles, a chain guide is about 80 rubles.
When buying a chain, carefully inspect its rivets ; they should all be well flattened so that not a single pin pops out and the chain does not come apart.
It is recommended to buy a new chain tensioner with a sprocket on a bearing, even despite its high cost. It increases the life of the chain and the noise level with it is much lower than with a classic “shoe”.
In addition, while the engine is running, the rubber pad on the shoe wears off, and all the chips fly into the oil, for this reason the chain needs to be tightened more often. A tensioner with a bearing does not have these problems, and its service life is much longer.
Split Gear Function
Principle of operation, instructions for replacing the VAZ-2106 camshaft A conventional gear mounted on the camshaft is designed to transmit torque from the crankshaft to the camshaft of the gas distribution mechanism. The part is a single piece without any moving parts. A split gear consists of two components - they can move relative to each other. This design allows the camshaft angles to be changed without affecting the tension of the timing belt or drive chain.
For example, this part on VAZ engines can rotate the shaft 5° in one direction or the other. Here you need to understand that you can change the engine operating characteristics in this way only in specific modes - in the upper or lower ranges.
Very often, to increase power and other engine characteristics, the camshaft and its gear are changed. If you replace them, you can adjust the valve timing differently. It will also be possible to change the valve lag angles. If a split gear is installed on the engine instead of the factory one without replacing the camshaft, then only the overlap angles can be changed.
see also
Timing marks do not match on 2103
- 0 3 7k
VAZ 2103 starts poorly and stalls
- 0 5 4k
How to adjust the valves of a VAZ 2107?
- 0 2 4k
Are rockers compatible with hydraulic compensators of the old standard?
- 0 3 4k
Can the ignition fail when the timing chain is stretched?
- 0 7 7k
This photo report shows how to replace the timing chain of VAZ 2106, 2107 cars. This method also applies to all models of the VAZ (Classic) car, not counting the VAZ 2105 engine, because it uses a belt drive.
Preparing for work
Having everything you need, you can start working.
On a carburetor car.
Next, we will look at how to replace the chain drive on a VAZ-2107 with a carburetor power system.
The VAZ-2107 is installed on a flat surface or in a garage, and is immobilized using wheel chocks and a handbrake.
To ensure good access to all the necessary elements, it is advisable to remove the radiator grille, drain the liquid and dismantle the radiator itself.
You don’t have to do this, but the ease of performing the work will significantly deteriorate. If there is a pallet protection, it will also have to be dismantled.
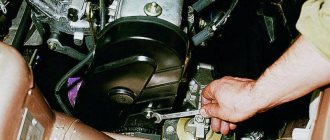
Then the generator drive belt is loosened and removed. Next, you will need to dismantle the pump drive pulley.
The valve cover is also removed from the engine, providing access to the camshaft sprocket.
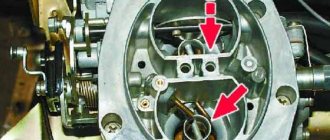
Next, all adjustment marks are installed. To do this, you need to rotate the crankshaft until the marks on the camshaft sprocket match the casting on the head.
In this case, the mark on the crankshaft pulley should coincide with the lower of the three marks on the drive cover. The label you want is the longest.
After this, use a special wrench to unscrew the nut securing the crankshaft pulley, and this pulley is removed.
The bolt securing the camshaft sprocket is also unscrewed, having first bent the petals of the lock washer of this bolt with a screwdriver.
To easily unscrew this bolt, the gearbox must be set to 4th gear. Before removing the sprocket, you need to check the alignment of the marks again. After removing the sprocket, it is better to keep the chain taut. To do this, a hook is made from wire and the chain is hung with it.
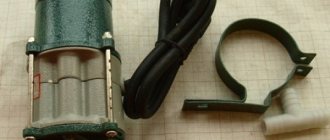
Next, the tensioner is removed from the engine.
Read more about this here.
After this, you can begin to remove the cover. To do this, you need to unscrew the three bolts securing the pan to the cover, as well as the nuts and bolts securing it in the front of the engine.
Carefully prying it off with a screwdriver, separate it from the crankcase and remove it, after which you will have access to all the sprockets that drive the chain.
Before removing the remaining sprockets, it is advisable to put marks on them and the crankcase, which will allow them not to disturb their position during assembly.
https://www.youtube.com/watch?v=7FHVpGmOuNc
Using a 17 wrench, unscrew the bolt securing the auxiliary shaft sprocket, after which it is removed.
Then, using the same key, unscrew the bolt securing the tensioner shoe, after which it is removed.
To remove the chain from the crankshaft sprocket, you will need to unscrew the limit pin installed at the bottom. After this, it will be possible to completely remove the chain.
Installation of a new chain and assembly are carried out in complete reverse order. In this case, you need to carefully monitor the coincidence of all marks.
DETAILS: Changing the oil and oil filter on the classic VAZ 2101-VAZ 2107 with your own hands Changing the oil on a Zhiguli in 20 minutes
This is especially true for the auxiliary shaft sprocket; if its position is disturbed, you will need to install the ignition after assembly.
After final assembly, you will need to tension the chain, as well as check that all marks match by turning the crankshaft several times until the marks match again.
Features of replacement on an injection engine.
This describes the replacement sequence on a carburetor car. But the latest versions of the VAZ-2107 already came with an injection power system.
However, the differences in the sequence of replacement work on this engine are no different from the carburetor, with the exception of the need to remove the crankshaft position sensor during the preparatory work.
Usually, during such a long mileage for a classic engine, not only the chain itself is subject to wear, but also other elements associated with it. The process of such a replacement is simple, but labor-intensive, since you need to unscrew a lot of bolts and nuts, remove some components and parts, and this takes time. Therefore, it is recommended to change the VAZ 06 timing kit, which includes the following main and additional parts:
- new timing chain;
- gears - 3 pcs.;
- chain tensioner shoe;
- chain damper;
- front crankshaft oil seal;
- cylinder block front cover gasket;
- crankshaft pulley key.
Very often, when removing the crankshaft gear, the key falls out and is lost, especially if there is debris or just an earthen floor at the bottom of the inspection hole. Without this part, gear installation and assembly are impossible, and given that it is cheap, it is better to purchase it in reserve.
Performing powertrain maintenance
VAZ 2107 cars with injection engines are still produced at enterprises in our country. They are highly reliable and economical at an affordable price, which is what determines their high popularity among consumers.
The main reason for replacing a double row timing chain is excessive stretching. The critical elongation is detected remotely by noise - the chain rattles and rubs against adjacent parts. In fact, extreme wear leads to loss of power, throttle response and unstable engine operation due to the mutual displacement of the camshaft and crankshaft. This will be visually indicated by a displaced auxiliary drive pulley.
Necessary tools and accessories
The replacement work, although not particularly complicated, requires the removal of a sufficient number of elements from the car.
The tools you will need are almost all common and can be found in any garage.
Open-end and socket wrenches (for 10, 13, 14, 17, 19);
- Special wrench for the generator pulley nut (36 or 38);
- Powerful flat screwdriver;
- Wire;
- New chain;
- Rags;
- Chalk.
The chain drive requires constant lubrication, which is why it is located inside the engine under the drive cover.
Therefore, extensive preparatory work will be required to carry out the replacement work.
- keys from the standard set;
- universal pulley clamp;
- special key for “36”;
- empty, clean container for draining antifreeze.