Hello everyone, dear subscribers and guests! The body shop saga is coming to an end. This part describes the installation of side members.
As I already wrote, we change the spars one at a time, respectively, removing only one beam fastening. The quality of the side members, like that of other body parts at VAZ, is at random, the pig’s tail nervously smokes to the side. You put the longge in place, clamped it with pliers and begin to adjust it using a hammer, clamps and a mat, constantly checking the dimensions. We check the diagonal - the difference is 7 mm - a lot. I took it off and put it back in about ten times... First, I dug it in with a hammer - the diagonal improved by 5 mm, but the force triangle got away from the welding holes - this is the reinforcement of the spar in the area where the beam is attached. Tapped him out. I tightened the spar with self-tapping screws, the result is that the diagonal is only 1 mm smaller - acceptable. The triangle fits normally to the floor.
I jack up the beam and check the fit - it fits perfectly and can be welded. Only first I painted it from the inside, and coated it with pushsal and Movil. The self-tapping screws used to adjust the spar were removed gradually as welding progressed.
Yes, that's another thing! The seat belt nut bracket, which is also the connector between the underbody and the side member... I've had a lot of hemorrhoids with this part. The fact is that I made it from 2 mm sheet metal. Due to the fact that I already had threshold connectors and external thresholds, it was very difficult to guess the bend of this part and the location of the nut (the factory one is bent very cleverly). I did this: first I grabbed the bracket to the spar, installed the spar in place, marked the location of the nut through the hole in the bottom with a marker, then removed everything, drilled it, welded the nut, reinstalled it in place, tightened the spar, checked the location of the nut relative to the hole, and then everything I removed and finally welded the bracket to the spar. The spar is welded to the floor of the cabin and trunk, to the threshold, to the rear arch and to the cross member of the middle floor.
Cars of the VAZ-2108-09 family are not distinguished by a strong body or durable body iron; the metal rusts especially quickly if it is not treated with anticorrosive. Over time, rust appears on the metal surface, and the rear spar often rots on either side, and cracks appear on it during use. If you drive for a long time with a rotten side member, the rear beam can tear out, which will lead to unpredictable consequences. To avoid a major nuisance or even disaster along the way, it is better to change the spar in advance; this work can be done in a car service center or with your own hands in a garage if you have sufficient experience, the necessary tools and materials.
Replacing the rear right side member 2109
The condition of the rear spar is determined by external inspection; if the body element has traces of severe corrosion and is thoroughly rotten, it must be replaced; in many cases its repair is impractical. Even before performing work, it is necessary to inspect the car body itself; often the iron on the 2109 rots to such an extent that there is practically nothing to weld to.
To carry out repair work you will need:
- welding machine;
- electric drill with drills;
- screwdrivers;
- a set of keys;
- hammer;
- core;
- chisel;
- cleaning wheels.
You must first buy the floor spar itself (LP), the average retail price of the body element in auto stores is from 1800 to 2500 rubles, catalog number is 2108-5101372. This spare part is suitable for model 2108-09-13-14, with minimal modifications it can be installed on VAZ cars 21099 and 2115. Since when replacing a spar you basically have to work under the car, you need to think about how to make it easy to get to below. There are several options here:
- use a car lift;
- carry out work in the inspection pit, hanging the rear part of the body on “goats” or other stands;
- turn the car over on its side, using a reliable support.
Before you start drilling out the old spar, you need to partially disassemble the car and remove:
- rear seats;
- gas tank;
- rear floor trim;
- rugs;
- rear beam (you will have to disconnect the handbrake cables and brake hoses).
After disassembly, you can begin to directly remove the rear LP; to do this, you need to find the attachment points, drill them at the spot welding points using a drill clamped into the drill chuck. After dismantling the body part, it is necessary to thoroughly clean the metal under the spar and prime it, remove the shipping primer from the new part (it can be removed very effectively and quickly using sandblasting). In order for the right side member to fit exactly in place, you should use measurements (there are control points for attaching units), there must be a certain distance between the elements of the front and rear suspension (between the fastening of the rear beam and the front wishbone).
After determining the control points, the spar is tacked by welding in several places, the correct installation is checked, then the part is finally welded to the seat. The final stage of repair consists of the following steps:
- cleaning welding scale with a grinding wheel;
- degreasing the metal surface;
- application of primer and anti-corrosion coating.
Very important conditions when performing welding are an intermittent seam, a maximum length of 4-5 mm. A continuous weld is unacceptable; with such welding, the body loses its elasticity and becomes very rigid. The left rear lip on the “Eight” or “Nine” changes in exactly the same way as the body element on the right side, the procedure for performing the work and the installation principle are the same.
Installation process
Let us describe the process of replacing the front side member on VAZ 2108/2109 cars:
Using a plasma cutter, in the absence of which you can use a hand hacksaw for metal, you need to cut off a new spar. Its size must be identical to the size of the damaged VAZ part. Once you have everything you need to make the repair, you can begin installation. The spar is connected to other parts, using guide templates, you can achieve precise installation. Now you can start welding parts 2108 / 2109, but first you need to check everything carefully. Only after this will it be possible to secure the part in several places. She welds the joint to the joint using arc welding. Fix the side member on the front panel of the VAZ. The method of spot or through welding is used here.
Please note that if you replace the spar, the second option is more reliable. All you have to do is go over the welding areas with a grinding machine. It will be enough to tap the new contact points between the spar and the wheel arch with a hammer to secure the result.
Finally, apply primer, soundproofing and sealant to 2108 or 2109.
If you have completed all stages of the work, then you can be proud of yourself! But remember that doing the repairs yourself is quite difficult. If you have doubts about your skills, it is better to contact a car service. It may cost a little more, but the car will serve you for many years.
Rear spar repair kit 2108-09
The rear spar repair insert allows you to replace only part of the body part, which simplifies the repair and makes it cheaper. The repair kit is a reinforcing element located on a bend; it is believed that this particular place on the body is subject to intense rusting.
In practice, it is not always possible to use a repair insert, since both the rear beam fastening in the side member (the main problem of 2109) and the jack often rot. The average cost of a repair insert in auto stores is 700-800 rubles, catalog numbers are 2108-5101372 and 2108-5101373 (right and left sides).
Replacing rear side members on a Nine in a car service center
Replacing rear LPs is a labor-intensive and quite complex job that requires care, metalworking skills, and the ability to use welding. Not every car owner undertakes to carry out such repairs on their own, so quite often the owners of front-wheel drive VAZs turn to professional technicians. The cost of replacing the rear spar 2108-09-099 can vary significantly, it depends on various factors:
- the location of the auto repair company, usually in the metropolitan region and large cities, repairs are more expensive;
- car service level;
- general technical condition of the car.
If the car body is heavily rusted, not all craftsmen agree to repair such a vehicle. I would also like to note that many auto repair shops fundamentally refuse to hire VAZ-produced cars, preferring to engage in more profitable repairs of foreign cars.
The average cost of replacing one rear spar 2108-09 is from 3,500 to 5,000 rubles; of course, car owners consider such prices to be simply extortionate. The price of body work, including materials, is sometimes a third of the cost of the used car itself, which cannot be considered normal. Private auto repairmen in garages have more affordable prices (from 2000-2500 rubles), but there are pitfalls here:
- a good repairman is not easy to find, and it is difficult to get to him, since due to high demand, repairs are carried out by appointment;
- among private traders working at low prices, there are many outright hacks;
- in garage conditions there is not always everything necessary for high-quality repairs;
- the work is carried out by repairmen with insufficient experience, technology is violated.
When replacing rear LPs, it is important to weld the body part exactly in place; if the spar is shifted to the side, the geometry of the body will be disrupted, the rear beam will “move” to the side, and the car will drive sideways with all the ensuing consequences.
Replacement procedure if you decide to do it yourself
- Raise the entire car on a rack lift, or just the damaged side.
- The VAZ 2109 spar is attached using spot welding, it must be drilled out. Anything that cannot be drilled out, cut off with a grinder.
- If some elements of the part are inaccessible to you, then remove the suspension (the wheels will have to be removed in any case).
- If, after all that has been done, you still cannot remove the spar, cut it off with a chisel.
- Let's try on a new part. If it is larger, then we will cut off the excess part.
- In the new case, we make holes in the places where you will weld it.
- We attach the part to the body by welding.
- We clean the welded points with a grinding machine.
- We prime the new part and paint it in several layers.
- If desired, you can carry out anti-corrosion treatment.
I have the same story, but it’s done simpler: if the car doesn’t pull anywhere and it goes smoothly, then we cook at the junction of 3 layers of the spar (this is at the very edge in the lower part of it), then seal from the outside and from the inside. Although sometimes I doubt the correctness, it still doesn’t let me down, pah, pah, pah.
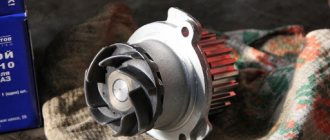
Are there any problems with the VAZ 2110 pump? No problem. All you need to do is read this article. Then you will know how to replace it, how to distinguish a high-quality water pump from a bad one, how much the cheapest pump costs.
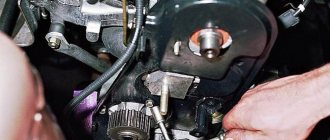
Do you know how to replace the crankshaft oil seal? This article will tell you about it. From it you will learn two ways to replace the oil seal: quick and correct. The replacement method from the flywheel side is also described.
The article addresses the following questions: what to do if the instrument panel begins to crack and a corner comes off, how to remove and disassemble it, and also what malfunctions occur and how to remove them.
Cars of the VAZ-2108-09 family are not distinguished by a strong body or durable body iron; the metal rusts especially quickly if it is not treated with anticorrosive. Over time, rust appears on the metal surface, and the rear spar often rots on either side, and cracks appear on it during use. If you drive for a long time with a rotten side member, the rear beam can tear out, which will lead to unpredictable consequences. To avoid a major nuisance or even disaster along the way, it is better to change the spar in advance; this work can be done in a car service center or with your own hands in a garage if you have sufficient experience, the necessary tools and materials.
Recommendations for replacing the rear side members of the VAZ-2108-09
- When replacing a LP, many craftsmen cut off the old body element with a gas cutter, but it is better to drill out the part.
- When installing a new spar, it is very important to find the control points correctly and not to disturb the geometry of the body, otherwise the work will have to be redone and problems will arise.
- It is recommended to grab the spar at three or four points; before thoroughly welding the part, it is recommended to try on the rear beam - the fasteners must match the studs.
- Before installing the body element, the seat must be thoroughly cleaned of rust and well primed; if the metal is rusty, new plates must be welded.
- You cannot weld with a continuous seam, this will weaken the metal of the body.
Replacing rear side members is not an easy job, if you are not confident in your abilities, you should not take on it, it is better to use the services of professionals.
The design of modern passenger cars involves using the car body itself as a load-bearing element. A little earlier, frame structures were predominantly used. In this regard, quite serious requirements are placed on the power frame of the car, the basis of which is the side members.
Installation process
Let us describe the process of replacing the front side member on VAZ 2108/2109 cars:
Using a plasma cutter, in the absence of which you can use a hand hacksaw for metal, you need to cut off a new spar. Its size must be identical to the size of the damaged VAZ part. Once you have everything you need to make the repair, you can begin installation. The spar is connected to other parts, using guide templates, you can achieve precise installation. Now you can start welding parts 2108 / 2109, but first you need to check everything carefully. Only after this will it be possible to secure the part in several places. She welds the joint to the joint using arc welding. Fix the side member on the front panel of the VAZ. The method of spot or through welding is used here.
Please note that if you replace the spar, the second option is more reliable. All you have to do is go over the welding areas with a grinding machine. It will be enough to tap the new contact points between the spar and the wheel arch with a hammer to secure the result.
Finally, apply primer, soundproofing and sealant to 2108 or 2109.
Body geometry VAZ 2108/2109
If you have completed all stages of the work, then you can be proud of yourself! But remember that doing the repairs yourself is quite difficult. If you have doubts about your skills, it is better to contact a car service. It may cost a little more, but the car will serve you for many years.
I just finished replacing the rear side members on the 2108. A short report with my comments.
The old spars were already covered with rust and the patches had been patched over (and rather obscenely), there was no living space left. At first I wanted to limit myself to a couple of patches during a quick inspection at the client’s, after removing the beam and a more or less detailed inspection from a hole in my garage, the decision was made to definitely change both entirely.
View from the arch of this wonderful patch after stripping with a wire wheel
Attention to the number of welding points
On the left side the picture was almost the same. I think the general condition of the side members is more or less clear from these three photos.
On the very first day of work, the new iron was immediately painted from the inside with gf-021 primer. Excellent primer, very durable and with good adhesion, insensitive to slight oiling and contamination, holds well, the layer is durable. One problem - it takes a very long time to dry. Even in the summer at 20 degrees, not just one day, as it says on the can, but all three until more or less complete drying; in winter, at least a week.
By the way, real gf-021 can ONLY be red-brown in color. I won’t describe here what and how, so as not to deviate from the main topic, if anyone is interested, write, I’ll make a separate post.
The easiest, fastest and highest quality way to remove old side members (and any body parts in general) is drilling. I used the most common metal drill with a diameter of 7.5mm. I’m clarifying about a regular drill because there are special drills for drilling resistance welding points - I’ve never used them, I can’t say anything about them.
Since I weld power elements in a way that is as close as possible to factory welding in terms of strength and rigidity, that is, with an electric rivet, drilling will immediately give the necessary holes for subsequent welding exactly in the same places where the old spar was welded, allowing you to navigate along them in the position of the new part.
About the purpose of the spar
Nine body repair
The spar used on the VAZ 21099 is a kind of integrated frame that runs along the entire length of the body and carries several specific functional loads:
- support for mounted body elements;
- imparting rigidity to the body, ensuring its geometric integrity;
- ensuring passive safety in the car;
- fastening of chassis parts;
- fastening of fixing elements (brackets, etc.) for fuel, exhaust, and brake systems.
This significant functionality explains the great importance given to the condition of the side members. If the quality of the metal when constructing the car was at the required level, the car was operated under normal conditions, and the driver paid attention to anti-corrosion protection, then the condition of the spar is not in danger. The greatest impact on this body element is when the car collides with an obstacle.
Do the rear side members need to be replaced?
Despite its apparent simplicity and relative cheapness, you should not make a definite decision regarding the immediate replacement of the spar. Indeed, in addition to the usual operations of removing the previous part of the body and installing a new element, many nuances must be taken into account in order to preserve the geometry of the car and ensure the safety of its further operation.
The technology for performing any repair operation must necessarily include a stage when troubleshooting a faulty part or device is carried out. When inspecting both the front and rear side members, it is necessary to pay attention to the corrosion state of each of them. It should be taken into account that it is the rear elements that are most exposed to external influences.
A rotten (or severely corroded) rear spar is practically beyond repair for the following reasons:
- if welding is used when sealing a certain area, corrosion should be expected to occur on the welds;
- the use of welding weakens the metal and can also lead to its deformation;
- the savings that are achieved if, instead of a labor-intensive replacement, a conventional seal by welding is carried out, can lead to rapid wear of the rubber, the creation of excessive load on transmission parts, and the constant pulling of the car to the side.
Preparation for work
Considering the long-term use of the VAZ 21099 sedan, the condition of the vehicle’s structural frame may not be the best. Therefore, if you need to replace the rear side member of a VAZ 21099, you need to purchase all the necessary spare parts.
Replacing the rear beam
It is equally important to decide how the replacement will be carried out. If you do everything in a garage, you will need a lift and the necessary equipment. If you are replacing the rear side member yourself, you need to perform a number of preparatory work before lifting the car on the lift.
- Seats, carpets and interior floor coverings must be removed. This is done to comply with fire safety and maintain the quality of materials.
- Considering the welding work, it is advisable to dismantle (or at least protect with special material) the fuel tank with gasoline residues. And after the car is on the lift, be sure to disconnect the negative terminal from the battery.
Further operations are carried out in the following sequence:
- drive the car onto a lift, remove the wheels from the hubs;
- release the rear beam with suspension elements, otherwise it will be impossible to carry out work;
- clean the rear spar to determine the mounting points.
It should be borne in mind that the spar is usually secured by spot welding, so it is important to locate all such places. For better cleaning, use a wire brush. We clean the welding areas using an angle grinder.
Content
Replacement or welding
Removing the rear side member
Installing the rear side member
Front spar
Removing the front side member
Installing the front side member
From the author
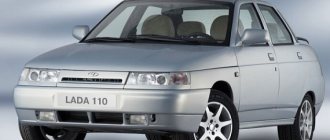
About 1.4 million copies of VAZ-2109 cars were produced and it, along with classic VAZ models, became a truly people's car. Not least of all, this was achieved thanks to the high maintainability of the “nine”. In this article I would like to dwell on such an important problem as replacing side members on VAZ-2109 and 2108.
Replacing side members on a VAZ-2109
Replacement or welding
Welding of the spar is used in two cases:
- When fatigue cracks started to appear. Then it makes sense to put a patch over the crack and weld it using semi-automatic welding.
- When there are small pockets of corrosion. In this case, the metal is cleaned, treated with a rust converter and primed. If necessary, small patches are applied.
Welding the spar is possible even if it is destroyed, but this will only be a temporary repair, and driving such a car is dangerous.
If the car was involved in an accident in which the side member was significantly deformed or rotted, then a complete replacement would be advisable. It is necessary to understand that you need to repair the spar if you have sufficient skills in body work and welding. For an inexperienced person, this process will be quite complicated, so if you are not confident in your own abilities, then it is better to trust the professionals.
Required tool:
- Semi-automatic welding.
- Bulgarian.
Semi-automatic welding
- Electric drill.
- Wire brush.
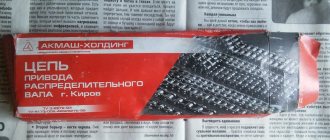
- Spars for VAZ-2109.
- Mastic, primer, solvent.
Removing the rear side member
Dismantling of the spar must be carried out on a slipway or with the machine turned over on its side. In addition, you need to completely remove all the trim and soundproofing of the trunk. After this, we clean the weld seams. Next, we will need to find all the resistance welding points of the spar and drill them out using a 7-mm drill. At the end of this process, we need to completely cut off the old spar. We clean the place of its attachment from rust and paint. This is done using a metal brush on an angle grinder and a rust converter. If necessary, we cut out the rotten body elements and put patches in their place.
Removing the rear side member
Installing the rear side member
Before installation, the mounting area is degreased and primed. The new spar also needs to be cleaned of transport soil, primed and holes made in it for welding points. If everything is done correctly and the geometry of the body is not damaged, then the new spar will fit into its seat without any problems. We weld the spar at the welding points to the body and cross member. At the end of this process, coat the seams with automotive mastic.
Front spar
The front spar is more loaded than the rear. This is because it bears the entire weight of the engine and gearbox. If we add to this operation on bad roads and aggressive driving, then its service life will be only about 4-5 years. In some cases, a special repair insert, which is welded into place of the damaged fragment, can save you from the labor-intensive process of completely replacing the spar.
Just as when replacing the rear spars, replacing the front ones must be done on the slipway. Otherwise, you can break the geometry of the body.
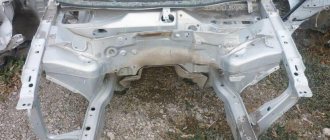
Before you begin replacing the side member, you need to remove the entire front suspension and engine and partially disassemble the interior. When disassembling the front part of the car, pay attention to the condition of the remaining body elements, such as glasses, radiator frame (most likely, the frame will have to be changed along with the side members, since it serves as a structural reinforcement), mud flaps. It is possible to partially replace the front spar. In this case, the old one is cut off, and a new one is welded in place of the cut out part. However, next we will look at the process of completely replacing the front side member.
Left front side member of VAZ-2109
Removing the front side member
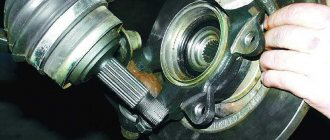
The process is similar to removing the rear side member. We drill out the resistance welding points (this is partly done from inside) and remove it. After this, we clean the seat and, if necessary, put patches on the body and get rid of corrosion. We prime the new spar and drill holes in it for attaching the suspension arms.
Installing the front side member
For proper installation on the body, near the beginning of the front door, there is a special “window” that must be aligned with the hole in the lower part of the side member. Then it will be considered that the rear part of the spar is installed correctly. Next, we completely place the spar in its seat and in the process adjust it for maximum fit.
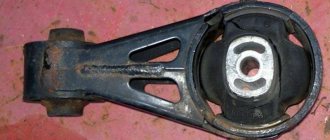
An indicator of correct installation is also that the stabilizer pin fits into the hole on the side member. Ideally, it will be in the center of the hole.
If it doesn’t hit at all, then you will need to edit the body or spar. For ease of operation, the entire structure is temporarily fixed with clamps and jacks. After installing the spar on the seats, you need to attach the radiator frame to the bolts. This is done so that the spars do not move to the sides during further work and to fix the distance between them.
To check the correct installation and geometry of the body, a drawing with exact dimensions between structural elements is required. It can be found on the Internet or in books on the repair and operation of this car. If the geometry of the body has not changed and the new side members are of high quality, then they should fall into place without much labor. However, this happens quite rarely, therefore, armed with a drawing, tools and patience, you will need to adjust the spar to the body and vice versa. At the end of this process, we take measurements, and if everything is correct, we weld the side members to the body and mudguards.
Installing the front side member
From the author
Above we described the technologies for repairing and replacing the spar. We emphasize that this article gives only a general idea of the process of repairing side members and is not an exact instruction. Therefore, after reading it, you should not start repairing a car without sufficient experience.
And to top it off, we’ll give you a few tips that can extend the service life of the side members:
- Less load means less wear and fatigue of the metal. Try not to load the car if you are not sure of the reliability of its power structure. With all its advantages, the “nine” has a significant drawback: mediocre reliability and durability of the body. This is especially true for models of the first years of production.
- Monitor the condition of the side members and repair cracks in a timely manner.
- Aggressive driving and off-road driving create additional stress on the suspension, and, consequently, on the car body.
- Monitor the condition of the protective coating. Cover the spar with primer and anticorrosive. The author had to deal with cars whose side members were processed not only outside, but also inside. This was done by applying waste oil to the inner walls of the spar through the holes. And as practice has shown, this significantly increased the service life.
Replacement procedure
- We drill out the attachment points of the power element, and if this fails, then the remaining points need to be cut off using a chisel and a hammer.
- After dismantling the old spar, it is necessary to thoroughly clean the area for the replacement part purchased, install it and, if necessary, adjust it to the required size.
- A new part is being prepared for welding. This must be done in the same places where factory welding was used. A minimum of three welding points will be required for initial fixation.
- The prepared part is secured to the place to be installed using removable clamps.
- We sequentially weld the spar to the body according to previously prepared marks, after which we evaluate the correctness of the design.
- The final stage of installation is the final welding of the part. In this case, the structure is strengthened by applying additional strength elements.
- After completion of the work, the welding areas must be processed by cleaning with a grinding machine. Finishing is mandatory.
This stage involves thoroughly cleaning the welding areas from scale and other foreign contaminants. The surface is thoroughly degreased, coated with primer and anticorrosive. Epoxy resin can be applied to the weld areas to permanently protect them from spot corrosion. The final step is to reinstall the suspension parts and secure the beam. The interior elements are installed, the car is completely cleaned, put on wheels and rolled out of the garage.
The body will have to be thoroughly disassembled
Despite its apparent simplicity, before starting work, you need to assess your own capabilities. After all, redoing it is more difficult than doing everything right in the first place. Mistakes that can be made during poor-quality installation can lead not only to the rejection of the new spar, but also to a violation of the geometric shape of the car or its incorrect behavior while driving. Thus, replacing the rear side members is a process that can be done independently, but a responsible approach to the work is required.
1200 rub. for the photo report
We pay for photo reports on car repairs. Earnings from 10,000 rubles/month.
Write:
The problem of failure of the VAZ 2108/2109 side member is not a pleasant situation, but this does not mean that it cannot be corrected. There are two ways to fix the problem: replacement or welding, DIY repair or in a workshop. You will learn further how to make the right choice.
Types and features of repairs
On a VAZ 2108, body repairs can be carried out in several areas. In this case, much will depend on the degree of damage to the vehicle, service life and much more. For example, work on a complete restoration of the body and partial processing/removal of scratches and chips will differ in complexity.
You can also correct the geometry of the body with your own hands. It will be enough to remove dents on your favorite V8, polish and paint the body.
Note. Polishing is an important procedure that helps not only improve the appearance of the body, but also protect it from further corrosion.
As for the car service, we immediately note that the price of repairs here is quite high. And this often explains the fact that many people strive to carry out repairs on their own, especially since most of the work can be done by anyone.
A corroded body, punctured in several zones, is already a “patient” that needs to be worked with. To begin with, you will have to remove the “tail” from such a body, and then treat them with anticorrosive. In particular, we are talking about doors, bumpers and other hinged elements.
Advice. The most difficult thing to unscrew on the “eight” is the nuts that have been exposed to aggressive environmental influences. For example, rear bumper nuts. To be able to remove them without much difficulty, it is enough to pre-lubricate the fasteners with brake fluid or pure gasoline.
How to treat holes in the body
Over time, no metal surface can avoid the appearance of defects, among which notches stand out. Holes in the body can be of different types. If they have rusted edges, then urgent intervention is required. Here's what you'll need to do:
- First, you will have to remove all the paintwork in order to be able to assess the scale of the upcoming work.
Note. The easiest way to remove paint from the body is to use an electric drill with a wire attachment.
- The second stage of work will involve the removal of corroded areas. First, the rotten edges bend inward. A hammer helps with this. Then a piece of tin or a special metal mesh with small holes is placed, and then putty is sealed on top;
- The final stage is polishing and painting.
When is it necessary to repair or replace the spar on a VAZ 2109
The decision to straighten or replace a side member on a damaged car depends largely on the length of the deformed zone, the degree of deformation, and also on the qualifications of the repairman. If there is slight deformation of the spar over a long length, even if there is a small fold, does not need to be replaced . Using a jack or square, you can restore the original shape and position of the spar while maintaining its characteristics. On the other hand, if there is significant deformation, the spar must be replaced, since straightening will cause a change in the metal structure and strength, which will lead to a change in the characteristics of the body itself.
If the metal is rotten, then the side members (front and rear) cannot be repaired or restored. Even if you weld, the rot will continue around it. In addition, welding on soft metal can disrupt wheel alignment, tires will begin to wear out faster, transmission parts will begin to break, and body deformation may occur. Such repairs will be enough for a couple of weeks.
If possible, it is always better to purchase a new part, which costs more than temporary repair work. But, even with a limited budget, in some cases you cannot save. Therefore, replacement is much cheaper, but if the crack is the result of an impact or collision with a VAZ, welding will be sufficient.
Replacement procedure if you decide to do it yourself
- Raise the entire car on a rack lift, or just the damaged side.
- The VAZ 2109 spar is attached using spot welding, it must be drilled out. Anything that cannot be drilled out, cut off with a grinder.
- If some elements of the part are inaccessible to you, then remove the suspension (the wheels will have to be removed in any case).
- If, after all that has been done, you still cannot remove the spar, cut it off with a chisel.
- Let's try on a new part. If it is larger, then we will cut off the excess part.
- In the new case, we make holes in the places where you will weld it.
- We attach the part to the body by welding.
- We clean the welded points with a grinding machine.
- We prime the new part and paint it in several layers.
- If desired, you can carry out anti-corrosion treatment.
I have the same story, but it’s done simpler: if the car doesn’t pull anywhere and it goes smoothly, then we cook at the junction of 3 layers of the spar (this is at the very edge in the lower part of it), then seal from the outside and from the inside. Although sometimes I doubt the correctness, it still doesn’t let me down, pah, pah, pah.
Are there any problems with the VAZ 2110 pump? No problem. All you need to do is read this article. Then you will know how to replace it, how to distinguish a high-quality water pump from a bad one, how much the cheapest pump costs.
Do you know how to replace the crankshaft oil seal? This article will tell you about it. From it you will learn two ways to replace the oil seal: quick and correct. The replacement method from the flywheel side is also described.
The article addresses the following questions: what to do if the instrument panel begins to crack and a corner comes off, how to remove and disassemble it, and also what malfunctions occur and how to remove them.
Cars of the VAZ-2108-09 family are not distinguished by a strong body or durable body iron; the metal rusts especially quickly if it is not treated with anticorrosive. Over time, rust appears on the metal surface, and the rear spar often rots on either side, and cracks appear on it during use. If you drive for a long time with a rotten side member, the rear beam can tear out, which will lead to unpredictable consequences. To avoid a major nuisance or even disaster along the way, it is better to change the spar in advance; this work can be done in a car service center or with your own hands in a garage if you have sufficient experience, the necessary tools and materials.
Preparatory work for replacing the VAZ 2109 spar
Since spar replacement and repair are carried out using the same technology, the set of tools will also be the same.
If you nevertheless decide to repair the side member on a VAZ 2109 yourself, first you will need to acquire the following tools for the job:
- welding unit (the most convenient and simplest option would be semi-automatic welding);
- grinder and discs, hard metal brush for the grinder;
- a set of new side members and connectors for the VAZ 2109;
- grinding tool;
- electric drill;
- metalworking tools;
- packaging of automotive mastic;
- 2 medium-sized paint brushes;
- can of primer;
- bottle of solvent.