1200 rub. for the photo report
We pay for photo reports on car repairs. Earnings from 10,000 rubles/month.
Write:
The VAZ 2110 is equipped with a mechanical, two-shaft, five forward gears and one rear gearbox. It is structurally combined with the differential and main gear. The service life of the VAZ 2110 gearbox and its performance directly depend on driving style and timely maintenance of the manual gearbox.
Frequent intense acceleration, incorrect shifting of the selector lever, untimely replacement of transmission oil, and the gearbox oil needs to be changed every 75,000 km , lowering its level can greatly reduce the service life of the gearbox. Removal of the VAZ 2110 gearbox and subsequent repair or replacement is carried out if faults are detected in the unit itself.
Signs of a faulty VAZ 2110 gearbox
Characteristic symptoms that require replacement of the VAZ 2110 gearbox are the following:
- appearance of noise. The cause of this defect may be worn gear parts. Also, if the bearings are damaged, knocking and grinding noises appear.
- spontaneous switching off of gears or the gear does not engage completely. This is due to wear and tear on the forks and selector mechanism.
In some cases, when this transmission unit cannot be repaired due to objective reasons, replacing the VAZ 2110 gearbox is necessary. It is worth mentioning that the price of a new box will be 16,500 rubles, but its repair at a service station will cost 7,500 rubles (parts and the repair itself) without removal and installation. You can also “exchange” the checkpoint, the price will be 5,000 rubles. without installation or 6000 rub. with installation (prices are indicated for spring 2017 in Moscow and the region).
So it's up to you. The following is a technology for removing a VAZ 2110 gearbox and then replacing it.
Finding a new synchronizer
Since the synchronizer is assembled for a specific gearbox, there is no reason to think that the mechanism from one car can be installed on the gearbox of another car. Of course, the operating principle of these two mechanisms will be the same, but, for example, their geometry may be different. It would be best to select a spare part according to:
- Vehicle VIN code;
- Code of an already installed synchronizer;
- Parameters of the vehicle and its gearbox.
- Onnuri (South Korea);
- Transporterparts (France);
- KAP (South Korea);
- Omix-ADA (USA).
Also, synchronizer components can be found in the catalogs of major European packers. The quality of these spare parts, as noted by car enthusiasts, is not always high. But spare parts from South Korean companies, on the contrary, please with both price and workmanship. As for assembled synchronizers, they can only be found under the names of automakers, i.e. originals . If you wish, you can save on buying a mechanism by choosing an option at a dismantling shop. If you are interested in purchasing a spare part with the longest service life, it is better to buy a new original.
How to remove a VAZ 2110/2112 gearbox (instructions)
In order to remove the VAZ 2110 gearbox, you must:
- Choose the right workplace. Such work should be carried out on a lift or a deep, at least one and a half meters, inspection hole.
To perform work on removing the gearbox you will need:
- two mounting blades;
- set of keys for 8, 10, 13, 15, 17, 24, 30 mm;
- torque wrench, 8 mm socket;
- jack;
- container for draining oil;
- inspection hole or lift;
- flat screwdriver, hammer;
- sealant.
A modern car includes many complex devices, instruments and components. During operation, they wear out and require either repair or replacement from time to time. The article examines cases when it is necessary to remove the gearbox and provides instructions on how to remove it from a VAZ 2110 car.
Advice from professionals
- Carry out technical inspections of your vehicles regularly. This manipulation will allow us to identify future breakdowns and eliminate malfunctions at an early stage of development.
- Respond promptly to emerging signs. Do not operate a vehicle with worn parts.
- When making repairs, use only new and high-quality spare parts.
- Once again, spend a little and entrust the work to qualified mechanics if you don’t know how to remove the clutch cable of a VAZ 2110.
- To extend the life of the clutch cable, systematically lubricate it with a special substance using a syringe provided for this procedure. This feature will prevent chafing of the element.
Carefully monitor the condition of your car. Timely maintenance will extend the life of the vehicle.
In what cases should the gearbox be removed?
Before removing the gearbox, you should make sure that the malfunctions are related specifically to it and are not caused, for example, by insufficient oil level, loose gearbox mounts, or defects in the clutch release drive.
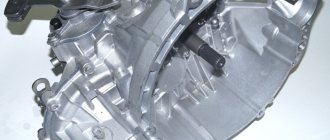
Gearbox VAZ 2110
The need to remove the gearbox occurs when the following malfunctions occur:
- transmissions switch off spontaneously;
- unclear gear shifting;
- increased noise, appearance of extraneous sounds;
- when overtaking, the clutch disappears;
- gears are difficult to shift;
- oil leaks.
In addition, the gearbox should be removed in the following cases:
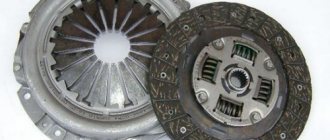
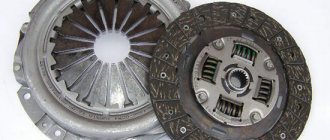
- when replacing the clutch;
- when replacing an old gearbox with a new one;
- if it is necessary to eliminate the leak of the crankshaft rear oil seal;
- when replacing the front gearbox oil seal;
- when replacing the release bearing;
- when replacing the flywheel;
- when replacing the bushing;
- in cases where the box interferes with any repair work.
The weight of the box without oil is approximately 30 kg, so it is recommended to carry out the procedure for removing it with an assistant. It is advisable that he has experience in auto repair work.
Gearbox under the car
Features of mechanical devices
Dismantling or removing the device is the first step for those who decide to repair the gearbox themselves. It is advisable to have an assistant nearby, it will be much easier.
First, the battery is removed from the car, then they move on to the starter. Replacing the backstage on your own is carried out in the same way, there are only minor differences. Repairing the secondary shaft requires approximately the same actions. The cable responsible for the clutch must be disconnected from the fork. The device has a special bracket from which the part is pulled out.
The VAZ 2110 gearbox device has its own characteristics: you will have to disconnect a large number of wires from the speed sensor in order to do the job.
Any reference book on gearbox repair at home will tell you about this.
Repairing the gearbox linkage is also not complete without this. First you need to compress the required number of spring-type clamps, after which the part with the block is dismantled. There are several bolts responsible for the connection between the torque rod and the box. They need to be unscrewed using a key with the appropriate parameters. How and when the gearbox drive shaft is repaired is indicated in the VAZ 2110 operating manual.
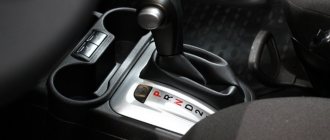
Gearbox shifter for VAZ 2110.
At the next stage, a major overhaul requires the removal of the wheel drives. The main thing is that there is a plug left there. The ball joint structure, which is located on the left side, is turned away from the fist.
Repair of the gearshift knob is carried out separately, if necessary. The instructions are easy to find.
The ball joints can be left in place, but unscrewing them makes the job faster and easier. The engine, for its part, is equipped with only one mount. Therefore, repairing a lever and other similar processes only require unscrewing one nut at a given moment. Sometimes it is necessary to remove the hose responsible for injection from the stud. The repair manual says that the box itself moves as far back as possible.
Instructions for removing the gearbox
The procedure for removing the gearbox is labor-intensive and time-consuming. It’s easier to replace it with a VAZ 2110 by visiting a car service center, but you can do it yourself.
Tools
To carry out the procedure, you will need tools consisting of:
- a set of wrenches, socket or open-end wrenches;
- set of heads with extensions;
- flat screwdriver;
- mounts;
- pliers;
- jack;
- clean rags.
Engines
On the domestic market, the model could be purchased with one of three engine options:
- 1.5-liter 8-valve engine, 69 hp. Model 2110 base carburetor powertrain;
- 1.5-liter 8-valve engine, 79 hp. Accelerates to hundreds in 14 seconds;
- 1.5-liter 16-valve engine, 94 hp. The most powerful version of the power unit. Acceleration to 100 km/h takes 12.5 seconds.
8-valve engines have valve protection - they do not bend if the timing belt breaks. There is no such protection on a 16-valve power unit.
All VAZ engines require timely maintenance. Failure to meet replacement deadlines may result in major repairs.
During operation, the intake manifold fails. Repairing a problem yourself requires a lot of time and effort. Repairs at a service station will cost twice as much. If you have no experience in such work on your own, it is better to turn to specialists.
Video “Removing the gearbox on a VAZ 2110”
This video demonstrates the process of removing the gearbox from a VAZ 2110 car.
Car repair is a rather complex and time-consuming operation, and it is usually entrusted to car service professionals. Certain machine components do not generally require dismantling and repair by the driver in a garage. However, repair services are becoming more expensive, and vehicles break down more and more every year. Owners of products from the domestic automobile industry are not yet deprived of the opportunity to troubleshoot problems in their “iron horse” on their own. Transmission breakdown is one of the common problems that cause headaches for the owner of VAZ cars. Today we will talk about how to remove the box on a VAZ 2110, diagnose it and carry out feasible repairs.
Eleventh model
Tuning a car with your own hands also gives interesting results - here the owner with his imagination also has a lot of space to make adjustments. We start with the simplest and most accessible means, for example, airbrushing - sometimes even just with its help you can completely change the appearance of the car.
However, there is an even simpler and cheaper way - this is covering the car or its individual parts with vinyl film. Today you can easily purchase vinyl in a variety of finishes - gloss, matte, carbon, protective, etc. Pasting with film is carried out without any particular difficulties - the main thing here is to understand the principle and adhere to the technology.
From such a film you can also create applications of an aesthetic or advertising nature.
Tuning VAZ 2111 using film
Improving the trunk is necessary not only to improve the exterior, but also to improve performance.
Alternative optics mean a lot - they are needed not only to make the car look impressive on the road. By installing new headlights, you provide yourself with adequate illumination of the road at night and thereby reduce the risk of a dangerous situation on the road.
In the cabin, install a new sports steering wheel - this will increase driving comfort and increase the level of aesthetic pleasure.
The instrument panel can be covered with film - this will make it look much nicer.
VAZ 2110 gearbox device
The Volzhsky Automobile Plant's 10th series vehicles are equipped with a five-speed manual gearbox. It is two-shaft, has five gears for forward movement and one reverse gear for reverse. The main gear, differential and the gearbox itself are combined in one housing. When connecting the crankcase to the cover, it is possible to seal it with a gasket or sealant that is resistant to gasoline and oil.
The two-shaft system is represented by a primary and secondary shaft. The first is a block of driving gears, the second contains driven gears that provide forward movement. The two groups of gears are in constant mesh. The secondary shaft parts can be removed for replacement or repair.
The secondary shaft is made empty inside to lighten the weight of the structure. At the locations of the gears there are circular grooves that ensure the supply of lubricant to the surface of the shaft during operation. The rotation of the fifth gear gear is carried out through the bushing. The shaft splines are used to install synchronizer hubs. The shafts themselves are installed in the box body on bearings - a pair of roller bearings on one side and a pair of ball bearings on the other.
The differential uses two satellites. The pretension of the bearings in it can be adjusted by changing a special ring from thick to more or less thin. This ring can be found under the outer differential bearing cover. The speed sensor is connected to a plastic gear located on the gearbox housing, which, in turn, is driven by the drive gear on the differential housing.
VAZ 2110 gearbox design: 1- clutch release bearing; 2 — guide sleeve of the clutch release bearing; 3 - main gear drive gear; 4 — roller bearing of the secondary shaft; 5 - oil sump; 6 — satellite axis; 7 — speedometer drive gear; 8 — axle gear; 9 — differential box; 10 — satellite; 11 — clutch housing; 12 — driven gear of the main gear; 13 — adjusting ring; 14 — tapered roller bearing of the differential; 15 — axle shaft seal; 16 — driven gear of the 1st gear of the secondary shaft; 17 — synchronizer for 1st and 2nd gears; 18 — driven gear of the second gear of the secondary shaft; 19 — driven gear of the third gear of the secondary shaft; 20 — synchronizer for 3rd and 4th gears; 21 — driven gear of the fourth gear of the secondary shaft; 22 — ball bearing of the secondary shaft; 23 — driven gear V of the secondary shaft transmission; 24 — 5th gear synchronizer; 25 - secondary shaft; 26 — rear cover of the gearbox housing; 27 — drive gear of the 5th gear; 28 — ball bearing of the input shaft; 29 — input shaft; 30 — gearbox housing; 31 — roller bearing of the input shaft; 32 — input shaft oil seal; 33 - breather
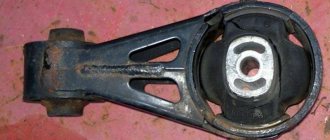
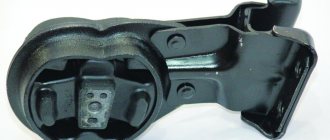
When driving on a bumpy road, the engine experiences vibrations, which, if the rubber dampers are worn out or sagging, can lead to displacement of the gearbox shafts. This can result in unpredictable transmission disengagement when the gears on the two shafts become disengaged. To compensate for such vibrations, a reaction rod is provided in the connection between the gearshift handle support and the gearbox housing. It is equipped with a rubber gasket to dampen vibration from the engine, which causes the gearshift lever to shake.
You can find out how much oil is in the gearbox by checking the dipstick. According to factory standards, the gearbox holds 3.5 liters. If the oil level drops, it is necessary to add it, otherwise accelerated wear of the gears can lead to breakdown. Technical regulations require routine oil changes every 90 thousand kilometers.
Malfunctions
Every car owner with experience begins to feel a malfunction in the car’s gearbox based on characteristic signs. Most gearbox breakdowns are associated with wear of rubbing parts, because they experience constant significant load while driving. However, such wear rarely reaches a critical state immediately. This is usually a gradual process, which is why a novice driver is always advised to learn to “listen” to the car. The sooner you notice a problem, diagnose it accurately and fix it, the less repair work will need to be done and the less it will cost.
It is recommended to regularly check where the vehicle is parked for stains to monitor leakage of technical fluids.
Oil change intervals
The official manual for the car indicates how often the transmission oil in the box needs to be changed - 60 thousand kilometers. To prevent unit malfunctions, experts recommend adhering to certain rules:
- change the oil in the box in a timely manner;
- pour the required amount of oil into the VAZ 2114 gearbox and monitor its level;
- Use only high-quality lubricant.
The oil volume in the VAZ 2114 gearbox is also indicated in the manual for the car. According to the instructions, the box holds approximately 3.3 liters of lubricant.
When choosing oil for a manual transmission, you need to decide on the packaging of the fluid. It is usually sold in canisters of 1, 3 and 5 liters, but there are also non-standard containers. Also, anyone can buy oil from a barrel for bottling in specialized stores
Therefore, you can get the required amount of oil on favorable terms, but it is important to carefully check the quality of the products. Otherwise, imaginary savings may subsequently lead to serious costs for repair work.
How to remove and install a manual transmission
The procedure for removing the gearbox must be carried out by driving the car onto an overpass or into a garage with an inspection hole. The wider and more spacious the pit, the easier it will be to do the work. Provide good lighting for the underside of the car, because all work will take place in semi-darkness.
The gearbox in the “ten” weighs about 30 kg, provided that the oil is drained. The weight does not seem very large, but keep in mind that you will need to hold the gearbox and unscrew the nuts. There are two options: work with an assistant or build a device into which you can rest the box when removing it and then grab it with both hands to remove it.
List of tools required for dismantling:
Further work is carried out in the following order:
- Remove the plastic engine protection by unscrewing the bolts with a socket wrench. We also remove the shield covering the engine compartment.
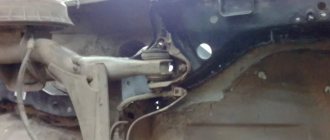
First you need to remove the crankcase protection
You need to insert a homemade chopper into the hole located under the inner CV joint.
Unscrew the gearbox mounting bolt
In order to remove the rear power support of the assembly you will need two keys
A thick screwdriver can be used as a crowbar to remove the gearbox from the guides.
After removing the box, it should be disassembled to carry out a visual inspection of the shafts and gears. If necessary, replace worn parts with new ones. When assembling the box, pay special attention to sealing the crankcase and replacing the seals.
Reinstallation of the box is carried out in the reverse order. If this is your first time carrying out a similar procedure, take photographs of each step, the location of parts and fasteners. This will help restore the sequence of actions.
Video: dismantling the gearbox on Lada 2110
After repairing the gearbox, you need to run in the new gears for some time, especially if you changed them block by block, in groups. During the break-in period, refrain from aggressive driving style. When switching to a higher speed, pause for one or two seconds, and when downshifting, on the contrary, engage a new one immediately. Always monitor the oil level - if it drops, take the time to crawl under the car and inspect for leaks at the junction of the cover and crankcase. Handle your vehicle carefully and the service life of the gearbox will increase.
Examination
Experts recommend paying special attention to the protective covers of the joints, monitoring their condition, and also checking the front suspension for mechanical damage. Make sure that neither the front suspension arm of the VAZ 2110 nor any other element has cracks or other visible damage. Pay attention to checking the connection points of the elements. If the components are deformed, the angle of the wheels will most likely be disrupted and they will no longer be able to be adjusted. Check ball joints, joints, upper stack mounts, cushions
If there are breaks in the rubber elements, they must be replaced. Measure the distance between the lower arm and the brake disc. This way you can check the condition of the suspension joint. If the distance is more than 0.8 millimeters, the hinge must be replaced with a new one. If the buffer shows signs of destruction, it should be replaced immediately. The spring is replaced if it has failed or sagged. Ball joints are replaced when they are worn or deformed. Other hinges must be replaced if they or the stabilizer bar struts are worn out. All rubber elements change under conditions of deformation or failure. If the fastening of the upper strut mount to the body is loose, simply try to tighten the fastening. Most likely, no major intervention will be required.
Understanding the structure of the front suspension, as well as audibly or visually identifying its malfunctions is quite simple, despite the apparent complexity of the assembly. But you should approach the issue carefully and periodically check the condition of the suspension, even if its malfunction is not indicated by any noise, knocking or behavior of the car on the road.
https://youtube.com/watch?v=SKYi74cgZFs
For any car, it is better to organize preventive maintenance than to later pay exorbitant prices for a full repair. Like a disease, it is better to prevent problems with the front suspension of the VAZ 2110 from occurring. It is cheaper, simpler and more correct on the part of the car owner.