It cannot be said that the interior provided by the manufacturer for the VAZ 2109 is a model for indication or an example of how not to make interiors. This is something average, ordinary for our time. Someone doesn’t pay any attention to the interior of their nine. Others, on the contrary, want to significantly improve it. That’s why we’ll be talking about improving the interior of the VAZ 2109 today.
Standard, gray interior
Seats
By replacing or upgrading the seats, you will have done almost half of the entire job of upgrading the interior. Just as for external tuning it is sometimes enough to install beautiful wheels, so for internal tuning it’s worth starting with the seats.
There are three main ways to add something interesting to your chairs:
- Use covers;
- Cover with leather or other material;
- Buy new seats.
Covers are the simplest and most versatile way to modify the interior of your VAZ 2109 without capital investments and with minimal installation costs.
Example of original cases
Cases
When purchasing and installing seat covers, be sure to pay attention to a few key points.
- Fasteners. The fastening systems used for current cases come in a wide variety - through cords, adhesive tapes, hooks, and braid. But all of them are far from perfect and are not capable of reliably and effectively fixing the pillow in its proper place. Over time, the fabric will stretch, the fasteners will lose their quality, and you will have to tighten the covers every time. The situation is exactly the same with the back row. To avoid this situation, sew the cover onto the edge of your seat trim.
- The backs of the front covers. They are put on separately, pulled over the chair. But the problem is that over time the backs become twisted. The defect is eliminated by sewing to the ends of the seat. The back of the rear seat has a folding lever, and there are grip holes on the back side. Therefore, be sure to choose covers with slots or make them yourself. Plus, we advise you to unscrew the decorative protection and attach the edges of the cover to the stiffeners. Putting the unit back together is not difficult.
- Cover maker. The VAZ 2109 car has been around for quite a long time. During this time, accessory manufacturers were able to study in detail all the strengths and weaknesses of the model’s interior, its features, and key nuances. Therefore, we advise you to choose trusted studios that have proven themselves well in the accessories market.
- Price issue. It is stupid to purchase consumer goods that will become unusable after just one season of use. But it’s not entirely reasonable to purchase sets of covers costing 10-15 thousand rubles. Today, eco-leather is considered the best option.
- Foam inserts. Many people use cases that have shaping inserts. They transform the shape of the seats, creating the effect of completely different chairs. Yes, lateral support will improve, but this will cause great harm to your health. Foam inserts create a greenhouse effect, which is why such inserts are harmful for car owners who spend a lot of time driving.
Bright and original
Why is it optimal to choose eco-leather for covers? This is due to the excellent characteristics of the material, which make it better than traditional leather and all similar options.
When choosing other materials from which covers are made, be prepared to personally become familiar with their negative sides.
Material
Features and Disadvantages
In winter, it will be cold on such covers, and in summer, due to the active heating of the interior by the sun's rays, it is almost impossible to sit in shorts inside the car
Tapestry, flock and other fabrics
The fabric actively accumulates dust, it quickly becomes dirty, but cleaning the covers is not so easy. They have to be removed, washed regularly, and special cleaning agents must be used.
They do not absorb moisture at all, so you will constantly sweat. This can cause allergic reactions, skin irritations and other troubles. Plus synthetics create static electricity
Interior reupholstery
Another good way to modify the interior. To do this you will need:
- Remove the seats;
- Remove the old sheathing, tear it apart, remove the pattern;
- Sewing elements of the new interior;
- Cover the chairs with them.
At the same time, it is recommended to change the padding to a more durable, wear-resistant material. Many additionally install a heating system, which has a positive effect on comfort, especially in winter.
The result of the constriction
Buying a new salon
Let's be honest, for the VAZ 2109, buying a new set of seats is the most effective, best, but at the same time the most expensive way of modification.
Much depends on which seat option you decide to purchase. Some people choose sports buckets, making the usual nine look like a sports car. Yes, it looks impressive and original, but you won’t be able to ride in buckets for a long time.
There is another option - comfortable, more modern sets of seats that will provide comfort. They are not so unique in their external characteristics, but they transform the appearance of the interior and change the understanding of comfort.
Chairs from a third party manufacturer
Causes of malfunction
Note that the reason that the fan does not turn on is problems with the power circuit. Oxidation of wiring contacts, blown fuse, faulty resistor - all this leads to the cessation of operation of the electric motor. Therefore, if it does not turn on, you should first check the power circuit components. Common problems with the fan motor are the occurrence of extraneous sounds during operation - squeals, rattling, interruptions in operation - spontaneous stopping, difficult starting, etc.
The reason for the appearance of third-party sounds:
- Deterioration in the landing bushings into which the electric motor rotor is installed, lack of lubrication in them. Because of this, the rotor becomes loose during operation, which creates increased vibrations and rattling, and “dry” friction is accompanied by squealing.
- Interruptions in operation are caused by critical wear of the graphite brushes and contact plates of the rotor. Because of this, the brushes and plates cannot make normal contact with each other, which leads to problems in the operation of the fan motor - it does not spin up when turned on and may stop spontaneously.
Troubleshooting the electric motor of the stove is a problematic process and not always advisable; it is easier to purchase a new fan and replace it.
Video: Repairing the VAZ 2114 stove motor
Tuning elements
If you want to turn your regular interior into a full-fledged, complete project, in addition to the door panels and seats, you cannot ignore the other components.
Salon element
What can be done
By default, the rear parcel shelf serves as a luggage compartment delimiter, although in most cases, during modification, acoustic equipment is installed there. The standard shelf is weak and of poor quality, so there is no point in trying to remake it. Just make a new one from sheets of quality plywood. Don't forget to add a thicker pad to make the acoustics sound clearer. Plus, it’s not scary to put something weighing more than 5 kilograms on the modified shelf
You should not try to change the steering wheel yourself unless you are an expert in this field. The easiest way is to find a ready-made steering wheel in the required color and material. Today they offer a huge range of products for the VAZ 2109. But it is important to consider two main points:
- The thick steering wheel will quickly tire you from driving;
- You should not use hygroscopic or porous materials for steering wheel trim, because if your hands become foggy or control with wet hands, they will begin to slide along the steering wheel.
Gearbox lever
The factory trim is far from perfect. Let's face it, she's disgusting. The available substitutes on the market have not gone much further, so it is best to sew the element. New sections are cut using the old casing, and the cover is placed on the lever. It is not necessary to change the lever head, since even in the stock version it is very good
The factory equipment does not include an armrest, although many motorists will agree that this is a useful element. So if you want, buy it and install it. Depending on the armrest you choose, you may have to make a couple of extra holes for installation.
You will see them only when the sun begins to hit your eyes. It’s not difficult to modify them - just change the trim, combining them with the front part of the cabin
Pads on the pedals
As a standard, rubber pads are put on the pedals. If you want, you can replace them with aluminum, special sports kits or similar ones. Just keep in mind that aluminum creates a rather slippery surface from which your foot can slip off at the most inopportune moment. This is not an isolated incident, so it is better to leave the old pad for safety reasons. Or install a new one on which the foot does not slip
Here you take an LED strip and install it wherever your heart desires. LEDs consume a minimum of electricity, so you definitely won’t have to buy a more powerful battery or generator to connect them
Pedal pads
There are a lot of ways to improve the interior of the VAZ 2109. Therefore, choose for yourself the method and what modification measures you use specifically for your car.
Most people do not dare to tune their own crayfish because they are afraid of doing something wrong or even causing a malfunction. Personally, I will tell you that tuning the interior of a VAZ 2114 is truly a great pleasure. This is explained by the simple design of the VAZ car. In order to do such work, hands, a head and the necessary tools are enough.
Many argue that to perform this work, without anyone's help, requires special education and a lot of practice. However, after you do the tuning of the VAZ 2114 interior with your own hands according to the instructions below, you can be convinced of the opposite.
How to tune the interior of a VAZ 2114 yourself?
First you need to change the appearance of the interior. To do this, we will need a fairly popular material - “vinyl leather”. It is sold in stores in a very large assortment. Therefore, you decide the problem of choosing a color yourself. Let's start with the sun visor.
Sunshield.
At the very beginning of the work, let's pay attention to the sun visors. First we have to remove them. Carefully cut the polyethylene, remove it and apply it to the underside of the “vinyl leather”. The next stage: we trace the outline, retreating one centimeter. Then we cut out the upholstery for the visors from our material. We make a bag from the pattern by sewing. The seam must be internal. We put the resulting bag on the visor and, using any long object, for example, a ruler, stuff the foam rubber into it. Then we sew up the hole through which we stuffed the “stuffing.” The sun visors can now be replaced.
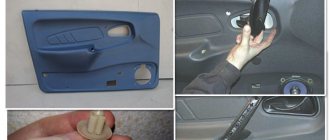
Door inserts.
The next step in our tuning is door inserts. Factory door inserts are made of fiberboard covered with regular fabric. Naturally, we remove these inserts along with the casing. In the same way as we did with the canopies, we make our own trim. Now comes the most difficult moment of our work - attaching the manufactured insert to the plate. Of course, this stage will not stop us from our goal! Using a staple gun we will solve this problem. Due to the risk of damage to the appearance, we buy staples number 8. Using a regular pistol, we shorten the mustache by about half. We load our staple gun with these staples and aim our workpiece against the fiberboard. A prerequisite for this work is a smooth surface of contact between our material and the slab. We put it back and admire our creation.
Conclusion.
You see, it’s not at all difficult to do the tuning of the VAZ 2114 interior with your own hands. At minimal cost, we were able to make the interior of your car the way you wanted it. In order to make tuning of the entire car you only need a little more effort on your part. Moreover, if you want to change something under the hood, then you will need a lot of literature about the design of your car, in particular the VAZ 2114 car.
Where to start
VAZ 2114 is an updated version of the already classic “Nine”. Engineers have improved the technical characteristics of the machine, which makes it very popular in our market. But many of the shortcomings remain the same, including interior comfort. This is why tuning is necessary. Many companies today offer professional services, but they are too expensive considering the price of the machine itself. Therefore, you can easily do it on your own.
The upgrade instructions are as follows:
- You need to start with the trim of the sun visors.
- Next, it is preferable to replace the doors and interior upholstery.
- You can finish it off with new covers.
The easiest way, of course, is to deal with the visors. To do this, they are removed, the old polyethylene is removed, and a pattern is made along the contour. Next, you need to cut out the selected shape from the fabric, leaving a centimeter of margin for the seam. Connects the pattern with internal stitches. Using a steel ruler, you need to put on the cover, filling the internal space with foam rubber. The second visor is upgraded in the same way as the first.
Do-it-yourself VAZ interior tuning
Do-it-yourself tuning of a VAZ interior is today one of the most popular activities for domestic car enthusiasts.
In this article you will find a lot of useful information, photos and videos, as well as various modification options for the most popular VAZ cars that will help you change the interior of the car according to your own preferences.
By tuning VAZ cars, you can add something unusual to the interior appearance of the vehicle. Therefore, it’s better to start with noise and vibration insulation. It often happens that this “element” can be easily improved with your own hands. After such work is completed, the car immediately becomes quieter and calmer. Of course, it does not reach the S class, but the overall level of comfort will depend only on your patience, work and partly on the money spent.
Tuning the VAZ interior photo of possible options opens up the widest scope for all sorts of improvements and modifications. One of the main stages of updating a car interior is the work that is done with the seats. Here you can install everything: from T-shirts or massagers on the seat to the installation of sports buckets.
Another original tuning option is replacing used seats. Here you should be careful with the size of the donor seats. It often happens that installing a seat from a BMW 7 leaves no room in the interior and a welder has to work. It is also possible to install new sports seats.
However, it should be noted that not everyone will be comfortable wearing them later. Here your own preferences come to the fore. Tuning the VAZ interior can be supplemented with various kinds of modifications to the dashboard, ceiling, steering wheel, maps. Here there is an opportunity for the tuner's imagination to run wild.
Additional tips:
- The tighter the material adheres to the case, the longer they will last. Therefore, it is better to take the time to remove the seats before installation.
- If the seats have built-in side airbags, then choose the appropriate cover models.
- The unraveling seam must be placed on the side where the Airbag pillow is located.
- Remove the seats. At least the front row. The quality of planting will be higher, and it will take less time. Removing the seats is quite simple: turn off the electrics and unscrew the mounting bolts of the slide.
- Be sure to turn off the ignition before removing the seats and rear sofa!
- There is no need to remove the plastic on the sides of the seats. In principle, it is not suitable for removal and returning it to its place can be problematic. To better push the cover fabric between the seat and the plastic, it is good to use a smooth metal plate (about the same as what doctors use to examine the throat).
- Squeeze the seat upholstery while pulling the cover. This will make it easier to install the covers without damaging the fabric around the seams.
- It’s unlikely that anyone is going to install seat covers in the cold, but just in case, it’s worth pointing out that it’s best to install protective coverings at above-zero temperatures. Especially if the covers are made of natural or artificial leather (eco leather). These materials “tan” and lose elasticity at low temperatures, so if you don’t have a warm garage, then summer is the best season to install covers.
Getting rid of noise in the VAZ 2106
Noise in the interior of “our” cars is, unfortunately, an integral feature, as, indeed, are potholes on the roads. Absolutely everything in the car rattles. Sometimes a simple car enthusiast gets used to this and does not pay attention. However, of course, there are owners who are trying to get rid of this drawback. There are several ways to eliminate noise in the cabin, each effective in its own way.
Do-it-yourself tuning of a VAZ 2106 at home involves eliminating the noise in the cabin by pulling it through and mounting everything that rattles on screws. Here, both ordinary rubber mats and polyurethane foam are used, which are used to fill the voids in the car body.
It should be recalled that if you have started a repair, the result of which should be the elimination of noise in the cabin, you will first have to completely disassemble the interior itself. This will subsequently allow you to get to problem areas.
The main noise comes from the front end, that is, the area under the driver and passenger seats. The hole for the gearbox, the front panel, and the internal cavity of the sills are also noisy. It is these places that need to be finished with high quality, first of all. Standard factory sound insulation is most often represented by several sheets of pressed tarred glass wool, which are glued piece by piece under the feet, as well as several sheets under the instrument panel.
Of course, this is not enough to avoid annoying noises. It is advisable to spray the front end with an anti-corrosion compound. But you need to glue sound insulation on top of it. You should not neglect regular polyurethane foam. It absorbs noise well. This material can be used to seal all corners and fill hidden cavities of car sills and side members.
You can also apply a thin layer of foam to the area where the gearbox will be located. This should be done from the inside of the cabin. The area under the rear seats is also better soundproofed. Attention should be paid to the wheel compartments through which noise from the wheels passes.
Types of repairs without welding
Experts say that independently eliminating defects on the surface of the body and paintwork is considered not a professional repair. Not every car enthusiast has a clear understanding of restoration techniques and the choice of consumables.
There are several methods of weldless installation.
These include:
- puttying the paintwork. A similar method is used to eliminate chips and cracks. This material allows you to create a smooth base for applying automotive paint. After prolonged grinding, the surface acquires a uniform shine;
- use of fiberglass and synthetic glue. This material is used to repair major damage. Epoxy resin and fiberglass are evenly distributed over the deformation areas. When exposed to high temperatures, they fill large cracks and chips. A similar restoration method is used to restore the bumper;
- soldering. Installation involves using a metal tab, which is tightly attached to the damaged body part. A high-power electric soldering iron creates the required temperature, which connects damaged elements to each other. The boundaries are cleaned with sandpaper, thereby creating a perfectly even coating for applying the paint and varnish composition;
- rivets. This restoration method is used to restore the underbody of a car. Metal rivets secure iron parts to each other. The advantages of this method are its endurance and durability.
Putty technique
To eliminate minor damage, use paint putty. This material evenly fills voids and helps to quickly level the surface for further painting.
The following compositions are used for work:
- fine-grained. It contains fine particles. This composition dries quickly after application and creates a dense base;
- medium grain Painting putty is used to restore the bumper and underbody of a car. The composition contains medium-sized particles. They penetrate into the crack cavity and fill the internal voids;
- coarse-grained. The composition is used to fill the boundaries of the weld. Thanks to this putty, it is possible to create a smooth transition between the load-bearing parts.
The recovery technology takes place in several stages:
- The damaged area is removed using a grinder.
- Next, an anti-corrosion compound is applied. It prevents corrosion after restoration.
- After this, they proceed to applying the putty mixture. Listen to each layer for 5 - 10 hours from the moment of application.
- The final step is to use sandpaper. It will smooth out the boundaries of the layers.
Technique using fiberglass and synthetic glue
Large areas of damage are repaired with fiberglass. This material is distinguished by its strength and endurance to further use. Epoxy resin is used to firmly fix this material. When heated, it is evenly distributed over the finishing material.
The damaged area is pre-coated with epoxy glue. Then several layers of fiberglass are applied. Each element should overlap the previous one by 3 cm. Using an electric soldering iron, glue the material to the damaged surface.
Tuning the interior of the VAZ 2107
Tuning a VAZ 2107 with your own hands, what can be done in the cabin? This question worries many car enthusiasts, and we will try to answer it for you. The domestic auto industry did not particularly care about the beauty of the interior of its cars. In this regard, many owners try to create the aesthetics inside the car themselves. Today, on the Internet and beyond, you can purchase various parts of materials that will help with tuning.
1. Since passengers in the car spend the entire journey in a sitting position, it is necessary to make the seats more comfortable compared to the factory version. Sports anatomical seats, which are created on the basis of foam, have increased density and are an excellent option for creating additional comfort. They are equipped with special lateral supports for the seat and back. Their design is designed to support the neck in a comfortable straight position without straining the lumbar muscles. After such modifications, driving a car will become much more convenient. A simpler option is to replace the seat covers.
2. Since childhood, many of us have felt like a racer. If you replace the standard steering wheel with a sports one, you can feel like a real Formula 1 car driver. The interior will have a unique and unique look if the steering wheel is also covered with leather, carpet, Alcantara or other material. For many, Alcantara is a new material. It has different structures and colors, but, among other things, it is durable and abrasion-resistant, but, accordingly, it is more expensive than leather.
3. Car enthusiasts often tune the VAZ 2107 torpedo. To remake it, you do not need to use expensive materials, and the possibilities are limited by our imagination. You can cover it with leather, velor, or beautifully trim it with carbon fiber or wood. When the design of the torpedo is changed, you can move on to tuning the dashboard.
Preparatory stages of putty
In the process of preparatory work, the following steps are required:
- The surface of the car is thoroughly cleaned. In particular, it is necessary to remove dirt, dust, and also rinse it with plenty of water.
- The entire surface area is treated with a solvent. This process will mark the boundaries of the area that will need to be puttied, and will also effectively identify any flaws.
- When carrying out preparatory work, many experts advise running your hand over it. This way you can feel all the protruding and rather sharp places, depressions and cracks. They will need to be sanded with fairly coarse sandpaper and all traces of rust removed.
It is necessary to carefully perform all of the above steps, as otherwise the putty may crack or even come off.
How to transform the interior of a VAZ 2109
Do-it-yourself tuning of a VAZ 2109 interior is an integral element with which the car can be given an original and unique look. Since the main disadvantage of the interior of the domestic “nine” is the relatively cramped space, internal modernization often consists mainly of installing sports seats, a beautiful europanel, and also changing the appearance of the gearbox. In the process of tuning the interior, it is necessary to touch the upholstery of the seats and the internal parts of the car.
As an upholstery material, it is better to use genuine leather. In a situation where you plan to use leather as a kind of “highlight”, you will also have to tint the windows, since leather heats up very quickly and is susceptible to fading in the sun. Covers, which are best purchased to order, can also extend the life of such seats. If reupholstering the interior using leather is not planned due to the high cost of such tuning, you can try using carpet of different colors. They can be used to cover podiums and false panels, boxes and acoustic shelves.
This way you can give your salon a unique look. Since the carpet is quite viscous, its use will not lead to the formation of all sorts of unattractive folds.
The interior of the "nine" also needs to be supplemented with a lighting system, but not connected to the car's on-board network. An alternative is a Chinese LED lamp, which does not quickly drain the battery. It is capable of providing quite good lighting. If you install a modern sound system in the “nine”, then your favorite music sounding from the new speakers will always create a great mood.
Types of repairs without welding
Experts say that independently eliminating defects on the surface of the body and paintwork is considered not a professional repair. Not every car enthusiast has a clear understanding of restoration techniques and the choice of consumables.
There are several methods of weldless installation.
These include:
- puttying the paintwork. A similar method is used to eliminate chips and cracks. This material allows you to create a smooth base for applying automotive paint. After prolonged grinding, the surface acquires a uniform shine;
- use of fiberglass and synthetic glue. This material is used to repair major damage. Epoxy resin and fiberglass are evenly distributed over the deformation areas. When exposed to high temperatures, they fill large cracks and chips. A similar restoration method is used to restore the bumper;
- soldering. Installation involves using a metal tab, which is tightly attached to the damaged body part. A high-power electric soldering iron creates the required temperature, which connects damaged elements to each other. The boundaries are cleaned with sandpaper, thereby creating a perfectly even coating for applying the paint and varnish composition;
- rivets. This restoration method is used to restore the underbody of a car. Metal rivets secure iron parts to each other. The advantages of this method are its endurance and durability.
Putty technique
To eliminate minor damage, use paint putty. This material evenly fills voids and helps to quickly level the surface for further painting.
The following compositions are used for work:
- fine-grained. It contains fine particles. This composition dries quickly after application and creates a dense base;
- medium grain Painting putty is used to restore the bumper and underbody of a car. The composition contains medium-sized particles. They penetrate into the crack cavity and fill the internal voids;
- coarse-grained. The composition is used to fill the boundaries of the weld. Thanks to this putty, it is possible to create a smooth transition between the load-bearing parts.
The recovery technology takes place in several stages:
- The damaged area is removed using a grinder.
- Next, an anti-corrosion compound is applied. It prevents corrosion after restoration.
- After this, they proceed to applying the putty mixture. Listen to each layer for 5 - 10 hours from the moment of application.
- The final step is to use sandpaper. It will smooth out the boundaries of the layers.
Technique using fiberglass and synthetic glue
Large areas of damage are repaired with fiberglass. This material is distinguished by its strength and endurance to further use. Epoxy resin is used to firmly fix this material. When heated, it is evenly distributed over the finishing material.
The damaged area is pre-coated with epoxy glue. Then several layers of fiberglass are applied. Each element should overlap the previous one by 3 cm. Using an electric soldering iron, glue the material to the damaged surface.
Soldering technique
Using a powerful electric soldering iron, parts are soldered to each other. The problem area is pre-treated to remove dirt and dust. The boundaries of defects are cleaned with sandpaper. After soldering, the protruding elements are removed with a hammer.
To get a smooth surface, use putty. It is applied in several layers and thoroughly sanded to an even base.
- The disadvantages of this restoration are:
- high cost of solder;
- short operation.
The metal patch should tightly cover the problem area.
Clock backlight in VAZ 2110
A watch is a useful thing. However, designers did not create this element of the interior of domestic cars as ideal. This concerns the lighting of the dial, which is not uniform. As a result, only individual parts are highlighted, and the arrows are poorly visible. In this situation, tuning the VAZ 2110 interior, or rather, its important element - the clock, will come in handy.
To make the backlight uniform, you should replace the factory light bulbs in the watch with modern LEDs. If you replace two light bulbs with LEDs, the illumination will be more uniform; the result ultimately depends on how the light from the diodes is scattered. If you install one instead of two LEDs, you can achieve an improved result. It should be placed in the center. You can abandon the factory bases and equip the watch with LEDs at your discretion.
However, in this situation, you will need to disassemble the watch and attach the required number of diodes with superglue. They need to be connected together, but at the same time, we must not forget about resistors. Also, if you wish, you can remove the filter or paint it the desired color.
Content
When carrying out tuning, many people pay attention to the fact that the interior should be changed. The interior of the VAZ 2114 is gray, unremarkable, and often shabby. At the same time, almost all cars of the automaker in question leave the water with an unfinished interior, which causes quite a lot of complaints. That is why, some time after purchasing a car, many people have a question: VAZ 2114 interior tuning - what stages of work need to be performed to improve comfort, what can be changed and what result can be achieved.
It should be noted right away that the result will depend on the investment; with the right approach, you can transform the interior of the vehicle almost beyond recognition. Let's consider all the features of transforming the interior of the car in question.
How to tune a VAZ 2114
Many owners want to make their car stand out from the crowd of other vehicles. To this end, motorists resort to various methods of improvement. To tune a VAZ 2114 with your own hands, you should know some nuances. Modernization can be carried out in different ways. First you need to reupholster the seats with new material. Which one - the choice is yours. I would like to immediately note that you don’t need to spend a lot of money on this; often the interior can be updated quickly, easily and on a budget.
When tuning a VAZ 2114, you can replace the factory steering wheel with a sports one. Go ahead. The dashboard is not only a decoration, but also a location for important information for the driver. Indicators of the number of revolutions, speed, necessary sensors and informers. In addition to a variety of inserts and overlays, tuning can also be done using black fiberboard inserts. They are very easy to install - you just need to secure them and then secure them with brackets. The panel lamps can be replaced with white and blue LEDs, which will create comfort in the car and will not strain your eyesight.
The interior can be re-upholstered in leather. Locks and windows, if desired, can be converted to automatic operation. The driver's doors can also be equipped with buttons for controlling the central locking and windows. Achieving high-quality sound in a VAZ 2114 is not easy. Therefore, you should install a new acoustic system, which, however, will be acceptable in price and quality.
For this option, for example, a Pioneer radio and amplifier are suitable. The speakers can be replaced with Fusion speakers. During installation, you will have to replace the stock podiums with a wooden shelf. The end result is a car that will be a pleasure to both drive and relax in. It would seem like a domestic car, but after some modifications you can even turn it into a convenient means of everyday use.
Changing the steering wheel
Before changing the shape of the steering wheel, make sure that this will not affect ergonomics and safety. In addition, the steering wheel of an exotic shape does not always comply with the rules of the road. Most often, the factory steering wheel is replaced with a sports steering wheel - this is the ideal solution: stylish, comfortable, certified.
Arch repair prices
Local painting of the inside of the arch per day 1000–1500 rubles. Local painting of the front arch per day 1000–1500 rubles. Local painting of the rear arch per day 1000–1500 rubles. Complete painting of the wing arch 1 day 1500–2000 rub. Full painting of the front arch 1 day 1500–2000 rub. Complete painting of the rear arch 1 day 1500–2000 rub.
Scratches and scuffs
Shallow (superficial) 15 min 400 rub. Average per day 1000–2000 rubles. Deep 2 hours – day 1000–2500 rub.
up to 5–10% of the part area 1 day 1000–1500 rub. over 10–15% of the part area 1 day 1000–2000 rub.
up to 5 cm 2–4 h 500–1000 rub. up to 10 cm per day 1000–1500 rub. up to 15 cm per day 1500–2500 rub. up to 20 cm 1-2 days 1500–3000 rub. over 20–25 cm 1-2 days 2000–3500 rub.
Removing and installing the wheel arch trim (extender) 15–30 minutes from 300 rub.
Puttying
So, if we are talking about minor damage, the putty method is used. Step by step it looks like this:
- It is necessary to thoroughly wash and dry the car.
- Remove all bare metal rust from the damaged areas and sand them thoroughly.
- Treat areas with reactive primer and allow the surface to dry.
Car rear arch putty
- Place acrylic filler on top of the reactive layer - under no circumstances should putty be applied to acidic primer.
- After the acrylic has dried, apply putty and wait for it to dry.
- Thoroughly sand the dried putty, gradually reducing the grain size of the abrasive. Thus, level the surface, preparing it for painting.
- Paint those areas of the car that have been repaired.
Wheel arch repair methods
When doing DIY repairs, two main methods are usually used:
You can putty only when the arch is not completely rotten. In this situation, you can simply remove the rust and clean the area with putty. However, this cannot always be done. If you have holes as a result of rust, simple putty will not help. In this situation, it will not be possible to cope without a welding machine.
Puttying
So, you can putty only if there is minor damage to the wheel arch.
To putty, you must perform the following algorithm of actions:
- We wash and dry the car;
- We remove all rust from clean metal, only after that we grind the metal;
- We treat the surface of the cleaned metal using a special solution. Reactive primer can be used as a solution. After application, allow the surface to dry completely;
- Acrylic filler is applied to the dried surface. The putty cannot be applied to acidic soil;
- After all the acrylic has dried, it is necessary to apply putty in an even layer. The putty must dry completely;
- After the putty has completely dried, it must be thoroughly sanded. This is necessary so that the surface of the wheel arch looks smooth, which will definitely not be noticeable;
- Areas that need to be repaired must be painted over. This will not only help hide the damage, but also prevent new damage from occurring.
Welding
Welding should be resorted to only when it is no longer possible to cope with conventional putty. Most often this happens when more than simple damage appears in the wheel arch, but holes form. Of course, you can guess that for such a method you must have a welding machine with you; you definitely won’t be able to cope without it.
So, to repair a wheel arch using the welding method, you need to perform the following algorithm of actions:
- First, thoroughly wash and dry the damaged area;
- We remove the affected areas using a grinder;
- Align and clean the edges of the arch;
- We align the patches and create the required shape from them;
- We prepare patches for the inner and outer parts of the arch;
- It is necessary to weld the inner part first, and then only the outer part;
- We grind the weld seams;
- We derive the geometry using putty;
- We sand the dried putty;
- Apply acrylic primer;
- Let's paint it over.
Selecting material for covers
It is necessary to choose the material for sewing covers especially carefully and responsibly. For this you can use very different materials, from cheap to very expensive. All of them are subject to the general requirements that we mentioned above. So, when choosing material for sewing covers, pay attention to the following options:
This option is considered the most luxurious, as it qualitatively improves the interior design of your car. It also increases the cost of the car when selling. The leather resists staining and does not require special care. Sewing leather covers requires special skills and some experience.
Neoprene
This synthetic material has excellent stretch, wear resistance, protects from dust, moisture, friction, does not burn or fade. It comes in different patterns and colors, which makes it possible to implement any design ideas. You can make products that are combined in texture and color.
Polycotton
This material perfectly combines the softness of cotton and the protective properties of polyester materials. It washes well, has water-repellent properties, is very soft and pleasant to the touch. Has a wide range of colors.
Velours
This material has an attractive appearance. At the same time, it is very durable and velvety to the touch. Fluffy and soft, it does not fade, washes well, is easy to cut and can be sewn on any sewing machine.
This fabric is remarkable in many ways. Easy to cut, affordable, sews well on any machine. Flock is easy to work with and does not require any special sewing skills from you. If desired, you can easily add decorative trim in the form of stitching or piping. It has a knitted base, excellent stretch, fits well on the seats, machine washable, wear-resistant and water-repellent.
Detailed description of the process: how to properly putty car parts and related nuances
Choice of putty
As a restorative material, primarily a polyester class of putty is used, which includes three types .
Finishing putty. It consists of fine fillers, thanks to which it is easy to apply in thin layers. Subject to shrinkage. Used as a final layer and when eliminating small irregularities ( 0.5-1.5 mm ).
Based on the classification data, it is easy to determine that an important component of the method of how to properly putty a car is a preliminary analysis of the surface being treated. Indirect parameters often play a role in the situation: the temperature stress of the damaged part and the nature of the defect.
Important:
- When restoring a hood exposed to heat, it is necessary to use a heat-resistant putty (often containing aluminum inclusions) as the base layer.
- If the area being treated is characterized by an impressive length and width (much more than 10x10), in the description of the putty you should look for an important property - elasticity.
Surface preparation
When processing large areas, it is advisable to use a grinding machine; local areas can be handled with a handy block with medium-grain paper (P 80-120) attached to it.
Many have learned how to properly putty car body parts from videos in which you can see that:
- cleaning is carried out with a small coverage of the area adjacent to the damage;
- grinding is carried out to a surface on which the use of a certain type of putty is allowed (usually primer or steel/aluminium).
A few words about the spatula
- A narrow spatula makes it easy to apply putty to the surface to be treated.
- A wide spatula is indispensable when processing a large area, when transitional stains after using a narrow tool are unacceptable.