Print this article Font size 16
At the end of the operational period or if the integrity of the cylinder head gasket is damaged, the element must be replaced.
The main sign of a malfunction or gasket wear is the formation of coolant and oil leaks at the junction of the engine block and the cylinder head.
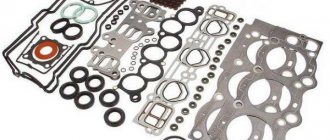
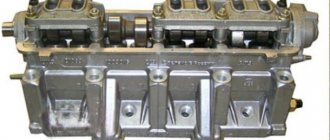
Cylinder head seals
Lada 2107 7up › Logbook › Two methods of tightening the cylinder head. Which one is correct? Let's figure it out.
I once had to climb into the engine and remove the head due to a burnt-out valve. Then the question arose: how to actually tighten the cylinder head according to science? In different manuals, this operation is described by two methods: 1. Tighten in several passes to a torque of 10.5-12 kg/m2. Pull up to 8 kg in several passes and then turn 90 degrees 2 times. Which method should you choose? The second method supposedly puts the bolts into elastic deformation mode, stretching them like a spring, while the moment goes beyond 13 kg/m. Being in a stretched state, the bolts compensate for the subsequent shrinkage of the gasket and tightening the bolts is no longer required. It goes without saying that re-tightening old bolts is fraught with entering the zone of plastic deformation and subsequent breakage. The fact that the bolts should be tensioned is in principle correct, but how can this be checked? Right! Moment! Having come to this conclusion, I decided to stall purely for the moment, and at the same time see how effective the second method would be. I took a click wrench marked up to 32 kg. I started with a smooth tightening from 2 kg in several passes and reached 11 kg and then the fun began. Each bolt began to live its own life. 70% of the bolts clicked when turned at the same angle, while the rest required turning more than 90 degrees to click. The cylinder head was previously milled and the plane of the block was carefully cleaned with a scraper. It turned out that the real compression of the gasket began only after 11 kg and took place in different areas with different intensities. If I had used the angle method, I would have gotten a scatter of moment across the entire plane and a bend in the cylinder head, which would have inevitably led to gasket burnout. Why is the gasket crimped at different speeds over its entire area? This may be due to the design features of the gasket itself; perhaps there is a curvature of the plane of the cylinder block. In any case, it is necessary to tighten solely using the torque on the torque wrench; this is the only way to guarantee tight and, most importantly, uniform pressing of the cylinder head plane to the block. At what torque should you turn? I settled on 13.5 kg, perhaps a bit too much, but good compression is guaranteed.
Mileage: 89100 km
Like 17 Subscribe
General rules for performing work, methods used
There are a number of general rules that must be followed when installing the block head:
It is important to strictly observe the tightening torque. For these purposes, a special tool is used - a torque wrench.
It is not recommended to perform this operation with regular keys; The head bolts must be pulled smoothly, jerking is not allowed. Since the tightening force on the last approaches is significant, extending the wrench arm with a pipe can simplify the procedure and ensure smooth, uniform tightening; Before installing the bolts, you need to carefully inspect the condition of the threads on them. There should be no dirt or foreign particles on the coils. The threads of fasteners should be lubricated with engine oil before tightening. But you should not pour grease into the holes for the bolts (especially for “blind” holes), since in the future it will not allow the fasteners to be fully tightened.
Despite the fact that each engine has its own characteristics of tightening the cylinder head, the general technology of this operation is the same. In general, two methods are used to tighten fasteners:
- In several approaches, bringing the tightening force to the required value;
- Tightening the fasteners to a certain force (in one or more approaches), and then tightening the bolts twice to a certain angle.
The tightening method is selected based on the type of bolts.
The first method is used when using non-stretching bolts (these are not used now, but they can be found on old cars). But often this type of fasteners requires tightening after a certain period of engine operation in order to compensate for the shrinkage of the cylinder head gasket. But such fasteners are allowed for reuse, and more than once.
The second method of tightening the block is relevant for most modern cars. And all due to the use of tensile bolts (the so-called TTY type).
Such fasteners, due to elastic deformation, are able to compensate for thermal expansion of the head and shrinkage of the gasket, but for this they need to be put into deformation mode (in fact, just stretched a little).
To do this, it is necessary to tighten the bolts twice to a certain angle. On some cars this angle is 45 degrees, on others it is 90 degrees.
But after the elements are put into elastic deformation mode, they will no longer be able to return to their original state, and therefore their reuse is not allowed due to the high probability of destruction.
Common Mistakes
Despite the fact that automakers clearly indicate the procedure and nuances of tightening the cylinder head, many car enthusiasts make mistakes when assembling the engine. The most common of them are:
- Pouring oil into the mounting holes to lubricate the threads (the liquid is incompressible, so poured oil will not allow the head to be properly tightened);
- Over-tightening (exceeding tightening forces leads to damage to the cylinder head and the fasteners themselves);
- The use of damaged or inappropriate keys (the edges of the bolt heads may be torn off, after which it will be problematic to tighten or unscrew them normally);
- Use of unsuitable bolts as replacements (fasteners from different engines may differ in length, thread spacing, head height and diameter);
To avoid problems in the future, you should use only fasteners designed for a specific engine and fully comply with the work conditions.
Reinstalling the head
Now you can carefully install the cylinder head in its place, making sure that at this moment the gasket does not slip out or move to the side. Of course, the guides fix it, but you should still be extremely careful.
Next, we will need a torque wrench, since the bolts will have to be tightened with a certain torque. It is also worth keeping in mind that the tightening order must be observed. The diagram below shows the sequence in which to twist:
Tightening procedure for cylinder head bolts
The standard tightening pattern starts from the central screws to the edges. This rule must be strictly adhered to in order to avoid distortion or cracking of the aluminum “motor head”.
Typically the sequence of actions for a four-cylinder model looks like this:
The following motors can be classified as standard row engines:
- ZMZ 406/402;
- GAZ 53;
- D 260;
- K24Z3;
- YaMZ 236;
- D 240.
Since these units are similar in design, the general system is applicable to them. This category includes the Lada Priora with 8/16 valves Chery Tiggo, and the VAZ 2108. Only Japanese engines of Mazda cars, some Toyotas, Hondas and Mitsubishi raise doubts. Due to the high-tech, complex design, the sequence of actions may vary.
Working with a torque wrench
Extreme caution should be exercised when using DMC. The tool is sensitive to mechanical damage - it’s easy to lose the calibration and the tool will become unusable
Depending on the type of key, the principle and sequence of operation differs.
Possible consequences
Leakage of lubricant through the oil seal is not dangerous only for the time being:
- Don’t forget about the dangers to the engine of oil leakage from the lubrication system: firstly, increased wear due to the parts running dry, and secondly, oil consumption for topping up, the price of which is also a pretty penny
- The timing belt can jump over a pulley tooth and even several teeth at once, all due to oil getting on the belt teeth caused by leaking camshaft oil seal, which causes an oil film to form on the timing belt
- If lubricant gets in (lubricant is a chemical), the belt begins to spread and can break under load at full speed of the car, you can imagine the consequences
- Therefore, if even minor oil stains are detected on the timing belt casing, it is necessary to immediately determine the cause of the stain.
A little about what an oil seal is in general:
An oil seal is a rubber-metal cuff that serves to seal the rotating parts of units and prevents liquids (lubricants) from leaking out of them. The name “seal” comes from ancient cars, where instead of a cuff, felt lubricated with lard (grease) was used. The cuff has a special edge, which when rotated creates a turbulence that prevents lubricant from flowing out of the unit. It is important not to confuse the direction of rotation (there are left and right cuffs), otherwise a new ideally installed cuff will leak
This is interesting: How to close the starter directly on a VAZ-2114 - photo and video
How to remove the cylinder head of a VAZ 2107
If you decide to change the cylinder head gasket or you have a burnt valve or other malfunctions, then you will have to partially disassemble the engine. And in this article I will tell you the entire sequence of actions so that you learn how to remove the cylinder head of a VAZ 2107 carburetor version and similar 2106, etc.
To begin with, we list the tools needed to remove the cylinder head: wrenches “13” “17” “21” spark plug wrench and a device for compressing the valve springs, as well as pliers and a screwdriver.
Before removing the part being repaired, you need to drain the coolant and loosen the clamps on the hoses leading to the cylinder head. Disconnect the high-voltage wires from the spark plugs. Next, disconnect the breather hose and remove the air filter. We unhook the choke cable from the carburetor, the gas cable, the wire going to the idle speed regulator, the hose of the vacuum regulator of the ignition distributor, the heating hose and unscrew the carburetor.
Unscrew the bolts of the intake and exhaust manifold. The next step is to remove the cylinder head cover and align the timing marks.
This procedure is done to speed up the assembly process. You can read how this is done in the article Replacing the timing chain on a classic. For engines with a belt, a similar procedure is performed. Unhook the wire from the coolant temperature sensor. Loosen the chain tensioner nut. Unbend the lock washer of the camshaft star bolt and unscrew it.
Remove the sprocket and secure the chain from falling.
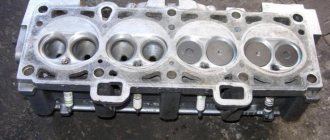
Remove the camshaft bearing housing, carefully, without dropping the washers, by unscrewing the 9 nuts. Now we see 10 bolts securing the cylinder head to the block inside and another one located outside. We unscrew them and the head is ready for dismantling.
Now you have learned how to remove the cylinder head of a VAZ 2107 and similar classic models. If you have any questions, please leave them in the comments.
Source
Required Tools and Process
In order to do it correctly, you will need:
- set of socket heads;
- extension;
- ratchet/wrench;
- torque wrench.
The replacement process itself should be performed according to the following scheme:
- Disconnect the wires leading to the emergency oil level and coolant temperature sensors.
- Drain the coolant.
- Remove the thermostat.
- Remove the air filter housing.
- Disconnect the exhaust pipe inlet from the manifold.
- Remove the casing, as well as the camshaft belt itself.
- Disconnect the drive rods of both dampers from the carburetor.
- Disconnect the wires going to the cylinder head.
- Disconnect the hoses suitable for the cylinder head by loosening their clamps.
- Remove the cylinder head.
- Remove the worn gasket.
- Clean the contact surface of the cylinder head from any remaining gasket material.
Installing the gasket and mounting the cylinder head in place is carried out in exactly the same sequence, but in reverse order. At the same time, it is worth paying close attention to such a factor as the tightening torque of the cylinder head of the VAZ 2114 8 valves - we will talk about it below.
The order of tightening the cylinder head bolts of VAZ 2112 16 valves
Reference sequence of actions.
- Completely degrease the flat surfaces of the block and head and allow to dry.
- Remove all debris and dust from the bolt sockets. If there is debris left inside, you won’t be able to tighten the studs all the way, as this could result in the threads being licked.
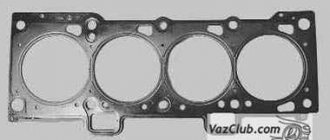
- Calibrate the guides and install a new seal. Only a metal gasket is used; the use of sealants, adhesives, and oils is strictly prohibited.
- Prepare the cylinder head for docking, pre-install and lubricate all components.
- Place the head on the gasket and lower the studs into the seats, after wetting them with a thin layer of motor oil.
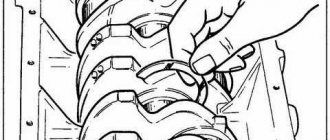
- Tighten the bolts in the sequence shown in the figure with a force of 20 N/m. (this is the first round)
- Next, rotate the elements 90 degrees and leave them alone for 3 minutes.
- By analogy, repeat point No. 7.
After this, you can continue assembling the motor as normal.
Replacing the cylinder head of Lada 2109 (VAZ 2109)
Repairing a cylinder head cannot be called a simple procedure, which requires certain skills and some experience. Repairs require special tools. As a rule, during this work the gasket is changed and the cylinder head tightening torque is adjusted: VAZ 2109 in our case. In order for the adjustment to be performed correctly, you must strictly follow the instructions. With a competent approach, you will successfully carry out the adjustment, achieving the desired result.
The majority of today's cars do not need tightening of the head bolts, but on the VAZ 2109, it is required at least to undergo maintenance.
If moisture begins to accumulate in those places where the block comes into contact with the cylinders, then this is a sure sign that urgent tightening of the bolts is required. Moisture in the above areas is a sign of a lubricant leak. The main reasons for tightening bolts are:
- damage to the cylinder head due to engine overheating;
Cylinder head - loss of tightness of the cylinder head gasket;
- the mileage specified in the instructions has been completed.
Adjusting the bolt torque
In order to do everything correctly and avoid mistakes, you must strictly adhere to certain rules and follow the order of execution.
Tightening should only be done with a special torque wrench, which allows you to control the tightening torque.
First, using a torque wrench, set the holder to the zero position. This means that the device data is equal to the moment of the original position. Then, you need to look at the indicator of the device when starting the fastener.
Rotating the holder, we monitor the indicators. If the moment has not changed, this means that the fastener can be stretched and this is normal, as it should be. If the torque increases rapidly, bolt movement must be achieved.
This indicates low stretch of the holder. This means stabilization is needed.
While the vehicle is running, the bolts that secure the cylinder head are constantly experiencing various impacts. They constantly heat and cool, which over time leads to the destruction of the structure of the fasteners.
For all power units there are specific rules that must be followed during operation:
- Strictly follow the data specified in the practical manual for the VAZ 2109.
- Adjustment is carried out only with a torque wrench. The use of another device will not allow this work to be performed correctly.
- Use only good bolts.
Replacement bolt kit - When starting to work, be sure to check the condition of the holders.
- Strictly adhere to the tightening torque values recommended by the manufacturer.
The most important data regarding adjustments is in the annotation for each specific car. As a result, you must carefully study and adhere to what is written in it.
During operation of the vehicle, you must strictly comply with all manufacturer's requirements and systematically diagnose the car.
Correct and smooth operation of the VAZ 2109 power unit prevents the need to adjust the cylinder head holders.
Since the cylinder head of the VAZ 2109 is a complex unit, it is necessary to carry out repair work only with absolute confidence in your actions. Strictly observing the order of work. If a deviation in the operation of the motor is detected, immediately carry out diagnostics. This will avoid more expensive repair work.
Tightening diagram
The cylinder head tightening pattern is the same as on traditional models and you need to start from the center. It takes place in four steps.
- tightening torque 2.0 kgf/m
- tightening torque 7.5 - 8.5 kgf/m
- turn it 90 degrees.
- turn it again by 90 degrees.
To make it clearer, let’s describe this process in more detail:
- Using a torque wrench, tighten the bolts in the sequence shown in the figure to 2.0 kg/cm.
- Then we go around the second circle and reach 8 kgf*m.
- Next, twist it 90 degrees.
- We go around the second circle, twisting another 90 degrees.
Attention! On 16-cl power units, bolts can be reused, but if their length is no more than 95 millimeters.
Otherwise it changes. The length is measured along with the washer. Do not try to replace the torque wrench with another device, otherwise the consequences may be unpredictable.
Video “Braching the cylinder head”
In this video, an experienced specialist explains in detail how to properly carry out work on the cylinder head and what tools are needed for this. On the VAZ 2109 they follow the same pattern.
https://avtozam.com/vaz/2109/zatiazhka-boltov-gbtc/
When is it necessary to puff?
On most injection and carburetor cars with engines of 8 and 16 valves, there is no need to tighten the cylinder head bolts during operation of the car. But in the case of the domestic “Nine”, it is necessary to correctly stretch the cylinder head and tighten the screws at least when carrying out maintenance of the machine. If it is discovered that moisture has begun to accumulate in the car at the point where the block itself comes into contact with the cylinders, then the bolts will need to be tightened. Since the appearance of moisture in this place indicates a possible leak of motor fluid.
For what reasons may a tightening be necessary:
- The device has been damaged due to engine overheating. Operating the motor in conditions of excessive temperature is fraught with serious malfunctions. The cylinder head of the power unit will need to be repaired, polished and then installed with tightening.
- The cylinder head gasket is damaged or has lost its tightness. If this problem is not resolved in a timely manner, engine fluid will enter the cooling system. A damaged gasket must be replaced. After changing the part, the head bolts must be tightened correctly.
- The engine has run for a certain time.
Start of work
The very first step is to remove the air filter. Of course, on a carburetor engine it is somewhat easier to remove it. If you have an injector, you will have to tinker with its rubber fasteners. But the essence remains the same - it is necessary to disassemble the fuel system completely to get to the cylinder head. But we will look at the example of not an injection, but a carburetor seven. Still, there are many more classic cars with such a power system.
We recommend: Fixing the problem with low beam lamps on the Lada Kalina
It is advisable to dismantle the carburetor, since if you remove the head along with it, you can accidentally damage it. On all classic series cars, the carburetor is removed in the same way. This procedure is quite simple, but it will take some time. Now you can unscrew the nut securing the distributor and remove the distributor along with the wires. Getting closer to the engine, all that’s left to do is drain the antifreeze from the system.
And then turn off all the pipes that you see. After this, it will be possible to dismantle the cylinder head cover. It is secured with nuts and shaped washers. Don't lose them during repairs. That's all, the preparation is complete, you can begin the most difficult part - dismantling and installing the cylinder head.
How to lap valves
To do this, you will need a drill - either manual or electric, as long as it has a reverse function. You also need an old valve, from which you need to make a small adapter. It will need to be clamped into a drill. In addition, you need to get a small piece of durable rubber hoses. You will also need to purchase lapping paste. Please note that there are two types - for coarse and fine grinding. It is also worth considering that you need to place the valve on the seat to which it was ground. Otherwise, the work will be completely disrupted. There will be no tightness between the valve disc and the seat. This work will also need to be carried out if the cylinder head is being replaced. The cylinder heads of the VAZ engine must be ground into new valves.
A prerequisite is the presence of a drill with reverse. It is necessary to turn the valve in different directions evenly so that the surfaces are as smooth as possible. It is worth noting that a coarse-grained paste is used first, and after it removes all small irregularities from the surfaces, it is necessary to wipe it off and apply a fine-grained one. The latter will allow you to clean the valve plate and seat to a shine. Please note that the lapping paste is an abrasive material, so it is unacceptable to get into the cylinder and other rubbing engine components. Carry out valve grinding work away from the engine to prevent paste from getting into the cylinders. Also, be sure to clean it after the process is complete.
Replacing the cylinder head gasket on a VAZ 2109
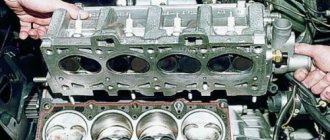
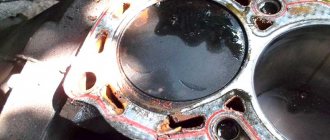
At the end of the operational period or if the integrity of the cylinder head gasket is damaged, the element must be replaced.
The main sign of a malfunction or gasket wear is the formation of coolant and oil leaks at the junction of the engine block and the cylinder head.
Cylinder head seals
To change the gasket, you will need to dismantle the assembly, get rid of the worn cylinder head gasket and reassemble the structure in the reverse order, following the recommendations regarding the tightening torques of the cylinder head bolts. We will tell you about all this in more detail.
https://youtube.com/watch?v=pW9OyNFXEcU
- Disconnect the wiring from the coolant temperature sensor and emergency oil pressure sensor.
- Remove the thermostat, just remember to drain the coolant first.
- Remove the air filter housing. There is no need to remove the carburetor, because it will not interfere with replacing the gasket.
- Disconnect the exhaust pipe from the exhaust manifold.
- Remove the camshaft drive gear after first setting the piston of the first cylinder to the TDC position. Now you can remove the protective casing of the camshaft drive belt, loosen the gear fixing bolts, securing the gear from turning.
- Remove the camshaft drive belt. Then you can completely unscrew the mounting bolts and remove the gear.
- Press the latch to disconnect the wiring block from the ignition distributor.
- Similarly, turn off the central high voltage.
- Loosen the clamps to remove the fuel supply hose from the fuel pump.
- Disconnect the throttle and air damper drive rods from the carburetor.
- Disconnect the power supply from the solenoid valve.
- Remove the vacuum booster hose from the intake pipe fitting.
- Disconnect the tube from the vacuum ignition corrector.
- Loosen the tension on the clamps to remove the interior heating hoses from the pipes.
- Remove the cylinder head. Using a socket with an extension, the mounting bolts are unscrewed.
- Rock the head a little jerkily, then remove the element.
- Remove the old gasket, clean it of any remaining rubber seal and other contaminants. Wipe dry thoroughly, after which you can reassemble.
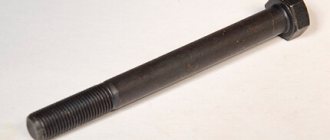
- Before assembly, check whether the length of the cylinder head bolts is within the normal range. Ideally, their length is 135.5 millimeters. If the bolts have lengthened during use, then all bolts will have to be replaced.
Replacement procedure
Reassembling the unit if you strictly follow the instructions for dismantling work will not pose any particular problems.
An incredibly important aspect of replacing the cylinder head gasket and all other activities associated with removing the head is the correct adjustment and tightening of the bolts.
Tightening the bolts is done strictly with a torque wrench, which will allow you to control the tension torque.
Here are some guidelines for using this specialized wrench and checking the current tension condition:
- Place the holder in the zero position. This will indicate that now the key data is equal to the moment of the original position;
- Look at the torque tool readings as you begin to tighten the bolts;
- Rotate the holder, monitor the indicators;
- If the torque does not change, the fastener may be stretchable, which is normal. This is exactly what should happen;
- If the torque increases rapidly, bolt movement should be achieved. That is, the stretch of the holder is small, it needs to be stabilized.
Golden rules of tightening
To properly reassemble the cylinder head, you need to adhere to the golden rules:
- Strictly follow the tightening torque data corresponding to the VAZ 2109;
- Make adjustments only using a torque wrench. Other tools do not allow you to get the desired result;
- To install the cylinder head, use only serviceable bolts that meet the requirements of your engine installed on the VAZ 2109;
- Before work, make sure that the holders are in good condition.
Checking the bolts
Tightening diagram
In addition to observing the required tightening torques for the cylinder head mounting bolts, one more rule must be observed here.
Returning the bolts to their places is carried out strictly according to the diagram below.
Tightening sequence
Next, do the work according to the table, and you will do everything right.
Tightening is performed in four circles, following the sequence of work with the mounting bolts indicated in the diagram.
When is it necessary to puff?
On most injection and carburetor cars with engines of 8 and 16 valves, there is no need to tighten the cylinder head bolts during operation of the car. But in the case of the domestic “Nine”, it is necessary to correctly stretch the cylinder head and tighten the screws at least when carrying out maintenance of the machine.
For what reasons may a tightening be necessary:
- The device has been damaged due to engine overheating. Operating the motor in conditions of excessive temperature is fraught with serious malfunctions. The cylinder head of the power unit will need to be repaired, polished and then installed with tightening.
- The cylinder head gasket is damaged or has lost its tightness. If this problem is not resolved in a timely manner, engine fluid will enter the cooling system. A damaged gasket must be replaced. After changing the part, the head bolts must be tightened correctly.
- The engine has run for a certain time.
Read more: How to install Bluetooth into any car radio yourself
Step-by-step instructions for replacing the cylinder head gasket
The design features of the Niva Chevrolet make it possible to remove the cylinder head without good access from below. However, the presence of an inspection hole or lift greatly facilitates access to some nuts and the coolant drain valve. There is no need to remove the engine, but it is advisable to clear the space under the hood of interfering hoses and wires.
For repairs you will need the following tools:
- set of keys and socket heads;
- powerful wrench, ratchets, extensions;
- hammer;
- flat screwdriver;
- head or special wrench 38 for cranking the crankshaft;
- torque wrench;
- brake pipe wrench (suitable for oil line).
Conventionally, all work on replacing the cylinder head gasket on a Niva can be divided into 2 stages: removing all attachments and all electrical sensors from the cylinder head, removing the timing mechanism and attaching the head to the cylinder block.
Procedure for removing the cylinder head of a Chevy Niva
The work algorithm is as follows:
- Drain the antifreeze from the radiator and engine block. To do this, unscrew the plug on the block with a 13 key. In this case, there is no need to drain the oil from the crankcase. Remove the terminal from the battery. We move the gearbox to neutral position.
- While the coolant is draining, we begin to disassemble the engine from the hood side. We unscrew the throttle valve, remove the throttle cable, remove the wires from the spark plugs, disconnect the electrical connectors of the injectors, TPS, IAC, oil pressure and coolant temperature sensor.
- Now you can disconnect all the cooling system hoses going to the thermostat, heater core and throttle body heating. Remove the brake booster hose from the intake manifold.
- We take the engine wiring harness and all removed hoses to the side and secure them if necessary.
- We unscrew the protective screen of the exhaust manifold, loosen the 4 nuts securing the exhaust pipe to the exhaust manifold. For the convenience of further actions, the exhaust pipe can be removed from the lower mounts and completely lowered under the car.
- On a Chevy Niva with power steering, the pump mounting bracket will interfere with us. It is not necessary to remove it completely - just unscrew the fastening bolts and carefully hang it on the wire.
- Now you can start opening the engine. Remove the valve cover. Using a special wrench, unscrew the oil line to the hydraulic compensators and chain tensioner.
- Set the piston of the first cylinder to TDC until the marks align by turning the crankshaft. Loosen the chain tensioner and unscrew the top sprocket. We immediately fix it in this position with wire to prevent the circuit from jumping and phase failure.
- Unscrew the 10 nuts securing the camshaft housing with bearings. You need to unscrew evenly around the entire perimeter (according to the tightening order in the instructions). Remove the assembly from the engine.
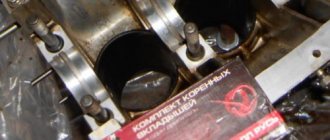
- Access to 10 cylinder head mounting bolts is now open. You need to tear them off with a wrench, starting from the middle and moving to the outer bolts. The bolts are removed from their places and checked for thread condition and possible elongation (no more than 117 mm).
- Gently tapping and prying from below with a screwdriver, pull the cylinder head out of its place. After which you can remove it from the engine along with the collectors. The mass of this unit allows you to perform the operation yourself.
After removing the old gasket, possible damage and wear of the surfaces are assessed. If no repairs are required, the valves do not have carbon deposits, and all dimensions are within tolerance, then you can immediately begin replacing the cylinder head gasket and assembling the engine.