VAZ cars of the 2112 family were produced with two 16-valve valves: 21120 and 21124. The cylinder head of these engines has different intake ports. In theory, there are no other differences. And therefore, the tightening torque of the bolts on the VAZ-2112 cylinder head will be the same if we talk about any 16-valve internal combustion engine. Tightening is performed in three steps, although repair books give another option (it is for 8-valve engines).
The following video shows how the cylinder head is installed in 5 minutes:
Consequences of incorrect cylinder head installation
Correct tightening of the cylinder head is very important, since the performance of the motor directly depends on it. The cylinder head acts as a cylinder cover, and any violations in its fit affect the processes occurring inside the power unit.
Insufficient tightening of the head leads to a drop in compression due to loss of tightness at the junction of the cylinder head with the cylinder block, burnout of the gasket, breakthrough of working gases from the cylinders and their entry into the channels of the lubrication or cooling systems, penetration of technical fluids into the combustion chambers, which in turn is negative affects the functioning of the power unit and can cause very serious damage.
Excessive tightening also does not bring anything good; in this case, damage to the head often occurs - cracks appear, or fasteners are destroyed - bolts break, threads break, etc.
Uneven or incorrect tightening often causes warping of the head, due to which gaps appear at the junction of it with the block, which leads to the same consequences as insufficient tightening.
see also
The cylinder head gasket has smaller holes for coolant
0 2 1k
The cylinder head gasket on 2112 was broken
- 0 1 809
What is needed to replace the cylinder head gasket on a 2112?
- 0 1 1k
I unscrewed the cylinder head bolts, do I need to change the gasket?
- 0 2 1k
How to eliminate craters on the block and cylinder head?
- 0 1 0
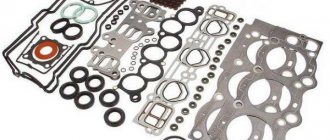
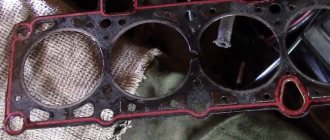
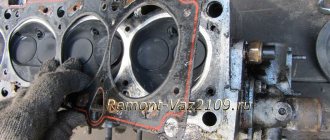
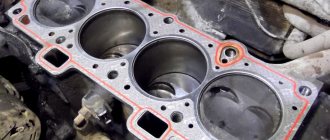
The cylinder head gasket is a perforated sheet made of iron and asbestos or aluminum paronite with edging on the sides and holes for cylinder chambers and connecting bolts. The main task of the cylinder head gasket is to seal the connection between the planes of the cylinder block. In addition, the gasket maintains the required internal oil pressure in the engine system and also prevents mixing of coolant and engine oil.
Part Features
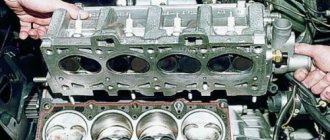
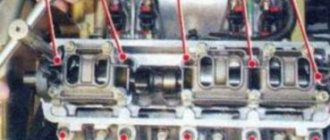
The cylinder head is a structurally quite complex part. It is a massive plate in which there are channels for the circulation of fluids of the lubrication and cooling system, and technological holes - spark plugs, for injectors (in diesel engines), mounting holes.
Also on top of the cylinder head there is a so-called “bed” of the camshaft - a seat for its installation.
Despite its massiveness, the block head is a fragile part due to the voids inside, so excessive tightening force often leads to cracks in the walls and bridges.
For the manufacture of cylinder head, two types of metals are used - aluminum (the most common) and cast iron.
To secure the latter, steel bolts or studs with nuts are used. For example, the head of the UAZ 31519 block is secured with studs.
The difference in the materials used to make the head and its fasteners has one negative factor - different thermal expansion of the components when heated, especially for aluminum cylinder heads.
Uneven tightening of fasteners (nuts, studs, etc.) during thermal expansion leads to the appearance of excessive stress in the metal structure, resulting in warping of the head.
Articles
Before you start replacing the gasket, you should purchase this gasket. Although any car store will select a suitable spare part for you, it is better to know its part number. The most suitable gaskets for the VAZ-2110 are:
- The original VATI gasket, which has the article number 21083100302020.
- Part VICTOR REINZ. This item is of higher quality than the original. Its article number is 613666000.
- TRIALLI gaskets, which have the article number GZ.
It’s better to immediately buy a better quality spare part than to bother with disassembly again later.
Bolt tightening conditions
When installing the cylinder head, it is important to comply with the tightening technology, which includes a number of criteria:
- Tightening order;
- An effort;
- Condition of fasteners (for example, studs with nuts);
Each engine has its own tightening order, which must be followed to ensure uniform tightening of the head to the block and to prevent the occurrence of stress on any surface areas. For example, on a VAZ 2105 it looks like this.
Force is another important factor for the correct fastening of this engine element. Attracting the plate is carried out in several approaches (their number differs on different motors), each of which is performed with its own force.
The cylinder head fasteners are tightened with quite a lot of force, which leads to them being pulled out. Therefore, on many engines, bolts cannot be reused; they must be replaced. But there are also motors for which replacement of fasteners is not necessary and their re-installation is possible.
All information regarding the cylinder head tightening technology is indicated in the technical specifications. documentation for the car, it is also often indicated on the packaging of head gaskets and fasteners.
Video
The video (Auto_Remont channel) describes in detail the process of installing and assembling the cylinder head on a VAZ 2112.
Do you have any questions? Specialists and readers of the AUTODVIG website will help you ask a question
Was this article helpful?
Thank you for your opinion!
The article was useful. Please share the information with your friends.
Yes (60.00%)
No (40.00%)
X
Please write what is wrong and leave recommendations on the article
Cancel reply
Rate this article: ( 5 votes, average: 4.60 out of 5)
Discuss the article:
General rules for performing work, methods used
There are a number of general rules that must be followed when installing the block head:
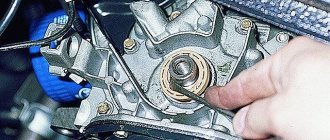
- It is important to strictly observe the tightening torque. For these purposes, a special tool is used - a torque wrench. It is not recommended to perform this operation with regular keys;
- The head bolts must be pulled smoothly, jerking is not allowed. Since the tightening force on the last approaches is significant, extending the wrench arm with a pipe can simplify the procedure and ensure smooth, uniform tightening;
- Before installing the bolts, you need to carefully inspect the condition of the threads on them. There should be no dirt or foreign particles on the coils.
- The threads of fasteners should be lubricated with engine oil before tightening. But you should not pour grease into the holes for the bolts (especially for “blind” holes), since in the future it will not allow the fasteners to be fully tightened.
Despite the fact that each engine has its own characteristics of tightening the cylinder head, the general technology of this operation is the same. In general, two methods are used to tighten fasteners:
- In several approaches, bringing the tightening force to the required value;
- Tightening the fasteners to a certain force (in one or more approaches), and then tightening the bolts twice to a certain angle.
The tightening method is selected based on the type of bolts.
The first method is used when using non-stretching bolts (these are not used now, but they can be found on old cars). But often this type of fasteners requires tightening after a certain period of engine operation in order to compensate for the shrinkage of the cylinder head gasket. But such fasteners are allowed for reuse, and more than once.
The second method of tightening the block is relevant for most modern cars. And all due to the use of tensile bolts (the so-called TTY type).
Such fasteners, due to elastic deformation, are able to compensate for thermal expansion of the head and shrinkage of the gasket, but for this they need to be put into deformation mode (in fact, just stretched a little).
To do this, it is necessary to tighten the bolts twice to a certain angle. On some cars this angle is 45 degrees, on others it is 90 degrees.
But after the elements are put into elastic deformation mode, they will no longer be able to return to their original state, and therefore their reuse is not allowed due to the high probability of destruction.
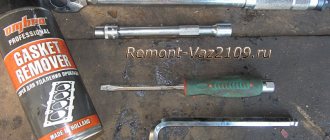
Tools
Although this part can be replaced right near the house, it is better to carry out all replacement operations in the inspection hole. To replace you will need the following tools:
- Set of sockets for ratchet. Heads must be from 10 to 19;
- Torx key;
- Several screwdrivers;
- Candle key;
- Torque wrench.
A special liquid, WD-40, will also come in handy, which will help when unscrewing soured bolts. As the practice of such repairs shows, during disassembly it is often necessary to use other tools, so having them will never hurt.
General procedure
Although tightening the cylinder head has many nuances and features, the general technology of the operation is not complicated, it is only important to comply with the conditions.
The general algorithm of work is as follows:
- We study the documentation (tightening order and force);
- We prepare the tool;
- We inspect and wipe the surfaces of the block and head, clean the mounting holes (with a rag or compressed air);
- We lay the gasket;
- We put the block head in place (the correct placement of the gasket and head is ensured by guide bushings);
- Lubricate the threads of the fasteners;
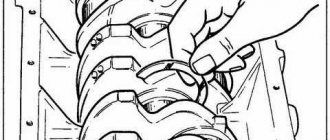
- We install the latter in the holes and tighten them by hand;
- We specify the drawing scheme, the number of approaches and the force of each of them, as well as the time of breaks between approaches (all this is indicated in the documentation);
- We make the first approach, observing the tightening order (for convenience, you can mark the bolts according to the order with a marker). In the photo is a VAZ 2103;
- We carry out all subsequent approaches.
Some vehicles additionally require re-tightening of fasteners after a certain period of vehicle operation. This information must be indicated in the technical documentation.
Replacement procedure
The replacement process occurs as follows:
- First you need to disconnect the battery; to do this, remove the negative terminal.
- You need to disconnect the exhaust pipe from the muffler.
- We dismantle the carburetor.
- Next, you need to disconnect all the sensor terminals, and all the wires are disconnected from the spark plugs.
- The next step is to disconnect the vacuum booster from the intake manifold.
- The distributor sensor is disconnected.
- Disconnect the high-voltage wires.
- Unscrew the nuts and remove the sensor.
- The fuel pump and the housing of auxiliary devices are dismantled.
The roller and timing belt are removed.
- The pulley is dismantled, after which you need to remove the timing cover.
- Disconnect the hoses and unscrew the cover nuts.
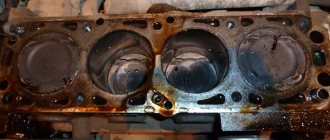
After this, all that remains is to unscrew the bolts and remove the block head. After removing the old gasket, you need to carefully inspect the contact surfaces of the head and cylinder block. There should be no dirt or residue from the old gasket on them. All obvious signs of contamination must be eliminated.
Some nuances
The tightening torque is one of the main factors for the normal fit of the block head. But this criterion is influenced not only by the applied force, but also by the fasteners themselves:
- General condition of the bolts – new or used;
- Presence of lubricant on the threaded part;
- Thread condition.
The type of power plant (petrol, diesel), as well as the number of valves, does not affect the cylinder head tightening technology. But this does not mean that the force and tightening procedure are identical for all motors, and before seating the head, you should definitely study the conditions for performing the operation and all its features.
How to carry out repairs
In order to repair the block voice, you will need the following tools:
- Device for compressing valve springs. You can use both “store-bought” and homemade. The main thing is that it is convenient to work.
- Device for pressing out oil seals.
- A tube-shaped mandrel for installing caps.
- "10" keys, hexagons, tweezers and screwdrivers.
Perform the following manipulations:
- Carry out all the steps to remove the head and camshafts.
- Remove all valves using a special device.
- Remove the valve stem seals.
- Replace and grind the valves. Valves need to be replaced if there is damage - burnouts, geometry violations. Be sure to sign which seats you are lapping the valve on - otherwise the tightness will be broken.
- Assemble all the valve drive mechanisms - hydraulic pushers, springs, secure them with bread crumbs.
Common Mistakes
Despite the fact that automakers clearly indicate the procedure and nuances of tightening the cylinder head, many car enthusiasts make mistakes when assembling the engine. The most common of them are:
- Pouring oil into the mounting holes to lubricate the threads (the liquid is incompressible, so poured oil will not allow the head to be properly tightened);
- Over-tightening (exceeding tightening forces leads to damage to the cylinder head and the fasteners themselves);
- The use of damaged or inappropriate keys (the edges of the bolt heads may be torn off, after which it will be problematic to tighten or unscrew them normally);
- Use of unsuitable bolts as replacements (fasteners from different engines may differ in length, thread spacing, head height and diameter);
To avoid problems in the future, you should use only fasteners designed for a specific engine and fully comply with the work conditions.
Signs of a broken gasket
You can find out that the seal of the connection is broken for the following reasons:
- White vapor appears in the exhaust gases.
- You may notice oil stains in the antifreeze.
- Leak in cylinder head connections.
- There is a large amount of oil in the pan.
- You may notice foam around the filler cap.
Although it seems that it is very difficult to notice the vapors in antifreeze, this can be done by placing a bag over the neck of the open expansion tank. If there are gases in the antifreeze, the bag will inflate.
Features of the work performed using the example of some cars
To prove the proposition that each power plant has its own characteristics of tightening the cylinder head, let’s consider the nuances of performing work on specific models.
VAZ-2112 16 valves
A number of modifications of the VAZ-2112 were equipped with two types of 16-valve power plants (factory indexes - 21120 and 21124). These two motors, despite some design features, have identical head tightening technology.
These units use 93mm long tension bolts. In this case, reuse of fasteners is allowed, but under one condition - if their length does not exceed 95 mm (if it is longer, they should be replaced). 10 bolts are used to secure the head.
Tightening is carried out in three approaches:
- The bolts are tightened according to the order with a force of 2 kg/m;
- Turning 90 degrees;
- Repeated tightening to 90 degrees.
The drawing diagram is shown below.
Between the 2nd and 3rd approaches you need to take a 20-minute break.
Since these engines use tensile bolts, additional tightening is not required during vehicle operation.
VAZ-2107
On the VAZ-2107, all installed modifications of power units are 8-valve.
The block head is attached to them with 11 bolts, 10 of which are main, and 1 is an auxiliary side bolt (installed in the side protrusion).
On this car, tightening fasteners is also performed in three approaches:
- 10 main bolts are tightened in order with a force of 3.5-4.0 kg/m;
- The same bolts reach with a torque of 11.5-12.0 kg/m;
- The auxiliary is tightened with a force of 3.5-4.0 kg/m.
Additional tightening of the cylinder head is not required when operating the VAZ-2107.
"Samara", 10th family, Priora
On models of the Samara family (2108-21099), as well as VAZ 2110-2112 with 8-valve units, tightening is already performed in 4 approaches:
- Tightening with a force of 2.0 kg/m;
- Reaching with a moment of 7.5-8.5 kg/m;
- Turn 90 degrees;
- Repeated rotation by 90 degrees.
The break between points 3 and 4 is 20 minutes.
As for the VAZ of the “tenth” family, which are equipped with 16-valve engines, their tightening technology is the same as that of the VAZ-2112 (described above).
The same applies to the Lada Priora; on 8-valve units, a method with 4 approaches is used (VAZ 2108-21099), and on 16-valve units, 3 approaches are used (VAZ 2112 with a 16-valve engine).
"Volga"
On ZMZ-406 engines installed on the Volga, according to the automaker’s technical documentation, tightening the engine block head bolts is carried out in two approaches:
- With a force of 4.0-6.0 kg/m;
- With a moment of 13.0-14.5 kg/m.
But many car owners of this car note that this technology does not allow the cylinder head to be properly tightened, so they use techniques with a large number of approaches.
A common method is the cross method, performed in 4 stages and with the following efforts:
- 4.0-4.3 kg/m;
- 7.5 kg/m;
- 11.0 kg/m;
- 14.3-14.5 kg/m.
Subsequent tightening of the bolts is not required when operating on this engine.
Replacing the engine of a VAZ 2111 (8 cells) with a 2112 (16 cells) | Topic author: Kakalina
Good afternoon The other day I purchased a VAZ 2111 with a 1.5 8 cl engine.
Igor (Anian) Mikhail, I have a 2112 16 valve engine in my V8, I converted it from a carburetor to an injector! I think everything will work out for you without any problems! Of course I didn’t do it myself
Mikhail (Armide) Igor, well, this is on 8, there are different fastenings and different wiring. It should be easier for me. I'm mainly thinking about fastenings and wiring.
Igor (Anian) the main thing is that the piston is “stick-free”; it’s just better to take care of this right away than to accidentally get stuck for a large sum of money later!
Igor (Anian) Mikhail, it even fit on my original pillows, and I completely changed the wiring.
Mikhail (Armide) Igor, well, that means I’ll get it too. Just plug in the brains from the donor and that’s it. in general, we need to talk to the guys at the service about this topic
Igor (Anian) Mikhail, talk to me, our basins have already been studied far and wide. GOOD LUCK
Alexander (Vasylyna) will get up without any problems. The attachment points to the body are the same, the difference is two additional ones. supports - the upper one is attached to the right glass (any body of the 10th family, regardless of the engine, has a bracket. If for some reason it is missing, stretching the struts with additional support will help) The lower support is attached to the transverse beam - it can be borrowed from the donor car.
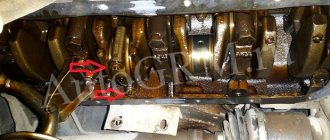
Engine lubrication system design
Let's look at the purpose and operation of individual nodes.
- The oil pump builds up pressure in the lines, with its help the liquid enters the oil filter from the sump, and is distributed throughout the system in a purified form. The pump is connected to the engine crankshaft and runs immediately after starting.
- Drain hole for draining the crankcase when changing the oil.
- The oil intake is a socket through which liquid is sucked into the pump. Located in the lower part of the crankcase to prevent oil starvation when the level drops.
- The bypass valve returns lubricant to the oil pan if the passage of a dirty filter interferes with normal circulation.
- Spray points on working units (original nozzles for creating oil mist). When the spray points become clogged, the lubrication regime is disrupted, so there should be no insoluble debris in the liquid (it remains in the filter cartridge).
- Oil line. It can be made in the form of tubes or special channels in the engine housing. Slag deposits interfere with the patency of the channels, so detergent additives are added to the lubricant.
- Filler neck (shown conditionally). It is used to top up or replace fluid.
- Oil radiator valve (tap). In summer it opens for additional cooling.
- Lubricant cooling radiator. Not present in all car models.
- Oil filter. It is a metal cylinder that can withstand high pressure. Inside there is a filter cartridge made of special paper or synthetic materials.
To monitor the state of the system, a number of sensors are integrated into it:
- temperature;
- pressure;
- in some designs - level;
- filter cleanliness (the same pressure sensor, only located directly on the flange of the filter element).
During normal operation, the engine maintains constant pressure. Malfunction of the system leads to a sharp increase in wear, temperature of parts, and engine jamming.
Please note As can be seen from the operating diagram, replacing oil with “magic” additives, which supposedly allow you to work “dry”, cannot provide all the functionality of the fluid. Therefore, you should not experiment with such chemistry