Share:
Here is the tightening torque for a VAZ 2108 car of different thread connections. It includes the tightening torque of the VAZ 2108 camshaft and the tightening torque of the VAZ 2108 car with an 8-valve engine. It includes the tightening torque of the bolts and the tightening torque of the VAZ 2108 hub. The tightening torque of the engine combines the tightening torque of the camshaft and the tightening torque of the cylinder head of the VAZ 2108 8 valves. And the tightening torques for threaded connections of the VAZ 2108 include the tightening torque of the rear hub and the tightening torque of the main VAZ 2108.
Tightening torques
| Detail | Thread | Tightening torque, N m (kgf m) |
| Engine | ||
| Cylinder head bolts | M12x1.25 | 1st move: 20.0 (2.0) 2nd move: 71.0–87.0 (7.1–8.7) 3rd move: tighten by 90° 4th move: tighten again at 90° |
| Nut of the stud securing the intake pipe and exhaust manifold | M8 | 21,0–26,0 (2,1–2,6) |
| Tension roller nut | M10x1.25 | 34,0–42,0 (3,4–4,2) |
| Camshaft bearing housing stud nut | M8 | 18,7–23,0 (1,87–2,30) |
| Camshaft pulley bolt | M10 | 68,0–85,0 (6,8–8,5) |
| Accessory housing mounting bolt | M6 | 6,8–8,4 (0,68–0,84) |
| Nuts of the studs securing the outlet pipe of the cooling jacket | M8 | 16,0–23,0 (1,6–2,3) |
| Main bearing cap bolt | M10x1.25 | 69,0–84,0 (6,9–8,4) |
| Oil sump bolt | M6 | 5,0–8,0 (0,5–0,8) |
| Connecting rod cap bolt nuts | M9x1.0 | 44,0–54,0 (4,4–5,4) |
| Flywheel bolt | M10x1.25 | 62,0–87,0 (6,2–8,9) |
| Coolant pump mounting bolt | M6 | 78,0–80,0 (0,78–0,80) |
| Crankshaft pulley bolt | M12x1.25 | 99,0–110,0 (9,90–11,0) |
| Coolant pump inlet pipe mounting bolt | M6 | 4,1–5,1 (0,41–0,51) |
| Muffler exhaust pipe fastening nut | M8x1.25 | 21,0–26,0 (2,1–2,6) |
| Nut securing the flange of the additional muffler | M8x1.25 | 16,0–23,0 (1,6–2,3) |
| Front engine mount bolt nut | M10 | 42,0–51,0 (4,2–5,1) |
| Left engine mount bolt nut | M10 | 42,0–51,0 (4,2–5,1) |
| Nut of the bolt securing the left suspension bracket to the engine | M10 | 32,0–51,0 (3,2–5,1) |
| Rear engine mount bolt nut | M10 | 28,0–34,0 (2,8–3,4) |
| Nut of the bolt securing the rear suspension bracket to the engine | M12 | 62,0–98,0 (6,2–9,8) |
| Bolt securing the oil receiver to the main bearing cover | M6 | 8,0–10,0 (0,8–1,0) |
| Bolt securing the oil receiver to the pump | M6 | 7,0–8,0 (0,7–0,8) |
| Oil pump mounting bolt | M6 | 8,5–10,0 (0,85–1,0) |
| Oil pump housing bolt | M6 | 7,2–9,2 (0,72–0,92) |
| Oil pump pressure reducing valve plug | M16x1.5 | 46,0–73,0 (4,6–7,3) |
| Oil filter fitting | M20x1.5 | 38,0–87,0 (3,8–8,7) |
| Oil pressure warning light sensor | M14x1.5 | 24,0–27,0 (2,4–2,7) |
| Carburetor mounting nuts | M8 | 13,0–16,0 (1,3–1,6) |
| Cylinder head cover nut | M6 | 2,0–4,7 (0,2–0,47) |
| Clutch | ||
| Nut securing the clutch housing to the engine block | M12x1.25 | 55,0–88,0 (5,5–8,8) |
| Bolt securing the clutch housing to the engine block | M12x1.25 | 55,0–88,0 (5,5–8,8) |
| Clutch release bearing guide flange bolt | M6 | 5,0–6,5 (0,5–0,65) |
| Bolt securing clutch housing to flywheel | M8 | 19,0–31,0 (1,9–3,1) |
| Nut securing the clutch housing to the gearbox | M8 | 16,0–26,0 (1,6–2,6) |
| Bolt securing the bottom cover to the clutch housing | M6 | 4,9–7,8 (0,49–0,78) |
| Transmission | ||
| Taper screw for fastening the drive rod joint | M8 | 16,6–20,0 (1,66–2,0) |
| Gear selector mounting bolt | M6 | 5,1–8,2 (0,51–0,82) |
| Shift Lever Housing Bolt | M8 | 16,0–26,0 (1,6–2,6) |
| Nut securing the drive rod clamp | M8 | 16,0–26,0 (1,6–2,6) |
| Nut of the rear end of the primary and secondary shafts | M20x1.5 | 123,0–149,0 (12,3–14,9) |
| Reversing light switch | M14x1.5 | 29,0–45,0 (2,9–4,5) |
| Bolt securing the forks to the rod | M6 | 12,0–19,0 (1,2–1,9) |
| Fastener cover bolt | M8 | 16,0–26,0 (1,6–2,6) |
| Differential driven gear bolt | M10x1.25 | 65,0–83,0 (6,5–8,3) |
| Speedometer drive housing fastening nut | M6 | 4,5–7,2 (0,45–0,72) |
| Gear selector shaft nut | M8 | 16,0–26,0 (1,6–2,6) |
| Nut securing the rear cover to the gearbox housing | M8 | 16,0–26,0 (1,6–2,6) |
| Reverse fork lock plug | M16x1.5 | 28,0–45,0 (2,8–4,5) |
| Tapered screw for securing the gear selector lever | M8 | 28,0–35,0 (2,8–3,5) |
| Clutch housing and gearbox mounting bolt | M8 | 16,0–26,0 (1,6–2,6) |
| Filler and drain plugs | M22x1.5 | 29,0–46,0 (2,9–4,6) |
| Front suspension | ||
| Nut securing the upper support of the telescopic strut to the body | M8 | 20,0–24,0 (2,0–2,4) |
| Nut securing the ball pin to the lever | M12x1.25 | 80,0–96,0 (8,0–9,6) |
| Nut of the eccentric bolt securing the telescopic strut to the steering knuckle | M12x1.25 | 79,0–96,0 (7,9–9,6) |
| Bolt securing the telescopic strut to the steering knuckle | M12x1.25 | 79,0–96,0 (7,9–9,6) |
| Bolt and nut securing the suspension arm to the body | M12x1.25 | 79,0–96,0 (7,9–9,6) |
| Extender fastening nut | M16x1.25 | 160,0–180,0 (16,0–18,0) |
| Bolt and nut securing the stabilizer bar to the arm | M10x1.25 | 43,0–53,0 (4,3–5,3) |
| Nut securing the stabilizer bar to the body | M8 | 13,0–16,0 (1,3–1,6) |
| Bolt securing the brace bracket to the body | M10x1.25 | 43,0–53,0 (4,3–5,3) |
| Nut securing the telescopic rod rod to the upper support | M14x1.5 | 67,0–82,0 (6,7–8,2) |
| Bolt securing the ball joint to the steering knuckle | M10x1.25 | 50,0–63,0 (5,0–6,3) |
| Front wheel hub nut | M20x1.5 | 225,0–250,0 (22,5–25,0) |
| Wheel bolt | M12x1.25 | 65,0–95,0 (6,5–9,5) |
| Rear suspension | ||
| Shock absorber lower mounting nut | M12x1.25 | 68,0–84,0 (6,8–8,4) |
| Rear suspension arm mounting nut | M12x1.25 | 68,0–84,0 (6,8–8,4) |
| Nut for securing the suspension arm brackets | M10x1.25 | 28,0–34,0 (2,8–3,4) |
| Shock absorber upper mounting nut | M10x1.25 | 51,0–63,0 (5,1–6,3) |
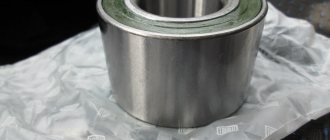
| Rear wheel hub bearing nut | M20x1.5 | 190,0–225,0 (19,0–22,5) |
| Brakes | ||
| Bolt securing the brake cylinder to the caliper | M12x1.25 | 117,0–150,0 (11,7–15,0) |
| Bolt securing the guide pin to the cylinder | M8 | 31,0–38,0 (3,1–3,8) |
| Bolt securing the brake caliper to the steering knuckle | M10x1.25 | 29,0–36,0 (2,9–3,6) |
| Bolt securing the rear brake shield to the beam | M10x1.25 | 35,0–43,0 (3,5–4,3) |
| Nut securing the vacuum booster bracket to the bracket booster | M8 | 10,0–16,0 (1,0–1,6) |
| Nut securing the master cylinder to the vacuum booster | M10 | 27,0–32,0 (2,7–3,2) |
| Nut securing the vacuum booster to the bracket booster | M10 | 27,0–32,0 (2,7–3,2) |
| Brake pipe connection fittings | M10 | 15,0–18,0 (1,5–1,8) |
| Front brake flexible hose end | M10x1.25 | 30,0–33,0 (3,0–3,3) |
| Steering | ||
| Steering gear housing mounting nut | M8 | 15,0–19,0 (1,5–1,9) |
| Steering shaft bracket mounting nut | M8 | 15,0–19,0 (1,5–1,9) |
| Steering shaft bracket mounting bolt | M6 | Screw until the head comes off |
| Bolt securing the steering shaft to the gear | M8 | 23,0–27,0 (2,3–2,7) |
| Steering wheel nut | M16x1.5 | 32,0–51,0 (3,2–5,1) |
| Tie rod lock nut | M18x1.5 | 123,0–150,0 (12,3–15,0) |
| Ball stud fastening nut | M12x1.25 | 28,0–33,0 (2,8–3,3) |
| Bolt securing the tie rod to the rack | M10x1.0 | 70,0–86,0 (7,0–8,6) |
| Steering gear bearing nut | M38x1.5 | 46,0–55,0 (4,6–5,5) |
| Electrical equipment | ||
| Spark plug | M14x1.25 | 31,0–39,0 (3,1–3,9) |
| Generator mounting bolt nut | M12x1.25 | 59,0–73,0 (5,9–7,3) |
| Generator mounting stud nut | M10x1.25 | 28,6–46,0 (2,86–4,6) |
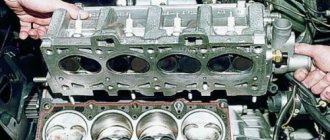
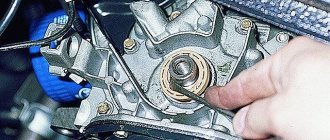
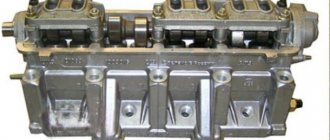
Procedure for installation and dismantling
The cylinder block is the basis for mounting the head, which is held on by 10 screws. Unscrewing is carried out with a special socket wrench - “ten”.
The photo shows the correct folding order:
- Top right corner.
- Bottom right corner.
- Top left corner.
- Bottom left corner.
- Top second from left.
- Top second from the right.
- Second bottom from the right.
- Second bottom from the left.
- Top in the middle.
- Bottom in the middle.
The correct tightening torque for the cylinder head on a VAZ-2108
The tightening torque is a very important nuance that guarantees the proper performance of the power plant, in which the cylinder head is one of the key elements. It is not surprising that the owners of the 8-valve VAZ-2108 pay so much attention to this aspect. The question of tightening usually arises after the head is removed, and a similar procedure is required mainly for the next gasket replacement. The sealing element is quite cheap, but its serviceability directly affects the engine power, its efficiency and, to a certain extent, economy. Read on for all the nuances regarding cylinder head tightening.
Tighten the engine bolts correctly
In the table below we have indicated the tightening torques for all threaded connections on the VAZ-2112 engine.
Tightening torque of threaded connections (table)
Measuring tool
Despite the fact that performing work according to the tightening rules requires a special approach, such a procedure will not take a lot of time.
The only thing required to perform such work is a torque wrench.
This wrench is used to measure the tightening torque.
You can get such a tool in any store, but its price is often steep and can sometimes reach 2,000 rubles.
When is it necessary to remove the cylinder head?
On cars that came off the assembly line of the Volzhsky Automobile Plant, regardless of how many valves the power unit has and which drive (rear or front) is used, tightening is carried out after disassembling the cylinder block. As noted above, usually dismantling the head is needed to replace the gasket, the service life of which is 60,000 or a maximum of 80,000 kilometers. The deterioration of the sealing element seriously affects the operation of the engine, and therefore it is better not to use the machine until it is repaired.
Often the gasket wears out between the communications through which lubricant and coolant circulate. As a result, mixing of such different compositions occurs and their mutual contamination. As a result, both of them noticeably lose their operational suitability. The following symptoms are typical for this failure:
- the oil becomes thinner (sometimes the level drops or rises);
- Antifreeze takes on a brownish tint.
Repair in this situation is urgently needed.
Another problem often encountered on 8-valve VAZ-2108 is a leak in the area between the coolant supply system and the combustion chamber. This happens in the following cases:
- insufficient tightening torque;
- uneven tightening of bolts;
- factory defective gasket.
Regardless of the reason, air is directed into the cooling circuit, which leads to heating of the antifreeze. An obvious sign of trouble is strong bubbling of the fluid in the distribution tank.
It is extremely rare to see damage to the gasket in the area between the cylinders. If this happens, then compression decreases, which leads to unstable engine operation.
Often such problems arise a short time after replacing the cylinder head gasket. In this case, car owners spend a lot of effort trying to find the cause, and cannot even think that the named sealing element or incorrectly tightened head bolts are to blame. Therefore, knowledgeable craftsmen recommend first checking whether the joint between the cylinder head and the block is airtight. If characteristic streaks appear on the motor housing in the area of the head, then there is no point in looking further.
Preparing to remove the cylinder head
In order to install a new sealing element under the cylinder head of an 8-valve engine, it will have to be partially disassembled. First of all, remove the air filter - unscrew all the screws holding it in place and remove it.
If the VAZ has a carburetor, then this unit will have to be removed. Some people recommend leaving it in place, but in reality this is inconvenient and seriously complicates the work.
After dismantling the carburetor, the fuel pipes are disconnected from the cylinder head. Next, you need to unscrew the distributor - it is held in place by one nut. The assembly along with the wiring is removed to the side. If the fasteners are rusty or stuck, do not try to tear them off by force - spray with WD-40 and wait 5 minutes.
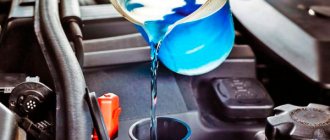
Next, proceed to drain the coolant. It’s worth talking about this point in more detail. Proceed like this:
- place the car on a pit or ramp;
- remove the mudguard from the engine;
- place a container (about 10 liters) under the radiator drain;
- screw the plug there;
- open the distribution tank.
When the antifreeze leaks out of the radiator, it is also drained from the cylinder block. It has a separate plug. Place a container under it and unscrew it with a key. Upon completion of the procedure, return all plugs to their place.
Correct operation of a torque wrench
It will be useful to understand the principle of working with a torque wrench, since it must be used with great care and caution. The mechanism is precise and quite easy to lose settings.
The tightening sequence with this wrench looks something like this:
- Set the holder to position zero.
- We put the wrench on the bolt and begin a smooth rotation, while monitoring its performance.
- It happens that when you start turning the key, the readings on it do not change. This indicates a slight internal stretching of the elements; the phenomenon is absolutely normal and rotation should be continued.
- When the desired indicators are reached, the tightening must be stopped.
If you need precise tightening with the required torque, do not try to do this with a regular ratchet. Precise and smooth tightening can only be achieved with the right tool.
Removing the cylinder head - key points
Now it’s the cylinder head’s turn. First, use a socket wrench of the appropriate size to remove its casing. Place the removed nuts and washers so as not to lose them. In addition, to gain access to the head, the timing chain must also be disconnected. Carefully loosen the tensioner and remove it completely after unscrewing the gear. To prevent the chain from slipping off the last one, it is tied together with any soft wire.
Next, the camshaft is disconnected - it is attached in nine places. If the tightening is too strong, then use WD-40 again.
After dismantling the shaft, remove the fuel supply hose and exhaust manifold from the cylinder head. We will not dwell on this point - everything is simple here.
Now unscrew the head bolts - there are 11 of them (one is in the lower left corner on a separate “ear”). If the cover is stuck to the gasket, carefully pry it off using a long screwdriver as a lever (rest it on the pipe leading to the manifold).
Work order
Before tightening, you will have to get to the block head. This can be done no earlier than after disassembling a good half of the engine.
First, open the connectors, the connecting wires leading to the antifreeze temperature sensors and the oil level control sensors. Once done, drain the coolant. It is necessary to dwell on this important point separately. Be careful - the composition mentioned above is quite toxic, so it is better to work with gloves. To collect coolant, prepare a container with a volume of at least 9 liters.
To drain the fluid, open the distribution tank, and then unscrew the plug located directly on the cylinder block. When the leak stops, move the container to the radiator - there is a separate drain here. After removing all the antifreeze, screw on the caps.
Further:
- remove the thermostat, and behind it the air filter;
- disconnect the exhaust pipe from the manifold;
- Remove the protective housing and the belt from the VAZ camshaft;
- The throttle valve drive cables must be separated from the carburetor;
- remove all cables leading to the cylinder head, as well as tubes, hoses, etc. (be sure to loosen the clamps that secure them, otherwise you won’t be able to move them to the side).
You now have direct access to the head. Unscrew all the bolts holding it, and, using the help of a partner, remove the cylinder head. After this, tear off the old gasket.
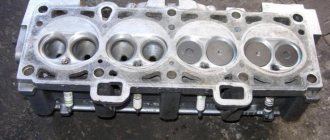
Carefully clean the rear surface of the VAZ 8-valve engine block from dirt and adhered fragments of the sealing element material. Sand it with fine sandpaper - you should be left with a completely smooth, matte base. At the same time, check all valves and seals.
Be sure to remove any oil or debris from the bolt holes. Lubrication helps reduce the friction force, which in this case is fraught with many troubles, and foreign fragments will not allow reliable fastening.
All that remains is to install a new gasket and reinstall the VAZ-2114 cylinder head. This is where the time comes to talk about what tightening torque is required.
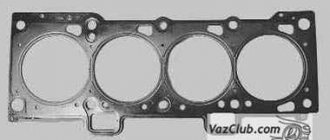
Replacing the gasket
There are a few things to consider when replacing the gasket. So, if the cylinder head is dismantled for another need, then it will have to be changed. The old one cannot be used in the future. The new one, fortunately, is inexpensive.
After removing the worn seal, the surface located under it must be thoroughly cleaned. It is important to work carefully so as not to leave scratches. It will not be superfluous to sand the area with fine-grained sandpaper. Be sure to degrease the surface and remove all debris - even a small grain will not allow you to achieve a tight seal even with the most correct tightening.
Check the functionality of the valves of your VAZ car. If necessary, replace the seals in them. Then put the gasket on and put the head back in place.
Video
The video (Auto_Remont channel) describes in detail the process of installing and assembling the cylinder head on a VAZ 2112.
VAZ 2110 engine assembly
Assemble the engine on a VAZ 2110 car as follows. Place a clean cylinder block on the stand and screw the missing studs into the cylinder block. Install the generator mounting bracket and secure it with two bolts. Lubricate the bearing shells and thrust half rings of the crankshaft, as well as the pistons and oil seals with engine oil. When assembling the engine after repair, install new crankshaft oil seals. Install liners with a groove in the 1st, 2nd, 4th and 5th seats of the cylinder block, and liners without a groove in the 3rd seat of the cylinder block and in the main bearing caps. Place the crankshaft in the main bearings and insert the thrust half-rings into the seat of the middle main bearing (Fig. 2-18).
The procedure for tightening the cylinder head on a VAZ model 2108
Finally, we’ll talk about the intricacies of proper tightening. When the cylinder head is in place, tighten all the bolts with your fingers and be sure to tighten them completely. This can be done in any convenient order - it is important not to displace the cylinder head and gasket.
For the next stage of work you will need a torque wrench.
Stand on the side of the car so that the cabin is on your left, and proceed in the indicated sequence.
The correct tightening torque at the first stage is from 3.5 to 4.1 kgf m. In the second circle, the indicator rises to 10.5-11.5 kgf m. Now all that remains is to tighten the 11th bolt. For him, the standard force will be from 3.5 kgf m to 4.
Next, wait 20 minutes and, maintaining order, turn all the fasteners 90 degrees, and then repeat this action again. Then reassemble the engine and check its performance.
How to use a torque wrench
To obtain the correct tightening torque, you need to understand how to use such a specific tool as a torque wrench.
Before starting work, it must be set to zero. After this, the tool is put on the bolt (or nut) and begins to rotate slowly, tracking the dynamics on the scale. When the force reaches the required torque, the key is removed.
Sometimes it happens that the tool does not show anything at first. In this case, continue rotating. The fact is that over time, its internal mechanisms stretch, but this practically does not affect the accuracy of determining the tightening torque.
Source
In what cases is tightening needed?
Most domestic drivers do not understand for what purpose this procedure needs to be performed, what order must be followed and what the tightening torque should be. However, every driver should know that incorrect actions during this process can damage the cylinder block. Accordingly, this procedure should be treated with all care and responsibility.
Just a few years ago, vehicle manufacturers were required to tighten the cylinder head bolts during the first maintenance of the vehicle. But now this need has disappeared and now it falls entirely on the shoulders of the drivers. If you are the owner of a VAZ 2108, then this procedure should be carried out from time to time. In what cases is it needed:
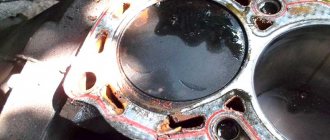
- If an oil stain appears in the place where the cylinder head connects to the block itself. This indicates a leakage of consumable fluid, which can be a consequence of both wear of the gasket itself and loosening of the pins.
- If you have done engine repairs. Sometimes even qualified specialists can make such mistakes. Therefore, the owner of a VAZ 2108 may find this information useful.
- For verification purposes. Experienced car enthusiasts recommend tightening the bolts at least every 2 thousand kilometers. In practice, there are cases when during the operation of the VAZ 2108 the pins loosen on their own.
Thus, if you notice a leak of engine fluid in the place where the head connects to the cylinder block, first of all you need to check the tightening torque of the pins.
Necessary tool
To carry out the work, we will need to have the right tool to do it correctly:
- Set of heads;
- Extensions;
- Driver or ratchet;
- Torque wrench.
The complexity of the process is that we will need to find or purchase the last key. Its price starts from 2000 for the simplest one. If you frequently repair your vehicle, this wrench will be a great addition to your garage as it is essential in many processes that require precise bolt tightening.
Procedure and diagram
We advise you to tighten the torque of the screws if you have ever encountered such a process. The following will describe the general procedure for the Lada 2108, but it should be noted that each engine has its own operating nuances that need to be taken into account.
Necessary tools
You will need a torque wrench for this procedure. This tool is needed specifically for tightening screws and determining torque. It can be purchased at any specialized store, and its price fluctuates around 1,300 rubles (approximately 400 hryvnia).
Sometimes so-called “masters” say that it is not necessary to use a torque wrench for this procedure. They say that an ordinary wrench will work just fine, and in general, you can tighten the screws “by eye.” Naturally, it will be possible to tighten the screws, but it will be incorrect, and later this may cause other problems.
Stages
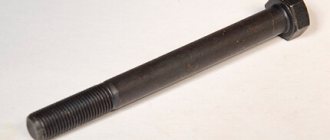
If you feel that the quality of the head screw is poor, then do not even try to tighten it. Replace it immediately to protect yourself from possible problems. In addition, before the actual procedure, you should check the quality of the thread. It is also advisable to lubricate it. Do not forget that reusing spring parts is unacceptable, since in this case you will not achieve normal tension.
The stages of tensioning the pins on the Lada 2108 are similar to those performed on classic car models. The diagram is provided below. The process itself should begin with the central bolts. It takes place in four steps.
Diagram of the order of tension of the cylinder head pins Tightening the cylinder head pins of the VAZ 2108
- Using the above tool, all cylinder head bolts must first be tightened to a torque of 2.0 kgf*m. First, the two middle elements are tensioned, then the two lower and two upper ones, which are located on the sides of the middle bolts. Then you need to tighten the two leftmost and two rightmost screws, starting with the bottom ones. The order should be exactly like this. The numbers on the diagram indicate the order of the components.
- Then, in the same order, using the same tool, you need to tighten the components with a torque of 7.5 - 8.5 kgf*m.
- After this, all pins must be tightened 90 degrees.
- Then they should be turned again, again by 90 degrees.
Basic rules for adjusting cylinder head holders.
tightening the cylinder head bolts
Regardless of the characteristics of the engine of a particular car, there is a general set of rules that must be followed during work. It is necessary to strictly follow the parameters specified in the manufacturer's instructions. The work should be carried out using a torque wrench. Using an analogue may lead to undesirable results. Only bolts that are in good working order can be tightened. Before starting work, carefully check the condition of the holders. Tightening torque indicators must be strictly taken into account and not deviate from those specified by the manufacturer. When repairing the cylinder head of a VAZ 2109, you should follow the tightening instructions specified in the included instructions.
Most of the particularly important features of bolt adjustment are indicated in the instructions for a particular car. Therefore, it is necessary to carefully study the operating and maintenance manual of the machine. When operating a vehicle, comply with the manufacturer's requirements and regularly maintain the vehicle. Correct engine operation prevents the need to adjust the cylinder head holders.
cylinder head tightening wrench
Since the cylinder head has a complex structure, it is necessary to carry out repairs only with full confidence in your knowledge. If problems arise in the operation of the car engine, it is necessary to promptly carry out professional diagnostics. Thereby, you will prevent large-scale car repairs and high costs.
A short video about how not to repair the cylinder head:
Repairing the cylinder head is a complex procedure that requires a sufficient amount of knowledge and certain experience. To carry out repairs, special equipment is used, which is usually available only in specialized service centers. Repairing the cylinder head involves changing the cylinder head gasket and adjusting the torque of the bolts. For correct adjustment, you must strictly follow the requirements specified in the instructions reviewed. Follow the manufacturer's specifications and use quality tools. With a careful approach, you can successfully make adjustments, obtaining the desired result. Happy renovation!