02/04/2022 13,971 VAZ 2109
Author: Ivan Baranov
According to many years of experience of various car enthusiasts, replacing the cylinder head of a VAZ 2109 is most often associated with problems arising from the gasket. But there may be others that can cause the engine to overheat or even seize.
Any driver can repair and modify the cylinder head on a VAZ 2109, but special tools and a little knowledge of the operating principle of this unit are required. Recently, tuning of this unit has become more and more popular, thanks to which the power of the car increases. You can do tuning yourself if you have experience in such work. Working with valves and cylinders requires special knowledge and skills.
[Hide]
How to correctly stretch the cylinder head of a VAZ 2109
All subsequent work of pulling the fasteners and the completed correction and installation of the cylinder head is done with a torque wrench.
On a note! Every car owner and simply a connoisseur of domestic cars must have a special device for diagnosing a personal vehicle.
You can also do the following using a special scanner:
- Set up the car's on-board computer
- Analyze sensors
- Reset
- Perform reading
A torque wrench is a specially designed tool. It is used to tighten the cylinder head bolts on the internal combustion engine.
Torque wrench
In addition to a special key, you need to take a ruler and a compass.
Replacement process
Replacing the cylinder head gasket on a VAZ 2109 is a simple procedure and is similar for engines that have both a carburetor and an injector.
Required Tools
In order to change the gasket, the cylinder head must be removed, and the following tools may be required for removal and replacement:
- hexagon;
- a set of keys;
- set of heads;
- torque wrench;
- extension;
- gasket remover;
- flat screwdriver.
To perform this procedure, the vehicle must be placed on a suitable lifting device.
Stages
Replacement is carried out as follows:
- The vehicle's power is turned off by disconnecting the negative terminal from the battery.
- Next, you need to drain the working fluids. The coolant may not be completely drained. The oil is drained if antifreeze gets into it.
- Next, you should disconnect all the wires with the sensors, remove the thermostat, the air filter along with the pipes.
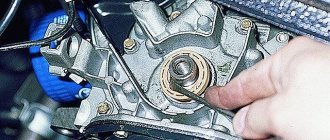
- Then the timing cover is removed and the muffler pipe is disconnected.
- Next, you need to set the alignment marks and remove the timing belt.
- After disconnecting all supply hoses, you need to dismantle the carburetor.
- Next, remove the cooling system pipes and the protective timing cover.
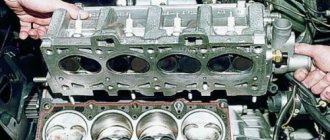
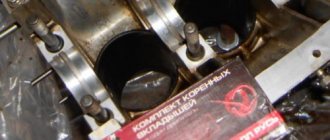
- After this, the mounting bolts are unscrewed and the cylinder head is dismantled.
Dismantling the cylinder head on a VAZ 2109
- If the old gasket has become stuck and is difficult to remove, you can use a special product.
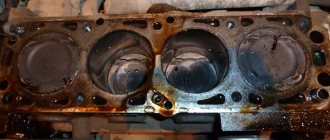
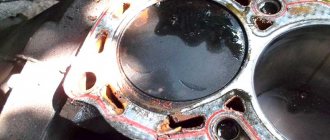
- Before installing a new consumable, carefully inspect the surrounding surfaces. There should be no defects on them, otherwise the head should be ground.
- When the surfaces are ready for installation, they need to be cleaned of dirt, degreased, and a new part can be installed. It is installed along guides located in the corners. For better sealing, a layer of sealant is applied at the joint.
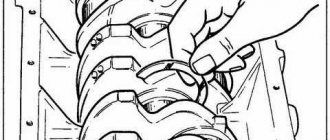
- The fastening bolts must be tightened with a torque wrench to the torque specified in the VAZ 2109 operating manual.
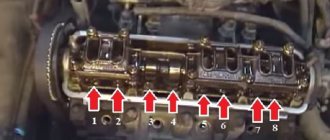
Bolt tightening diagram - After installing the cylinder head, you need to replace all the removed parts in the reverse order.
Sorry, there are no surveys available at this time.
Step-by-step scheme of work
The procedure and torque for tightening the cylinder head of a VAZ 2109 with various types of engines was initially established at the manufacturer’s factory and written in full and step by step in the book. According to the diagram, the procedure for pulling the cylinder head of a VAZ 2109 should be done with 2 central bolts.
How to properly tighten the cylinder head of a VAZ 2109:
- First, the screws are twisted with a mandatory force of 2 kg/cm, which is measured in Newtons. The next step is to tighten the screws with an important torque of 7.5 to 8.5 kg/cm. Subsequently, the screws are tightened 90 degrees.
- Next, after the previously completed work, it is necessary to make one more turn of each individual bolt by 90 degrees.
Ridiculous cases
If the engine seizes, signs of thickened oil may indicate sugar entering the system. Similar consequences occur when stirring a raw egg, which, when the motor is running, will certainly heat up and weld all the channels. How the latter substance enters the system is known only to the owner of the car.
Sugar can be poured into the fuel by ill-wishers through the refueling hatch. There are many substances that change the composition of the oil. It happens that a driver may mistakenly pour a mixture that is lethal to iron into the engine neck.
A malfunction where coolant penetrates into the oil can also lead to jamming of the rubbing metals. This can be noticed when measuring the level using the dipstick. The changed composition is noticeable to the eye and to the touch: by color, viscosity, and the presence of foam. A whitish tint indicates a loss of oil quality.
How to properly tighten the cylinder head on a VAZ 2109 with your own hands
You need to take the key holder and be sure to put it in the “0” position. This proves that the specially invented instrument shows the truth of the original position.
Next, you definitely need to evaluate the displayed values on that same key. Before you begin the initial tightening of the cylinder head on the VAZ 2109.
After all the steps have been completed, you can begin to rotate the holder. Be sure to monitor the indicators while performing the actions. If the tightening torque does not change, then, undoubtedly, the head mount will be easy to stretch. In this situation, this is normal.
Firstly, you need to tighten the bolts with a torque wrench to 2 kg/cm; the diagram shows how to properly tighten the tension.
At the end, the tightening is done one more time in the same order, only the bolts need to be pulled to 8 kg/cm. To complete the work, pull the screws 1 time 90 degrees clockwise, and then 1 more time also 90 degrees.
Reasons for increased engine oil consumption by a car engine
Using the example of carburetor engine 21083 of a VAZ 21083 (21093, 21099) car, we will try to identify the culprits for increased engine oil consumption. We will also find out what can be done about this problem.
For the carburetor engine 21083 of VAZ 21083, 21093, 21099 cars, the maximum permissible oil consumption is 1 liter per 10,000 km. If this norm is exceeded, you should look for the reasons for the increased oil consumption.
The reasons may be different, but first of all you should start with a visual inspection of the engine seals (oil seals, gaskets, etc.) since even a small and unnoticeable oil leak ultimately leads to a periodic drop in its level in the car’s engine sump. Also, it is worth noting that measuring the oil level should be carried out on a level surface (preferably always on the same one); a warm engine should be allowed to cool for half an hour so that the oil flows down.
Reasons for increased oil consumption by the engine 21083 of VAZ 21083, 21093, 21099
Oil leaks through engine seals
Inspect places where oil may leak from the car engine: front and rear crankshaft oil seals, valve cover gasket, camshaft oil seal. Replace worn seals.
The crankcase ventilation system is clogged
Excessive pressure is created inside the engine, which squeezes oil through its seals. Clean and rinse the elements of the crankcase ventilation system.
Occurrence (coking) of piston rings, or their sedimentation after engine overheating
In this case, a large volume of gases breaks into the engine crankcase, again creating excess pressure there, which, as in the first case, squeezes the oil through the engine seals. In addition, some of the oil not removed by the oil scraper rings burns in the combustion chambers. Fill the cylinders with 10 cm/cube of motor oil mixed with acetone and kerosene in equal parts. Let stand for several hours (you can leave it overnight). Then let the engine run for a while. The rings should decarbonize. Piston rings that have settled and cannot be decoked will have to be replaced.
After decoking, it is necessary to replace the engine oil with new one.
Broken or worn piston rings
The consequences will be the same as in the previous case. The cause of the malfunction can be identified by measuring the compression in the engine cylinders. In those where there is no required standard (compression less than 9 kg/cm), the rings may be faulty. Pour 10 cm/cc of engine oil into the cylinders and measure the compression again. If the compression has increased, change the rings or decarbonize them. If it remains the same, the valve stem seals are faulty. Replace broken and worn rings.
Worn or damaged valve stem seals
The malfunction can be identified using the method described above - by measuring compression. Inoperative caps should be replaced.
The following pattern can also be observed: when the piston (rings, cylinders, pistons) are worn, there is constant smoke from the muffler, when the oil seals are worn, only when the gas is overloaded.
Worn valve stems and/or valve guides
Perhaps the engine has a long service life, or low-quality engine oil or low-quality parts were used during repairs. This implies either a major overhaul of the valve mechanism or replacement of the engine block head.
Wear of the piston group (cylinders and rings)
After one hundred thousand kilometers, the 21083 engine may require a major piston overhaul. Under gentle operating conditions and compliance with maintenance and repair requirements, this period can be extended to 200-250 thousand kilometers. In any case, a worn piston will constantly reduce the oil level in the engine sump.
Notes and additions
Signs of a malfunction of the piston as a whole or the piston rings and (or) oil seals of the engine are: increased smoke from the breather of the ventilation system, bluish smoke from the muffler, crankcase, unevenness (popping) of the smoke stream coming out of the breather, heavy oiliness of the spark plugs, oil in the air filter housing .
How do you install the cylinder head and tighten the bolts?
What unexpected problems may occur during execution:
- Without a doubt, it is necessary to adhere to the cylinder head tightening torques.
- In this case, you cannot use other tools. Due to the fact that it is possible to determine the degree of tension only with a torque wrench.
- To perform tensioning, it is allowed to use serviceable screws. According to the requirements that are installed on the VAZ 2109 vehicle on the power unit.
- Subsequently, you need to know for sure that the holders are in working order.
- If a repair or complete replacement of the cylinder head has already been carried out before, in this case it is not advisable to use the bolts twice to perform tension. At the same time, go to the nearest spare parts store and buy a new spare part.
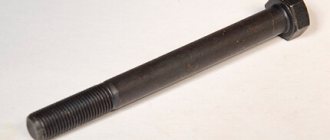
- On 16 cl internal combustion engines, secondary use of cylinder head screws is permitted, only in one case, if the length is no more than 9.5 centimeters. The screws are measured with a washer; if it turns out that the bolt is more than 9.5 centimeters, then it certainly needs to be changed.
- If the car is equipped with an aluminum head, then the cylinder head is mounted on TTU bolts. They will not have to be tightened as they are screwed into the thread.
- When purchasing cylinder head gaskets, first of all pay attention to the specifications of the manufacturer. Today they indicate a certain tightening ratio for each specific gasket. It is worth remembering that the specified moment of force should not differ from those used during repair work.
When is it time to change?
- There may be a need to replace or repair the cylinder head if you begin to notice that fuel consumption has increased or the power of the power plant has decreased.
- Incorrect assembly and installation of valves and cylinders can also lead to malfunctions in the cylinder head system.
- If you constantly fill your car with low-quality gasoline, then do not be surprised that over time this system will begin to malfunction and will need to be repaired.
- A crack that appears in a block cannot be eliminated in any other way than by completely replacing this element.
- A symptom indicating problems in the cylinder head may be white smoke coming from the exhaust pipe, this is caused by antifreeze getting into the engine cylinders.
White smoke from the exhaust pipe - If oil stains appear on the surface of the coolant in the tank, this also indicates that repair of the unit is necessary. This is due to the fact that oil, in one way or another, began to get to places where it should not be.
- Not often, but sometimes exhaust gases begin to break through the gasket. There is no other choice but to dismantle the head and replace the gasket.
- Removing the head may be necessary in the case of VAZ 2109 tuning, modifications, problems with plugs, tightening bolts or boring cylinders.
Replacement process
Replacing the cylinder head gasket on a VAZ 2109 is a simple procedure and is similar for engines that have both a carburetor and an injector.
Required Tools
In order to change the gasket, the cylinder head must be removed, and the following tools may be required for removal and replacement:
- hexagon;
- a set of keys;
- set of heads;
- torque wrench;
- extension;
- gasket remover;
- flat screwdriver.
To perform this procedure, the vehicle must be placed on a suitable lifting device.
Stages
Replacement is carried out as follows:
- The vehicle's power is turned off by disconnecting the negative terminal from the battery.
- Next, you need to drain the working fluids. The coolant may not be completely drained. The oil is drained if antifreeze gets into it.
- Next, you should disconnect all the wires with the sensors, remove the thermostat, the air filter along with the pipes.
- Then the timing cover is removed and the muffler pipe is disconnected.
- Next, you need to set the alignment marks and remove the timing belt.
- After disconnecting all supply hoses, you need to dismantle the carburetor.
- Next, remove the cooling system pipes and the protective timing cover.
- After this, the mounting bolts are unscrewed and the cylinder head is dismantled.
Dismantling the cylinder head on a VAZ 2109
Bolt tightening diagram
Sorry, there are no surveys available at this time.