The exhaust manifold is a component of the exhaust system that carries out the process of removing exhaust gases from the cylinders of the power unit into the exhaust pipe.
If the collector malfunctions, the culprit may be either the element itself or its gasket. Replacing the exhaust manifold (exhaust manifold) gasket is a common procedure when repairing a VAZ 2109.
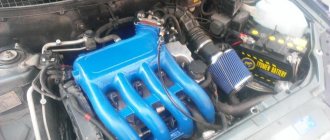
Appearance of the unit
Replacing the exhaust manifold of a VAZ 2109
Burnout of the gasket under the exhaust manifold is a rather unpleasant and common malfunction on the VAZ 2109.
A product that has become unusable will allow exhaust gases from a running engine to pass under the hood, and the characteristic chattering sound when the engine is under load also does not greatly contribute to a comfortable ride. Replacing the manifold gasket on a VAZ 2109 will help avoid such problems.
The collector gasket is made from a specially compressed asbestos mixture reinforced with steel thread; it can be purchased at any spare parts store. The price of the product, depending on the manufacturer, varies from 50 to 200 rubles. For a VAZ 2109, replacing the intake manifold gasket at a car service center will cost approximately 1,500 rubles and more, not counting the cost of the gasket itself.
Causes of malfunctions
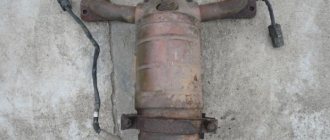
The key factor that causes 90% of exhaust manifold malfunctions on VAZ 2114 cars is high temperature and poor quality materials from which the parts are made. During operation, the steel repeatedly heats up and cools down, which leads to the appearance of cracks in the body. This is a common occurrence for VAZ cars older than 7-8 years.
Auto repair shops offer crack welding services using argon welding. However, for a number of reasons, this activity is useless for cars older than 7 years.
1) Just removing and installing the exhaust manifold will cost about 2.5 thousand rubles. Taking into account the work of the welder and other actions, the cost of repairs can be 4-5 thousand rubles. If you do the work yourself, buying a new part will cost less.
2) Welding, even argon welding, disrupts the structure of “tired” metal. A boiled part rarely lasts longer than a year, after which new holes appear. The older the car, the faster the problem returns, and the collector has to be removed again.
If the car is older than 8 years and there are problems with cracks in the manifold, it is better to remove the part and replace it with a new one.
Preliminary work
Replacing the VAZ 2109 intake manifold gasket with your own hands is not very difficult and does not require specific knowledge or expensive tools - the required set of keys is usually present in the trunk of every car enthusiast.
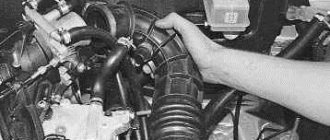
But before replacing, you should try to tighten the fastening of the intake unit - if the gasket is not burned out, it is the loose fastening that may cause exhaust gases to get under the hood. If tightening the fastening does not help, it means that the gasket is completely burned out and needs to be replaced. Replacing the VAZ 2109 manifold gasket will require preliminary work to dismantle the air filter, remove the carburetor and the manifold itself. All of the above work is carried out exclusively on a cold engine.
Removing the air filter with housing
On the injection engine of a VAZ 2109 car, to remove the air filter, it is enough to unscrew the four self-tapping screws securing the cover of the filter element housing - for this, use a 10mm wrench or a ratchet. There will be a filter element under the cover. If the cover is difficult to lift, you can disconnect the mass air flow sensor from the plug.
On a carbureted engine, there are three latches under the hood that can be easily opened. There is a screw in the middle of the metal cover, which can also be unscrewed by hand, after which the cover is removed. Under the cover there is a filter element that must be carefully removed. Subsequently, during reassembly, the filter element can be replaced - if the time has come or if the filter element is very dirty.
Removing the carburetor
After the air filter has been removed, you can begin to remove the carburetor. To remove the carburetor on a VAZ 2109, you will need the following tools:
Instructions for dismantling the carburetor will be as follows:
The work of removing the carburetor is completed. The presented photos and videos will help you clearly follow the process of removing the carburetor.
Removing the intake manifold
After the work of removing the air filter and dismantling the carburetor is completed, you can begin to remove the intake unit. To do this you will need the following set of tools:
The work order will be as follows:
Removing the exhaust manifold
Removing the VAZ 2109 exhaust manifold will require the following tools:
When removing the collectors, a problem may arise such as sticking of the studs and nuts - since the metal is constantly heating and cooling, a souring process occurs.
To make work easier, the fastening studs can be filled with WD 40 liquid in advance, about a day before starting work. This will make it much easier to remove the manifold for subsequent gasket replacement.
If the pin breaks off when unscrewing, you just have to drill it out, and then cut a new thread and screw on a new pin.
Difficulties in reworking
Since the work is quite labor-intensive and takes a lot of time, we recommend performing the steps in stages. The quality of components and their assembly play an important role during work. Beginners may have difficulty securing some elements, so it is better to call for help from a familiar car service specialist or a person who has replaced a carburetor with an injector before.
Replacing a carburetor with an injector will require you to be careful and careful. You will need to replace a lot of parts, and this is quite difficult for a beginner to do. But if you wish and strictly follow the instructions, you can perform a really serious modernization of your car and save a lot on car service costs.
Replacing the gasket
After the preparatory work is completed - the air filter, carburetor and intake and exhaust manifold are dismantled, you can begin the main work, for which all previous steps were done - directly replacing the gasket itself.
The work order will look like this:
Replacement of the exhaust manifold gasket on the VAZ 2109 has been completed. The exhaust pipe of the muffler is secured with brass nuts, preferably new ones. And don't forget to fill in the coolant that was drained when dismantling the carburetor!
see also
How to check DBP
Will exhaust manifold 2115 fit 2109?
Smoke under the hood of VAZ Samara 2
How to unscrew a broken bolt
How to remove the exhaust manifold if the pin is stuck
The collector (resonator, “pants”) is an engine attachment; it is a closed reservoir of complex shape with a common chamber (receiver) and outlet pipes. Depending on the nature of the functions performed in a car, there are two types of manifolds - exhaust and intake.
Removing and installing the fuel manifold and injectors
The Multiport Fuel Injection (MFI) system is a device controlled by the ECM. It measures the fraction of fuel under pressure in each cylinder.
The ECM provides control pulses to the fuel injector solenoid.
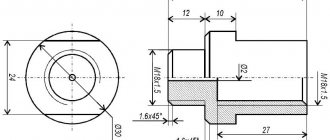
Fuel enters the top of the injector through the ball or valve needle and a recess in the guide plate at the injector outlet.
The guide plate has 6 holes that control the fuel flow, which creates a conical spray of fuel towards the intake valve. The atomized fuel evaporates before entering the combustion chamber.
Conclusion Attention: the fuel system is under pressure. To reduce the risk of personal injury or fire, the fuel system must be relieved of pressure before disconnecting fuel lines.
1. Release fuel pressure.
2. Disconnect the “-” battery cable.
3. Remove the fuel injector harness connectors.
4. Remove the exhaust gas recirculation valve.
5. Remove the supply line.
6. Remove the fuel manifold mounting bolts.
Before removal, the fuel manifold should be spray cleaned according to the included instructions.
How to remove the manifold on a VAZ 2109
Removing manifolds on a VAZ
.
replacing manifold gaskets. installation of collectors on a VAZ 2109
. 2108 21099.
Do not submerge the manifold
into the liquid cleaning solution. Be careful when removing the manifold to avoid damaging the injector connectors and spray heads.
Do not allow contaminants to enter open pipelines and passages.
Fittings should be capped and plugs should be blocked with plugs during maintenance.
7. Remove the fuel manifold with the injectors installed on it.
8. Remove the fuel injector mounting clamps.
9. Remove the fuel injectors by pushing them down.
10. Remove the injector O-rings.
Installation Caution: Injectors are marked for flow rate. When ordering a fuel injector, be sure to order the part with the same number on it as the old injector.
1. Install new O-rings on the fuel injectors, after lubricating them with engine oil.
2. Install the fuel injectors onto the fuel manifold sockets with the injector terminals facing outward.
3. Install the injector retaining clamps on the injectors and the edge of the fuel manifold
.
4. Make sure the yoke is installed parallel to the fuel injector harness connector.
5. Install the fuel collector assembly onto the cylinder head and tighten the fuel manifold mounting bolts to a torque of 25 Nm.
7. Connect the supply hose.
8. Connect the fuel injector harness connectors. Rotate each of the fuel injectors to avoid stretching the wiring harness.
9. Install the exhaust gas recirculation valve, if installed on the vehicle.
Online auto parts store "AvtoPasker"
The online store "AvtoPasker" is one of the largest and most convenient catalogs of auto parts for Russian-made cars, such as VAZ, GAZ, Oka, Moskvich, as well as neighboring countries - ZAZ, RAF, LuAZ. You can easily find the necessary part for your car using our catalog with illustrations and explanations. The catalog also includes a search by spare part number or name. To order auto parts, simply add the required product to your online cart - it’s very fast and convenient.
Online auto parts store "AvtoPasker" is always happy to welcome new customers
Please note the system of discounts for customers through our network of stores
Replacing the Exhaust Manifold Gasket VAZ 2109 Injector
Do not immerse the manifold in liquid cleaning solution. Be careful when removing the manifold to avoid damaging the injector connectors and spray heads.
Do not allow contaminants to enter open pipelines and passages.
Fittings should be capped and plugs should be blocked with plugs during maintenance.
7. Remove the fuel manifold with the injectors installed on it.
8. Remove the fuel injector mounting clamps.
9. Remove the fuel injectors by pushing them down.
10. Remove the injector O-rings.
Installation Caution: Injectors are marked for flow rate. When ordering a fuel injector, be sure to order the part with the same number on it as the old injector.
You may also need a wrench;
— remove the fastening nuts that secure the base located under the carburetor and bend it back;
— discard all hoses that are connected to the intake manifold;
- Unscrew the six fastening nuts;
- remove the intake manifold.
— prepare a tool (the same as when dismantling the intake manifold);
— Unscrew the four fastening nuts that secure the exhaust manifold and the receiving pipe. If you can’t immediately tighten the rusted nuts, use the life-saving WD-40;
— move the discarded “pants” a little to the side.
In fact, this is more than a myth. However, the real problems of two or more are serious, so repairs should not be put off.
Cracks in the exhaust manifold or a worn gasket usually cause the engine to run dirty.
1) A lambda probe is installed in the exhaust manifold, which affects the operation of the accounting (software) injection. Strong air suction disrupts the oxygen mass content in the exhaust; the lambda incorrectly adjusts the quality of the mixture, causing tripping, uneven idling, loss of power, and “black” spark plugs.
5) Additional function – crankcase ventilation.
Add to this the price of a high-quality gasket and you get quite a lot of money. You will avoid such costs if our client can do it on his own.
By removing the air filter and carburetor, you gain access to the intake manifold.
To dismantle it you will need a certain set of tools:
When our client is ready, we get to work.
To do this, simply swing the knot to the sides. Often it sticks to the gasket, which causes problems with removal.
To remove a graduate, you will need:
Is our client still ready? Then let's get started.
Replacing the exhaust manifold and gasket on a VAZ 2114
The exhaust manifold is a unit that is responsible for driving properties, without which comfort is impossible. This is quietness and the absence of exhaust aroma under the hood, which can be drawn into the cabin through the hole in the cabin filter. Eliminating leaks in the exhaust manifold of a VAZ 2114 - necessary repairs. Modern, it is not urgent, there is an option to prepare in advance and choose the right moment.
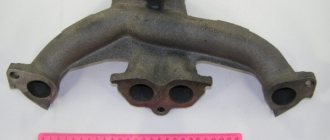
Exhaust manifold for VAZ 2114
A little about the “nine” collector
Modification of the VAZ 2109 collector
As a rule, the collector on the “nine” seems at first to be a simple device, but it is not so. On the contrary, it is extremely complex and its operating principle is based on the action of many laws of physics.
Why is it needed?
VAZ 2109 collector
A question that is often asked on forums. Many people really don't know what the role of this device is. This is the main function of the collector:
It is designed to evenly distribute fuel assemblies (or just air, if the internal combustion engine has direct injection) among the cylinders.
- In addition, the intake manifold or VK is needed to attach a carburetor (see VAZ 2109: tuning Solex carburetors) or fuel injection equipment (on “nines” with an injection internal combustion engine), as well as other engine components;
- A partial vacuum also forms in the manifold, which has a positive effect on engine performance.
What are VKs made of?
VAZ 21093 collector
It will be interesting to know what the VC is made of and what shape it should be. As a rule, a VK is a closed tank with a common chamber (also called a receiver). The VK has outlet pipes that go to the engine cylinders (as many cylinders, so many pipes). The shape of the VK resembles a spider. By the way, that’s what they call it in the automotive world. The spider is most often made from aluminum, less often from cast iron. Since the beginning of the new century, new materials have been used in the production of VC, significantly increasing savings and in no way affecting quality. On the contrary, the performance, so to speak, the efficiency of the spider increases significantly. We are talking about composite materials, for example, the plastic from which the internal combustion engine of the Ford Zetek car is made.
Basic operating principle
It is done like this:
- The spider receives atomized fuel into the receiving chamber (receiver);
- Electrostatic forces operate inside the receiver, due to which drops of fuel instantly scatter throughout the chamber, tending to settle on the walls or form into larger drops by mixing with air.
Collector VAZ 21093
- To ensure uniform and rapid spraying inside the receiver, the walls and internal surfaces of the spider, as well as the surface of the cylinder head, are left unpolished. But the surface should not be too rough, as this leads to an increase in pressure and a drop in engine power;
- The spider must have a strictly defined length, capacity and shape. When developing an internal combustion engine, all this is taken into account, but not in the same way as on manifolds for racing cars.
Manifold for VAZ 2109 and its tuning
Replacing the gasket
A good driver must maintain his car efficiently and in a timely manner, but at the same time always be prepared for the unexpected. Indeed, it is very difficult to control the condition of all the components, parts and gaskets of the machine, which at any moment can fail and stop performing their functions. Thus, one of the most unpleasant “surprises” for car enthusiasts is damage to the exhaust manifold gasket.
The main task of the exhaust manifold gasket is to prevent the gas-air mixture from escaping from the general system. The most common material used for laying is metal or asbestos-free paper. The reason for this precaution is the difficult working conditions, because the gasket has to withstand very high temperature conditions. Consequently, the materials used must have appropriate properties.
Despite its reliability, this gasket often burns out. At the site of damage, exhaust gases come out, which rise upward and seep through the cracks in the hood. It is very difficult not to notice such a malfunction. In addition, the sound of the engine also changes (it becomes louder).
In such a situation, it is enough to inspect the running engine. If the leakage of exhaust gases at the junction of the exhaust manifold is clearly noticeable, then the best solution is to replace the gasket.
I would like to note right away that this work cannot be called very difficult. But its disadvantage is its volume and very significant time costs. So be prepared to set aside a few hours of your personal time. So, the algorithm of actions looks like this:
— unscrew the filter cover fastening (usually it is held on by one screw). If a nut is installed, then use an appropriate open-end or socket wrench to unscrew it;
— lift the lid and put it aside (you won’t need it yet);
- move the air filter aside;
— remove the unit body (to do this, unscrew the four nuts) and also put it aside.
How to extend gasket life
Although replacing the exhaust manifold gasket is inexpensive and can be done successfully in your own garage, who wants to waste their time on it? It's better to let it serve longer. And to extend its service life, listen to the following tips:
- monitor the condition of the cooling system, check the level of antifreeze (antifreeze) to prevent engine overheating;
- use only high-quality fuel;
- check the tightness of the connection between the cylinder head and the exhaust manifold;
- If you find that the integrity of the gasket is damaged, do not wait until it burns out completely, replace it;
- When buying an exhaust manifold gasket, choose a quality product from well-known manufacturers.
In this article we will discuss the symptoms when the exhaust manifold gasket has burned out. For an exhaust device, the gasket is one of the main parts on which the entire correctness and accuracy of the exhaust system will depend.
If the manifold seal is not replaced in a timely manner, the safety conditions for operating the vehicle are greatly reduced.
In general, a manifold is a device designed to remove exhaust gases from a car engine. The second function of the collector is to improve the filling of the working chambers and enhance the ventilation of the working space. All operation of the exhaust device is carried out at elevated temperatures and high gas pressure.
This element is attached directly to the head ( cylinder head
) and the other side is in contact with the exhaust pipe or converter. The most important task of the exhaust manifold gasket is to prevent exhaust gases from entering the valve space. These gases, in turn, can cause fire of parts or elements of the power unit.
Symptoms of a blown exhaust manifold gasket
The following can be distinguished: exhaust gases begin to flow into the car interior or their smell is felt; the car engine begins to start poorly; Strange sounds appear in the engine compartment. If these ailments are detected, you should begin to inspect the exhaust system. The collector itself is made of high-strength austenitic steel.
In this regard, burnout and replacement of the collector is quite rare. The main reason for the breakdown of the collector itself is drops of water falling on its hot surface, which leads to the formation of cracks in it.
The weak link of this durable and reliable element is the gaskets. Wear of the manifold gasket occurs mainly due to: poor quality of the material or very long operation under increased loads.
Manifold gaskets are now made from steel-reinforced, durable asbestos. However, even such a durable material is susceptible to destruction. The process of replacing the exhaust manifold gasket is not at all difficult.
Experts even recommend replacing the gasket after some time, without waiting for it to fail.
We carry out the following procedures:
- 1. Open the hood of the car;
- 2. Remove the air intake. Then remove the carburetor. Under these engine elements is the exhaust manifold;
- 3. Remove the thermal shield. It covers the collector;
- 4. Unscrew two nuts on each cylinder that secure the manifold;
- 5. Unscrew a couple of bolts from the exhaust pipe;
- 6. Remove the manifold;
- 7. There should be an old gasket or remains of it on the cylinder head;
- 8. We clear all the space for a new gasket;
- 9. Clean everything until it shines;
- 10. After cleaning, apply a graphite-based lubricant to the area;
- 11. Now install a new gasket;
- 12. Reassemble everything in reverse order.
- 1. The pressure on the turbine begins to decrease;
- 2. When driving at high speeds and under load, black smoke appears in the exhaust;
- 3. When driving on the highway, you feel increased fuel consumption;
- 4. It may start to whistle at certain speeds.
As you can see, the symptoms can significantly affect the driving characteristics of the car. Therefore, you should not delay replacing a burnt gasket. In this article, we discussed the main symptoms that the exhaust manifold gasket has burned out. I would like to add the word “may” to all the symptoms described in the article, since they may not appear, or they may appear in a slightly different way.
Symptoms that the exhaust manifold gasket has burnt out. Full list and action plan »
Removing and installing the fuel manifold and injectors
The Multiport Fuel Injection (MFI) system is a device controlled by the ECM. It measures the fraction of fuel under pressure in each cylinder.
The ECM provides control pulses to the fuel injector solenoid.
Fuel enters the top of the injector through the ball or valve needle and a recess in the guide plate at the injector outlet.
The guide plate has 6 holes that control the fuel flow, which creates a conical spray of fuel towards the intake valve. The atomized fuel evaporates before entering the combustion chamber.
Conclusion Attention: the fuel system is under pressure. To reduce the risk of personal injury or fire, the fuel system must be relieved of pressure before disconnecting fuel lines.
1. Release fuel pressure.
2. Disconnect the “-” battery cable.
3. Remove the fuel injector harness connectors.
4. Remove the exhaust gas recirculation valve.
5. Remove the supply line.
6. Remove the fuel manifold mounting bolts.
Before removal, the fuel manifold should be spray cleaned according to the included instructions.
Preparation stages
To replace the manifold or its gasket, in any case you will have to dismantle the VK. But before you get to the element you are looking for, you will first need to go through some preparatory steps. Namely, tighten the fasteners, and then remove the air filter and carburetor if the first stage does not help.
All dismantling work must be carried out only on a cold engine. To make it easy to unscrew all fasteners, you can pre-treat them with WD40, several hours or even a day before the repair begins.
Often, loose manifold fastenings caused the entry of contaminants, which disrupted the performance of the exhaust system. If the tightening did not give any result, then the gasket is definitely burned out or the collector itself is damaged, which is less likely
Removing the air filter
Removing the carburetor is carried out in the following sequence:
How to repair a muffler
If your car's muffler requires repair or complete replacement, it is not recommended to do this work yourself, since there is a high risk that you will only worsen the condition of the exhaust system, and possibly the entire vehicle as a whole. In order to prevent such a situation, contact only specialized car services. In our car service center, qualified specialists with the necessary competence in the field of working with exhaust systems will competently diagnose the exhaust system of your car, and, if necessary, repair or install a new muffler in the shortest possible time.
If you encounter any malfunction in the exhaust system and you need to diagnose it, repair it or replace the muffler, then our salon specialists will be happy to help you with this, since we carry out all types of this work!
Required tool for replacement
Before you begin the process itself, you need to decide on the necessary tools. So, what will you need: a ratchet and sockets for 17, 19; screwdrivers with flat and Phillips tips; a set of keys and the gasket itself.
Now that everything is prepared, you can start working directly. In order for the manifold to be removed without any problems and rusted bolts not to create trouble, everything must be lubricated with WD-40 before performing the operation. It is advisable to do this several times. Before performing the operation, you need to think again, weigh everything and calculate your strength.
Collegium of Advocates
The video will tell you how to properly replace the intake manifold gasket, and also tell you about some of the subtleties and nuances of the process.
The tools are assembled, now you can go directly to performing all kinds of operations. Before removing the manifold, you need to spray the bolts with WD-40, which will remove corrosion and allow you to remove the part without any problems.
- Remove the negative terminal from the battery.
We remove the terminal from the battery We remove the throttle cable We unscrew the pipes shown in the photo We remove the intake manifold As you can see, the gaskets of the intake and exhaust manifold are replaced simultaneously and, by and large, this is one gasket material. Trialli GZ 102 0013 is a well-known Russian manufacturer that produces a wide range of analog parts for domestically produced cars. The cost of the gasket is 200 rubles per piece.
Source
Dismantling of collectors
Now comes the turn to remove the intake and exhaust manifolds. Having dismantled them, you can understand whether it is possible to get by with replacing the gasket, or whether the collectors themselves will need to be completely replaced.
The gasket is a consumable item, the purchase of which will literally cost you 50-250 rubles, depending on the manufacturer and region. Services for replacing the gasket at a service station cost more than 1,500 rubles. Add to this the cost of a high-quality gasket and you will get quite a lot of money. Such costs can be avoided if you do everything yourself.
Intake manifold
By removing the air filter and carburetor, you will gain access to the intake manifold.
To dismantle it you will need a certain set of tools:
When everything is ready, you can start working.
An exhaust manifold
To dismantle a graduate you will need:
All is ready? Then let's get started.
Pad
Well, the check showed that the burnt gasket was to blame. Therefore, only it will have to be changed.
Alas, to get to a simple gasket, it was necessary to remove the air filter, carburetor, exhaust, and intake manifolds. But there is no way without this.
To replace an old, used gasket, you will need:
Installing a new gasket
It is up to you to ensure that the new gasket has a long service life. To do this, before installation, treat the gaskets on both sides with graphite lubricant. This way you will increase the product’s resistance to temperature changes that it regularly encounters. Similarly, coat the cylinder head studs with graphite lubricant for the same purpose.
VESKO-TRANS.RU
AutoNews / Reviews / Tests
How to Remove the Exhaust Manifold of a VAZ 2109 Injector
The exhaust manifold is part of the exhaust gas metering system, which makes the process of removing exhaust gases from the cylinders of the unit into the exhaust pipe.
If the manifold is not working properly, the culprit is both the element itself and its gasket. Replacement of gasket (exhaust manifold). a common occurrence when performing repairs on a VAZ 2109.
To replace the manifold or gasket, the LCD must be removed in any situation. But until you get there, you will first need to complete a few preliminary steps. Specifically, tighten the fasteners, and then remove the air filter and carburetor if the first step does not help.
Your actions
Often, loose manifold fastenings became a prerequisite for contamination, which led to a malfunction of the exhaust system. In this case, lifting did not give any result, then the gasket or the manifold itself was damaged, which is the least possible
Disassembling the air filter
- If the engine is a fuel injector, you will need to remove the four filter housing cover mounting screws to remove the air filter. Under the cover is the filter itself. If you have trouble lifting the cover, turn off the MAF sensor and remove the filter.
- If there is a carburetor installed under the hood, the filter housing will be held in place by 3 clips. In the center of the iron cover is a screw, often loosened by hand. Removal allows the cover to be lifted easily. Below is a filter that should be removed carefully. Examine its condition carefully. If the filter has been in use for a long time, it is recommended to replace it during assembly.
Remove the carburetor in the following order:
- Disconnect the starter antifreeze hose from the unit. To do this, unscrew the clamps;
- Pour coolant into the prepared container;
- Disconnect the exhaust pipe from the exhaust manifold and bracket BC;
- Disconnect the throttle cable handle. To do this, remove one end of the spring from the throttle control rod, and then remove the entire spring. Now unscrew the nut on the bracket to remove the cable from its engagement;
- Unplug the EPHX sensor from the outlet;
- Disconnect the vacuum tube and steam hoses from the carburetor heating block;
- Remove the crankcase ventilation hose;
- Remove the four mounting nuts that hold the carburetor and intake manifold in place;
- Remove the carburetor carefully without slipping. This should be evenly spaced away from the studs.
It's time to remove the intake and exhaust manifolds. Having disassembled them, you will easily understand how to replace the gasket, otherwise you will need to completely replace the collectors themselves.
Pad. consumables, the purchase of which will cost you almost 50-250 rubles, depending on the manufacturer and region. Services for replacing 100 gaskets cost more than 1,500 rubles. Add to this the price of high quality gaskets and you get a small quantity. You will avoid such costs if our client has to do it themselves.
By removing the air filter and carburetor, you gain access to the intake manifold.
To dismantle it you will need a certain set of tools:
- Rat Head 10;
- Collar;
- Rats;
- Deepest head at 13;
- Common head at 13 years old;
- Key 13.
Preliminary work
Replacing the VAZ 2109 intake manifold gasket with your own hands is not very difficult and does not require specific knowledge or expensive tools - the required set of keys is usually present in the trunk of every car enthusiast.
But before replacing, you should try to tighten the fastening of the intake unit - if the gasket is not burned out, it is the loose fastening that may cause exhaust gases to get under the hood. If tightening the fastening does not help, it means that the gasket is completely burned out and needs to be replaced. Replacing the VAZ 2109 manifold gasket will require preliminary work to dismantle the air filter, remove the carburetor and the manifold itself. All of the above work is carried out exclusively on a cold engine.
On the injection engine of a VAZ 2109 car, to remove the air filter, it is enough to unscrew the four self-tapping screws securing the cover of the filter element housing - for this, use a 10mm wrench or a ratchet. There will be a filter element under the cover. If the cover is difficult to lift, you can disconnect the mass air flow sensor from the plug.
On a carbureted engine, there are three latches under the hood that can be easily opened. There is a screw in the middle of the metal cover, which can also be unscrewed by hand, after which the cover is removed. Under the cover there is a filter element that must be carefully removed. Subsequently, during reassembly, the filter element can be replaced - if the time has come or if the filter element is very dirty.
After the air filter has been removed, you can begin to remove the carburetor. To remove the carburetor on a VAZ 2109, you will need the following tools:
Instructions for dismantling the carburetor will be as follows:
The work of removing the carburetor is completed. The presented photos and videos will help you clearly follow the process of removing the carburetor.
After the work of removing the air filter and dismantling the carburetor is completed, you can begin to remove the intake unit. To do this you will need the following set of tools:
The work order will be as follows:
Removing the VAZ 2109 exhaust manifold will require the following tools:
When removing the collectors, a problem may arise such as sticking of the studs and nuts - since the metal is constantly heating and cooling, a souring process occurs.
To make work easier, the fastening studs can be filled with WD 40 liquid in advance, about a day before starting work. This will make it much easier to remove the manifold for subsequent gasket replacement.
If the pin breaks off when unscrewing, you just have to drill it out, and then cut a new thread and screw on a new pin.
Air leak VAZ 21099 injector
For normal operation, a gasoline engine requires an accurate ratio of fuel to oxygen. Air leakage in the intake manifold leads to an increase in the proportion of oxidizer, which, naturally, is registered by the engine ECU (Engine Control Unit). Let's look at the main causes and symptoms of the malfunction, as well as how to find leaks in the intake tract using a smoke generator.
Symptoms
- Unstable engine operation at idle speed. At idle, the mechanical throttle valve is closed, and air enters the intake manifold through the bypass duct. In this mode, the vacuum behind the throttle valve is maximum, so the symptoms of air leaks appear most clearly. By opening the throttle valve, we increase the flow area for air flow, so the negative impact of suction on engine operation is reduced.
- Increased idle speed.
- Unstable engine operation after abrupt release of gas (stalls when braking).
- The Check Engine light comes on on the dashboard due to error P0171 - lean mixture. Error codes can be read through the diagnostic connector using a multi-brand scanner with suitable software or a specialized diagnostic device. If, after removal, the error appears again at idle speed, there is a high probability that the reason is due to air leaks, and not a breakdown of the mass air flow sensor or oxygen sensor.
It should be borne in mind that individually, each of the symptoms does not yet indicate the leakage of unaccounted air and can be caused by malfunctions of the power supply system, mass air flow sensor, IAC, throttle assembly or lambda probe.
Effect on engine operation
The cause of air leak symptoms lies in unaccounted for oxygen entering the cylinders. It’s time to remember the purpose and operating principle of the mass air flow sensor. The sensor is installed behind the air filter. Consequently, the ECU can only count the flow that has passed through the heating element.
We speak of a leak when there is a leak in the intake tract behind the mass air flow sensor, through which unaccounted air is sucked into the intake manifold.
Since the ECU calculates the fuel portion based on the MAF readings, the mixture at idle turns out to be lean (excess oxidizer).
In systems with a MAP sensor (DBP), the ECU relies on pressure in the intake manifold.
But for normal operation, the flow area of the bypass channel, which is controlled by the extension of the IAC rod, and the degree of opening of the throttle valve must correspond to the calibrations included in the engine ECU.
Of course, the intake of unaccounted air creates confusion in the operation of the control unit, so it tries in every possible way to synchronize the operation of the actuators and the sensor readings. Therefore, the revolutions begin to float, and in general the idle speed is unstable.
Possible places for leaks in the intake tract
- All tubes and hoses of the vacuum system. Most often, hoses dry out at the connection points with fittings and crack at bends. Also, the leakage of unaccounted for air can occur due to carelessness, when after repairs they forget to connect or confuse the hoses, or inadvertently pull them off the fittings.
- Vacuum brake booster system. Air leaks can occur not only through a check valve or hose, but also through a torn membrane or depressurization of the vacuum chamber housing. We have already looked at how to check the VUT.
- Intake manifold gasket.
- Sealing rubber bands for injectors.
- IAC seal at the point where it is screwed to the DZ housing.
- Mechanical throttle valve rotation axis. The depletion that occurs at high mileage leads to the appearance of backlash. Throttle valves with an electric wire do not suffer from the problem of suction of unaccounted air in such places.
- Crack in the intake manifold. A fairly typical problem for cars with plastic manifolds.
- Crankcase ventilation system. The cause of suction is leakage of hoses, tubes, and valves.
- Leakage of the gas tank ventilation system.
Application of the diagnostic tool
The scanner allows you to identify additional symptoms indicating that the cause of unstable idle speed is air leaks. The device will allow you to observe in real time:
- lambda probe readings;
- throttle valve opening degree;
- idle speed control position;
- desired and actual idle speed;
- long-term and short-term fuel trims.