Replacing gaskets in the main power unit takes a lot of time and effort, since, as a rule, it is necessary to dismantle most of the parts. This process is not considered easy, and not every motorist can do it. Replacing the cylinder head gasket on a 16-valve VAZ-2112 engine is more difficult than on an 8-valve engine.
Video about replacing the cylinder head gasket on a VAZ-2112 16V below:
The video shows the process of replacing the head gasket of a VAZ-2112, and also contains basic recommendations and nuances.
How to replace a cylinder head gasket with your own hands
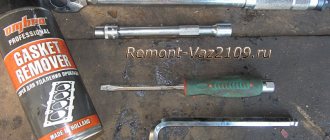
Before you start repairing the car, you need to prepare all the tools that replacing the cylinder head gasket on a 16-valve VAZ-2112 engine will require:
- automobile keys of overhead and socket types;
- torque wrench;
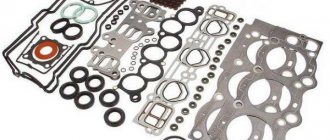
- high-quality new gasket;
- container for draining liquid substances.
If the cylinder head gasket is replaced in a special pit intended for vehicle inspection, then the whole process will be much simplified. When there is no such recess, then this operation can be performed without it, if you carry out the manipulations step by step, taking into account all the recommendations.
Gasket replacement process
How to change the cylinder block gasket on a Chevrolet Niva
In order to make the replacement faster and more convenient, you will need a pit, overpass or lift. As practice shows, such conveniences are not always at hand and you have to suffer in the garage. Let's consider the step-by-step process of replacing the cylinder head gasket:
- We remove the “minus terminal” from the battery.
Removing the battery terminal for repair
- To replace the gasket, it is necessary to clear the head channels of coolant, so we drain it into a previously prepared container.
- Relieve pressure in the fuel system.
We relieve pressure in the fuel system through a special valve.
- Approaching the engine from below, it is necessary to dismantle the exhaust pipe.
After unscrewing the mounting bolts, disconnect the exhaust manifold and exhaust pipe
- The next step is to dismantle the thermostat.
- Since it is necessary to replace the gasket itself, we will not disassemble the head and dismantle it together with the camshafts.
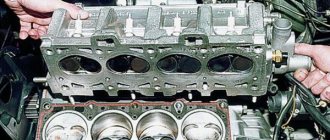
When everything is disconnected, we dismantle the cylinder head
- The cylinder head is removed together with the fuel rail.
- Disconnect the camshaft and engine oil sensors.
- We are dismantling the timing belt.
Removing the timing belt
- Now, you need to fix the camshafts, and then remove the pulleys so that they do not interfere.
Fixing the camshafts from turning so as not to disturb the valve timing
- We dismantle the cooling sensor.
- Remove the valve cover. To do this, you need to unscrew the mounting bolts. During assembly, the bolts must be tightened in a certain order and with a certain torque.
- Now you can lift the cylinder head.
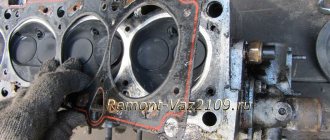
- We remove the remaining gasket material from the surface of the block and cylinder head.
- Install a new gasket on the head surface. If the gasket material has a red edge, then there is no need to use sealant, but if it is not there, then the gasket must be lubricated with graphite grease and sealant must be applied along the contour.
- We put the block head in place and tighten the screws in the sequence following the diagram.
- The rest of the assembly is carried out in reverse order.
Now the gasket has been replaced and you can continue to use the car.
Selecting a cylinder head gasket
Before you start choosing a head gasket based on the catalog number, you need to consider what types of gasket materials there are. Let's look at the main types of cylinder head gaskets:
- Asbestos. The main advantage: minimal shrinkage and excellent recoverability.
- Metal. These are some of the most reliable and high-quality consumables.
- Non-asbestos. Used as repair kits. Main advantages: elasticity, heat resistance, elasticity.
Metal cylinder head gasket
So, now you can consider the original gasket, as well as the substitutes that are used. Basically, all manufacturers label gaskets according to the original.
Reasons for failure
There are not many reasons why the cylinder head gasket failed, but every car owner must know them. So, let's look at the main ones:
- Wear. Each element of the car has its own service life, and therefore wear of the part is simply inevitable.
- Deflection or deformation of the cylinder head can lead to gasket breakdown or hot antifreeze getting onto its surface.
- Boiling your car can cause the gasket to fail.
Signs of replacement
To correctly diagnose and identify faults, it is necessary to diagnose correctly.
White steam from the exhaust is a reason to think!
Let's consider the main direct and indirect signs that the cylinder head gasket has worn out and requires replacement:
- White steam starts coming out of the exhaust;
- Traces of coolant or engine oil leakage appear at the cylinder head joints;
- Traces of oil appear in the coolant;
- An impressive amount of lubricant accumulates in the pan;
- Foam forms around the filler cap.
Now all the issues have been considered, the reasons, signs and method of replacing the cylinder head gasket have been established.
Let's move on to the cylinder block
We remove the pallet. Rotating the crankshaft as it is convenient for us, unscrew two bolts on each connecting rod cap. We use a TORX E10 head for this.
We take out the pistons along with the connecting rods. To do this, use the wooden handle of a hammer to press the connecting rod from below and lightly tap it to knock it up. We remove the old liners and buy new ones of the same size according to the markings on them. Here is another stone in AvtoVAZ’s garden, the owner has never climbed into the car from the interior or into the engine, but three pistons were of group “B” and one was “C”. It turns out that at the factory they re-sharpened one cylinder a little and simply put an enlarged piston there, no words. There are no options, we take group “C”, don’t sharpen the engine because of this. We will not touch the main liners either.
We buy a new piston group that does not bend the valves, connecting rods and connecting rod bearings.
Eliminating longitudinal play of the crankshaft
It was noticed on this motor. To eliminate it, replace the thrust half-rings. Standard and repair sizes are available. We take the first repair size, if they are too tight we sand them down a little. We unscrew the middle main bearing and gently push it with a screwdriver and move the half rings. The mark on it is in the form of three serifs, shown below.
When the half ring comes out a little, turn the crankshaft, it will push it out. There are two types of half rings: white at the front and yellow at the rear; the grooves on them should point towards the crankshaft cheeks.
We install them as we removed the new half rings; if they go in with great effort, you can grind them a little on a small abrasive stone, but not from the side of the grooves. Checking the play.
We tighten the main bearing with a torque of 8 kgf*m.
Assembling the piston
There is an arrow stamped on the top of the piston; it should be directed towards the front of the engine. And there are marks on the connecting rod that should look the same way.
Don't get confused!
We insert one retaining ring into the groove on the piston. We insert the connecting rod into the piston and, having lubricated the connecting rod and the piston pin with oil, insert it into place. Insert the second retaining ring. Although this operation seems simple, it will take some pains. We inspect the assembled structure; all retaining rings must be clearly in their grooves, otherwise a ring that has jumped out while the engine is running can cause a lot of trouble.
After assembly, you need to break off the connecting rod bearing cap, since the connecting rod is made in one piece. It's like that on our cars. First, unscrew the bolts. We insert the connecting rod into the cleats at the level of the mark shown in the figure with the black arrow and lightly clamp it, then break it off with a slight movement of the hand. The first time is very scary. We put the cover in place and tighten the bolts so as not to mix it up in the future.
Checking the thermal gap in the piston rings
We lay out each set of rings for each cylinder.
In the future we will not change their places.
In turn, we insert each ring into its own cylinder and push it a little with the piston approximately to the middle.
We measure the gap with feeler gauges.
Nominal clearance: 0.25 - 0.45 mm.
The maximum clearance for all is 1 mm. But this already smacks of waste.
Installing new rings
First, install the oil scraper ring expansion spring, then the ring itself. The oil scraper ring lock should face the opposite direction of the spring lock. Then we install the lower compression ring and finally the upper compression ring.
The inscription “TOP” must be stamped on the rings; it must face up.
The rings in the piston grooves must rotate easily.
When is it time to change?
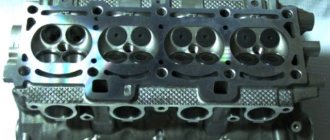
Engine block and cylinder head design
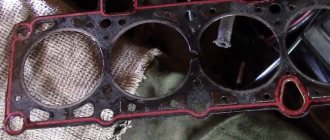
The gasket serves to seal the connection between the head and the cylinder block. There are several types of it:
- Asbestos. The main advantage: minimal shrinkage and excellent recoverability.
- Metal. These are some of the most reliable and high-quality consumables.
New metal cylinder head gasket
Non-asbestos. Used as repair kits. Main advantages: elasticity, heat resistance, elasticity.
The procedure for replacing the cylinder head gasket on a VAZ 2112 16 valves is indicated in the manual, but this is not the main reason. There are a number of signs that determine the need for replacement:
- leakage of engine oil or antifreeze in the connection area;
- white steam present in the exhaust gases indicates that antifreeze has entered the cylinders;
- when exhaust gases enter the cooling system, foam appears at the neck of the expansion tank;
- the presence of oil stains in the coolant indicates a leak in the connection;
- the presence of a white coating on the oil dipstick indicates that there is antifreeze in the engine oil; this may be due to a damaged gasket.
For what reasons do they change the cylinder head gasket on a VAZ-2112?
Tightening the cylinder head
An official source claims that the cylinder head gasket on a VAZ-2112 with 16 valves can last up to 200 thousand kilometers. Basically, after a completed mileage, this part simply wears out and requires replacement.
There are several reasons why you need to replace the cylinder head gasket on a VAZ-2112:
- the first reason to change this part is its wear and tear, since any item has an expiration date;
- if the cylinder head is damaged, deformed or punctured, then it is worth checking the gasket; it can also be damaged, and coolant may get on it;
- If you drive a car for a long time with an overheated engine, the gasket will be damaged.
Reasons why you should change the cylinder head gasket:
- If you see that engine fluid has begun to leak, then it is necessary to diagnose the operation of the engine.
- If during operation of the machine there are not characteristic exhausts coming out of the pipe, but steam or smoke, then it is worth checking the engine, as this may indicate that coolant has entered the cylinders.
- If foam appears in the expansion tank, this indicates that exhaust gases are entering the cooling system because the seal is broken.
- If greasy spots appear on the antifreeze, this means that the seal has been broken and there is a bad connection.
- If coolant gets into the lubricant, a white coating will appear in the engine fluid, this is a sign of gasket damage.
Consequences of untimely replacement
Failure to comply with the timing of gasket replacement can lead to serious consequences:
- If the seal is damaged, the engine fluid will begin to mix with antifreeze. Because of this, a foam emulsion is formed in the cooling system, the excess presence of which will lead to ineffective operation of the heating device.
- Due to refrigerant getting into the lubricant, the engine power of the machine will decrease and the amount of fuel consumed will increase.
- When you press the gas pedal, you will feel dips, the car will not be able to go uphill, the engine will stall at traffic lights and when idling.
- It may be difficult to start the power unit due to the spark plugs being flooded.
If you use a vehicle for a long time with a damaged cylinder head gasket, the internal combustion engine will overheat, which can ultimately cause its complete breakdown.
How to independently detect a faulty cylinder head gasket
Owners of any cars, including the VAZ-2112 with 16 valves, must constantly inspect their car, observe whether oily spots appear under it, listen to how the vehicle’s engine works
If, during inspection, oily discharge is detected in the place that is connecting to the cylinder head and the cylinder block, you need to pay attention to the gasket. Most often, such leaks appear due to burnout of the gasket, and to eliminate such a malfunction it is necessary to immediately replace the cylinder head element for the 16-valve VAZ-2112 engine
Replacement is quite simple, so every car enthusiast can do this operation independently.
Meet the model
With the new engine, the unit was given the name VAZ 21124, this car intensively fights against the ecology of the external environment. In addition to everything, when the car starts, the traction at the bottom has become noticeable, and the engine now runs calmer, without large jumps. We often hear questions from owners of 16-valve engines: “What needs to be done to prevent the valves from bending in the piston?” In Veil 21124, this task will not exist for you, in the bottom of the piston there are holes and sports shafts that keep the rise of the piston under control, and don’t let the knocking and noise of the VAZ 21124 engine frighten you, this is its normal environment.
Which gasket material is better?
Gaskets made of different materials
When replacing a gasket, many car owners have a reasonable question: which gasket is better - metal or paronite? Each of these materials has its own advantages and disadvantages. At the same time, you need to understand that if the manufacturer recommends using gaskets made of a certain material, then you must adhere to these requirements.
As a rule, a metal gasket is stronger than its paronite counterpart. Therefore, it is advisable to install it on powerful turbocharged or forced engines. If you do not plan to tune the engine of your car, but simply operate it in a gentle mode, then the choice of material does not matter much to you. Accordingly, a paronite gasket is quite suitable. Moreover, this material is more flexible and is able to adhere more tightly to work surfaces.
Also, when choosing, it is necessary to take into account that the material from which the gasket is made does not have a primary impact on its service life. A much more important indicator is how the gasket was installed. The fact is that there are very thin walls between the individual groups of holes. Therefore, if the gasket is not installed exactly in the seat, then there is a high probability of burnout even in the strongest material.
The most obvious sign that the gasket was installed incorrectly is its rapid failure. Also, if you installed it incorrectly, the car may simply not start. In diesel engines, the knocking of the pistons may also be heard. This happens because the piston touches the edge of the gasket.
Conclusion
If you have a broken cylinder head gasket, then it is not advisable to drive a faulty car. Therefore, we recommend that if you discover a gasket pierced, replace it immediately
In addition, it is important not only to detect the very fact that it is broken, but also the reason for this. In particular, why the engine overheats or other malfunctions occur
During the replacement process, monitor the torque on the mounting bolts. Timely replacement of the cylinder head gasket will save you from large financial expenses on repairing more expensive components. The longer you drive a car with a blown cylinder head gasket, the more likely it is that other, more expensive and important engine components will fail.
1) Don’t drive far and don’t drive
You can overheat the engine. Repairs will cost a pretty penny
You can’t kill the engine, if the gasket is blown, then firstly, antifreeze can go into the oil pan, and secondly, gases can go into the cooling system, which will lead to overheating of the engine, the cylinder head or block may burst,
A car engine has two important parts: the cylinder block and the cylinder head (cylinder head). And their connection to each other is sealed with a cylinder head gasket. Its main task is to seal combustion chambers and channels through which antifreeze circulates. When the cylinder head gasket is punctured, problems appear in the engine, which we will discuss in this article.
Cylinder head gaskets are usually made of thin sheet metal or reinforced paronite with metal edging for the combustion chamber holes. The walls between some of the holes in the gasket are quite thin, so the slightest mistake during installation or replacement will lead to their rapid burnout.
The easiest way to check if the cylinder head gasket is blown is shown in the video at the bottom of the page.
The main guarantee of the durability of the cylinder head gasket is the ideal contact plane between the head and the cylinder block. Adjacent surfaces must be clean, free of holes and roughness.
The second important point for extending the life of the gasket will be to follow a certain order of tightening the cylinder head bolts. For this, motor manufacturers, as well as gasket manufacturers, provide a diagram for screwing in fasteners indicating the tightening torque.
Installation and dismantling procedure
The part called the cylinder head is attached to the cylinder block with 10 screws. They are unscrewed with a 10mm socket wrench. The procedure for dismantling the cylinder head is shown in the first photo.
Reversal sequence (1-10)
The standard screw length is 93 mm. If the screw has been pulled out to at least 95 mm, it is replaced with a new one (AvtoVAZ requirement).
During installation, a different scheme is used (photo 2). Each screw is lubricated with machine oil, otherwise the efforts will be reduced to nothing.
The order of tightening the head is indicated in this photo
Tightening torque for cylinder head cover bolts
For VAZ-2112, the cylinder head tightening torque is standardized:
- First pass – the force is 20 N*m;
- Each screw is turned 90 degrees to the right;
- Wait 20 minutes, then turn the screws another 90 degrees.
At first the effort is very small. But at “step 3” it will be difficult to cope with the work. Use the lever.
Why are guide bushings needed?
Before installing the cylinder head, perform the following steps: clean the threaded holes, as well as all holes for the bushings (photo 1). Each bushing is installed in place, and only then a gasket is placed on top.
Everything is ready to install the cylinder head
Metal parts adjacent to the gasket must be degreased. We looked at the cylinder head tightening diagram, but the cylinder head itself must be installed correctly:
- We place the cylinder head on the cylinder block;
- By moving the part in different directions, we ensure that the bushings fit into the recesses.
After “step 2” the screws can be tightened.
Sealant
No sealing compounds are used when installing the gasket! Solidol, CIATIM and other lubricants are not even needed. The main thing is that the metal must be degreased. And the cylinder head gasket must be new.
Hi all.
Last fall I noticed drops of oil in cylinder 4 and leaks around the entire perimeter of the valve cover.
I've been through the winter and it's time to fix the problem. I change everything together as usual. What we need:
1) Anaerobic sealant “Locktite” 20 ml - 150r2) Camshaft oil seal BRT (cat. number 21080-1005034-00) 2 pcs. - 240r per pair 3) Camshaft plugs 2 pieces (cat. number 21120-1003290-00) - 100r pair4) Crankcase ventilation pipes for engine 21126 (21126-1014240-00 (E-gas) - thin long, 21124-1014058-00 upper small, 21120-1014056-00) lower large - 3 pieces - 250r set5) Filter “ Knecht” KL23of - 150r6) Carburetor cleaner - 150r7) Intake manifold and throttle gaskets - 150r set BRT8) Oil dipstick seal (cat number 21120-1009078-00) - 30r9) Torque wrench
I don’t see any point in describing the entire process of disassembling the valve cover. There are plenty of manuals, I’ll only focus on the moments that cause difficulties
Remove the decorative cover
We remove all wires, ventilation hoses, and throttle. The receiver is secured with 2 bolts and 3 nuts. The nuts with the left bolt unscrew easily, you can crawl up. But there is a problem with the right bolt; the generator does not work.
I have a car with air conditioning, the pipes are in the way. There are two bolts near the gene; we remove them (the bolts are visible in the photo). When you remove the intake manifold, you need to bend the tubes, don’t be afraid to bend them, there are rubber inserts. Remove the generator belt, unscrew the top fastening and carefully move the gene towards the radiator with a pry bar.
Many motorists have heard that it is necessary to correctly tighten the threaded connections on the 16-valve VAZ-2112 engine, but they have never done it themselves. Thus, the tightening torque is determined by the manufacturer and is indicated in the service repair manuals.
Video about installing camshafts and split gears on a 16 valve engine
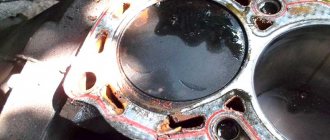
Signs of failure of the cylinder head gasket of a VAZ 2110
There are no specific warranty periods for the use of a cylinder head gasket. Its durability is influenced by such factors as: the degree of operation of the engine, its model, driving style and other reasons. However, there are several symptoms by which you can determine that the gasket has failed:
- There are leaks of engine oil or coolant at the junction of the block and the head;
- using an oil dipstick, foreign light impurities or a foam-like emulsion is detected, which occurs when antifreeze penetrates through the connection with the cylinder head;
- the color of the exhaust changes to bluish-white, which indicates water entering the combustion chamber of the cylinder block;
- presence of oil stains in the coolant reservoir;
- The engine temperature rises due to the breakthrough of hot gases into the cooling system, which immediately heat the coolant.
Tips for replacing the cylinder head gasket
Removal and installation of the cylinder head gasket is carried out with the crankshaft set to TDC. It is also necessary to ensure that both valves of the 1st cylinder are closed.
It must be remembered that the cylinder head gasket must be changed after each removal of the engine head, even if this is not due to its unsuitability.
The procedure for replacing the cylinder head gasket on a VAZ 2110 on a 16-valve engine is generally similar to how to change the gasket on an 8-valve engine, but has several nuances:
- The receiver must be dismantled.
- When removing timing belt pulleys, a mark is placed on two pulleys and two pulleys are removed.
- The fuel rail is removed.
- The order and tightening torques are carried out in accordance with the requirements for a 16-valve engine.
Let's get inside the car
Tuning VAZ 21124 includes changes to the internal world of the car. Replacing the pump and timing belt for VAZ 2110, 2111, 2112, Lada Priora, Lada Granta, Lada Kalina. (16 valves) is the pump leaking? How to change the pump on a 16 valve engine? Additional devices are installed in the VAZ interior and the old ones are improved; sports seats, a steering wheel and airbags are installed. For a chic look, the VAZ 21124 lacks door trim, new armrests, interior handles and wooden pockets.
In the world of car tuning design, there is a wide range of PVC fabrics for ceiling upholstery, many options for door cards and leatherettes, which differ in color and design.
beautiful in the new VAZ 21124 , especially in yellow, red or blue. Replacing the timing belt on an 8-valve Lada Granta engine directly with your own hands is almost no different from that performed on the 16-valve version of the domestic Lada Granta. Don't forget about podiums for speakers and columns; they come in different diameters, colors and models.
If desired, corner covers, door inserts, sun visors, decorative floor coverings can be installed in the interior; it all depends only on your imagination.
Tuning VAZ 21124 photo
Tuning the VAZ 21124 changes most of the car’s system, so this car can rightfully be classified as a high-speed car. It’s so nice when on the road, your car easily bypasses other cars, moves easily and does not make noise when accelerating quickly. Installation of a turbine on a VAZ 21124 . high-quality braking system, steering, improved suspension for maneuverability and easy handling - all this is called car chip tuning.
Self-replacement of the cylinder head gasket VAZ 2112 16 cl: instructions with photos
When is it time to change?
The gasket serves to seal the connection between the head and the cylinder block. There are several types of it:
The procedure for replacing the cylinder head gasket on a VAZ 2112 16 valves is indicated in the manual, but this is not the main reason. There are a number of signs that determine the need for replacement:
- leakage of engine oil or antifreeze in the connection area;
- white steam present in the exhaust gases indicates that antifreeze has entered the cylinders;
- when exhaust gases enter the cooling system, foam appears at the neck of the expansion tank;
- the presence of oil stains in the coolant indicates a leak in the connection;
- the presence of a white coating on the oil dipstick indicates that there is antifreeze in the engine oil; this may be due to a damaged gasket.
Replacement process for a 16 valve car
The procedure for replacing the cylinder head gasket on a VAZ 2112 with engines that have 8 and 16 valves is similar. To carry it out you need to prepare:
- a set of spanners and wrenches;
- torque wrench;
- new consumables;
- container for draining coolant;
- clean rags.
For the convenience of the procedure, it is better to use an overpass or inspection hole.
Stages
- First of all, you should de-energize the car by removing the negative terminal from the battery.
- Then you need to drain the antifreeze into the prepared container.
- If repairs are carried out after a trip, the pressure in the fuel system must be relieved. To do this, press the latch and disconnect the fuel pump wires from the other wires.
- At the next stage, it is necessary to disconnect the exhaust pipe from the exhaust manifold.
- Next, the thermostat is removed.
- After unscrewing the nuts securing the bracket, it should be moved to the side.
- Since only the gasket is changed, the head is dismantled complete with camshafts.
- Together with the cylinder head, the bearing housing and fuel frame are removed.
- Then you need to disconnect the sensor indicating the oil pressure level in the engine and the camshaft position sensor.
- Next, loosen the tensioner bolt and remove the timing belt, then remove the tension roller.
- The toothed pulley must be fixed so that it does not rotate. Then you should unscrew the mounting bolt and remove it with the washer.
- Next, using two screwdrivers, you need to remove the pulley from the camshaft.
- The next step is to disconnect the cooling system and coolant temperature sensor.
- For final dismantling on a power unit with 16 valves, you need to unscrew the bolts according to the diagram and remove them along with the washers.
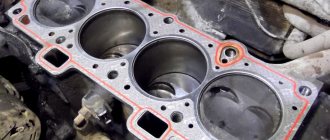
- The old gasket is removed along with the cylinder head.
We dismantle the cylinder head along with the gasket - Before installing a new consumable, the surface at the connection point should be cleaned of remnants of the old gasket and dirt.
- Threaded holes must be clear of coolant and engine oil.
- The new consumable is installed along the guide bushings.
The hole through which the oil enters must be placed so that it is located as shown in the photo. Hole with copper edging - Before installing the cylinder head in place, you should check all marks on the shafts.
- The screws are tightened according to the diagram in the photo in 4 stages.
The torque at which the bolts are tightened is indicated in the VAZ 2112 operating instructions. Scheme for tightening the mounting bolts - Assembly is carried out in reverse order.
- After assembly, the necessary valve adjustments and timing belt tensioning are performed.
Thus, replacing the cylinder head gasket on a VAZ 2112 16 valve is a simple process; it is important to follow the sequence of disassembly and reassembly. https://www.youtube.com/embed/IHd2TFCAzcg
Cleaning valve channels
To remove any valve, you will need to remove the camshaft. All screws on the bearing housing must be unscrewed evenly and tightened with a force of 10 N*m. The hydraulic compensator can be removed with a magnet, and then the valve is desiccated by compressing the spring with a puller (see photo).
How to remove the valve
There may be carbon deposits in the valve channels. It is cleared:
- Flat screwdriver;
- Sanding felt.
Grinding is carried out as follows: a rubber pipe is placed on the valve, a paste with diamond chips is applied (one drop), then the valve is pressed into the channel and scrolled. It will also be possible to change the valve stem seals (2112-1007026). You can’t do this without a special puller.
Cap puller
On any car, including the VAZ-2112, cylinder head repair comes down to cleaning and checking, as well as correcting geometry defects. In the latter case we are talking about milling. The presence of cracks and chips is a reason for replacement, not repair.
A small photo report
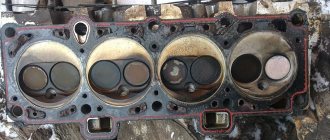
A burnt valve is immediately visible.
One valve burned out in cylinder 2
Carbon deposits were found in each valve channel.
Carbon layer in the cylinder head channels
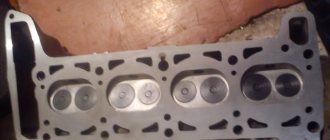
Repair: cleaning all channels, replacing the valve with lapping. Direct repair of the VAZ 2112 cylinder head will require several operations that require some special equipment. Of course, this is not possible at home, and car enthusiasts simply replace worn parts. Next, we will consider the process of repairing the block head, as well as some of the nuances associated with this work.
Stages of block head repair
Before proceeding directly to the cylinder head repair process, it is worth noting that the head must be completely disassembled and all the necessary spare parts purchased. Let's consider the process of complete overhaul of the cylinder head.
Washing and crimping
The process of washing automobile spare parts with hot kerosene
In order to wash the head, it must be completely disassembled, that is, all parts that can be easily removed must be dismantled. For a complete wash you need 12 liters of hot kerosene. At car services, this is done using a sprayer that supplies liquid under pressure. This way, all the dirt and remaining metal shavings are washed away. The washing is carried out until the cylinder head is completely clean.
The process of crimping the cylinder head
Crimping is a process in which the integrity of a part is checked. Pressure testing can be carried out in two ways, which are basically similar. The first is to close all the cracks and fill the part with water. If there is water leaking or leaking somewhere, then the integrity has been compromised and repairs are necessary. The second method is to close all the cracks and immerse the head in an aqueous solution. It will be immediately obvious where the part is depressurized. If the integrity of the head is damaged, it must be restored.
Removing saddles
Before moving on to the rest of the overhaul steps, the valve seats must be removed. In the best case, they will easily be knocked out of their seat, and if not, then you will have to use Russian ingenuity.
The valve is welded to the seat and knocked out of the seat
So, what to do if the valve seats do not come out? The solution is simple. It is necessary to weld a tube to them so that the working end passes through the channel of the guide sleeve and knock it out until the seat comes off the mounting mount. Of course, cracks may form on the seat ring or a piece may break off. After completing the procedure, it is necessary to inspect the place and, if necessary, weld it with argon welding.
How to replace the cylinder head gasket on a VAZ-2112
Replacing this part on a VAZ-2112 16 valves is quite difficult, and if there is no experience, then it is to some extent unrealistic. It is necessary to thoroughly understand and understand the essence and scope of the work that needs to be done.
When replacing the gasket yourself, you should immediately prepare the following items:
- set of spanners;
- engine oil and cooling agent (this is in case the consumed items are mixed);
- a force wrench (with its help you need to tighten each cylinder head bolt);
- container for collecting waste liquid;
- Phillips and flat screwdriver;
- clean cloth.
Principle of action when replacing the cylinder head gasket:
- First, the car needs to be sent to an inspection hole or overpass, since you will need access to the bottom of the car.
- Next you should open the hood. It is necessary to loosen the bolt located on the battery negative terminal with a key, and then remove it.
- It is necessary to prepare a container for draining the coolant in advance, and unscrew the drain plug.
- If you started replacing it immediately after you arrived, then you need to relieve the pressure in the fuel lines. To do this, press the latch and disconnect the cables that lead to the fuel pump.
- Afterwards, it is necessary to disconnect the manifold from the intake manifold passing through the exhaust system. The thermostat must be disassembled. To do this, you need to loosen the clamps located on the pipes and then separate them.
- When the disconnected nuts securing the bracket have been unscrewed, the bracket itself can be moved to the side just right. Afterwards you can begin disassembling the cylinder head. To do this, you will need to unscrew all the bolts that hold it in place using a torque wrench. Then you need to remove the bearing devices with their housings and the fuel rail from the head.
- To remove the controller that controls the fluid pressure in the engine and the DPKV, you need to disconnect the plugs with wires from them.
- To dismantle the belt located in the timing mechanism, it is necessary to loosen the tension roller screw. Then we fix the pulley in the form of teeth, which actually holds the strap. After this, you need to unscrew the fixing screw, and you can begin dismantling with the washer.
- You need to remove the disc from the camshaft using a prepared tool.
- Separate all cooling lines from the engine and remove the system that controls the temperature of the antifreeze in the engine itself. Then you need to unscrew the screws securing the head. The part should be removed together with the former gasket. Afterwards, you need to clean the surface where the head comes into contact with the blocks from various dirt. The threaded holes also need to be cleaned.
- Then you can install a new gasket.
- Before installing the cylinder head, make sure that each mark on the shaft corresponds.
- After installing the cylinder head, you need to tighten the fixing bolts. For this procedure, you should use a torque wrench, since without it it will be impossible to do this.
- Next, you need to carry out the assembly procedure in the exact backward order. After assembly, you will need to adjust the valves and tighten the timing belt.
This work is quite difficult and long, not every beginner will be able to do it efficiently and effectively. If you are not confident in your abilities, then it is better to turn to specialists who know how to do their job at the highest level.
Removing the valve covers on engine 21120 (16v 1.5)
Briefly, the sequence looks like this: remove the filter box and the plastic trim, disconnect the wires and unscrew the ignition module. The key must be turned to position “0”.
Removing the air filter box
To remove the filter, loosen clamps 1 and 2, and then disconnect connector 3. Pipes 1 and 2 are removed from the box. Use a 10mm wrench to unscrew the screw on the body, then remove the box from its mountings.
To disconnect high-voltage cables, you need to pull the caps out of the wells. The cables are also disconnected from the ignition module. It is pressed to the valve cover with three 10mm nuts.
We figured out the ignition module
Don't forget to disconnect the low-voltage connector and dismantle the module. If you do not unscrew the module, you will not be able to remove the valve cover on a VAZ-2112.
The part called “receiver”
First of all, you need to remove the throttle assembly: unscrew the cap on the antifreeze tank, disconnect the TPS and IAC connectors, unscrew the two fastening nuts (wrench “13”). It is also advisable to disconnect the negative terminal from the battery.
What to do before removing the receiver
Using a 10mm wrench, unscrew the cable mounting bracket from the receiver. All that remains is to remove the throttle assembly: the operation is carried out so that the assembly remains above the expansion tank. The assembly itself is finally attached to the body partition.
Replacement
As we have already noted, the replacement procedure on engines with 8 and 16 valves does not differ significantly. Therefore, the instructions presented below will be equally useful to owners of VAZ 2110 with different types of power units.
- Drive your car onto the overpass inspection pit. Although a lift would also be a good option. You need full access to the bottom.
- Be sure to disconnect the negative terminal from the car battery. This way you can turn off the power to the car and avoid possible problems.
- Disconnect the downpipe from your muffler.
- Remove the carburetor.
- Now let's get to work with the electrical wiring. You need to disconnect the wiring from the spark plugs, remove the connector from the temperature sensor, and also disconnect the connector from the pressure and oil level sensor.
- Next, disconnect the vacuum booster pipe attached to the intake manifold.
- Disconnect the ignition distributor sensor.
- Now you should dismantle the fuel pump with all its components.
- Slightly loosen the tension roller bolt. This will allow you to remove the roller itself, as well as the timing belt.
- Secure the camshaft toothed pulley so that it does not rotate during subsequent manipulations.
- Remove the mounting bolt, and then remove the pulley itself. To do this, you will need to pick up two screwdrivers at the same time.
- Locate the nuts that hold the rear timing cover in place. They need to be unscrewed and the cover removed accordingly.
- Use a Phillips screwdriver to slightly loosen the tension on the clamps, which will give you the opportunity to disconnect the hoses that go to the cylinder head exhaust pipe.
- A hexagon is used to dismantle the GB mounting bolts. There will be 10 of them in total.
- The bolts should be removed along with the washers. If necessary, replace the washers with new ones.
- The cylinder head is removed along with the old gasket.
Removing the valve covers on engine 21124 (16v 1.6)
Remove the filter box and decorative trim (see Chapter 1). Next, remove the ignition coils: disconnect the plugs and use a “10” key to unscrew the fastening screws.
Customized ignition coils
What to do with the damper drive cable: remove the rubber holder from the bracket, cut the plastic clamp.
The throttle cable needs to be released
Now remove the throttle assembly according to the instructions from the previous chapter.
How to remove a plastic intake module
A wiring harness is attached to the front of the intake module. The cables go to the DPKV, DPRV (DF) sensors and to the adsorber valve. All connectors must be disconnected, then the wiring harness is removed.
We release all the pipes
The photo shows how the brake system hose is disconnected, as well as the crankcase ventilation hose. It is also necessary to remove the oil dipstick and tube by unscrewing screw 1.
Plastic part attachment points:
- Key “10”: two nuts 1;
- Key “13”: three nuts 2, two bolts 3.
All elements are shown in the photo.
Mounting the intake module
What is this?
What exactly is this gasket?
This is a rubber element that has a certain elasticity. With use and wear, elasticity is lost. This reduces the quality and efficiency of performing the main task of the element - sealing the connection between the cylinder head and the cylinder block.
In order for the engine to work properly and without problems, the gasket must be installed efficiently and reliably. Ignoring its wear will lead to a serious reduction in engine life.
Signs of wear
If your old gasket is worn out, it won't be difficult to determine. There are several characteristic signs of loss of elasticity of a rubber element:
- White steam starts coming out of the exhaust;
- Traces of coolant or engine oil leakage appear at the cylinder head joints;
- Traces of oil appear in the coolant;
- An impressive amount of lubricant accumulates in the pan;
- Foam forms around the filler cap.
Features of tightening fasteners
Even a non-professional can do this job.
It is important to follow two rules - the tightening torque and the sequence of working with fasteners. The tightening torque on engines with 8 and 16 valves is no different, while the sequence is different
Pay attention to the diagrams below; numbers indicate the order of tightening the bolts.
It is necessary to pay attention to the cylinder block:
- if during operation the bolts become loose due to vibration (the malfunction is detected by leakage of the gasket);
- after dismantling the cylinder head and installation;
- if the iron gasket is replaced;
- during tuning of the cylinder block.
Before work, take the instructions from your Priora to understand which engine is installed in the car.