Cars admin26.02.2020
V-belt (profile A) Used on “Classic”, Samara, Niva 710 mm cars - VAZ 2108-21099 with a carburetor engine and generator drive. Of the most common 715 BRT cat. number 2108-3701720-01RU,
820 mm - VAZ 111, 1113 (OKA) - generator drive The most common are BRT 1111-3701720-01RU (geared), BRT 1111-3701720RU (simple).
840 mm - used on LADA 4×4 in a variant to drive the power steering pump (vehicles of new years of production)
940 mm - the generator drive of the VAZ Classic 2101-2107 of their modifications, the VAZ 2121 NIVA, the generator drive and the steering hydraulic pump drive of the VAZ 21213 (costs 2 belts) in a variant version a poly V-belt is installed, we will consider it below. AvtoVAZ 21010-1308020-82 (geared), BRT 2101-1308020RU (can be either simple or geared).
Poly V-belts (ribbed) are used to drive the generator and auxiliary mechanisms.
6PK698 - drive of the VAZ 21093 generator with an injection engine, 2113-2115 with an 8-valve injection engine. The belt tension is produced by a generator, without additional rollers or mechanisms. BRT 21082-3701720RU
6PK742 - drive of the VAZ 2110-2112 generator without power steering, found on the first production LADA Priora. BRT 2110-3701720RU
6PK823 Lada Granta - generator drive. Engine 2116, 8 valves. There is no belt tensioning mechanism. Elastic belt used 6PK823SF
6PK882 - drive of the LADA Kalina (1118) generator with an 8-valve engine, the belt tension is carried out by a mechanism.
4RK913 - drive of the generator and air conditioner Lada Largus, engine 1.4 BRT 4RK913RU
5K990 — alternator belt Lada Largus BRT 5K990R
6PK1005 - Lada Kalina (1118-1119) generator and power steering drive.
6PK1015 - drive generator and power steering VAZ 2110-2112 with a 16-valve engine, LADA Priora, Priora2 with a 16-valve engine, LADA Kalina, Kalina2, Kalina-cross with a 16-valve engine, LADA Granta with a 16-valve engine. Motor VAZ 21126, VAZ 21127
6PK1025 drive of the generator and air conditioning compressor of VAZ 2110-2112 with a 16-valve engine, LADA Priora, Priora2 with a 16-valve engine, LADA Kalina, Kalina2, Kalina-cross with a 16-valve engine, LADA Granta with a 16-valve engine. Motor VAZ 21126, VAZ 21127
5РК1110 — generator drive LADA Largus engine 1.4. BRT 5RK1110RU
5PK1747 - generator drive, power steering, air conditioning LADA Largus 8 valve engine. BRT 8200833541RU
6PK1822 - drive of generator, power steering, air conditioner LADA Largus 16 valve engine BRT 8200598964RU
5PK1885 drive of generator and auxiliary mechanisms LADA 4x4 21214, 21230, Chevy Niva 2123
—> Auto-moto-bicycle equipment —> Posted: 12/16/2015
LOCATION
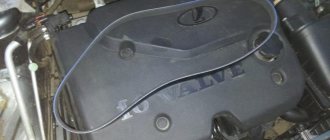
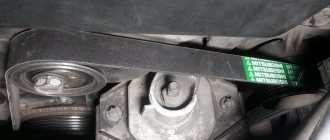
Finding the Alternator belt in a VAZ 2114 is not difficult; when you open the hood, it is immediately visible. There are 2 criteria by which you can easily see it - firstly, it differs from all other belts in that one of its sides is toothed, and secondly, it connects not only the crankshaft and camshaft, but also passes through several small auxiliary parts . If you still don’t understand where it is, let’s first find the generator itself, it is located to the left of the car engine, not far from the right headlight, on the right side of the passenger compartment - accordingly, the belt is located on the generator itself (logically).
Also, before talking about changing, it is necessary to mention that in any case, no matter how carefully the car is operated, and no matter how often you drive it, the alternator belt will begin to deteriorate. Perhaps it will slide, or maybe it will be eaten away, it doesn’t matter, the main thing is that in any case it will become unusable. Therefore, its condition must be monitored very carefully, because no one wants it to break on a long journey.
Adjusting belt tension
Incorrect tension of the alternator belt can have an extremely negative impact on the operation of the components and assemblies that depend on it. Thus, too weak a tension will lead to its slipping, leading to unstable operation of the generator (due to poor transmission of torque) and interruptions in the on-board network (including rapid battery discharge).
On the contrary, an excessively tight belt tension can cause excessive stress on the generator bearings, thereby leading to their rapid wear or even destruction. It is for this reason that the tension value is extremely important and should be checked periodically.
In order to correct it and return the belt to normal operating condition, you need to:
- loosen the generator fasteners from below and from above;
- turn the adjusting bolt and thus tighten the tension (to increase the tension, rotate the bolt to the right, to loosen it, to the left);
- Using a wrench, turn the crankshaft several turns and check the tension;
- If the tension is OK, tighten the generator fasteners.
VAZ 2114 generator belt tension
The tension check itself can be done by simply pressing the belt with your hand. If it is tensioned correctly, its deflection will be about 8 mm. If the deflection is greater, the tension should be increased; if it is less, it should be weakened.
You can check the correct tension in another way - just put the multimeter in DC voltage measurement mode with a limit of 20 volts and measure the voltage at the battery terminals with the engine running. Stable readings will indicate that the belt is tensioned well (which means that rotation is transmitted smoothly to the generator). If the voltmeter readings fluctuate, the belt tension should be adjusted.
Another clear sign of proper belt tension is that it runs silently. If it moves smoothly, without making a whistle, hum or other extraneous sounds, then everything is fine. If any noise is heard during its operation, it means that the tension was performed incorrectly (in some cases, the cause of the noise may be jamming of the generator, as discussed above.
That is why, if after repeated attempts to adjust the belt tension it is not possible to remove the whistle, you should pay attention to the condition of this device).
CHANGING THE GENERATOR BELT
Surely, if you are looking for tips on how to remove the alternator belt and then put it back in place, you have already encountered the problem of its malfunction. Know that in order to perform the replacement correctly, you do not need to contact a car service; you can easily perform this procedure yourself . So, first we need to decide what tools we need to replace the alternator belt:
- Socket wrenches for 17 and 19, you can also use open-end wrenches;
- 10mm socket;
- Special tension wrench;
- Flat screwdriver;
- Ratchet wrench.
Attention! Before starting work, be sure to remove the negative terminal from the battery.
Further work must be performed according to the following instructions:
Why does the timing belt slip?
Water pump The cause may be one or several in combination. Let's look at them in order.
1. The belt itself may be to blame, or rather, the faulty manufacturer. A belt that has different rigidity across widths begins to float towards less rigidity almost immediately after installation. Diagnostics in this case is simple, remove it, turn it the other way, install it, and if it starts to creep in the other direction, then the culprit has been found. This belt is definitely for scrap. To be fair, this is much less common now. Tip: Always keep timing belts and alternator belts in your trunk.
REMOVING THE ALTERNATOR BELT
- First, you need to put the vehicle on the handbrake with fourth gear engaged;
- Next, open the hood and remove the protective cover from the belt, now you need to loosen the tension, then you can remove it;
- Now we remove the generator drive pulley from its place, while leaving its bolt in place. Remove the vehicle from gear.
- Then, you need to turn the crankshaft clockwise, while you need to keep an eye on the mark and the flywheel, they are visible in the hole in the clutch housing. You need to twist it until it becomes parallel to the middle strip of the scale;
- When the mark is in the indicated position, you need to unscrew the tension roller, by the way, with the help of it the tension is released. Now we remove the damaged spare part.
All the steps to replacing the timing belt “from start to finish”
Before replacing, you need to make sure that: neutral gear is engaged, the car is stopped, the minus terminal is removed from the battery (key “10”). The plastic cover is removed from engine 11183 and the part is carefully pulled up. Then remove the drive casing:
- Unscrew the three fastening screws and remove the plastic part (see photo).
Timing casing on motor 2111 and 11183
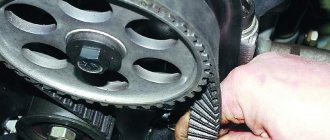
Using the “17” key, rotate the crankshaft and see when the marks on the upper pulley and on the engine coincide. Then, opening the plug, we check the alignment of the marks in the clutch housing. Immediately fix the flywheel with a screwdriver.
Marks on the pulley and flywheel
An alternative way to “break” the timing belt
It is impossible to replace the timing belt on a VAZ-2114 without removing the alternator belt. loosen the upper and lower fastening screws, mark the position of the adjusting screw and unscrew it by 80%.
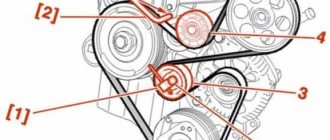
How to move the generator to the engine
Using a 17mm wrench, unscrew the screw securing the generator drive pulley. During installation, you will need to ensure that the marks match (see photo). The screw tightening torque is 99-110 N*m.
Generator pulley on engine
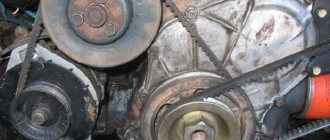
Loosen the nut on the roller, turn it and remove the belt. Now you can replace the roller itself.
The final step for dismantling
When installing a new belt, the upper pulley is once again aligned according to the marks (see above). The locking screwdriver is removed after installation.
New timing belt installed
How to adjust tension?
If everything was done correctly, it means that the belt can be turned half a turn with two fingers, but no more (as in the photo).
Correct tension setting
A fork wrench is used to make adjustments. If you don't have such a wrench, circlip pliers will do. Hold the roller with a wrench and tighten the nut.
The holes for the key should be located under the nut from below. This is the correct position of the roller.
Recommendations
- Before installing a new belt, wipe all pulleys, that is, the teeth on them, with white spirit. And the adjusting screw can be treated with a rust solvent.
- There is no point in protecting a new belt with silicone lubricant. By the way, according to the regulations provided for the VAZ-2114, the timing belt must be replaced every 60,000 km or if necessary. And the need can even be caused by oil products getting on the rubber.
Apparently, an assistant must fix the flywheel: the clutch housing and timing drive are located on two different sides.
2108-1006120 – roller
Attention. parts 2108-1006120 and 2112-1006120 are not interchangeable!
2108-1006129 – pin for the roller;
2108-1006040-10 – belt;
2108-1006149 – seal under the casing;
2108-1006146 – plastic casing.
Analogs of belts
- GATES 5521 or 5521XS (heavy duty), recommended
- FINWHALE BD-111
- BOSCH 1 987 949 559
- LEMFORDER 58-111-19 or 14458 01
- CONTITECH ST-527
- GOOD YEAR G1474 (semicircular tooth) or G1485 (trapezoid tooth)
- DAYCO 111x190/1
- HANSE HZ 011 008
- BRTI 21080-1006040-10
- TOYOTA 13568-19035
- RENAULT 7701462019
- OPEL 636359
- ROVER GTB1124
- AYWIPARTS AW2110560
- PROCODIS FRANCE 05CD27
- FAI 40305
- GK 791170
- MAGNETI MARELLI 340018181434
- MAPCO 43080
- HEPU 29-0165
- OPTIMAL R-1113
- SCT G124
- WILMINK WG1151273
- VEYANCE G1474
- OPTIBELT ZRK 1123 (3 pcs.)
- TRISCAN 8645 5521 (2 pcs.) or 8645 5124 (2 pcs.)
- FLENNOR 4410 (2 pcs.) or F904410 (belt + roller)
- LYNXauto 111CL19 (1 piece) or PK-1236 (belt + roller)
Analogues of the video
- GATES T42042 or T42042A (2 pcs.)
- MAPCO 23081
- FLENNOR FS99018
- LUK 531 0671 20
- OPTIMAL 0N1917
- BREDA LORETT TDI3009
- TORQUE 830900AE2
- ESPRA 2108-1006120/ES0108
- INA 531075010
- CORAM C747
- VPZ-23 830900AE1
WHAT DO YOU NEED TO KNOW?
You have successfully removed the belt from your fourteenth, now in order to install a new one, you need to purchase it. You can buy a new part in any store that sells parts for domestic cars, it doesn’t cost very much, 100-400 rubles, this amount depends on the region of the country.
Important: before you run to the store, be sure to find out what the size of the alternator belt on the VAZ 2114 is in your case. If for some reason you cannot take the measurement, you can take the old one with you for demonstration and purchase the same one.
Other causes of timing belt wear
One of the camshaft teeth is broken.
As a rule, such a problem can be noticed with the naked eye, and belt failure begins with the peeling of the teeth themselves from the belt.
A more significant cause of such a malfunction can be oil leakage from the engine, which gets onto the belt during operation, thereby wearing it out faster. An oil leak is also easy to notice, but eliminating it will require certain skills.
Such problems in the form of oil leaks can damage the timing belt.
It also happens that the cause of a belt rupture may be poor-quality material from which it is made. It often happens that when producing belts from reputable manufacturers, fakes are encountered.
REVERSE INSTALLATION
When you have purchased a new part, it is time to figure out how to install the alternator belt. This procedure is performed in the following order:
- We put the new generator belt on the camshaft pulley, now we tighten both branches;
- The part that is not tensioned is tightened by the roller, put on the pump and crankshaft pulley, then we tighten the belt by reverse rotation - counterclockwise;
- We turn the crankshaft about 2 turns, check the positions of the marks, they should be in the middle;
- If the marks do not match, repeat the entire procedure until you can set them correctly;
- You need to unscrew the crankshaft bolt and put the generator pulley in its place, then tighten it with the bolt. This is done by turning the roller counterclockwise;
When is it necessary to replace the timing belt and set the marks?
Without exaggeration, a worn timing belt can be called a “ticking time bomb.”
The importance of this element in the car system is difficult to overestimate. Usually it is made of high-quality rubber, the service life of which is designed for 50-60 thousand kilometers.
But, if the vehicle is operated in unfavorable conditions, the replacement interval will be different.
In most cases, the replacement interval is indicated by the manufacturer in the documentation for the vehicle. In addition to the resource built into the belt, it is worth considering the following factors that shorten the service life of the rubber element:
Related article: Error P0171 – mixture too lean
- Engine oil getting on the surface of the timing belt
- Leakage of the front crankshaft oil seal
- Tension roller malfunction
- Pump jamming
As you can see, there can be a sufficient number of breakdowns in the car system that directly affect the service life of the belt. If the scheduled replacement time has come, or its resource has been prematurely exhausted, it is not enough to simply replace the old mechanism with a new one - you also need to take care of the correct installation. To successfully do all the work, it is enough to arm yourself with the necessary tools and know how to align the belt with the marks.
How to replace the tension roller on a VAZ 2113-VAZ 2115?
Removal: 1) At the beginning of the operation, install the entire timing mechanism according to the marks, detailed information in details and pictures on how to do this is explained in the article called “Setting the valve timing according to marks” so go to this article and do everything as described in it , by the way, just above we indicated in this article about the cover that will need to be removed in order to get to the timing mechanism, so read about how to remove this cover in the same article to which the link is given in this paragraph.
2) Go ahead and move on to point 2, now you will need to remove the tension roller itself from the car, but before removing it, remove the timing belt from the camshaft and from the tension roller itself, to do this, slightly loosen the nut that secures this roller (This nut in the photo above is indicated by a blue arrow, by the way, we’ll run straight ahead behind it, there will also be a washer located behind this nut, so don’t lose it when you completely unscrew the nut) and turn the roller by hand so that the belt loosens (the roller itself is made in the form of an oval, that’s why he regulates the belt tension, that is, at some point he strongly pulls the belt, and at some point he doesn’t pull it at all), after which remove the belt from the camshaft as shown in the photo below (Just do everything carefully), and well also remove it from the roller itself and let it hang (To completely remove the belt, you need to unscrew the bolt that secures the generator drive pulley, you also need to remove the belt itself from the generator, in general there are a lot of brands and so as not to completely remove it, just like we already indicated a little higher, remove it from the camshaft pulley, from the tension roller and let it hang from you).
3) Well, at the end of the operation, when the belt is no longer in the way, completely unscrew the nut that secures the tension roller, remove the nut and the washer located behind it, and then remove the roller itself along the shaft as shown in the photo below, after the roller will be removed, check its bearing, to do this, grab the central part of the roller with your hand and rotate the outer part of the roller, it should not jam and should spin normally, there should be no play, and grease should not leak from the bearing (B In this case, the roller will be contaminated with grease).
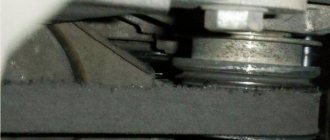
Note! When the roller is removed, a spacer ring will be installed behind it, which we also recommend that you remove and check for defects. If it is in good condition, that is, not crimped or cracked, then you can not replace this ring with a new one and install it on your place again, by the way, due to this ring, as you already understood, the fact how the tension roller will stand depends, for example, if the ring is installed large, then the roller will come out a little and the belt will not stand straight, but at an angle, so if The belt doesn’t eat you up, and if it doesn’t fly off while driving, then you don’t even have to touch this roller, since it does its job, as they say, with a bang!
Installation: The new roller is installed in its place in the same way as it was removed, but only the entire operation is performed in the reverse order of removal, in addition, the roller must also be installed in such a way that the two holes that are on it (see photo below) are directed not inwards, but outwards, by the way, if you look closely at the tension roller which is shown in the photo below, you can even notice with the naked eye that it is covered in lubricant, such a roller needs to be replaced and cannot be reused, because there is a possibility that it will soon time, the bearing will jam, but a jammed tension roller will not lead to good things (Either the timing belt will fly off in this case, or it will break), after you install the new roller and secure it with a nut, be sure to put on the timing belt and adjust it, in more detail For information on how to do this, read the article: “Replacing the timing belt,” point 1.
Additional video clip: We have attached a very interesting and visual video clip for you just below, so that you can watch it and see in more detail how the process of replacing this tension roller is carried out, so watch this video clip and delve into it.
- Electrical equipment
- Engine
- Brake system
- Other
- Steering
- Transmission
- Suspension
- Tuning
- VAZ 2110 Other
- Engine
- Steering
- Electrical equipment
- Transmission
- Brake system
- Suspension
- Tuning
- Electrical equipment
- Steering
- Video publications
- VAZ tuning photo stream
- Operation and repair manuals