Performing tension
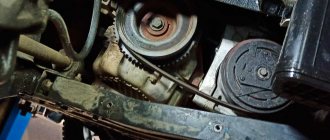
If there is no wear on the V-belt drive, but there is a whistle, first of all, check the tension level. We will not use complex terminology, but will simply advise you to press with some force on the belt in the middle.
If the tension is done correctly, then the belt will bend no more than 8 millimeters. If the deflection is greater, then the element will have to be tensioned, and if it practically does not deflect, the tension will have to be loosened. The problem is not the whistling. Due to weak tension, the battery does not charge effectively, and the drive itself begins to wear out faster. Excessive tension can lead to damage to the alternator bearings and stretching of the belt.
Correct tension of the VAZ 2110 generator belt is performed as follows:
- Loosen the generator from the bottom and top. A nut is used for this;
- Turn the adjusting bolt and adjust the belt;
- If you want to increase the tension, the bolt is turned to the right. Thus, you move the generator away from the cylinder block;
- To loosen the tension, move in the opposite direction - to the left;
- Use a wrench to grab the fastening bolt and turn the crankshaft a couple of turns, then check the tension;
- If all is well, the tension is correct, the nut can be tightened back.
Tension adjustment
If you discover that the V-belt drive is not yet worn out, but is whistling, you must first check its tension. According to the book, its deflection with a force of 10 kg/cm2 (100 N) should be 10 - 15 mm. To put it simply, you just need to press it approximately in the middle with some force.
If the tension is correct, then the deflection will be 6 - 8 millimeters. If it is more, it needs to be tightened, if less, it needs to be loosened. And it's not just that he whistles. If the tension is weak, then the battery charges less well, and the drive wears out faster. If the tension is too strong, there is a risk of failure of the generator bearings and the belt stretches.
We carry out the necessary adjustments as follows:
- Loosen the generator mounting nuts from the bottom and top;
- By turning the adjusting bolt, we make the adjustment: - To increase the tension, turn the bolt to the right - this moves the generator away from the cylinder block; — To loosen, turn the bolt to the left - bringing the generator closer;
- Having hooked the key onto the mounting bolt, turn the crankshaft two turns and check the tension again;
- If everything is fine, tighten the fastening nuts.
Replacement
We have already figured out how to tighten the alternator belt. But such measures are not always relevant. If the element is cracked, overstretched and no longer tensioned, then there is nothing left to do but replace it with a new one.
In fact, replacement cannot be called a complex procedure. Follow the instructions and everything will work out.
- Slightly loosen the bolt nut from the lower mounting of the car generator, as well as the tension nut.
- Loosen the tension of your belt further. You already know how to do this from the previous section, where we talked about tensioning the alternator belt.
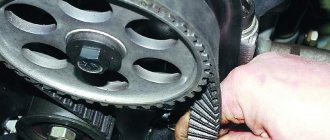
- Move the generator towards the power unit, which will allow you to remove the belt from the crankshaft and generator pulleys.
- The next step is to install a new element. To do this, you will need a high-quality belt purchased from a trusted store. What exactly this part will be and what size it will be is not difficult to determine. But quality comes first.
- First, the belt is put on the crankshaft pulley.
- Now it goes to the generator pulley.
- At the last stage, you have to repeat the tension adjustment procedure. You already know very well how this procedure is carried out, so there should be no problems.
Step-by-step instructions for replacing the timing belt
Engine 8 valves.
- Loosen the locking nut of the generator tensioning device (key 13) and unscrew the adjusting screw (head 10) to the maximum. We take the generator to the cylinder block and remove the generator drive belt.
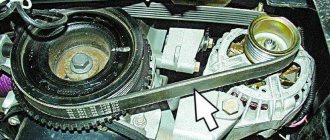
- We dismantle the plastic protective cover of the timing belt by unscrewing three bolts (10 wrench). Plastic timing cover.
Set top dead center (TDC)
- We turn the crankshaft clockwise until the mark on the camshaft toothed pulley and the curved edge on the metal casing coincide.
Camshaft mark.
- We remove the generator belt drive pulley by unscrewing the bolt by 17, you will need a wrench with an extension and a pipe as a lever, since the bolt must be well tightened.
- The mark on the crankshaft toothed pulley should also coincide with the low cast mark on the oil pump. Crankshaft mark. We dismantle the tension roller together with the timing belt by unscrewing the nut (head 17). Next, unscrew the bolt 17 and remove the camshaft pulley. To avoid losing the key, you can secure it with electrical tape. It is advisable to replace the camshaft and crankshaft pulley. Fastening the tension roller.
Replacing the pump
- We remove the metal protection, unscrew the 10 nut on top and the three bolts on the bottom securing the water pump. We take out the old water pump.
Pump mount.
- Before installing a new pump, apply a thin layer of sealant to its gasket. After installing the pump in place evenly, in several passes, tighten its mounting bolts.
How to properly replace and tension the VAZ 2110 alternator belt (8 valves)?
06/05/2018 Quite often a whistle is heard in the V-belt connection, indicating the need to tighten or replace the belt. Let's focus on tightening and replacing the belt on the VAZ 2110 model.
Quite often a whistle is heard in the V-belt connection, indicating the need to tighten or replace the belt. Let's focus on tightening and replacing the belt on the VAZ 2110 model.
The appearance of a characteristic sound is due to the following reasons:
- poor belt tension. Typically, a whistling-like sound occurs at night. This is explained by the increased operation of the generator due to the need to provide the vehicle with lighting;
- moisture. Quite a rare occurrence. In this case, the car owner needs to tension the belt;
- reduction in performance characteristics. We are talking about the destruction of communication elements with drying out. In the first stages, cracks appear on the surface of the element, and then further destruction occurs. During movement, individual belt fragments touch the pulley, which leads to slipping. In this case, the only way out of the situation is replacement;
- generator wedge.
In what cases is replacement necessary?
According to the regulations, it is necessary to change the belt on a VAZ 2110 (8 or 16 valves) every 50,000 kilometers. Check its condition and, if necessary, carry out a tightening every 15-20,000 kilometers (over time, it may increase in size - stretch). Also, replacing the VAZ 2110 alternator belt (8 or 16 valves) is necessary in the following cases:
- detection of grease stains;
- cracks and damage;
- abrasions;
- increase in size - stretching;
- worn out teeth;
- frayed edges.
Visible frayed edges
This is interesting: How to check support bearings
How to properly replace and tension the VAZ 2110 alternator belt (8 valves)?
Let us dwell on the procedure for tensioning the V-belt drive. If there is no visible damage to the element, it is necessary to check the tension level.
In accordance with the vehicle operating manual, a force of 10 kg/cm2 should result in a deflection of one to one and a half cm. It is impossible to check the tension without special equipment in this way.
Therefore, car owners use a practical method based on their own experience. This can be done in a simple way by pressing with a certain force on the product. If the element bends no more than 0.8 cm, then this indicates proper tension.
If the tension is strong or weak, the level of the V-belt drive must be brought back to normal.
In fact, the difficulty is not in the increased noise. Improper tension can result in two serious problems:
- low level - the battery is not charging efficiently. Also in this case, the belt wears out faster;
- strong tension - increases the likelihood of failure of the generator bearings.
In order to perform tension, you must perform the following steps:
- use a nut to loosen the generator mount (in the lower and upper parts);
- use the adjusting bolt to adjust the element;
- to increase tension, the adjusting bolt must be turned clockwise;
- after rotating the bolt, you need to check the tension level;
- tighten the nut securing the generator.
Belt tension
This video shows how tension occurs correctly.
Every driver should be aware that a poorly tensioned drive reduces battery charge and can lead to faster wear on the belt drive. In addition, it often slips and a characteristic whistle is heard.
If you tighten the belt, then this is fraught with rapid stretching (increase in size) and failure of the generator bearings.
Checking the tension is very simple. If you press on the drive in the middle part between the pulley and the crankshaft with an approximate force of ten kilograms, then it should bend by ten to fifteen millimeters.
Tension check
Adjustment is made using a special bolt. If you turn it clockwise, the belt will tighten and vice versa, if you turn it counterclockwise, it will loosen.
Adjusting bolt
Attention! If there is power steering, then the tension is performed not with a bolt, but with a tension roller.
Replacing the VAZ-2110 alternator belt
If there is no visible damage on the surface of the belt, then tension or loosen it. Other cases, including excessive stretching of the element, require replacement. To perform the work, you must adhere to the following sequence of actions:
- use a nut to loosen the generator;
- adjusting bolt, loosen the tension;
- Move the generator slightly towards the engine;
- remove the belt;
- install a new element purchased from an online store or retail outlet. It is recommended to buy good quality products;
- put the element on, and first this is done on the crankshaft pulley, and then on the generator;
- perform tension adjustment settings;
- tighten the generator mounting nut.
To replace the belt, the motorist will need several wrenches. You can also get by with one spanner.
After completing all operations, it is recommended to rotate the crankshaft and recheck the tension. To rotate the shaft, you need to engage fourth gear and roll the car forward a little. If necessary, the belt tension must be loosened or tightened. At the same time, it is important not to forget about the need to secure the upper and lower nuts of the generator until they stop.
It is not uncommon for a VAZ 2110 car to experience a whistle in the V-belt connection of the generator. For this reason, it needs to be tightened or completely replaced. Today we will talk in detail about the tightening procedure, and also tell you how it changes.
Work progress
- The generator drive belt should bend by 10–15 mm with a force of 100 N (10 kgf) applied in the middle between the crankshaft and generator pulleys. Otherwise, adjust its tension.
- To do this, loosen the nuts of the lower and...
- ...top mounting of the generator.
- To tighten the belt, move the alternator away from the cylinder block by turning the adjusting bolt clockwise. To loosen the belt, move the generator to the cylinder block by turning the adjusting bolt counterclockwise.
- Using a wrench, turn the crankshaft by the pulley mounting bolt two turns clockwise and check the belt tension again. Repeat the adjustment if necessary.
- Tighten both generator mounting nuts.
- It is more convenient to check and adjust the tension, as well as replace the alternator drive belt from underneath the car. To do this, you need to lift the front of the car and remove the engine crankcase protection.
- To replace the belt, loosen the nuts on the lower and upper fastenings of the generator, turn out the adjusting bolt as much as possible and remove the old belt, moving the generator as far as possible towards the cylinder block. Place the new belt on the crankshaft pulley and then on the alternator pulley. After this, adjust the belt tension.
Generator 94.3701 Internal structure of generator 94.3701 1 – casing; 2.
Work progress Remove the generator from the car (see Removal and.
Contents1 The warning lamp does not light up when the ignition is turned on. Control devices.
Copyright © 2022 All rights reserved. Any use of materials and images from the site without our consent and an active backlink is prohibited.
Source
Why does the whistle occur?
There are several reasons why the characteristic whistle-like sound occurs.
- Weak tension. The element slips, and this happens most actively at night. The increased intensity of the whistle at night is explained by the fact that the generator additionally works for lighting.
- Gradually the component is destroyed. The belt can dry out, causing its structure to be disrupted and it literally crumbles into pieces. The first signs are cracks, and then whole pieces break off. When moving, the pulley hits and slipping begins. Only replacement is required here.
- Although moisture gets on the belt very rarely and evaporates almost immediately, the connection can still whistle. In this situation, tension is required.
- The generator itself jams.
Replacement algorithm
Before changing the air conditioning belt on a Hyundai Accent, you need to remove the right mudguard of the power unit. This is done as follows:
- We drive the car onto a viewing hole (overpass, lift). Open the hood and, using a Phillips screwdriver, unscrew the piston bolt that holds the mudguard fastening system. The piston must be pulled out.
- We climb under the bottom of the vehicle, find the screws holding the mudguard fastening from below, and use a 10mm wrench to unscrew them. After removing the mudguard, it is also recommended to remove the wheel - in this case, the replacement procedure will be more convenient and faster.
- To get to the A/C pulley, you must first remove the alternator belt. To do this, use a 12mm wrench to loosen the generator mounting nut. Using the same tool, unscrew the adjusting bolt to loosen the belt tension.
- After this, we move the entire drive of the auxiliary units towards the cylinder block, which will allow access to the air conditioner pulley. Remove the belt from the shafts.
- Since we previously loosened the Accent air conditioning belt tensioner, we can now completely unscrew the adjusting bolt without any problems. Now we remove the air conditioner belt - the first part of the task is completed.
- We install the new belt in its original place. To tension the air conditioner belt, use a 12mm wrench to loosen the screw that secures the generator to the oil pump. We begin to slowly rotate the adjusting screw until the pulley is sufficiently tensioned. Note that the tension should be moderate - when pressed from above, the belt should move vertically by 5 - 7 mm. If you clamp the Hyundai Accent air conditioner belt tensioner roller too tightly, the load on the bearings during rotation of the generator shaft will be constantly increased, which can cause their premature wear. The same trouble awaits the refrigerant pump bearings.
- After tightening the strap, you should tighten and tighten all the bolts and screws that were previously unscrewed or loosened.
- All subsequent operations should be performed in reverse order. The last thing to install is the mudguard.
If this operation is being performed for the first time, it is better to use the help of more experienced colleagues - this will allow you to avoid incorrect actions and at the same time gain invaluable experience, since this procedure will have to be performed more than once.
The last recommendation can be safely related to the repair of any part of the car: avoid purchasing cheap spare parts and consumables of unknown origin - as a rule, their quality is several times worse than that of the original parts. Remember that the resource of noname accessories is significantly lower, and therefore such minor savings will come back to your side. Using an original strap guarantees that it will last at least the specified time.
Replacing belts on Hyundai
Accent
Changing belts on a Hyundai Accent usually causes difficulties due to difficulty of access. After all, there is little space for changing belts under the hood of the Hyundai Accent, and there are three drive belts. Air conditioning compressor poly-V belt (unique number 97713-1E000), generator poly-V belt (25212-26021) and power steering V-belt (57231-29100). To understand how the whole system works, we offer a diagram of the Accent belts.
The air conditioning compressor belt is thrown from the crankshaft pulley to the air conditioning compressor pulley. The belt tension is ensured by a special tension roller. The alternator belt rotates through the crankshaft, alternator and water pump pulleys. The tension of this belt is carried out by a tensioning mechanism that moves the generator. The power steering belt is thrown over the pump pulley and the power steering pump pulley, this belt
by moving the power steering pump housing on a special bracket attached to the engine. We look at the diagram of Hyundai Accent drive belts in the photo.
To change or adjust the tension of the air conditioning belt in the Hyundai Accent, you need to remove the wheel and fender liner. Since there is no other access to this area. The tension roller, which regulates the tension, allows you to loosen or tighten this belt. For clarity, we offer a photo. The arrow indicates the tension roller.
Dimensions
The sizes are different, and they are individual for each VAZ model.
If we talk specifically about the “ten”, then adhere to the following rules for choosing a belt size:
- In the absence of air conditioning and power steering, 742 millimeters is suitable;
- If the car is equipped with a hydraulic booster, then the size will be 1115 millimeters;
- If an air conditioner is also present, then the optimal size is 1125 millimeters.
Some craftsmen regularly use original belts from other AvtoVAZ models - Priora and Kalina - to replace them when repairing their "ten".
Alternator belt tension Kalina 8 valves. Installing a generator without a fret tensioner Kalina
The alternator belt on the Lada Kalina plays an important role in engine operation. Without it, the generator will not be powered, which in turn may result in the battery not charging. If the battery is not charged, the car will not be able to start.
Replacing the alternator belt: step-by-step instructions
First of all, to replace the alternator belt of the 8-valve Lada Kalina, you will need a tool: an open-end wrench with a size of 19, a wrench with a size of 10, and a socket with a size of 8. Now you can proceed directly to the replacement process:
The tension moment must be strictly observed. Too little tension will not give normal speed to the generator, which will lead to a drop in voltage in the on-board network. Too strong and will cause the belt to “stick” or break.
Russian know-how, ordinary market weights guard the alternator belt tightening force
Experts recommend changing the alternator belt on the 8-valve Kalina every 25 thousand km, but AVTOVAZ - every 30,000 km. But, it is worth considering that you need to constantly check the condition of the belt. Since failure can occur even after 10,000 km.
Gates belt - mileage 40,000 km, rips are visible, nothing critical, but better to replace
Replacing this element is not limited by a time frame, but is determined by the condition of the generator belt. If you constantly examine the condition, you can prevent breakage and other negative consequences. At the same time, motorists are recommended to carry a spare belt with them so that they can change it at any time and move on.
Belt selection, catalog number, price
Each belt in a car has its own service life and resource, and therefore requires periodic replacement. So what kind of alternator belt should be installed on the 8-valve Lada Kalina and how is this done?
Original number and belt size:
It is worth considering that the replacement of the alternator belt also includes a tension roller, which wears out along with it.
When performing the replacement process, it also needs to be replaced.
When choosing a belt and roller, the motorist faces a difficult task: original or analogue. Both are good. But what should you do if you don’t have a belt with you when buying in a store?
Table of alternator belt roller analogues for the 8-valve Lada Kalina
Determination of malfunction and replacement time
Determining a faulty alternator belt is quite simple. Let's look at the main indicators:
All these malfunctions indicate that it is time to replace the alternator belt on Kalina. Otherwise, it may break at the most inopportune moment.
Torn belt on one of the Kalinas
conclusions
Replacing the belt and generator roller on an 8-valve Lada Kalina is very easy and simple. A wide range of product choices will not suit every consumer's taste. Moreover, even analogues of original parts are of fairly high quality. Diagnosing faults is easy and can be done by any motorist.
An extraneous whistle may disturb you. Having delved into the essence of the breakdown, it turns out that the cause is the alternator belt. You can try to solve this problem yourself, or you can visit a car service center.
In any case, no matter which solution to this problem you choose, it is still worth familiarizing yourself with the generator belt drive device. Regardless of the car brand, each unit has a generator. The transmission of rotation from the crankshaft to the generator shaft occurs using a belt, which often causes breakdowns or malfunction of the car. In order to accurately determine that the reason lies precisely in the belt, you first need to know what it is.
Drivers who have been driving a car for many years have learned from personal experience that before leaving they need to do a small technical inspection of special control zones. These include: technical fluids, fuels and lubricants, oil seals and anthers, as well as a generator belt.
Performing tension
If there is no wear on the V-belt drive, but there is a whistle, first of all, check the tension level. We will not use complex terminology, but will simply advise you to press with some force on the belt in the middle.
The problem is not the whistling. Due to weak tension, the battery does not charge effectively, and the drive itself begins to wear out faster. Excessive tension can lead to damage to the alternator bearings and stretching of the belt.
Correct tension of the VAZ 2110 generator belt is performed as follows:
- Loosen the generator from the bottom and top. A nut is used for this;
- Turn the adjusting bolt and adjust the belt;
- If you want to increase the tension, the bolt is turned to the right. Thus, you move the generator away from the cylinder block;
- To loosen the tension, move in the opposite direction - to the left;
- Use a wrench to grab the fastening bolt and turn the crankshaft a couple of turns, then check the tension;
- If all is well, the tension is correct, the nut can be tightened back.
Installing a new timing belt
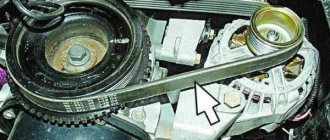
- A new timing kit from Gates was purchased.
- The kit includes a toothed belt and a tension roller. VAZ 2110 timing kit.
We also check the tension during periodic monitoring.
Tighten the tension roller fastening.
Do not overtighten the timing belt as this will apply increased force to the pump bearing and it will not last for a long time.
The entire operation took approximately 30 minutes. Since this procedure does not require hanging the engine, you can do it yourself in the field, and if the pump does not change, then you don’t even need to remove the wheel.
Replacement
We have already figured out how to tighten the alternator belt. But such measures are not always relevant. If the element is cracked, overstretched and no longer tensioned, then there is nothing left to do but replace it with a new one.
In fact, replacement cannot be called a complex procedure. Follow the instructions and everything will work out.
- Slightly loosen the bolt nut from the lower mounting of the car generator, as well as the tension nut.
- Loosen the tension of your belt further. You already know how to do this from the previous section, where we talked about tensioning the alternator belt.
- Move the generator towards the power unit, which will allow you to remove the belt from the crankshaft and generator pulleys.
- The next step is to install a new element. To do this, you will need a high-quality belt purchased from a trusted store. What exactly this part will be and what size it will be is not difficult to determine. But quality comes first.
- First, the belt is put on the crankshaft pulley.
- Now it goes to the generator pulley.
- At the last stage, you have to repeat the tension adjustment procedure. You already know very well how this procedure is carried out, so there should be no problems.
Replacement process
Almost any car enthusiast can replace the VAZ 2110 alternator belt (8 or 16 valves) using the most common tools and in the most common garage conditions.
Required Tools
- new drive to replace the required size;
- a set of keys;
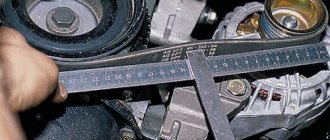
- ruler;
- set of heads;
- screwdriver.
Stages
- Like any work in the engine compartment, we start by de-energizing the system by disconnecting the negative terminal on the battery.
- Using a 13mm wrench, loosen the nut that secures the generator to the mounting plate.
This nut needs to be loosened - We unscrew the adjustment bolt to loosen the drive tension.
Adjustment bolt - We move the electric generator towards the engine block.
- We remove the old drive.
- We install a new one.
- We make tension.
Motorists Council
This is due to the fact that its breakdown can occur at the most inopportune moment. This node cannot be called the weakest point of the “ten”, but problems may arise with it. And it is better for you to be prepared for such a situation.
Otherwise, you will have to call a tow truck, go to the nearest service station, and pay a lot of money for the services of specialists. Although, if you have a spare alternator belt and a standard set of tools, if it breaks, you would spend literally a couple of tens of minutes and calmly continue driving with a new belt. Because the choice is always yours!
Belt generator VAZ 2112. stretching and replacing the generator belt yourself
Hello, dear motorists! VAZ tenth series cars quickly spread throughout our country.
The new design, economical engine and affordable price helped expand the circle of fans of these cars.
How to check tension
Before checking the tension of the generator belt, it is necessary to take into account that the optimal value depends on many external factors, which include:
- car make and model;
- type of generator installed under the hood;
- type of belt used to transmit rotation.
What level of belt tension on the alternator should be in a car can be found in the instructions for the car brand. Also, manufacturers of generators and belts regulate the value, indicating it in the data sheet attached to the products. The parameter is influenced by the presence of additional connected equipment. Such components include generators, hydraulic and electric power steering. Not in all conditions it is possible to obtain accurate information about the electrical equipment installed in the car. In such situations, experienced drivers are guided by a universal rule, which applies to a large number of domestic and foreign cars.
Important! For many vehicles, tension testing is performed on the longest straight section of the belt between the pulleys. After applying a force equivalent to 10 kg, the belt deflection should be approximately 10 mm. For example, in VAZ 2115 models, generators of different models can be installed depending on the year of manufacture of the car
There are brands 37.3701 or close analogues 9402.3701. In the first case, a deviation of 10-15 mm at 10 kg is acceptable, and in the second case, the interval is limited by manufacturers to 6-10 mm
For example, in VAZ 2115 models, generators of different models can be installed depending on the year of manufacture of the car. There are brands 37.3701 or close analogues 9402.3701. In the first case, a deviation of 10-15 mm at 10 kg is acceptable, and in the second case, the interval is limited by manufacturers to 6-10 mm.
How to tighten or loosen the VAZ 2110, 2114, 2115 alternator belt
Cause and solution to the problem with whistling on the VAZ 2112
.
If the VAZ 2112 generator the belt
not dense enough. When the speed changes, the pulley rotates and the belt slides along its surface, creating a characteristic sound. In addition to the unpleasant squeaking noise, you need to be prepared for the fact that the belt will quickly overheat and may fail.
A highly tensioned VAZ 21124 belt generator can also lead to various breakdowns, the most common of which are:
- wear and failure of generator bearings;
- tape break;
- curvature of the bracket.
Operating principle of drive belts
The belt is attached to a V-groove pulley and drives the generator and water pump/fan by transmitting rotational motion from the crankshaft.
Stretched belts often slip and jump off the pulleys. Cracked belts will eventually break. It is necessary to check the tension and general condition of the belts at least once a month.
A broken belt is usually indicated by an ignition warning light or a stoppage of the generator.
An overheating engine or a suddenly discharged battery may indicate that the belt is sagging or has slipped off the pulley.
As a rule, the belt slips when the generator is heavily loaded - for example, when the headlights and rear window heater are turned on at the same time. In this case, the warning light does not come on, but the battery does not charge to its full capacity and eventually wears out.
Overheating caused by belt slippage interferes with the operation of the water pump and fan.
In addition, under the influence of excess temperature, the belt itself wears out much faster. As a rule, its inner surface cracks first.
On the other hand, excessive belt tension increases the load on the generator and pump gears, which causes premature failure.
Before checking the belts, remove the ignition key to prevent possible injury from the engine suddenly turning on.
During the initial check, carefully inspect the belt and feel its inner surface to identify damage. For a more thorough inspection, remove the belt and bend each section one by one to expose possible cracks.
If cracks, abrasions, tears or bulges are found, the belt must be replaced. The V-grooves on the pulleys also need to be inspected. Make sure they are not causing damage. The grooves must be clean, smooth and level. Make sure that they are completely aligned with the belts and do not twist them.
Any discrepancy usually means that the generator was not secured correctly.
Intermediate wheel tension mechanism
Some cars have an auxiliary mechanism that allows you to quickly and accurately adjust the degree of belt tension. Loosen the nut on the adjusting screw and turn it until the belt is tensioned to the desired degree. Fasten the nut and check the tension.
Typically, a sagging or slipped belt produces a high-pitched squeal. This sound changes depending on the engine speed.
Do not try to fix it by lubricating the belt with oil. This may cause unexpected damage and breakdowns. Additionally, a sticky and wet belt will still squeak even after adjustment.
A broken belt, indicated by the ignition warning light, can severely damage other parts.
For example, its dangling ends often touch electrical wiring elements, cut hoses, or even pierce the radiator. If you suspect a rupture, turn off the engine as quickly as possible.
Composite pulley
Where the generator is attached to a fixed support there is usually a composite pulley that allows you to remove or adjust the belt. The design includes two concave disks fastened together and several spacers (washers).
The illustration shows the outer half of the pulley with the nut, spacer, and extra washer.
Replacing the VAZ 2112 alternator belt in the garage with your own hands
As much as we don’t want, most machine parts have their own resource, after the development of which it must be replaced.
The VAZ 2112 alternator belt can provide a mileage of more than 100 thousand km provided it is of high quality and careful operation, but it is better to replace it without tempting fate after it has met the established production time.
Replacing generator tape 2112 in the following order:
- The car is installed on a viewing hole, since access from the bottom to the belt is more convenient;
- After disconnecting the battery, the upper and lower mounting nuts of the generator are loosened;
- the adjusting bolt is loosened and the generator moves into the engine block;
- The old one is removed and a new alternator belt is applied.
Belt tensioning is carried out as described above. Given that a new belt is installed, after a short period of operation it may stretch slightly and the tension will be relieved. Eliminate this by additionally tightening the generator drive belt to the parameters set by the manufacturer.
Alternator belt: choice of brand and length
When the alternator belt wears out quite strongly, many owners begin to think about which manufacturer to choose for the next replacement. We often come across reviews from VAZ 2110 owners who installed new belts and did not have time to drive even 5,000 km, after which they broke in half.
This is a clear sign of low-quality or even defective products, if the tension was normal and there were no external influences.
Sources
- https://luxvaz.ru/vaz-2110/54-natyazhka-i-zamena-remnya-generatora.html
- https://pts.ru/razmery-remnya-generatora-vaz-2112-16-klapanov/
- https://venteler.ru/dlina-remnya-generatora-vaz-2110-16-klapanov-s-konditsionerom/
[collapse]