First you need to remove the wipers and plastic from the bottom of the glass, then carefully unclip the trim of the passenger compartment pillars along the glass.
Next, using an 18mm knife, we begin to cut off the Priora windshield from the inside, so as not to damage the side moldings. Actually, this is the point of cutting with a knife in order to preserve expensive moldings. Carefully pull out the rubber molding on top; if you can’t pull it out, then don’t blame me, but you won’t be able to replace the windshield on a Priora competently and cheaply. And this is not meant as an insult, it is a purely mathematical calculation. Glue and primer are the cheapest, poor quality 400 RUR + factory moldings 1500 RUR. + little things in the form of tape, some kind of key or screwdriver, 300 rubles, and + a lot of wasted time without a 100-year final result. You decide. If everything is taken out, we begin to cut off the Priora windshield like this
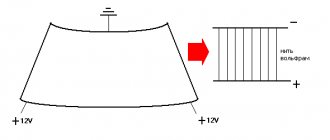
If you don’t have such a knife, it’s okay, then we’ll cut it with a string, but it will take more time and it looks something like this. (used someone else's drawing)
We remove the old glue from the surface of the car body with a sharpened chisel. We do not recommend removing glue with a stationery knife, because... You can cut the trim and ceiling. Please note that the glue must be removed as close to the car paint as possible. It is not recommended to leave old glue.
We degrease and prime the glass and body. We do not use solvent or white spirit under any circumstances. These liquids are not intended for degreasing.
We put on the molding and apply glue to the Priora windshield.
Then we apply it.
We put everything back together in reverse order.
Please note that the body must be free of rust; if there is corrosion on the frame, it must be removed. Otherwise, the entire replacement of glass on the Lada Priora will go down the drain.
As you can see, replacing the Lada Priora windshield is not difficult, the main thing is patience and accuracy. Good luck!
And then Ostap suffered. (From the director of the company) Update from 11/04/2014.
While digging around on the Internet the other day, I came across a fairly popular topic on vazclub about replacing the windshield on a Priora, and was, to put it mildly, very amazed at the illiteracy of the person who wrote it. I will write about the most fatal mistakes when replacing glass on a Priora.
So, they write there that “Pry up the edge of the side trim of the Lada Priora windshield with a screwdriver...”
You cannot pry the side molding from the outside with anything, because... you scratch the body, which will lead to inevitable rust. The side molding of the Priora windshield can be easily removed after the adhesive is cut off with an 18 mm knife from inside the passenger compartment.
Next: “Saw the glue line along the entire perimeter of the glass with a string.”
Under no circumstances should you cut as shown in the picture above. This can scratch the roof and doors, and the Priora windshield will inevitably crumble. The string should run along the windshield of the Priora something like this:
Next: “Cut off the old seam, leaving a thin layer of glue (1.0–2.0 mm).”
This is a 100% failure! The glue from the body frame must be removed as close to the paint as possible, because... We do not know the reliability of gluing the old glue to the body. If it later peels off from the body, all the work is down the drain. Old glue should be removed as much as possible. Like that:
And yet, it is better to remove the glue with a chisel, because... a knife can damage everything that is adjacent to the glass frame, and a chisel goes clearly along it.
Next: “21. Apply glue evenly to the window opening (layer thickness 0.5 cm) and along the perimeter of the glass.”
What is this anyway? Tips on how to harm your sworn enemy? It is written correctly, the thickness should be 5mm or thicker, but what is written about applying glue is nonsense. The glue is applied only to the Priora windshield, but not along the perimeter, but along the already installed moldings. Moreover, it is applied not as a “sausage” as in the photo above, but as a “house” with a height of 15 mm (1.5 cm). Most likely you will ask, why is this so? I will answer. By applying glue to the body, you will not be able to get 100% onto the primed part of the windshield; the glue will get on both the glass and the moldings, and water will most likely flow in these transitions. And if you apply glue to the glass, it will only lie on the body and nowhere else.
What's this? How can you grab a degreased and primed Priora windshield with your bare hands? Why degrease it at all if you plan to stain it like in the picture above. When replacing the Lada Priora windshield, you must apply it with suction cups, or (as a last resort) with your hands, but do not hold on to the place where the glue will adhere. I don’t even know how to characterize the excerpts from another site, it seems that they wanted to help those people who decided to replace the windshield on a Priora themselves, but they also advised so much dirty tricks that it would be impossible to replace it properly. And they haven’t yet described how to replace the windshield on a Priora with heating / heating, I think with their advice you can generally burn the car. I hope my remarks will help you avoid mistakes when replacing the windshield on a Priora. Well, if you decide to change the windshield of your Lada Priora in our company, we will be only happy to help.
Drains on the windshield from Priora for VAZ 2110
Due to the lack of drains on the VAZ 2110, dozens of drivers in rainy weather face the same problem: dirty water getting from the windshield onto the side windows. There are several ways to solve this sensitive problem; This article will discuss one of them.
The developers of LADAPriora took into account this significant minus of tens and installed deflectors and drains on the car. These plastic linings redirect the flow of water onto the roof of the car, preventing it from flowing onto the door pillars from the windshield.
The photo below shows the windshield drains on a LADAPriora car:
Some time after the release of the LADAPriora car, it became clear that the edging moldings of the new model fit well on the VAZ 2110: sometimes absolutely perfectly, sometimes with minor modifications.
Catalog numbers for windshield overlays for LADAPriora
Numbers of windshield overlays for the LADAPriora car according to the catalog (shown in the figure above):
- — upper wind window edging 21700 21700-5206070-00;
- — windshield edging 21700 21700-5606065-00 left;
- — windshield edging 21700 21700-5606064-00 right.
The price per piece is about 100-130 hryvnia.
The photo below shows what they look like in reality:
practical guide
To complete the work you will need:
- gun for applying glue;
— string for cutting glue-sealant glass;
— a heated room in which you can leave the car without moving while the glue dries;
— repair kit for gluing glass and a device for applying glue. The set consists of a tube with adhesive-sealant, an activator for degreasing the surface, a primer, a cloth for degreasing and a brush for applying the primer.
Since the materials offered by different manufacturers may vary, you should also read the instructions included with the repair kit before performing the work.
Kits (from different manufacturers) can be supplemented with spacers for glass and a string for cutting the adhesive seam. The string can be purchased separately, but, as a rule, it comes complete with handles.
As a last resort, you can use fishing line or welding wire with a diameter of 0.8 mm from a Kempi-type semiautomatic machine.
We carry out the work with an assistant.
1. We prepare the car for the work.
2. Remove the air intake grille.
3. Remove the interior rear view mirror.
4. Use a slotted screwdriver to pry off the three rack trim holders.
5. Remove the lower edge of the trim from the instrument panel and remove the trim.
6. Similarly, remove the trim from the right pillar.
7. Having opened the front doors, remove the upper door seal on each side of the car to a level just above the windshield.
8. Remove the plastic trim from the side edges of the windshield.
9. Remove the rubber trim from the upper edge of the windshield.
10. Using a screwdriver, remove the two adjusting wedges from the underside of the glass.
11. Using wire cutters, bite off a piece of string about a meter long. We pierce the glue-sealant with a string and bring the end of the string out.
12. We put handles on the ends of the string.
In the absence of special handles, the string can be tied to the handles of screwdrivers or to wooden blocks.
13. Together with an assistant, we cut the glue seam along the entire perimeter of the glass with a string, like a two-handed saw.
14. Remove the glass from the car.
15. Using a sharp knife, carefully cut off the remaining glue seam from the body (the permissible residual seam thickness is no more than 2 mm).
Refinement of gutters on the windshield from Priora
In order to install gutters from LADAPriora on a VAZ 2110 without modifications, two conditions must be met:
- — the ability to remove the windshield on the VAZ 2110;
- — The VAZ 2110 should have a frill of a new type (or a frill from LADAPriora).
If there is rust under the windshield rubber on your VAZ 2110, then the process of removing it can be combined with installing gutters.
If you are not inclined to remove the windshield from your ten, then to install drains you will need to make minor adjustments to the car:
- First, you need to remove the standard rubber side seals of the windshield;
- Secondly, you will need to trim at a slight angle that part of the drain that will later extend behind the glass (shown in the figure below);
- The next step is to apply silicone sealant to the inside of the drain, extending behind the glass;
- At the last stage, we snap the gutters from LADAPriora.
If necessary, in order to avoid detachment of the upper corner of the edging, it may be necessary to trim or glue in certain places (depend on the situation).
If your VAZ 2110 car has an old frill installed, then the bottom of the drain will rest and it will need to be cut in place (although it is better to replace the old frill with a new frill - no alterations are required for this).
After installation
Do not move the car or close the doors abruptly for 7-8 hours after installing the windshield. The side windows should be kept open so that when the doors are closed there is no air pressure on the windshield. Work involving the application of force to the glass can begin 14 hours after gluing. Optimal strength of the adhesive joint is achieved, depending on weather conditions, after 4-6 days. Reassemble.
If you have rain, light or heated windshield sensors, do not forget about disconnecting/connecting the connectors with wires.
VAZ 2110 with gutters from Priora Photo
The standard upper rubber band of the windshield on the VAZ 2110 is installed with an overlap on the roof. In this regard, it rubs against the metal surface of the roof and rust gradually forms under it. To avoid this kind of problem, it is recommended to replace the standard horizontal windshield seal with a seal from LADAPriora: it does not fit onto the edge of the roof, as it is smaller in size.
If you have previously removed the windshield from your ten, then you will not have any problems installing the seal from LADAPriora. However, if you prefer to install the seal without removing the windshield, you will have to put in a lot of effort:
- 1. First you need to remove the upper rubber band of the windshield;
- 2. Using a soap solution and a plastic credit card, install a new seal from LADAPriora;
- 3. The new rubber needs to be cut where the old sealant remains under the windshield;
- 4. For complete tightness around the perimeter, apply sealant.
This is roughly what (see photo below) the gutters and upper sealing rubber from LADAPriora on a VAZ 2110 look like:
For comparison: something like this (shown in the photo below) looks like gutters with a standard horizontal rubber gasket on a VAZ 2110:
In conclusion, I would like to note that when installing drains from LADAPriora on a VAZ 2110 with the removal of the windshield, the edging will be installed without modifications, flaws or distortions, which is very often used by resellers when selling used cars - this simple tuning adds attractiveness to a used car and the chances of selling the car quickly .
In addition to keeping windows clean, these rubber covers provide a significant reduction in wind noise at high speeds, since most of the cracks along the glass are covered by gutters.
Types of windshields
The dimensions of the windshield, standard, and sensor-equipped windows are the same. Additional features and prices will vary. The most convenient way to select is by article number.
Standard
The most common glass without additional options. Installed on the factory rubber seal. The cost of the original glass model is approximately 2.5 thousand rubles; replacement will cost 2 thousand rubles if the work is done in a workshop.
Standard glass for Lada Priora may have a blue or green tint. The cost is 400 rubles higher.
Front windshield on Priora with rain sensor
The rain sensor automatically turns the windshield element and sometimes the washer system on and off. The essence of the operation of the unit is the refraction of an IR light beam. It passes through snow, mud, and water drops, coordinating the operation of a special photocell. The sensor can be rearranged after replacing the glass. The price of one product is from 5 to 9 thousand rubles, installation will cost 2 thousand rubles.
What types of glass are installed on Priora?
On previously produced VAZ models, two types of windshields were installed, like all other glass. It was:
- tempered windshield;
- glass - triplex.
What is the fundamental difference between these types of windshield? Triplex is made in the form of two-layer glass, in the spaces of which a thin but durable film is glued. Tempered glass is a glass of uniform formation and more transparent. Tempered glass is much cheaper to produce, and therefore the price for the end consumer, the car owner, is correspondingly lower. However, at the first opportunity, all drivers tried to change the tempered windshield to triplex. What is the reason? And the fact is that when a more or less massive object hits this glass, and even at speed, it simply bursts, showering the driver and passengers with a hail of cutting fragments. But with triplex, such things never happen, even if a large stone hits, the film holds the fragments on itself until it is replaced. Therefore, now, only triplex comes from the factory initially.
In what cases is it necessary to replace car windshields?
Rear glass types of Priora Sedan, Station Wagon, Hatchback or frontal models must be purchased taking into account the dimensions. The main part of the glass is standard, but there are deviations. Main reasons for replacement:
- deformation as a result of mechanical damage, constant contact with hot air;
- cracks (can also be on headlights);
- significant damage.
It’s not difficult to do the work yourself, the main thing is to work according to the scheme.
The main enemies of car glass are stones flying off the road and hail.
What glass color should I choose for replacement?
It would seem a strange question, especially against the backdrop of the ongoing discussions of traffic police (state road safety inspection) fines in the area of fines for tinting the windshield. But it's not that simple! The car owner should know that they are fined for window tinting applied using film, but the one produced by the factory with a certain amount of darkness is allowed! And this is a very useful thing, especially when driving in places with bright lighting. This protection also helps with sudden glare at night, reducing the risk of an accident. Therefore, moderate factory tinting, and even if it is a color close to the car’s paint, will not only not harm, but will also be beneficial on the road.
Windshield manufacturers for Priora
Deciding which manufacturer to choose when replacing the front windshield of a Priora is, of course, difficult. The fact is that there are now many companies on the market working in this area. Therefore, it’s easier to remember a few simple rules: European manufacturers are quite reliable; Asia is China and Turkey, which are also the cheapest, but also unreliable. The original ones are always the most expensive, but at the same time the most reliable and easy to replace. Therefore, before replacing the windshield on a Priora, it is worth comparing all these factors and thinking carefully about it.
Removing the rear door glass
We carry out work when replacing door glass. Operations are shown on the left rear door. The glass of the right rear door is removed in the same way. Remove the door trim (see “Removing the rear door trim”). Set the glass to the bottom position.
Remove the inner glass seal.
Using a slotted screwdriver, pry the outer glass seal from the inside of the door...
...let's take it off. Set the glass to the top position.
Using the “8” head, unscrew the bolt securing the glass guide...
...and bring the guide down through the technological hole in the inner door panel.
