Types of systems
To upgrade your VAZ-2106 car and its heater with your own hands, you can choose one of three current methods.
They are used quite actively and make it possible to increase the level of comfort inside the interior of domestic classics. Additional electric heater. This is a device for heating the interior, which is quite simple and elementary in terms of use and installation. Electric heaters operate by connecting to the cigarette lighter on the front panel. To complete the installation, no special skills are required, since the heater starts working immediately after connection. However, this is an electric unit that will take energy. When operating at maximum speed, the battery will quickly drain. So, when the engine is not running, you should not use such a device. In fact, this is an ordinary hair dryer with a heating element and a fan, which creates the effect of additional heating inside the VAZ-2106. Autonomous heaters. For the VAZ-2106, such devices are practically irrelevant. More often used for additional equipment of trucks, large minivans or vans. The heater receives power from fuel. It has an autonomous combustion chamber and exhaust system. The operation of the system does not depend on the car engine. The unit has complex installation and negatively affects fuel consumption. And buying an autonomous system will cost significantly more. Externally, it is a metal structure with a combustion chamber and the necessary electronics. Auxiliary radiators
To heat the interior, car owners, including the VAZ-2106, where the standard stove does not cope with its tasks, often pay attention to additional radiators. The connection is made through the standard cooling system and stove.
Installation
Considering the internal design features of the VAZ-2106, you can install an additional stove in it in two places:
- between the front seats;
- under the passenger seat.
The size of the available free space should be taken into account when selecting an auxiliary heating device.
The process of installing an additional radiator involves the following steps.
- The heater is installed directly under the front seat. Some people put it under the driver's side, but it's better to do it on the passenger side. The saddle itself must first be removed or moved as far back as possible.
- The engine cooling system needs to be depressurized, take durite hoses from the new stove and connect them to the cooling system. Make sure they do not touch the exhaust pipe or the controls.
- You will have to make a couple of holes in the motor shield, about 19 mm in diameter. The heater pipes will pass through them.
- The auxiliary heater pipes themselves are laid under the upholstery. On top it will look extremely unsightly.
- The pipes come out of the upholstery near the front passenger seat.
- It is better to fix the pipes on the additional stove. Use regular, good quality clamps.
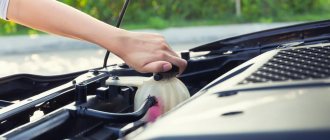
- Approximately 1.5–2 liters of antifreeze are poured into the expansion tank.
- Air locks are likely to form in the cooling system, so they should be eliminated first.
- If you wish, install an additional button on the panel of your VAZ-2106, which will be used to control the auxiliary heating device.
- There may be some problems with coolant injection. Experienced fans of modifying domestic classics advise immediately installing an additional pump. This way the stove will work more productively.
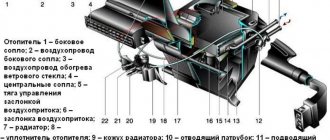
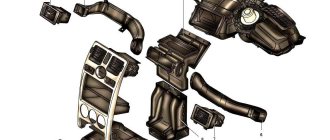
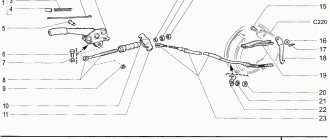
Device elements
The stove on the VAZ-2106 includes the following main components:
- deflectors;
- stove tap rods;
- air intake covers;
- windshield air ducts;
- radiator;
- radiator casing;
- outlet pipes;
- underwater;
- stove tap;
- air distributor cover;
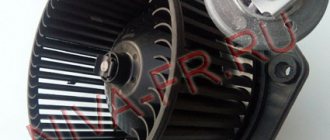
- electric fan motor;
- fan impeller;
- additional resistors;
- air ducts of the internal ventilation system;
- distributor cap lever;
- brackets;
- lid control handle;
- crane control handle;
- draft of the air supply cover.
These elements represent a heater device on a VAZ-2106 car.
Design and operating principle
The cabin heater on the VAZ-2106 car is a compact unit, the main components of which include:
- stove motor;
- fan with impeller;
- radiator;
- damper for air flow distribution;
- stove faucet with control levers.
IMPORTANT! If leaks were found in the radiator circuit of the VAZ-2106 stove, then, if possible, replace the radiator with a new one. Its repair is complex, plus it does not always bring positive results.
This is more of a temporary measure.
The design of the stove on the VAZ-2106 car is quite simple, but for beginners, coping with the tasks of repairing it may be an impossible task. This is wrong. Especially if you are familiar with the device and design features of the heater.
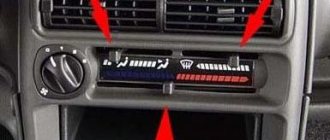
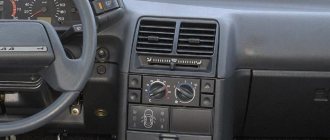
- The standard, that is, factory heater for the VAZ-2106, has a relatively compact size, but effectively cools the liquid and warms up the interior. This is noted by many owners of domestic classics. Switching on and control is intuitive.
- The VAZ-2106 uses the most common heating system design among the Russian automobile industry, and in some places even the Soviet one. The basis is the liquid cooling system of the main engine.
- The main elements of the heating system are the stove, connections to control elements (faucets, levers), lines and a radiator.
- The heater dampers and valve are connected to the control device using an elastic and flexible rod.
- When the upper element is moved to the upper limit position, the valve opens completely, which ensures the maximum amount of coolant entering the heating system through the radiator.
- If the lower control device is moved to a similar position, then the air intake damper will be open to the limit. This way, maximum air flow will be directed through the stove into the heating system.
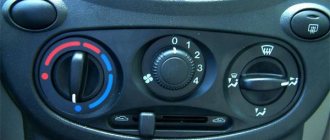
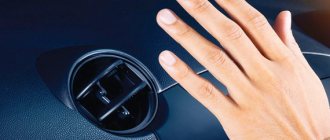
- Deflectors made of plastic can change the airflow angle in the VAZ-2106 cabin. Thus, the driver and front passenger regulate the direction of the air flows created during heating or normal ventilation.
- The air distribution cover is not connected to the heater control system switch. This damper allows you to adjust the degree of closing or opening using a lever device. This design provides additional comfort to the driver of the VAZ-2106 when regulating the operation of the heating system.
- The device includes a three-position toggle switch designed to regulate the volume of air flow passing through the stove. The regulator allows you to choose between two ranges of rotation of the heater fan - from minimum to maximum.
IMPORTANT! Never turn on the electric heater fan if the air intake damper is in the retracted position and the valve is open
Features of connecting the stove
The VAZ-2106 uses the Me 255 electric motor. This is a direct current electric motor that is excited by a permanent magnet. Several nuances of the VAZ-2106 heater connection diagram:
- When an additional resistor is connected to the electric motor supply circuit, the armature shaft begins to rotate, but at a lower frequency.
- The resistor is secured with a pair of spring washers inside the heater fan casing.
- At a temperature of 20 degrees, the resistor resistance is 1.5 ohms.
- If the electric motor fails, it should be replaced;
- Repair consists only of cleaning the commutator or applying lubricant to the bearings.
- Normally, the nominal voltage parameters in the circuit are 1 V.
- Rated power indicators - 2 W.
- The rotational speed of the electric motor shaft is 3000 rpm (under 12 V voltage conditions).
The heating equipment is relatively simple in its design and design, which is why most VAZ-2106 car owners prefer to carry out repairs themselves.
Design and main malfunctions of VAZ stoves
The standard radiator of the VAZ 2106 stove, despite its small size, copes with its task of cooling the liquid and warming up the interior quite well. The design of the interior heater can be seen more clearly below.
The operating principle of this device is shown in the figure.
The “six” type of heating system is one of the most common designs based on the use of liquid from the cooling system of the power plant. It consists of three main components - the stove itself, the price of which is acceptable for Russian car enthusiasts, mounts with control devices in the form of taps and air ducts with a radiator.
The air intake damper and valve of the VAZ 2106 stove are connected to control devices using flexible and elastic rods. The maximum right position of the upper device means the maximum opening of the tap and the greatest flow of coolant through the radiator into the heating system. If the lower device occupies this position, then this means the maximum opening of the air intake damper, which directs the greatest air flow through the stove further into the heating system.
Plastic deflectors with a variable angle of airflow into the cabin make it possible to change the direction of air flow and direct it in the desired direction. Structurally, sometimes called the air flow distribution cover, it is not connected in any way to the system central stove control switch. This damper is adjusted to open and close using a lever device mounted for comfort on the driver's side of the seat.
The volume of air moved through the VAZ 2106 stove, a video about which can be watched on the Internet, is regulated by a three-position toggle switch. With this switch you can set 2 fan speed ranges, both the lowest and highest levels. It is strictly not recommended to start the electric heater fan with the air intake damper retracted and the tap in the “open” position.
The main defects of the VAZ 2106 stove include the following:
- defects in the stove motor, as a result of which it does not start;
- depressurization of the radiator heating system or pipelines, which is why the stove in the VAZ 2106 does not heat well and the cabin becomes cool;
- sometimes the stove blows cold when there is not enough coolant in the system, and if, when adding it to the norm, the defect is not eliminated, you need to cover the front part of the radiator of the cooling system with thick cardboard and the situation should improve.
Installing a motor from a chisel stove into a stock stove with modifications
I would like to bring to your attention my version of a modification of a classic stove. First, I will say that a serviceable Zhiguli heater copes with its task quite successfully, the car is warm even in severe frost, but at the same time it has a number of significant shortcomings that every classic car owner dreams of getting rid of. This includes strong annoying noise, insufficient airflow of the windshield and side windows, and a low number of heater fan speeds. It all started with the fact that a fifth assembled stove and an old chisel stove motor with an impeller ended up in my hands “completely free of charge.” This allowed me to experiment slowly while continuing to drive my car with the stock heater.
- Read more about Installing a motor from a chisel stove into a stock stove with modifications
- Login to leave comments
What is the best way to tune the VAZ 2106 stove?
There is a need to tune the VAZ-2106 stove due to its inability to cope with increased loads in cold or hot weather. There are many messages on thematic forums from drivers who are forced to wait almost 30 minutes for the oven to heat the air in the car at subzero temperatures. Increased consumption of resources and low efficiency of their use are the most common “stone in the garden” for equipment manufacturers.
Technical basis of modernization
The main goal of the planned transformations is to reduce noise and vibration pollution. Before starting work, you need to think about what exactly the driver wants to get at the end. The most common option is to increase the cold or warm air flow while necessarily reducing the level of noise pollution. To achieve this goal you will need:
- industrial hair dryer - used to give the required shape to plexiglass;
- several aluminum corners;
- screws;
- stove connecting elements;
- plexiglass, the thickness of which is 3 mm;
- “snail” from a VAZ-2108 passenger car - is responsible for reducing noise pollution and increasing air flow.
Initially, the “snail” body is created. It is advisable to avoid mistakes related to the parameters of the product, otherwise the stove will cause frequent visits to the service station. That is why the mounting socket is measured before starting work. Based on the collected parameters, plexiglass is cut. An industrial hair dryer is used to give the product the required geometric shape.
It is recommended to keep it at a safe distance, otherwise the plexiglass will be severely deformed. Practical experience shows that a good stove should be 2-3 cm smaller in size than the previous one. In this regard, it is necessary to carefully cut off the snail plug. If everything is done correctly, the parameters of the finished stove will eliminate the appearance of characteristic whistles and vibrations.
Increased attention is paid to the side walls. If they are too thick, this will negatively affect the air flow, but if on the contrary, the oven will actively vibrate
That is why duralumin is used as the starting material for them. The optimal thickness is 1.5 mm. At the next stage, the tightness of the structure is ensured. Silicone sealant is a proven tool for these purposes.
Practical results of transformations
Each crack is processed carefully, otherwise the air flow density from the stove will leave much to be desired.
The structure of the channels responsible for supplying air flow to the air duct and the turn signals are carefully studied. It is necessary to use material that allows you to solve several problems simultaneously.
Firstly, the air must move through the channel without increased resistance of the material. Secondly, the structure itself should not actively vibrate at times of increased loads. That is why the optimal material for forming air ducts is duralumin. After this, slots are created to air the driver and his feet.
From a practical point of view, the result of the work done is noticeable immediately. The reduction in noise pollution is significant. In second place is the increased power of air flow from the side slots. Despite the bends of the air channels, the airflow is significant. You no longer need to wait 20-25 minutes for the temperature in the cabin to reach the required level.
Step-by-step instructions for installing a new heater radiator
In order to correctly and accurately replace an old device that has ceased to function properly, first of all, as a rule, you should stock up on the necessary tools. In particular, if we are talking about replacing the radiator installed in the heating unit of a VAZ-2106 car, the car owner will only need a pair of keys (for “7” and “10”), as well as a screwdriver.
The first step is to open the stove faucet; this manipulation can be done by moving the control lever to the right side. Then you need to rid the engine cooling system of antifreeze.
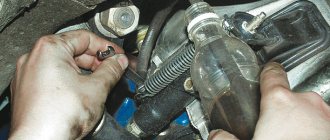
Replacing the heater radiator on a VAZ-2106 car requires unbending the brackets that hold the vacuum hose. These small structural elements are located in the engine compartment, holding the wiring harness. Thanks to the fact that the motorist can move the hose with the harnesses to the side, it will be possible in the future to easily begin working directly with the heating unit.
Further actions should be aimed at loosening the clamps; after reducing the fastening force, all hoses can be removed from the system. After both bolts securing the seal are unscrewed, with which the front panel is held in place, the motorist will be able to remove the seal without much effort by carefully pulling it along the pipes
It is important to take into account one important detail, in particular the spacers. These small elements of the system are located inside the seal, so it is important not to lose them when removing them
The radiator of the VAZ-2106 stove can be upgraded only after removing the fan. It is worth noting that the unit should only be removed together with the machine casing. Immediately after this, you can begin to dismantle the heater radiator itself, carefully lowering the unit down to a level that will be directly determined by the control rod of the heater tap. When dismantling the device, it should be taken into account that the rear part of the radiator is lowered first, after which the pipes located in the niche of the front panel are removed.
The motorist must unscrew the bolt that holds the shell of the faucet control rod, and then remove the rod from the faucet itself. After this, not only the radiator can be removed from the vehicle, the faucet and pipes should be removed along with it. If you carefully unscrew a couple of bolts and remove the outlet pipe, you can quickly get rid of the gasket located on the pipe flange. After unscrewing the next two bolts, you should dismantle the faucet directly with the supply pipe.
The next thing to be removed is the gasket, which is fixed on the tap of the heating device. By unscrewing a couple more bolts, it will be possible to remove the supply pipe fixed to the heater faucet, so it will be necessary to rid the system of the gasket located on the supply pipe and faucet.
Before proceeding with replacing the main device, the motorist should first inspect both gaskets (on the inlet and outlet pipes). It should be remembered that these elements are interchangeable. In addition, the gaskets should not have any mechanical damage, and there should be no marks on them that hint at aging of the rubber. It is more expedient to replace these parts with new standard elements.
If the car owner was interested in how to remove the heater radiator on a VAZ-2106, then the described instructions, with the right approach, will allow you to do everything yourself in the shortest possible time. After dismantling, the car owner will only need to install a new radiator along with a faucet, in the reverse order described.
To make sure that their actions are correct, the motorist can check the heater radiator, in particular, by plugging all the holes in the device’s tank, supply air to it, which will have a pressure of at least 0.1 MPa. Then the unit should be placed in any container filled with water, and everything should be left there for at least 20–30 seconds. Any leaky place in the radiator with this approach will make itself felt by escaping air bubbles.
After a thorough check, it is necessary to position the rod shell, through which the stove faucet is controlled, in such a way that, when positioned in extreme positions, the adjustment handle can completely fix the opening or closing of the faucet.
At the end of the manipulation, you should fill the engine cooling system with antifreeze, check the tightness of the structure, as well as the functionality of the stove in the cabin.
Modification of the carburetor and ignition system
In addition, it is impossible to imagine tuning a VAZ 2106 without modifying the carburetor. An increased engine volume with a reduced compression chamber will simply force you to increase the flow areas of the nozzles and the performance of the accelerator pump. The ignition system should not be ignored either.
If you decide to leave the stock one, check the stiffness of the springs in the ignition timing mechanism using a strobe light and, if necessary, adjust it to the factory values. Of course, it is best to install an electronic system. It will allow you to more accurately set the ignition timing and provide a powerful spark that will allow the engine to operate even in severe frost.
If you do at least half of the activities described above, you will see that modifying the VAZ 2106 engine with your own hands allows you to significantly increase its power.
The stove has lost efficiency - reasons
If the failure of one of the elements of the heating system is not difficult to diagnose, then it is often not easy to deal with cases of loss of efficiency on your own.
So, when the stove produces too little heat at maximum, then it is possible to suspect the following problems:
- blockage of the main or furnace radiator;
- wear of the air intake damper seal;
- cooling system malfunction.
We recommend starting your search for the problem with the heater radiator. For this:
- start the engine;
- warm it up to operating parameters;
- set the oven regulator to maximum;
- feel the radiator, as well as the pipes connected to the tap.
If the latter are both hot, then the heat exchanger is most likely clogged and will have to be cleaned or replaced. When the hoses are cold, there is a problem with the cooling system. Heating of only the pipe leading to the tap indicates that the latter is jammed or the traction cable is broken.
An abnormally high radiator temperature coupled with low heater efficiency indicates airflow problems. This is where the damper gasket most often fails.
The results of high-quality improvements - warmth and comfort in your cabin
After you check the rational arrangement of all new elements of the heating system, you need to carefully apply sealant at the junction of the cuffs and hoses with the stove body. Simple tuning of the heater, which can significantly increase the efficiency of heating the interior, has been completed. Now you will see a big difference in the level of comfort in the cabin before modifications and after upgrading the stove. In particular, this concerns not only the convenience of the driver and passengers, but also the quality of the glass blowing, which tended to fog up due to an insufficiently powerful flow of warm air.
vote
Article rating
2.6.12 Heating and ventilation system / VAZ 2106
| Cause of malfunction | Elimination method |
| Heater fan motor does not work | |
| The wires are damaged, oxidized or their tips are loose | Crimp terminals, strip ends, replace faulty wires |
| Wear, freezing of electric motor brushes, break in the armature winding, oxidation, commutator wear | Clean the commutator or replace the motor |
| Short to ground of the armature winding (the fuse immediately blows) | Replace the motor |
| Heater switch faulty | Replace the switch |
| Heater fan motor does not operate at low speed | |
| An additional resistor has burned out, its wires are damaged or their tips are not tightly put on | Replace the resistor, crimp the terminals, strip the tips, replace faulty wires |
| Heater switch faulty | Replace the switch |
| Heater fan motor armature rotates slowly | |
| The collector is dirty or oxidized | Clean the commutator or replace the motor |
| Interturn short circuit of the armature winding (the fuse may blow) | Replace the motor |
| Seizing of the armature shaft in the bearings (creaking, squealing, the fuse may blow) | Replace the motor |
| The car interior is not heated well | |
| Insufficient coolant temperature | See Diagnostics of malfunctions of the engine and its systems: “The engine takes a long time to warm up to operating temperature” |
| Low fluid in the cooling system | See Diagnostics of malfunctions of the engine and its systems: “Dropping coolant level in the expansion tank” |
| Crane jamming in the closed position, cable flaps jamming or control cables breaking, loosening their fastening | Replace faulty faucets, cables, valves. Securely fasten the cable sheaths, lubricate the cables with engine oil, adjust the drives |
| Heater radiator is faulty | Replace the radiator |
| The temperature in the cabin is not adjustable | |
| Sticking of the heater valve, dampers, cables in the sheaths or their breakage, loose fastening of the cable sheaths | Replace faulty faucets, cables, valves. Securely fasten the cable sheaths, lubricate the cables with engine oil, adjust the drives |
Malfunctions of the VAZ 2106 cooling system
The stove motor sometimes works, sometimes it doesn’t. One of the reasons for the malfunction.
Cooling system of VAZ-2106. Zarubin S.Yu. #DOTIPOVKO
Toma Zhdanova and her Lada: SPECIAL ISSUE! How much did tuning ShKETA 2106 cost?
How to ventilate the cooling system of VAZ-2107-2106-2101 engines
Modification of the stove for the VAZ 2106 car
The heating device in the interior of the classic “six” must provide heat and work properly, otherwise the VAZ 2106 stove needs to be modified. The temperature inside the car must be comfortable not only for the passengers of the vehicle, but also for the driver, especially if he has to spend a long time driving time.
A significant part of VAZ 2106 cars are traditionally operated in fairly cool climatic conditions, when even in summer it can become sharply cold. The stove in classic models is well thought out and works, but small improvements to the heater or repair (or replacement) of the heater valve and/or radiator grille can significantly increase the heat transfer and functionality of this device.
Article: 2101-8101060, additional articles: 2101-8101060-02, 2101-8101050
Order code: 104243
- Buy with this product
- show more
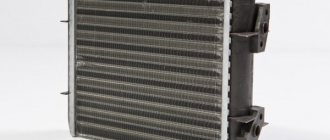
Heater radiator 2101-8101060-01
The heater radiator is designed to heat the cabin of cars. The heater radiator is copper-brass soldered, tubular-tape using traditional soldering technology.
Radiator Specifications:
- Number of rows of tubes, pcs: 3
- Heat output, kW (kcal/h): 7.5 (6500)
- Capacity, l: 0.9
- Overall dimensions, without pipe extension, mm: 254x67x184
Applicability
: VAZ-2101, 2103, 2105, 2107 without crane.
Information used: JSC "SHAAZ".
- Passenger cars / VAZ / VAZ-21021 drawing
- » href=»/catalog/vaz-3/legkovye_avtomobili-30/vaz_2102-4/otopitel-58/#part5845″>Heater radiatorVentilation and heating / Heater
- Passenger cars / VAZ / VAZ-21041 drawing
- » href=»/catalog/vaz-3/legkovye_avtomobili-30/vaz_2104-5/otopitel-41/#part13225″>Heater radiatorVentilation and heating / Heater
- Passenger cars / VAZ / VAZ-21061 drawing
- » href=»/catalog/vaz-3/legkovye_avtomobili-30/vaz_2106-7/otopitel-43/#part19459″>Heater radiatorVentilation and heating / Heater
- Passenger cars / VAZ / VAZ-1111 “OKA”1 drawing
- » href=»/catalog/vaz-3/legkovye_avtomobili-30/vaz_1111__oka_-16/otopitel-32/#part66526″>Heater radiatorVentilation and heating / Heater
- Passenger cars / VAZ / VAZ-21011 drawing
- » href=»/catalog/vaz-3/legkovye_avtomobili-30/vaz_2101-3/otopitel-58/#part1361″>Heater radiatorVentilation and heating / Heater
- Passenger cars / VAZ / VAZ-21031 drawing
- » href=»/catalog/vaz-3/legkovye_avtomobili-30/vaz_2103-106/otopitel-38/#part9829″>Heater radiatorVentilation and heating / Heater
- Passenger cars / VAZ / VAZ-21051 drawing
- » href=»/catalog/vaz-3/legkovye_avtomobili-30/vaz_2105-6/otopitel-41/#part16331″>Heater radiatorVentilation and heating / Heater
- Passenger cars / VAZ / VAZ-21071 drawing
- » href=»/catalog/vaz-3/legkovye_avtomobili-30/vaz_2107-8/otopitel-42/#part22757″>Heater radiatorVentilation and heating / Heater
Today, the next article in the series “Crystal VAZs or typical breakdowns of domestic cars” is dedicated to the “classics”: VAZ-2101, 2103, 2104, 2104, 2105, 2106 and 2107. These cars have been driving along our roads for decades and, despite Despite all the shortcomings that we will talk about, their popularity is still high.
In the series of articles “Crystal VAZs or typical breakdowns of domestic cars,” we will tell you about typical problems that occur when operating cars from the Volzhsky Automobile Plant. In this article we will talk about the VAZ-1111 (“Oka”) car.
No matter how reliable a car is, sooner or later one or another part will break down. Owners of VAZ 2104–2107 sometimes have to deal with the problem of poor heating of the interior or the appearance of a leak in the heater radiator. In this case, you need to understand the reasons, repair or replace the product.
PROCEDURE FOR REPLACING THE VAZ 2106 HEATER
The vehicle interior is heated by engine coolant. The heater design details are shown in the diagram.
Many car enthusiasts only think about the heating system when it gets cold. But sometimes the heater can remind you of itself with an unpleasant smell in the cabin and the appearance of puddles of antifreeze under the feet of the driver or passenger in the front seat. This means that the heater core is leaking and needs to be replaced. This work can be done with your own hands.
To do this you will need:
- open-end wrenches for 7 and 10;
- flat and Phillips screwdriver;
- Antifreeze supply is approximately 1.5 liters;
Replacing the heater radiator VAZ 2106
Open the heating valve and remove the vacuum hose and wiring harness
- Having moved the heater control lever to the right all the way, open the heating tap and drain the Antifreeze from the heater radiator;
- in the engine compartment, release the fastening of the vacuum hose and wiring harness and move them to the side, thereby providing access to the heater hoses;
Release the clamps, remove the hoses and gasket
- loosen the hose clamps and remove them from the pipes;
- then unscrew the two bolts that secure the seal to the shield;
- carefully remove the sealing gasket from the radiator pipes so as not to damage it;
PLEASE NOTE: THERE ARE TWO SPACE WASHERS INSERTED INTO THE GASKET, IT IS PREFERABLE NOT TO LOSE THEM. remove the electric heating fan together with the casing (how to dismantle the electric fan is described below);
remove the electric heating fan together with the casing (how to dismantle the electric fan is described below);
Replacing the heater radiator on a VAZ 2106
We take out the radiator and remove the heating valve VAZ 2106
- we take out the heating radiator along with the tap, lower it down as far as possible and remove it along with the pipes;
- unscrew the bolts securing the outlet tube and disconnect the tap;
RECOMMENDATION: REMOVE ALL SEALING GASKETS, INSPECTION THE FLANGE CONNECTIONS, CLEAN THEM IF NECESSARY, INSPECTION THE ATTACHMENTS OF THE PIPE TO THE RADIATOR, IF THERE ARE SUSPECTS OF LACK OF TIGHTNESS, IT MUST BE ELIMINED IMMEDIATELY, REPLACEMENT IS MANDATORY REPLACE ALL GASKETS WITH NEW ones.
- install a heating tap on the new radiator, connect all the pipes;
- install the new radiator in the reverse order;
- set the heating tap control lever to the extreme right position and make sure that the tap is fully open, connect the tap control cable;
- Replenish the engine cooling system, start the engine and carefully check all connections for leaks.
Heater modernization
Every car owner knows that on a VAZ 2107, replacing the heater may be due to its poor performance. But not everyone decides to change the heater - most owners of the “Seven” decide to disassemble, repair, tune and remake the heater as a whole. There are many schemes for tuning and repair, but you need to take into account that it is not so easy to implement them at home. Without any problems, you can seal the joints of the system lines with nozzles with your own hands, and also redistribute the air flows according to need (the author of the video is VAZ 2101-2107 REPAIR AND MAINTENANCE).
However, such a modification of the stove will not improve the microclimate in the cabin. If you want the air in the cabin to be warmer, you will need to increase the air flow with a new radiator, since the factory device will not allow this idea. Fan replacement is also necessary in such cases. The best option would be to install a V8 electric motor.
So, the repair and tuning scheme for the heating system is as follows:
- First you need to know how to remove the stove. You are required to dismantle the lower part of the structure, namely the casing on top of which the fan is installed; the latter can be dismantled.
- After removing the fan, you should carefully cut off one of the so-called ridges that supply air flow to the feet of the front passenger and driver. This is done necessarily, since the electric motor from the “eight” is much longer.
- The impeller is dismantled. Inside this element, it is necessary to increase the diameter of the hole into which the shaft must subsequently be carefully installed. Make sure that the new structure can fit into the installation location as securely as possible.
- Before installing a new fan, diagnose its functionality.
- The resistor should be replaced, since it is thanks to this element that the fan will operate much quieter. As practice shows, it is best to install a resistor from the same “eight”.
- The vent switch should also be replaced. When the heating system is operating, another current will begin to flow to it. Accordingly, over time this button may fail.