Owners of domestic VAZ 2110, 11 and 12 cars unanimously claim that the stove in these cars is one of the most capricious and problematic units. Considering our frosty winters, you simply cannot do without a working stove in your car, and it breaks down quite often. Therefore, specialized experts recommend that if the heating system fails, immediately contact a car service center or restore the operation of the stove yourself.
Trouble-shooting
Checking the cabin air temperature sensor
You can check the serviceability yourself; special skills are not required. Carefully remove the sensor from its original place. We find the contacts on the back side. Using a multimeter, apply a voltage of 1.2V. We set the regulators of the automatic heater control system to the “Min”, “Max” positions. The motor should not be activated.
The second method is to turn off the cabin air sensor. Check fan speed settings. The first speed (“A”) should be inactive.
Video: Heater VAZ 2110, 11, 12. Design and principle of operation.
Checking the proper operation of the automatic control system
The proper operation is checked with a multimeter. The voltage at the terminals of the pink and brown wires is measured, the ignition is activated. Smoothly turn the temperature regulator; the arrow on the multimeter display should show an increase in voltage.
On old-style heaters, at maximum voltage, the controller value remains unchanged. Take this into account so as not to make hasty conclusions about the malfunction of a particular unit.
The cause of controller malfunction may also be deformed dampers. To verify this and eliminate the breakdown, we disassemble the heater.
Prevention of the damper of the heating system of VAZ 2112
To be precise, two dampers are subject to inspection; this is the number of them present in the VAZ 2112. The cold air intake is regulated in the upper part. In the lower part, warm (hot) air is supplied to the car interior. Due to wear on the drive mechanism, the damper opens halfway or partially, the air flow is reduced, and the interior is not heated sufficiently.
Reasons for failure:
- biting, jamming during operation, due to the lack of a sufficient amount of lubricant;
- a lot of debris, moisture, sand, dirt, which contributed to jamming;
- failure of the gear motor damper cable;
- numerous layers, rust, corrosion.
The old and new dampers differ only in the type of sealing ring. In the old ones it is plastic with foam rubber, in the new ones it is a metal seal with rubber. If you can’t hear the movement of the “curtain”, move it, set it in motion, after first removing the deflectors from the central part of the dashboard with a flat-tip screwdriver. Be careful, as the plastic casing of the console is damaged.
Metal ones are better and more practical, but they are afraid of moisture, rust, and deposits. Plastic ones, on the contrary, are deformed from heat and elevated temperatures.
The second way to check the performance of the damper: if the windshield heats hot air, but the sides or legs are warm, there is a malfunction. There is no air flow - the microdetector has failed. This is the drive mechanism.
Defective damper micro-reducer
Diagnostics is permissible if you have a special device - an ohmmeter. It is designed to measure resistance in an electrical circuit. In old-style controllers, the indicators are in the range of 750 - 1250 Ohms, in new ones - 3400 - 5100 Ohms.
Troubleshooting occurs as follows: we start the power unit, set the temperature to o, wait 15 - 20 seconds, turn it off. We disconnect the controllers, measure the resistance with the ignition on between contacts X1.4 and X1.1.
At maximum temperature, the ohmmeter shows up to 5.0 Ohms on the new one or 1.6 Ohms on the old one. The absence of resistance indicates a malfunction: failure of the micro-gear sensor. More often, the tracks wear out, the wiring becomes damaged, and the fuse blows. To replace the micro-reducer, the stove is disassembled.
If the motor rotates only in the first two speed modes, then look for the reason in the resistor. It's faulty. Activation only at the third speed indicates “direct” operation, bypassing resistors. The reason is worn tracks on the switch, temperature controller.
Let's sum it up
Malfunctions of the VAZ-2110 heater control unit can lead to both incorrect functioning of the vehicle’s heating system and complete failure of the heater. During the cold season, this will affect not only a comfortable stay in the car, but also safe driving for the driver of the vehicle.
Repairing the stove control unit can be done on your own if you have basic knowledge of electronics, a desire to work and improve your comfort.
High-quality repairs and timely regular inspections of the unit before the onset of cold weather will help you save money on stove repair services at service centers and the purchase of expensive heating system elements.
On the VAZ 10th family, which includes the VAZ 2110-2112 models, the designers used an electronically controlled interior heating system, thanks to which the temperature set by the driver is maintained automatically.
On the VAZ-2110, instead of a manual heater control mechanism with a cable drive of the main elements - the coolant shut-off valve and dampers, an automatic heater control system (AHC) controller with a temperature sensor and a gearmotor that regulates the position of the dampers are used.
In such a stove, the valve for shutting off the antifreeze supply is no longer used, and the adjustment of the heater operating mode - “heating” or “ventilation” - is carried out by a central damper, which directs the air flow through the radiator or bypassing it.
Assembly
When installing a new damper, be sure to make sure that the fork located on its axis is clearly engaged with the lever. If the flap is in the raised position, you did everything right. Otherwise, it will be impossible to control the device, so you can forget about restoring the functionality of the stove.
Article on the topic: Modification of the immobilizer on the VAZ 2110: disabling, reprogramming
Damper location
After this, reverse the assembly procedure according to the dismantling steps. Refill the system with coolant and check that the new damper is in place.
It is important to ensure that there are no leaks or tight hose connections.
Turn on the stove and check how the heater behaves. If everything is normal, you have carried out competent and successful work, for which we congratulate you.
Blowing cold
The most unpleasant thing is when the stove stops working completely and only blows cold air. In 90 cases out of 100, the gear motor is to blame, which on a VAZ 2110 is changed as follows:
- Wipers are dismantled;
- Remove the frill;
- The three self-tapping screws securing the gearmotor are unscrewed with a Phillips screwdriver (a short one is needed);
- Unfasten the wires;
- A new one is installed in place of the old gearmotor. To do this, it is better to ask an assistant to switch the regulator modes while you are installing this part;
- They install the frill back and install the windshield wipers.
There are also situations when you have to change the heater because the old one is completely worn out. In this case, experts recommend models “2112-01” or “2112-02”. They are ideal for the VAZ 2110, and the difference between them is that the first is without an air filter, and the second with a filter.
Replacing the gearmotor
If the damper does not work, hot or cold air blows from the heater, and the ability to adjust it is lost. In such a situation, the cabin heater gearmotor must be replaced.
Replacing the damper on a Priora begins with raising the hood and removing the wipers. To do this, remove the plastic caps and unscrew the nuts with a 14 wrench, after which they are easily removed. Next, the left and right frills are dismantled by removing the rubber pad, protective plastic caps and unscrewing six screws. Then the plastic soundproofing of the engine compartment is removed, the cooling system hose passing through it is carefully disconnected from the expansion tank, then the tank itself is removed. To avoid draining the coolant, the holes in it must be plugged.
To inspect the heater gear motor, remove the expansion tank mounting bracket by unscrewing two bolts under the wing and removing the protection above the left front wheel. After this, the wiper motor and trapezoid are dismantled.
Now the unit is being dismantled; first you need to carefully disconnect the heater damper sensor and the power supply contacts. After this, install and check the new spare part, reassemble everything in the reverse order, and the replacement of the stove gear motor is completed.
Instructions for replacing the stove
Before removing all the necessary parts, cables and other components from Kalina, prepare a new radiator, pipes and clamps. The pipes will be required in case the old ones are worn out or they have never been changed over the years of operation. As practice shows, hoses are most susceptible to wear due to temperature changes, so in any case they need to be changed from time to time.
Instructions on how to change the radiator are presented below:
- We begin the replacement procedure in the engine compartment. First, place a container under the drain hole and drain all consumables from the radiator. If you notice that the coolant is already old and has exhausted its service life, which can be understood by its color and deposits, then it is also better to change the antifreeze.
- You need to ensure the most convenient access to all pipes and hoses of the radiator assembly in the engine compartment. To do this, dismantle the power unit air filter housing, the battery, and its platform. Next, you need to disconnect all the lines from the radiator unit in the engine compartment. Having done this, you can use a wrench to unscrew the nut that secures the metal casing to the engine shield. This nut is located next to the pipes that go into the Kalina's interior.
- Next, we move into the car interior. You need to remove the gas pedal; to do this, unscrew the three nuts. As for the brake pedal, it cannot be removed, so just move it to the side as far as possible.
- Now you have to cut the steel casing as shown in the photo, and then cut off the tubes of the radiator assembly. Having done this, you can dismantle the device from the pedals, but to do this you will also need to unscrew the bolts that secure it.
- Before installing a new radiator device, it will be necessary to carefully sand its tubes. Please note that they should be as even as possible. After all surfaces are ready, a line with a widened end is put on the upper tube, and a line with a narrower end is put on the lower tube. The remaining outputs must be connected in the engine compartment instead of the old ones. Also note that on the side of the Kalina’s interior, it is advisable to treat the place where the lines exit into the engine compartment with sound-insulating material.
First step: check the functionality of the device
- start the car;
- set the regulator to different positions;
- manually move the flap.
The plastic damper has a huge disadvantage: when high temperatures occur, the plastic becomes deformed. As a result, the valve may jam, and only cold or hot air will enter the cabin.
Old-style dampers are installed on VAZ-2110 cars manufactured before 2003. As a result of manual movement of the valve, the functionality of the stove can be temporarily restored. But such work cannot be called a full-fledged repair, since after some time the problem in question will manifest itself again.
It is important to pay attention to in what case the valve can be controlled. The breakdown may be hidden in the micromotor-gearbox if the valve is controlled with the engine running and the regulator in the extreme position
Also, do not exclude the control unit and microfan from the list. These elements can also cause the problem in question.
A malfunction of the control unit, fan and gear motor indicates that the stove needs to be replaced. This is the only solution to the problem. If the work is not completed in a timely manner, the motorist needs to prepare for more serious consequences and expensive repairs.
DAMAGE IN HEATING STRUCTURES
VAZ 2110 heater control units
The control unit starts in one mode. If one of the resistors burns out, the fan motor starts up and there is no speed control, you need to do the following:
- Open the hood.
- Get the block.
- Change the resistor.
- The wires in the controller can also burn out.
- Unscrew it, install new wires. They must be selected in accordance with the cross-section and number of cores.
- Check the relay block; the contact in the circuit may be broken (it is located on the right side in the engine compartment).
Intake of warm unheated air
- Check the interior temperature sensor.
- Check that the coolant level in the expansion tank is correct.
- The liquid should be between the maximum and minimum marks - in the middle.
- Check the operation of the thermostat.
Diagnosis of the problem
If the reason why the VAZ-2110 stove does not work is the damper, it is not difficult to identify it. To do this, disassemble the central deflector, turn on the ignition and rotate the temperature setting knob to its extreme positions. In a working stove, the central damper will not knock and will completely open and close the air supply channel.
If the heater damper does not move or stops in a position that does not completely block the air passage, it may be stuck. You can verify this by pushing the valve with your hand or a long rod. If after this the damper returns to its normal position, then this is the reason why it is jammed. Through the mounting hole of the deflector, you can assess the condition of the damper and its seals. If the damper is deformed, its bend is clearly visible.
Diagnostics of serviceability and dismantling of the stove control unit
The SAUO module is located on the center console of the car and is responsible for proper heating of the interior. Repairing the VAZ-2110 stove control unit requires certain knowledge in electronics, so before you begin repairing the part, you need to determine whether the problem is really in the electronic module itself.
To do this, you must initially dismantle the unit and install a known-good part in its place. Take the SAUO unit from friends or at a service center to diagnose the heating system of your car.
Before performing any work on the vehicle that involves electronics or wiring, turn off power to the battery to avoid shorting or burning out the electronic components.
Then you can proceed directly to removing the unit through which the functionality of the stove is coordinated. To do this, the buttons that are located on the sides of the stove are initially dismantled. The heater controls must be switched to zero positions. Only then can the module be pulled out. This must be done very carefully, since the power plugs are connected to the back of the unit. As soon as you see them, they must be carefully disconnected so as not to damage the contacts. At this point, dismantling can be considered complete.
The working unit is installed on the standard seat, and the operation of the vehicle’s heating system is checked. If the stove functions correctly with the new unit, then the fault is in the ACS unit itself. Otherwise, it is necessary to diagnose other elements of the heating system.
Causes of poor foot airflow
Heater malfunction
Air through the cabin filter is taken from the street by the rotating blades of the electric heater motor. Through a damper system, air is distributed through air ducts and supplied into the cabin through deflectors and non-adjustable grilles.
Air, like any gaseous medium, tends to follow the path of least resistance. Therefore, it is logical that the air flows first come out of the central and side deflectors. The feet of the driver and passengers are blown last. Structurally, the air ducts to the central deflector and the upper side airflow points have a larger cross-section, and it is much easier for air to pass through them.
Initially, you need to make sure that nothing interferes with the intake of air from the atmosphere. After all, if the air is supplied in insufficient volume, then it will not be enough to supply all airflow points with the intensity that was calculated at the design stage of the car.
Check the condition of the cabin filter. To do this, remove the wipers and frill. The cabin filter is located on the right side of the vehicle under the windshield. It is covered with a plastic casing, which is secured with four self-tapping screws. Unscrew the screws and remove the cabin filter. We start the engine, warm it up to operating temperature and check the operation of the stove. If the situation has improved, change the cabin filter and close the issue.
The second common cause is a clogged heater core. In this case, the heating of the interior will be weak, because warm air does not come out of all the deflectors well, and not just into the legs. But the fact is that when driving for a long time, your feet begin to freeze first, so it seems that the problem is in this part of the airflow.
Video: Why the stove does not blow at the feet of VAZ 2111,2110
This malfunction is easily diagnosed. We find two pipes for supplying antifreeze to the heater radiator (rubber hoses on the left side in the direction of travel of the car). With the engine warm, carefully touch the two pipes one at a time with the heater running at full power. The difference in temperature between the pipes should be minimal. If one pipe is hot and the second is cold or barely warm, we wash or replace the heater radiator.
Checking the operation of the dampers
There are nine exit points for air flows from the heater on the VAZ-2110:
- central deflector;
- two side deflectors and two windshield air vents;
- heated feet of the driver and front passenger;
- two outputs for heating the feet of rear passengers.
In an ideally operating system, the pressure generated by the heater motor is sufficient to create an effective flow to warm the feet. However, over time, gaps form in the joints of the air ducts, and the dampers of the VAZ-2110 heater begin to fit loosely to the body. This leads to atomization of the air flow. As a result, a minimum amount of air reaches the distant exit points.
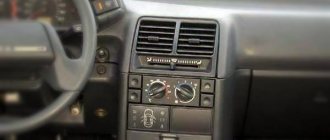
First, dismantle the panel with the central deflector. It is held in place by four plastic clips. To remove it, simply pry it off one of the sides with a suitable object, such as a flat-head screwdriver. Be careful: the clips are fragile.
Evaluate the damper's performance
In older cars with a manual damper drive, pay attention to the play in the linkage of the rods. A broken rod system will not allow the damper to fit tightly to the body in the extreme position, which will cause air to leak from the cold circuit
The problem is corrected by adjusting the damper. In a mechanical drive, it is possible to shorten the rod due to a movable lock on a gear rod or a threaded tip. During the adjustment process, check that the position of the switch on the panel corresponds to the actual position of the damper.
Another reason why the VAZ-2110 stove does not blow into your feet is a malfunction in the operation of the automatic heater control system (AHC) unit or the gear motor of the VAZ-2110 stove. In this case, there is usually insufficiently warm or even cold air from the stove operating in maximum heating mode. This is due to the incorrect position of the damper in which the gearmotor sets it.
Evaluate the operation of the gear motor of the VAZ-2110 stove. To do this, visually check how it closes the damper when switching modes. The easiest way to do this is to remove the panel with the central deflector. Move the temperature knob to the extreme position (for example, set the minimum temperature), then sharply switch to the opposite mode. The damper should completely block the channel visible from the driver's position. If this does not happen, the problem lies in the gear motor or the automatic control system unit. Check the serviceability of the gearmotor and unit.
Nissan Note E11. How to remove and repair the stove regulator
So, what we did to remove the interior heater regulator, without much labor:
- Unscrew and remove one climate damper. Unfortunately, its photograph has not survived, but when you put your head under the steering wheel, you will immediately understand which damper we are talking about.
- We unscrew the pedal assembly (brake pedal and gas pedal), disconnect the connectors from the pedals and the wiring harness that is attached to the assembly.
Then we disconnect the connectors from the stove regulator, there are two of them. We immediately look at what’s wrong with the contacts, maybe they’re burnt or oxidized.
All that remains is to unscrew the regulator itself. It is held on by two self-tapping screws, which are difficult to unscrew, but possible.
Well, the part we removed is on the table - the stove regulator, also known as Power Transistor.
Its original number in the spare parts catalogs is 27150-ED70A. By the way, it’s basically not expensive and there are a lot of analogues...
- The fog lights on the VAZ-2110 do not light up, what should I do?
But ordering and waiting is not our option, especially since it’s winter outside and we need the stove to blow right now, and not in 10 days)) Therefore, we are disassembling our Power Transistor...
The main part of this block, the N632AG transistor from the manufacturer Fairchild Semiconductor, was naturally intact, since the stove worked sometimes...
But the soldering of elements and contacts on the board left much to be desired...
Everything was soldered, assembled, and the problem with the unstable operation of the interior heater motor went away.
And finally, since failure of the N632AG transistor itself, in the regulator unit, is quite common, its characteristics are:
- Type Designator: IRF632
- Type of Transistor: MOSFET
- Type of Control Channel: N-Channel
- Maximum Power Dissipation (Pd): 75 W
- Maximum Drain-Source Voltage |Vds|: 200 V
- Maximum Drain Current |Id|: 8 A
- Maximum Junction Temperature (Tj): 150 °C
- Maximum Drain-Source On-State Resistance (Rds): 0.5 Ohm
- Package: TO220
... and Datasheet of its closest analogue IRFS644B - download *.pdf
- The procedure for repairing a VAZ 2110 stove resistor with photographs
The main reasons for the inoperability of the VAZ-2112 stove
Before carrying out repairs, it is extremely important to ensure a successful diagnosis. Here are the reasons for this problem:
- lack of ability to adjust the temperature;
- the stove cannot change the heating speed;
- breakdown of elements that should distribute warm air flows throughout the car interior;
- violations in the temperature sensor installed on the ceiling;
- malfunction of the ACS controller;
- Antifreeze leak.
Carrying out diagnostic measures will allow you to understand what the problem is and how it can be successfully eliminated.
Heating system design
Design of the heating system "tens"
If the stove cannot turn on, it begins to blow heat poorly or has stopped producing heating altogether, you need to take a very serious approach to solving the problem. After all, operating a vehicle in the winter without a heater is the most inconvenient and uncomfortable option for a motorist. Therefore, before you learn how to remove and disassemble hoses on new and old devices and how to properly adjust the system, let's understand the device.
On domestically produced vehicles, including the VAZ 2110, the heating system has certain differences. First you need to take into account that the heating system operates separately. In particular, it is represented specifically by the heater. The heater is the stove itself.
The stove will be filled inside with a hot air flow, which enters the vehicle interior through special heat distributors - pipes. The pipes themselves are led to the car's interior, where warm air flows directly from the front center console to the driver and passenger (face and legs), as well as to the windows.
Thanks to window blowing, the driver can get rid of the problem of freezing or fogging. The entire system is controlled using a special regulation and control unit, which regulates the air flow and temperature conditions. That is, in essence, this block is an air flow distributor. Unlike other domestically produced car models, the stove on the “ten” has a fundamental difference - it is equipped with an evaporator (the author of the video is Alexander Amochkin Kolomna AAK).
We are engaged in the drive
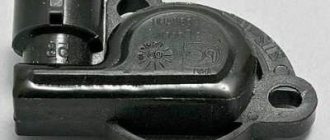
Simultaneously with replacing the damper, we check its drive, and if the MMR does not work, it is necessary to either replace the motor or repair it. After removing the trim and lining of the windshield behind the vacuum amplifier of the VAZ 2110, we find the MMR, disconnect two connectors - the MMR and the micromotor.
MMR new sample MMR old sample
Next, unscrew the screws and take out the MMR, from which we remove the motor. Its operation is checked by connecting to the automatic control system.
If you find that it is not working, you can replace it, but repair is also possible. The stages are:
- Partially bending the pressed side, remove the lid;
- Check the condition of the bearings, brushes and commutator;
- Replace or fix them. If the gear teeth of the gearbox are worn out, it needs replacement;
- Bearings require silicone grease.
If after repair the operation of the motor is restored, you can assemble the MMR and install it in place. In the VAZ 2110 this is done like this:
- The MMR lever pin must be inserted into the slot of the lever, which is located on the heater damper drive;
- If the indicated lever is turned incorrectly, you need to apply 12 V voltage with two wires to the contacts of the motor connector (yellow wires fit here), and the lever will move to the desired position;
- After installing the MMR, check how it works, at the same time, how the heater damper drive moves and the heater control lever works to set the temperature in the VAZ 2110 cabin.
https://youtube.com/watch?v=CuGGXakB5Ew
By properly repairing the heater damper and its drive, you will ensure that the operation of the stove becomes stable, providing you and your passengers with the proper level of comfort in cold weather.
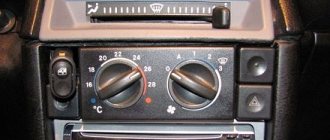
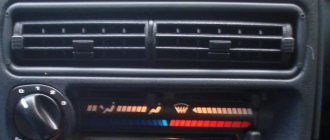
Adjusting the stove controller
The manufacturing plant provides for heating the interior to the specified temperature in fifteen minutes with a deviation of up to two degrees. Use the controller knob to set a comfortable temperature in the car interior.
To check the proper functioning of the stove, use a regular mercury room thermometer. If after fifteen minutes the interior has not warmed up to the required temperature, the controller must be adjusted.
To do this, pull the heater control module back out and rotate the temperature regulator, first to the maximum value, then in the opposite direction. After carrying out such actions, install the unit in place and check the operation of the stove again.
At the same time, it is necessary to check the operation of the heater dampers. If there are extraneous sounds when switching temperature modes, then you need to check the condition of the dampers. If cold air flows well, but hot air hardly flows in, then the lower damper is faulty. If there is no normal flow of cold air but there is a good flow of hot air, there is a problem with the upper damper. The reason may be deformation of the dampers under the influence of air of different temperatures. In this case, it is better to replace the standard plastic dampers with aluminum analogues, which are more resistant to temperature changes.
After adjusting the controller, all heater elements are installed in their original places. Assembly is carried out in reverse order.
Malfunctions and their causes, primary diagnosis
There are several malfunctions due to which the gear motor of the VAZ-2110 stove does not work or does not respond correctly to changes in the position of the handle.
- If the ECU sends an incorrect signal or does not supply power to the servo at all, the damper will not work properly. This malfunction manifests itself in a complete failure of the damper drive (hot or cold air always blows from the deflectors) or its partial functionality (when some modes are turned on, nothing changes or the damper goes to its extreme position).
- Lost contact. Oxidation or broken wiring will naturally damage the micromotor gearbox of the stove drive.
- Switch electronics failure. A switch is the simplest set of contacts that alternately close when the handle is turned. Its malfunction manifests itself in the “loss” of one or more modes.
- Motor burnout. Rare malfunction. It is observed in damp weather when the seal of the housing is broken or after a power surge in the on-board network.
- Gearbox jamming. Plastic gears sometimes jam due to misalignment or foreign bodies getting between the teeth.
- Drive failure. In old-style servos, the thrust breaks off; in new motors, the edges of the drive shaft are folded. This breakdown only involves replacing the micromotor gearbox of the VAZ-2110 stove.
Typical breakdowns
It happens that the stove on a VAZ 2110 does not heat well, does not allow you to fully control it, and so on. Let's look at the most typical breakdowns for this unit.
- The ability to control is lost, that is, the temperature of the stove on the VAZ 2110 is not regulated;
- The ceiling sensor refuses to work;
- The device does not work for heating, the stove blows cold air into your VAZ 2110;
- The flow of hot air to the feet or to the side windows is poor;
- The coolant level drops;
- The heater fan on the VAZ 2110 does not work properly;
- The stove turns on and heats up, but this is accompanied by a lot of noise.
How to replace the radiator of a VAZ 2114 stove
In this section you will learn how to replace a stove radiator yourself. Start by draining the coolant that is in the system. After you have completed this work, you can remove the instrument panel. Now let's go through the points:
- In your cabin, directly under the instrument panel, disconnect the pair of hoses that go to the heater tap pipes.
- To perform these manipulations without problems, loosen the clamps.
- Do the same steps in the space under the hood: disconnect the hoses from the valve nozzles themselves, unscrew the nuts that secure the radiator, remove the valve from the shield.
- Remove the faucet rod holder.
- Disconnect the rod from the lever.
- Go to the interior, remove the cover from the gear shift knob.
- Remove the plastic trim: it is located under the brake (manual).
- Unscrew and remove the floor trim (rear): it is located between the seats. For convenience, slide it back.
- Disconnect the air vent (cabin) from the heater body and remove it.
- Disconnect the connector from the motor and resistor.
- To the right and left of the heater, unscrew 2 pairs of nuts.
- Remove the radiator with the control panel.
- Make a replacement.
- Start the assembly process in reverse order.
In addition to what has been said, you can watch a video with the repair of the radiator frame, also more about the stove radiator and its replacement here and here
and one more small story:
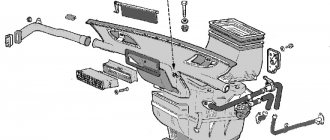
Dismantling
The stove is being disassembled
To replace the device, you will have to perform a series of sequential steps. The work is not particularly simple, but doing it yourself is more than possible:
- Drain all coolant from the heating system;
- Disconnect the battery. To do this, simply remove the negative terminal;
- Remove the trim, windshield trim and sound insulation;
- Remove the fan from the stove;
- Disconnect the vacuum pipe clamps from the heater housing;
- Remove the front heater air intake housing. There's definitely no need to rush here. To facilitate dismantling, we recommend removing the dashboard. Inside the cabin, the fasteners that hold the heater are unscrewed, and then raised;
- Remove the spring clips, mounting nuts, and front housing;
- Disconnect all hoses from the radiator;
- Disconnect the rear casing from the heater;
- Remove the radiator from the stove.
After these manipulations, you can finally replace the damper.
Principles of interior ventilation
Before you understand the causes of the malfunction, you should know the principle of the device and the rules by which ventilation is carried out. So:
- Air is supplied to the passenger compartment through the holes in the trim on the windshield: when the car is moving voluntarily, or forcibly with the help of a heater fan.
- Air escapes through the gaps between the inner door panels and between the upholstery, then through the holes located at the ends of the doors. The thermal insulation of the interior is improved by valves built into the openings, which allow air to pass out and prevent it from entering the inside of the car.
- The main part of the air is directed to the windshield; flows are directed to the central part and side windows through deflectors blocked by flaps.
- Air is supplied to the driver’s feet and the passenger sitting next to him through two pairs of deflectors: one pair is located near the floor, the other at knee level.
- Through a lining located on the floor tunnel and two air ducts built under the front seats, air is supplied to the feet of passengers in the rear.
- To prevent the entry of outside air, especially if the road section is polluted, smoky or very dusty, there is an air recirculation system. When the recirculation button is recessed on the instrument panel, the electro-pneumatic valve opens. In this case, under the influence of the vacuum that occurs in the intake pipe, the access of outside air is blocked by the recirculation system flap into the vehicle interior.
- The air temperature is regulated by the controller handle from 16°C to 30°C.
- Information about the temperature is read from its sensor by a unit with a microfan located on the ceiling. The unit turns on the micromotor when a temperature difference occurs, which controls the heater dampers. When the damper reaches the desired position, a signal is sent from the sensor to the control unit, which turns off the micromotor.
SAUO repair
Before repairing the SAUO VAZ 2110 unit, you should make sure that the problems with the stove are associated with it. To do this, you should connect a known working heater control unit (borrow from a friend or from a store). If there are no problems with the stove with the working unit of the automatic control system, then we try to find out what the reason is. If the obviously working unit of the automatic control system did not help, then the problem with the stove is somewhere else.
Remove the buttons next to the SAUO block. We take out the stove control unit. Set the controls to position 0 and remove, and then remove the front cover and glass from the latches. We unscrew 2 screws in the front and 1 in the back. Remove the board from the plastic case and check the integrity of all tracks, jumpers and resistors. In this example, a broken jumper was found. Solder it on one side and the other. Assembly in reverse order. Now all speeds of the SAUO block work.
FAQ on the operation of the VAZ 2110 stove
1st oven speed does not work
All heater fan speeds (except the last one) are connected through an additional heater resistor, which is located under the frill (wind flap). One of the reasons when the first speed of the heater does not work is a malfunction of this resistor. Depending on the ACS unit, this additional resistor varies:
RDO 2108-8101081 is used on the oldest SAUO units, which have only 2 speeds. (0 A 1 2).
RDO 2110-8118022-01 is installed on a modified heater until September 2003, the SAUO unit has 3 speeds (0 A 1 2 3). The most common malfunction in this resistance is that all stove speeds stop working, except maximum 3. The reason is that the thermal fuse is unsoldered (indicated by a red arrow), and is treated by soldering it in place. But if it is unsoldered later, you need to look in the direction of the motor, the motor takes a very large current (not lubricated, wear on the brush assembly, etc.).
RDO 2123-2118022 has been installed on the latest heaters since September 2003, the SAUO unit has 4 speeds and does not have an auto mode (0 1 2 3 4).
- In addition to a malfunction of the additional heater resistor, the problem may also be in the contacts of the heater control unit board. Often, due to high temperatures, the board becomes very hot and the contact is soldered off. Carefully examine all contacts on the boards, especially at the power supply points.
- Clean contacts.
Heater speed 2 doesn't work
The reason is exactly the same as in the case when the first heater speed does not work.
3rd speed heater doesn't work
- If the 3rd speed is the last, then it works without resistance (directly). And the problem may be in the contacts of the ACS unit (stripped/crimped), or in the contacts on the board of the ACS unit.
- If you have a stove control unit with 4 fan speeds (0 1 2 3 4), then look for problems with the 1st stove speed.
4th oven speed does not work
The reason is exactly the same as in the case when the third heater speed does not work.
The stove blows equally at speeds 1 and 2, that is, there is almost no difference between the first speeds, but at speed 3 it blows much stronger
The reason is the additional heater resistor, it needs to be replaced.
The temperature on the heater control unit is not regulated or the heater fan does not work. Disassemble the ACS unit and carefully examine all tracks and contacts. If there are no visible defects, then you need to look for the cause in the part indicated in the photo.
Another reason could be poor contact in the fuse box. On the back of the block there is a 6-terminal chip, the blue wire on it is to the fan. Perhaps it was burnt in this connector at the connection point. It is necessary to replace the chip and crimp the new connector. Remove the block, disassemble and solder the leg (perhaps it melted and became unsoldered due to heating).
ps If there are other solutions to problems with the operation of the stove, then leave comments, we will supplement the FAQ on the operation of the SAUO unit. By the way, malfunctions in the heater can be caused by other reasons.
What most often failed in the stove of your “ten”?
It turns out that the cabin air temperature sensor (IAT) is especially needed for VAZ cars in winter. Cold inside a car is not only a discomfort, but also a common cause of glass frosting, which must be avoided. Freezing of glass, especially the windshield, almost completely eliminates the possibility of operating the vehicle. At least until the glass is completely warmed up.
The principle of operation of the stove heater on the VAZ 2110 2111 2112
On VAZ 2110, 2111, 2112 there is no heater valve. The temperature in the cabin is controlled by an air damper, which regulates the flow of hot air into the cabin. Antifreeze also flows into the stove in the summer, because of this, some car enthusiasts additionally install a tap to shut off the supply of antifreeze during the summer period of operation. The VAZ-2110 heater control system is automatic, the temperature is maintained with an accuracy of 2 degrees Celsius. In addition, it is preferable to control the air damper than the tap (it can become sour or jam).
The air entering the cabin is heated, if necessary, by passing through the heater radiator and distributed in accordance with the position of the air flow control handle. The main part of the air is directed to the windshield and, through deflectors blocked by flaps, to the side windows and into the central part of the cabin. Air is also supplied to the feet of the driver and the passenger sitting in front through two pairs of deflectors (one pair at knee level, the other at the floor) and to the feet of the rear passengers through the lining on the floor tunnel and two air ducts under the front seats.
To speed up the heating of the cabin and prevent the entry of outside air into the cabin (when crossing gas-filled, smoky, dusty sections of the road), an air recirculation system is used. When the recirculation button is pressed down (on the instrument panel), the electro-pneumatic valve opens, and under the influence of vacuum in the intake manifold, the recirculation system flap blocks the access of outside air to the car interior. Thus, the operation of the recirculation system is possible only when the engine is running. At the same time, if the fan is turned on, the air in the cabin continues to circulate, passing through the heater air ducts.
The fan has three operating modes: low speed, medium and automatic speed selection (determined by the control unit). The fan electric motor is a DC commutator motor, excited by permanent magnets. Current consumption at maximum speed is 14 A.
Depending on the selected speed, the electric motor is connected to the vehicle’s on-board network directly (maximum speed) or through an additional resistor. The latter has two spirals with a resistance of 0.23 Ohm and 0.82 Ohm. If both spirals are included in the circuit, the fan rotates at low speed, if only one (0.23 Ohm) rotates at medium speed.
It is not recommended to press the fan wheel from the electric motor shaft - it can upset the balancing. The electric motor cannot be repaired (except for cleaning the commutator); if it fails, it should be replaced as an assembly with the fan wheel.
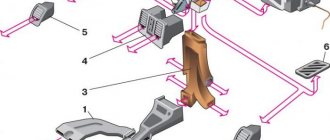
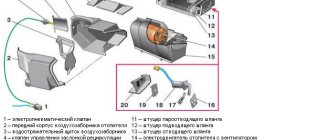
Heater parts (VAZ 2110 2111 2112): 1 - electro-pneumatic valve; 2 — front housing of the heater air intake; 3 — water deflector air intake flap; 4 — recirculation damper control valve; 5 — air intake recirculation damper; 6 — rear heater air intake housing; 7 — heater channel damper; 8 — heater control damper; 9 - radiator; 10 — heater radiator casing; 11 — fitting for steam hose; 12 — supply hose fitting; 13 — outlet hose fitting; 14 — electric heater motor with fan; 15 — electric motor housing; 16 — support platform for the heater control damper drive lever; 17- heater control damper drive lever; 18 — micromotor gearbox for damper drive; 19 - resistor; 20 — heater casing cover.
The heater (stove) radiator is installed horizontally under the instrument panel, in a plastic casing, and consists of two plastic tanks (the left one has a steam outlet fitting) and two rows of aluminum tubes with pressed-on plates. Depending on the position of the dampers, part of the intake air passes through the radiator (in the extreme positions of the dampers all the air passes or does not pass at all), while the rest of it bypasses the radiator.
Unlike previous VAZ models, there is no valve that shuts off the flow of coolant through the heater radiator, thus, when the engine is running, the heater radiator is always heated. This design ensures low inertia of the system at start-up (the set air temperature is reached faster) and the absence of leaks associated with leaks in the valve.
The heater is controlled by commands from the electronic control unit.
Removing and disassembling the heater on a car with a VAZ-21124 engine
| EXECUTION ORDER |
|
|
|
|
We do not disconnect the steam exhaust hose from the heater radiator, since its fastening clamp is difficult to access. It is easier to disconnect this hose from the expansion tank pipe (see Removing the expansion tank) and remove the heater housing along with the hose.
|
|
|
|
|
- Unscrew the nut of the upper fastening of the heat shield of the steering rack cover.
|
|
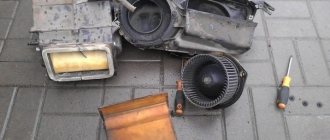
When dismantling the heater electric motor assembled with the impeller, remove the cover of the air purification filter entering the interior ventilation and heating system.
You can also dismantle the heater motor in a car, but to do this you will have to perform all the operations necessary to remove the heater housing assembly. You can only not remove the body from the engine compartment, but only pull it out to a sufficient distance.
| EXECUTION ORDER | |
|
|
- We take out the screws...
|
- To remove the heater core...
|
|
|
- We take out the screws and remove the lock washers located under them.
|
The heater components are not subject to further disassembly. If they fail, it is better to replace them with new ones. There is no point in separating the body parts, since they usually do not fail until the end of the vehicle's service life.
We install the removed components and parts in the reverse order.
When installing the heater housing assembly on a vehicle, you should be prepared for the fact that the heater housing is difficult to fit into place. The installation of the housing should begin from the middle of the engine shield, directing the right (along the direction of the car) part of the housing, first towards the starboard side and down, and then up. It is better to carry out the installation with an assistant.
| previous page20.2.7. Car bodies with VAZ-21114 and VAZ-21124 engines | next page 21. Applications |
Popular problems
Most often, owners of the domestic “ten” are faced with situations regarding the stove when the regulator does not respond to user manipulations. That is, the regulator does not work. Whatever position you choose, either cold or only hot air comes from the air ducts.
Scheme
There are different reasons for damper failure.
| Causes of failure | Characteristic |
| Micromotor gearbox jammed | This element is responsible for controlling the damper drive |
| Problem in the control unit | It should be checked in order to understand whether the micromotor gearbox, the damper, or the control unit is at fault |
| The plastic dampers have moved from their seat and are jammed, making it impossible to control the stove. | This is typical for the old-style VAZ 2110 heater damper, when plastic was still used for this component. |
When the gearbox is functioning, but the damper still does not turn, you can hear characteristic sounds - clicks. This indicates that a square shaft rotates inside the socket.
There is only one way to cure such a malfunction - remove the old damper made of plastic with foam insulation, and replace it with a new, modern one. The new type of damper is made of metal, and the seal for it is made of rubber.
Blowing cold air - inspection of the heater radiator and cooling system
The radiator of the VAZ-2110 stove also does not have high heat transfer, and besides, it is quite difficult to get to it. However, it may be associated with a weak interior heating temperature:
- The heater radiator is clogged . If antifreeze does not get into it when the cooling system is in full working order, then it will not heat. Diagnosing a clogged stove is difficult, but it is possible. With the engine fully warmed up and the heater on, we feel the temperature of the radiator inlet and outlet pipes by touch. If the inlet is hot and the outlet is cold, the heater radiator is clogged. Few people clean it; the public prefers to buy a new one. The market will allow you to choose several models of aluminum radiators and one or two copper ones at our discretion.
The problem of radiator obstruction is solved either by flushing using special liquids, or by replacing the element.
It wouldn't hurt to check the cabin filter as well.
If the radiator leaks, you will have to dismantle it and replace it with a new one.
Video about replacing the VAZ-2110 heater radiator
Repair of the VAZ-2110 heater damper
Repair of the damper is carried out only in a situation where it is skewed or jammed in a certain position. It is very difficult to call this a repair; it is most often a forced measure to extend its operation for a short period of time. If there are problems with the valve or its drive, then soon you will still have to disassemble the stove and replace the failed parts.
The repair consists of installing the valve in its standard seat. To do this, you do not need to completely disassemble the heater. With the ignition on, it is enough to try using manual adjustment to try to seat the valve in its seat. You can also remove the deflector and try to activate the damper by hand. If it starts to move, then you have a temporary fix. However, as previously stated, this is a conditional fix for the problem. If a part jams, it will soon have to be replaced, since the stove will not function correctly.
Location of the heater damper of the VAZ-2110 car
If, after restoring the performance of the damper with the ignition on, it is only possible to manually control the damper, then the source of the breakdown is the micro-gearbox.
Functionality check
If you do not want to spend a lot of money on repairing and replacing the device, you need to first check whether such manipulations are required. To do this, you can try to return the displaced damper to its rightful place.
- Turn on the ignition;
- Switch the regulator to different positions;
- Manually move the flap;
- This way it can be returned to its original position.
Of course, you first have to dismantle the deflector to gain access to the damper. If this method works, the damper will be able to work again as before, which means it will respond to the regulator.
But this cannot be considered a full-fledged measure for restoring the functionality of the damper, since if the socket is already loosened, the unit will no longer be able to work normally. At first, you will apply the half-measures described above over and over again, but over time you will still have to replace the heater damper on the VAZ 2110.
If any of these components stops working normally or is completely out of order, then the heater damper will not work on the VAZ 2110. Only its replacement is required. Ignoring the problem will result in even greater repair costs in the future.
Repair and restoration of the stove damper
The deformed heater damper of the VAZ-2110 cannot be repaired; it only needs to be replaced. In this case, it is better to purchase a replacement metal part that is not so susceptible to temperature effects.
Whatever heater is installed on the VAZ-2110, to carry out repair work, the heater must be completely disassembled. In this case, the process of dismantling and disassembling depends on the design of the stove.
A positive aspect of the heater design on the VAZ - 2101 is its location - to get to it and the dampers you can from the engine compartment and you don’t have to remove the front panel.
Disassembling an old-style stove
For example, let's look at how to disassemble an old-style heater:
- Remove the terminal from the battery.
- We remove the windshield wipers, the seal, remove the air intake near the windshield (“jabot”) from the car, in the process you will need to disconnect the windshield washer nozzle tubes.
- We dismantle the insulation that separates the stove body from the engine compartment.
- We remove the gear motor.
- We divide the housing of the stove and air filter into two halves. To do this, unscrew the coupling bolts around the perimeter of the housings and remove the mounting brackets.
- Disconnect the fan power wires.
- Remove the outer half of the air filter and heater housing (along with the fan).
- We dismantle the inner part of the fan housing.
After this you will have access to the dampers. If you are only planning to repair or replace the heater dampers, there is no need to drain the antifreeze, since the heater radiator will remain in place and will not be removed.
Before removing the dampers, carefully inspect and remember their position and the way they are engaged. Further actions depend on the nature of the damage. Deformed damper parts cannot be repaired and only need to be replaced. As for damaged rods and levers, try to repair them or simply replace them. The damaged seal is replaced.
When assembling the stove, pay special attention to the engagement of the dampers. Do it as it was before disassembly, otherwise the dampers will not work correctly, which will affect the performance of the heater
Disassembly and repair of a new type heater
The new model stoves are disassembled differently:
- disconnect the battery terminal, drain the antifreeze;
- dismantle the frill and insulation;
- disconnect the power wires of the fan and micromotor gearbox;
- unscrew the fasteners that secure the stove body to the body;
- disconnect the coolant supply pipes to the heater radiator;
- We remove the heater from the car along with the filter housing.
After this, we disassemble the stove body, dividing it into two halves, after first disconnecting the air filter housing and removing the mounting brackets. Next, we change or repair the damper, assemble the heater and install it on the car.
Note that the general algorithms of work are indicated above, but in reality, dismantling the stove is not so easy, since many fasteners are located in hard-to-reach places, sometimes you have to disconnect or remove elements that make it difficult or interfering with the removal of the unit.
Video: Why the VAZ 2110 stove does not heat up. Modification of the damper.
The cars of the Togliatti automaker are assembled at an average level. There are some known shortcomings that affect many car models. In this case, we are talking about the stove of the VAZ 2110 model. Despite the fact that the manufacturer takes into account the previous shortcomings, in the “top ten” the air distribution system is considered a weak point. At the same time, if you regularly carry out preventive maintenance, you can avoid expensive repairs.
The vehicle is designed for movement, as well as providing passengers with a certain level of comfort. The stove plays an important role in this. The task of the VAZ-2110 vehicle unit in question is to maintain optimal temperature conditions.
Weak supply of warm air, stove modernization
One of the main problems of the VAZ-2110 heater is leakage and poor-quality assembly, low quality of air duct elements.
The stove can wildly heat up the air entering it, but the barely perceptible warm breath of the heater can reach the cabin. It's all about leaky air duct connections, and, unfortunately, there are quite a lot of them. Firstly, it is recommended to seal the primary air ducts ; a leak of heated air is often detected between them and the stove itself; it simply warms the engine shield.
Blowing cold
The most unpleasant thing is when the stove stops working completely and only blows cold air. In 90 cases out of 100, the gear motor is to blame, which on a VAZ 2110 is changed as follows:
- Wipers are dismantled;
- Remove the frill;
- The three self-tapping screws securing the gearmotor are unscrewed with a Phillips screwdriver (a short one is needed);
- Unfasten the wires;
- A new one is installed in place of the old gearmotor. To do this, it is better to ask an assistant to switch the regulator modes while you are installing this part;
- They install the frill back and install the windshield wipers.
There are also situations when you have to change the heater because the old one is completely worn out. In this case, experts recommend models “2112-01” or “2112-02”. They are ideal for the VAZ 2110, and the difference between them is that the first is without an air filter, and the second with a filter.
How heating and ventilation work
There is supply and exhaust ventilation in the interior of the VAZ 2110. The windshield trim has holes through which air either spontaneously (when the car is moving) or forcibly - with the help of a heater fan - enters the passenger compartment. The supplied air exits through the provided slots - at the ends of the doors, between the upholstery, and door panels.
In fact, all of the holes mentioned are equipped with valves that work “for release” and prevent (at least hypothetically) the spontaneous entry of air from the outside.
However, you can make high-quality tuning of the heating system, then the car will be truly comfortable.
Heating is done as follows:
- The air passes through the heater radiator, while warming up. The heating temperature is controlled by a relay;
- Next, the warm air is distributed through the air ducts;
- Special deflectors direct the main flow of hot air to the windshield and to the center of the cabin. The flaps can be used to block/open the flow to the side windows;
- There are two more flaps - for heating the front window and also for the feet of the driver and passengers. For this purpose, deflectors are provided for the front seats: one pair is at knee level, the other is almost on the floor. For rear passengers, there are air ducts under the front seats plus a pad on the floor tunnel;
- There are special handles to control air flows;
- The fuse located in the mounting block protects the entire electrical heating system from blowing.
If desired, you can carry out tuning, adjust the flow of heat to different parts of the VAZ 2110 interior, thereby improving comfort.
Assembly of the unit
Interchangeability of gearmotors
When work on restoring the functionality of the MMR is completed, install it in place. For this:
- Insert the pin of the micromotor-reducer lever into the slot of the lever. It is located on the damper drive;
- If the lever is not turned properly, apply 12V voltage to the motor connector pins using two wires. We are talking about yellow wires here. This way you can return the lever to the correct position;
- Having installed the micromotor-reducer, check it for operability, plus watch how the damper drive of your heater moves, whether the heater control lever “plows” properly to regulate the temperature.
We will repair or replace the damper and heater drive, you will be able to return the heater to its previous functionality and independently determine what temperature regime will be set inside the cabin of your VAZ 2110.
Loading …