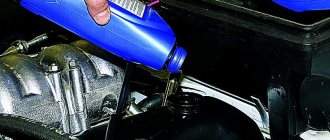
Many car enthusiasts like to carry out tuning of various kinds. Recently, the installation of a crankcase gas oil separator has become widespread. It is especially popular among fans of fast driving. In stores, they will ask for 2000 rubles for such a device, if not more. However, why pay if you can make such a necessary device yourself?! But first you need to figure out why it is needed at all. Maybe the engine is fine without it? But there are some peculiarities that this article is devoted to.
Instructions for creating an oil catcher with your own hands for the Tavria ZAZ 1102 car
Hello everyone, dear subscribers and visitors of the site, today’s article will be about the oil trap for Tavria. I’ll tell you a secret, I made this device a long time ago, but I was able to write about it only now, after I analyzed its work.
So, what is an oil trap, or as it is also popularly called an oil sump?
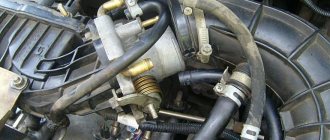
Everyone has probably already encountered the problem that after cleaning the carburetor regularly becomes dirty, the engine runs worse, and the spark plugs simply turn black, even though the oil seals and oil rings are intact. Also, in the so-called pan above the carburetor, white foam and oil constantly collect, all this enters it from the crankcase gas chamber in the engine head cover (see photo below). In the design of the Tavria car, the pan and the lid are directly connected by a hose, through which all the nasty stuff flies into the heart of our iron horse. Foreign cars use such a thing as an oil trap - this is a device that separates oil from the flow of crankcase gases, thereby filtering it.
I had a problem with carburetor contamination, which was very large hemorrhoids, since white foam was always in the pan, and accordingly the oil was also very unpleasant when the car is in this condition. You can see a photo of this horror below. Accordingly, this cannot result in ideal or even stable engine operation.
I struggled with this for a long time, changed the oil, blamed condensation inside the engine, etc., but in June of this year I decided to do an oil flush.
Having installed Recaro seats that day, I set about creating an oil sump with my own hands. For convenience, I will create a small list of parts that we will need for our oil sump.
DIY crankcase oil catcher
How to make an oil sump (crankcase gas oil trap) with your own hands? Everyone can do this
There are quite a large number of options and methods for making such a device. Your task is to choose the most suitable option for you.
How to make an oil sump (crankcase gas oil trap) with your own hands?
Before asking such a question, you need to decide why you need it. Everyone knows that increased gas pressure forms in the crankcase. To reduce it, ventilation (breather) is used, from which a hose goes to the throttle assembly. Drops of lubricant often fly out with gases. When the engine operates at high speeds, the crankcase gases contain significantly more oil. Also, a large amount of lubricant is thrown out through the breather by a worn engine.
As a result, oil clogs not only the air filter, but also the throttle. As a result, the injector (carburetor) cannot operate properly. To avoid the need for frequent cleaning of the power system and replacing the filter, an oil trap is installed.
A more reliable device can be made with your own hands. It’s easy to make, and you don’t need anything special for it:
- Metal power steering reservoir;
Metal sponges for dishes (4 pcs are enough);
Relevance
Why do you need to install such a clever device? Due to high crankshaft speeds, oil flies through the crankcase ventilation breather and can end up on the carburetor assembly, and in the case of injection engines, on the throttle unit. And to prevent this from happening, just such a device is installed. Moreover, it is advisable to install it not only for those drivers who do not mind pressing the accelerator pedal to the floor. Those owners who have been using their car for quite a long time should also think about it. After all, during this period, the rings have most likely already worn out and do not provide proper sealing of the combustion chamber.
More information about JTlab oil traps
An oil trap (oil washer) is a device for condensing oil vapor from the crankcase gases of an engine. Oil traps are designed to sift out (condensate) oil vapors and then collect them or drain them into the oil system of the internal combustion engine. On most conventional engines, crankcase gases are supplied directly to the combustion engine intake or turbine intake for TURBO engines. In this case, oil condenses in the intake manifold, cylinder head passages, cold part of the turbine, piping, intercooler, sensors and throttle valve. Over time, fine dust adheres to a thin layer of oil, and after several tens of thousands of kilometers, all parts of the intake system are covered with a layer of a thick mixture of oil and dust. This scheme has a lot of serious disadvantages - oil reduces the efficiency of the intercooler, leads to contamination of the turbine, intake, cylinder head channels, piping, leads to problems in the operation of the throttle valve, idle speed regulators, worsens sensor readings, but most importantly, oil can provoke detonation, which is a disaster for the internal combustion engine.
On powerful tuning ATMO and TURBO engines, oil traps (oil washers) are installed, which separate the oil from the crankcase gases, eliminating all the shortcomings of the system. With this scheme, crankcase gases with oil vapor first enter the separator (oil sump), where, due to various physical principles and design features, the oil is separated from the gas flow. After separation, the oil flows back into the engine crankcase, and “dry” toxic crankcase gases are supplied to the intake and burned in the engine. Moreover, most factory engines use a positive pressure system in the crankcase of the internal combustion engine, which means that when the piston moves down, it has to overcome the force of this pressure, this state of affairs increases losses and reduces the efficiency of the internal combustion engine. Open and closed type oil washers solve this problem as well. An open-type oil sump is an oil separator, from which crankcase gases are removed directly into the atmosphere; a closed-type oil sump feeds crankcase gases back into the engine for combustion (environmentally friendly type).
Usually, an oil sump is considered to be just a jar with fittings, empty inside, this type does not work well and only collects condensation of water and oil; it is dangerous to use oil sumps of this type in winter.
We have been working on our own design of oil sumps for several years now. Our early designs worked perfectly all year round on TURBO and ATMO engines, did not require maintenance or periodic drainage of condensate, and removed up to 90% of oil from crankcase gases. But as soon as we began assembling engines for high boost 2+ bar, the issue of quality and performance of the oil sump arose with renewed vigor.
The new design of the high-performance oil sump was developed using CAD technologies, including modeling of gas flow processes and oil/water condensation. Thanks to this, a special design of the internal structure of the oil sump was developed, which retains low resistance to gas flow and high separation efficiency, allowing up to 95-98% of oil to be captured from crankcase gases.
The photo below shows several pictures visualizing the oil separation processes inside our oil sump.
Main characteristics
| Make: BMW | Gearbox: automatic / manual |
| Model: X1 | Body: sedan, coupe, station wagon |
| Year of issue: 2009 | Power: petrol/diesel |
| Engine capacity: 1985 cm³ | Drive: rear |
–> Good afternoon, Friends!
I would like to share with you my experience in making an oil trap and crankcase gas filter with my own hands, using the example of a VAZ 21102 produced in 2000.
First, a small digression, for those who do not know why this modification is needed.
Many car owners, both domestic and foreign cars with high mileage, have more than once paid attention to oil deposits in the form of a plasticine-sticky mass (which appears when crankcase gases with droplets of oil escape, due to wear of the oil scraper rings, from the “breather”) in the intake path, as well as on the throttle valve, intake manifold, idle air valve, oil also flows into the air filter through the mass air flow sensor (MAF), which can lead to failure of the mass air flow sensor (replacement cost is about 2500-3000 rubles) . And so, if you are tired of suffering from idle problems and constantly carrying out preventive work on cleaning the intake manifold, throttle assembly and changing various sensors, which, firstly, not everyone can do due to lack of knowledge, and secondly, it is necessary a lot of time, tools and of course money
In general, to avoid all of the above, you can install a crankcase gas filter or an oil trap, which can also be bought at a tuning store at a fairly decent price, or you can make it yourself. We will dwell on the latter, that is, the manufacture of an oil trap (crankcase gas oil trap), in detail.
So, to make a crankcase gas filter we will need:
– a hose with a diameter approximately similar to the hose of the interior heating system and a length of about 25-30 centimeters;
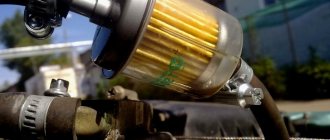
– fine fuel filter without settling tank for carburetor cars,
– plastic clamp for the filter.
First, we disconnect the hose from the valve cover and from the intake tract, you need to make any plug for the hole remaining in the intake tract (I took a technological plug from the new VUT), then we take a hose of the required length (depending on the location of the filter), I took about 30 centimeters, so that the filter is at the level of the air filter housing, we put it on the valve cover fitting and fix it with a clamp, then from the fine fuel filter housing, you need to take out the filter element and put it on the hose, securing it with a plastic clamp.
Now, when crankcase gases escape, the oil will remain inside the filter.
Oil in pipe
Check the condition of the oil scraper rings. When the engine operates for a long time, especially under increased loads and slipping, soot accumulates on the rings. The use of various additives can also give this result. Compression rings burn out and stick in the grooves. The internal pressure increases, and oil leaks appear on the pipe inside and even outside. In this case, everything needs to be cleaned and the seals replaced.
Check for the presence of an oil trap in the corrugation. It looks like a set of thin plates or maybe a version of small meshes. In the off-season, the draft in the pipe worsens when you put the lid in the winter position in warm weather and vice versa. To eliminate this drawback, you can install an additional oil separator from Opel, the price of which is around 500 rubles and it works well on a VAZ.
Compression
A thin tube extends from the outlet pipe closer to the crankcase. It has an internal diameter of about a millimeter and clogs quickly. Clean it, then do not connect it, but put your finger on it at idle. You should feel how it is attracted by the rarefied air. If this does not happen, then you need to adjust the engine valve stroke.
The adjustment instructions are complex and require special tools and skills to carry out this work. It is difficult for an amateur to cope with such a task on his own. Therefore, it is better to remove oil in the VAZ 2112 air filter by adjusting the compression, preferably in a specialized workshop. You can find a related video, but it won't answer all your questions.
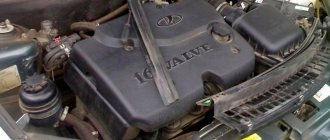
On engines with 16 valves, the power is greater due to the increased compression ratio, so oil practically does not appear in the air filter of the VAZ 21124 due to weak compression.
Adjustment of valves
If the reason for oil getting into the filter, and from there through the carburetor into the combustion chamber, is due to improper valve adjustment, then when operating at high speeds, the exhaust gases will appear blue in color, and at idle a turquoise tint.
It is necessary to remove the engine from the car frame, open the cover, wash everything and look at the valves. During operation, they gradually wear out, losing their correct shape, and gaps form where they slide along the cylinder. The valves are ground in using a special paste.
You should not use diamond lapping paste, since solid dust particles are not completely washed off and will destroy the surface of the valve head and cylinder when the engine is running. After this, everything is washed with gasoline, assembled, and the gaps are set using a feeler gauge.
Crankcase ventilation
Oil can collect in the bellows of the VAZ 2112 air filter due to poor crankcase ventilation. All hoses must be checked. The valve cover has holes from which tubes extend. One goes to the corrugation on the side. The second, widest one, extends near the location of the dipstick to check the oil level.
Most often, the third, thinnest hose, running from the valve cover to the throttle, becomes clogged. It is this that often causes problems with air ventilation in the crankcase. As a result, oil accumulates in the corrugation of the air filter of the VAZ 21124 and other similar models.
If the small crankcase ventilation channel is clogged, the oil is squeezed out through the breather into the flame arrester and begins to burn due to the high temperature. This can be seen by the bluish or black color of the exhaust gases. When oil burns, it releases soot, which comes out.
Oil in the VAZ 2112 air filter pipe can accumulate if its level in the engine is elevated. The easiest way to check this is with a feeler gauge. In this case, the consumption of lubricating fluids remains normal and the leaks in the air filter are small.
Additives
Additives are designed to improve oil quality. In theory, they always make the engine perform better. In practice, their use is ineffective and many experts from the domestic automotive industry consider it harmful. Additives should complement the quality characteristics of the oil if the engine requires major repairs, but there is no way to do it. But their use can lead to oil accumulation in the air filter, since crankcase circulation is disrupted and the hoses become clogged with soot.
What might you need?
There is no need to immediately run to the store in search of a miracle device, because you can make it yourself, unless you buy the necessary “ingredients”. So, for home production of a crankcase gas oil separator on a VAZ-2109 (for example), you cannot do without:
- repair coupling;
- plugs for the socket (2 pieces);
- plastic pipes (also 2 pieces);
- metal sponge.
A repair coupling is sold at any hardware store and is used when carrying out sewer work. It is a plastic cylinder, which at both ends has a small thickening on the outside with a rubber seal. The remaining components can also be purchased both at construction sites and in stores selling household goods. As for the cost, it is quite affordable and affordable for any family budget. The metal sponge will serve as the main element of the entire system.
Cheap and cheerful, but functional
Many drivers who have already managed to make a crankcase oil separator on their own are pleasantly surprised by the price. In some cases it is practically zero. Perhaps craftsmen make do with improvised means that they find in their own garage. But even if nothing suitable is available, the price of the crankcase gas oil separator is low, since all the parts from the instructions discussed above are cheap.
On the Internet you can find many ways to make a homemade device, for which different materials are used. However, everything is done according to the scheme described above. Differences may relate to the use of additional elements or the replacement of plastic pipes with metal fittings that are screwed into the oil separator cover.
At the same time, there is a positive trend in engine performance. Oil no longer accumulates, which means you can drive for a long time without problems. However, do not forget to look under the hood of the car and check the condition of the device.
Methods for filtering crankcase gases
Diagram of the crankcase ventilation system
Domestic cars and some foreign cars do not have a crankcase gas filter.
The problem of filtering crankcase gases to ensure cleanliness in the combustion chamber and crankcase can be solved in several ways.
- Disconnecting the crankcase gas pipe from the throttle assembly. In this case, gases will escape into the engine compartment, polluting it. When pressure changes, air with dust and dirt can be sucked into the crankcase, thereby contaminating the oil. Simply disconnecting the pipe is not a solution to the situation, so a filter is attached to the pipe. The inlet to the throttle body should also be plugged to prevent dirt from entering the intake manifold and combustion chamber.
- Installing a filter element between the crankcase and the throttle assembly, in opposition to the pipe. This option is preferable, since it solves the issue of filtering crankcase gases and preventing the access of air from the external environment into the crankcase and throttle assembly. At the same time, oil vapor is partially supplied in minimal volumes to lubricate the units in the inlet manifold (throttle).
Here are photo instructions for implementing the first method:
The end of the hose circled in blue is disconnected
A filter is installed on the free fitting
The hose is cut and plugged with a champagne cork.
Into this hose.
. insert a metal ball for sealing
Since the manufacturer does not provide crankcase gas filters in the design of the car, it is impossible to purchase the recommended filter. It is not prohibited to use filters designed for modern foreign cars, but financial resources must be spent on this. An alternative to the factory filter is to use a simple fuel filter element. True, it is significantly inferior to the factory ones in terms of its consumer properties. It will quickly become clogged with oil droplets, resulting in the need for frequent replacement.
Conventional fuel filter in ruptured pipes
Filter after 2000 km
Some car owners decide differently with the filter element. You can make a crankcase gas filter with your own hands. The process of making it at home is not difficult, and the cost of homemade filter elements is minimal.
Homemade filter option
Homemade filter circuit
For self-production you will need:
- Sewer connection coupling made of propylene with a diameter of 50 mm, a length of 10 cm, which has protective rubber cuffs at the edges on both sides.
- two plugs for sewer pipes with a diameter of 50 mm made of propylene. They are necessary to turn the coupling into a hollow cylinder.
- two plastic pipes for connecting to a hose. The size must match the inner diameter of the hose. You can use plastic or metal threaded fittings.
- metal sponges for washing dishes. They will be used as a filter element and oil catcher.
- hoses, according to the size of the pipe outlets from the crankcase and the entrance to the throttle assembly.
Use a sewer coupling and metal brushes
Do-it-yourself oil catcher for a VAZ
Good day everyone, I scoured the Internet and found how to make an oil trap with my own hands. This is a necessary thing, because the engine is no longer new, and there are more and more crankcase gases, and so that they do not get into the throttle body, it was decided to install this device. To do this, I purchased: 1) Volga power steering reservoir (metal) - 525 rubles. 2) Two hoses for it - 50 rubles each. 3) Four metal sponges for washing dishes - 17 rubles each. 4) Barrel mounting hardware - 270 RUR. 5) 4 hose clamps - 40 rubles.
First of all, we disassemble the barrel and take out all the insides, throw out the filter, the spring and the small spring, and leave the rest - all this will come in handy.
Next, we insert a 14mm diameter tube inside the barrel so that the crankcase gases drop to the very bottom. I made it from the handle of a hand pump.
Then we fill the tank with 4 metal sponges, after fluffing them. We insert the cotter pin and put on the washer.
Oil separator
(oil catcher) - hereinafter MO - was made a long time ago. MO designs of modern engines and engine installations from Volkswagen and Audi were used as inspiration and source material.
All explanations are under the photos.
In an internal combustion engine, the MO is designed to filter crankcase gases, preventing engine oil from entering through the crankcase ventilation into the engine intake manifold.
And in the fight for the environment, it is used on all modern, as well as high-speed engines (or those who like to drive).
The design is a flask divided into two cavities by a cone, on the inner wall of which oil vapors settle and flow down.
In dry technical language, such designs are called gravity (inertial) cyclone filters
(or cleaners). Operating principle: a flow of dirty gas/air mixture is introduced into the apparatus tangentially to its body in the upper part. A rotating gas flow is formed in the apparatus, directed downwards towards the conical part of the apparatus. Due to the force of inertia (centrifugal force), dust particles are carried out of the flow and settle on the walls of the apparatus and fall into the lower part, where through the outlet they are removed by gravity into a separate cavity for collection. The gas stream, cleared of particles, then moves from bottom to top and is discharged from the cyclone through a pipe.
The most common types of homemade dehumidifiers
Experts recommend using the following types of dehumidifiers:
- cyclone type;
- absorbing moisture using silica gel;
- refrigeration type.
Each type has its own advantages and disadvantages. To choose the best option for yourself, you need to familiarize yourself with all the device diagrams. The designs use old cylinders, oil filters, and refrigeration equipment elements. Before starting work, make sure that you have a welding machine, a set of keys and screwdrivers, a drill, a hammer, glue and insulating material.
Homemade cyclone-type devices
The operating principle of a cyclone dehumidifier is quite simple. When a stream of compressed air enters the installation, it begins to rotate. Under the influence of centrifugal force, condensate, small particles of debris and oil are directed towards the walls. At this time, the purified air passes into the lower central hole and is then supplied to the compressor.
The air mixture is supplied through the upper hole; under the action of centrifugal force, the moisture is separated and discharged through the outlet pipe
To create a homemade centrifugal apparatus we will need:
- old propane tank;
- union;
- welding machine;
- two metal tubes of short length.
An old cylinder is perfect as a body; it has sufficient height and can withstand increased pressure. The work order is as follows:
- We install the product vertically, with the tap down.
- We weld the inlet fitting to the top of the housing. It should be shifted closer to one of the walls of the cylinder. We weld the inlet fitting and the outlet pipe to the cylinder
- We weld the outlet pipe to 2/3 of the height of the cylinder. We install the cyclone moisture separator vertically, moisture will be removed through the lower hole with a valve
Silica gel dehumidifier
Silica gel allows you to filter the air mixture; you just need to correctly place a layer of this substance in the housing of the oil or water filter. Old equipment from Volga is ideal for creating a homemade dehumidifier.
- We disassemble the old oil filter. We disassemble the old oil filter and prepare it for further work
- As an inlet pipe, you can use the original tube through which oil was previously supplied.
- We plug the extra holes using bolts of the required diameter and sealant. To plug the holes we use bolts of the required diameter and sealant
- We reassemble in the reverse order, filling the free space with silica gel. We fill all the free space of the case with silka gel
- We put on the top cover and screw it tightly with a bolt. Press the top cover firmly against the oil filter housing
The filter design has several brackets, with the help of which the filter can be easily installed in the desired place.
Refrigeration device
As you know, low temperatures allow moisture in the air mixture to condense. Refrigeration type dehumidifiers are quite popular among auto mechanics. The devices cover almost all requirements for the air supplied to the compressor. When creating a dehumidifier, it is necessary to direct the air flow through the freezer or other refrigeration equipment.
It is important to completely seal the freezer in the receiver and make a pipe to drain condensate. For residents of the “cold” regions of our country, experts recommend supplying air to the compressor from the street
In winter, you will directly receive an air mixture with a low moisture content.
Engine crankcase ventilation system
As a rule, pistons fit tightly to the cylinder walls of the engine due to compression and oil rings. Despite this design of the piston group elements, it is impossible to ensure complete sealing of the combustion chamber. And some of the gases from the burned fuel still break into the crankcase, which is why they are called crankcase gases.
Moreover, depending on the design of the engine, 10-30 liters of gas can flow into the crankcase from just one cylinder in one minute. Due to the fact that the pistons move at high speed, the crankcase gases are constantly enriched with oil particles 0.1-2 microns in size. Oil mist is also formed due to the rotating crankshaft, which is immersed in an oil bath.
The problem itself is that the accumulation of gases in the crankcase leads to an increase in pressure that is exerted on the lubricant consumable. And in the absence of an oil separator for crankcase gases, this leads to an increase in pressure inside the lubrication system, and the oil puts pressure on weak areas, which are oil seals and seals. As a result, oil leakage cannot be avoided, and the engine becomes oil starved.
Alternative solutions for crankcase gas filter
There are several options. The first is to simply bring the hose with crankcase gases outside, but here you will need to install a filter so that when air is drawn in from the external environment, dust does not get into the crankcase. The hose going to the intake manifold inlet will need to be plugged in this case.
The second option is to use a filter, which should be installed between the crankcase pipe and the intake pipe. This filter is used on some machines as standard, but not on all.
(standard oil trap with Ford Focus 2)
Apparently the ubiquitous savings are making themselves felt. And if this is so, then you have the opportunity to improve your car a little. By limiting the entry of crankcase gases with oil vapor into the throttle assembly, without associated cleaning.
As you understand, we offer you to solve the issue of filtering crankcase gases with your own hands. Next we will talk about these options...
How to make an oil sump (crankcase gas oil trap) with your own hands? Everyone can do this
People who want to make their engine operate more efficiently are often interested in how to make an oil sump (crankcase oil catcher) with their own hands. This modification allows you to rid the carburetor or car injector of excess lubricant that comes with crankcase gases. Some modern cars, usually with a claim to a sporty character, are equipped with standard catchers. Well, owners of other models have to figure out on their own how to get rid of this problem.
There are quite a large number of options and methods for making such a device. Your task is to choose the most suitable option for you.
From a plumbing coupling
This option is also quite simple. The advantage of this device is the ability to drain oil, which extends the life of the filter element. To implement it you will need:
- Transition coupling (plumbing);
- 2 plugs;
- Adapter, fitting made of copper;
- Fitting gaskets;
- Nuts;
- Hose;
- Dish sponges.
Since you plan to drain the liquid, it makes sense to also purchase a faucet for the coolant. Assembly is carried out as follows:
- 2 holes for adapters are soldered into the plug; it is advisable to use sealant for reliability;
- Fittings are screwed into the adapters;
- A hose is installed from the return of one of the adapters. Please note that it is not advisable for it to reach the opposite plug by 12 mm;
- The plug and coupling are assembled, the jaws are placed inside;
- A tap is mounted on the opposite cover. With its help it will be possible to drain the oil collected there;
- We install the resulting device on the car.
Conclusion
. Over time, any car may develop a problem with oil escaping from the breather. Thus, the air filter and throttle body can become very dirty. Therefore, many drivers are interested in how to make an oil sump (crankcase gas oil catcher) with their own hands? In fact, setting up such a modification is not that difficult. The cost of such a device will be much cheaper compared to the purchased option.
breather VAZ 2112 16 valves - hello. thank you very much. I have a VAZ 2112 - 22 answers
In the Service, Maintenance, Tuning section, hello to the question. thank you very much. I have a VAZ 2112 asked by the author Ask for the best answer It may have overheated and the rings are stuck.
Reply from 22 replies Hello! Here is a selection of topics with answers to your question: Hello. thank you very much. I have a VAZ 2112 Reply from Alexander Sudorgin overfilled the oil Reply from Eurovision On the upper plane of the head, the valve drive parts are fixed, which are covered with a lid with a cap. A breather is mounted on the cap. It communicates the crankcase cavity with the atmosphere. The breather is necessary to prevent oil from being squeezed out through the crankcase seals by gases penetrating from the cylinders. Air and gases that have escaped from the cylinders into the crankcase come out through the breather. If, after stopping the engine, the pressure of the cooled air in it becomes below atmospheric pressure, the air enters the crankcase from the outside through the breather. Wire packing soaked in oil cleans the air of dust. In some engines, the breather is located on the side wall of the block (from the side of the rod chamber) or in the neck cover for pouring oil into the crankcase. Most car engines have forced crankcase ventilation. A pan is attached to the bottom plane of the crankcase, which serves as a reservoir. In general, check the oil level)) Answer from Ashera? Is this when they started installing the Priora engine on the VAZ 2112? 16 valves does not mean at all that it is a Priora one. And how did you notice this oil? The breather drives gases into the spider and not into the air vents. There are 2 breathers. Which one does it drive from? Most likely, the partition between the rings on one cylinder has burst. Answer from Theosophy: Check the crankcase ventilation system, there should be a primitive oil separator, so check it first of all with engine diagrams on the Internet, so start by studying the hardware.
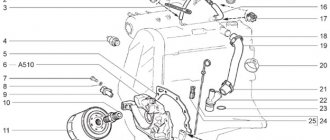
The engine crankcase ventilation system 2111 of VAZ 2108, 2109, 21099 cars with fuel injection is designed to effectively remove gases from its crankcase and burn them in the combustion chambers. As a result, the emission of harmful substances into the atmosphere is reduced.
Design of the crankcase ventilation system for engine 2111 (diagram)
1. Engine crankcase.
3. Hose from the breather to the valve cover pipe.
4. Oil separator under the valve cover.
5. A thin hose from the valve cover to the fitting with the throttle body nozzle.
6. Fitting with a jet on the throttle valve block.
7. Thick hose from the valve cover to the inlet pipe.
Operating procedure for the 2111 engine ventilation system
— At idle, with the throttle valve closed, crankcase gases under high vacuum are sucked through the breather and its hose under the valve cover to the oil separator. Further, under the influence of the same vacuum, through a thin hose from the valve cover to the fitting with the nozzle into the throttle assembly, under the throttle valve and further into the combustion chambers (small branch). The jet limits the amount of crankcase gases entering at idle, as normal operation in this mode may be disrupted.
— In operating and power modes, when the throttle valve is slightly open and more efficient crankcase ventilation is required, crankcase gases also flow through the breather, its hose, to the oil separator under the engine valve cover. And then they are sucked through a thick hose from the valve cover into the intake pipe to the throttle body (large branch). Crankcase gases practically do not flow through a thin hose, since when the throttle valve is open, the vacuum behind it drops significantly.
Engine crankcase ventilation system malfunctions 2111
— The main and most common malfunction of the ventilation system is clogging. A clogged crankcase ventilation system can lead to negative consequences in the operation of the car engine. The hoses or oil separator or jet in the throttle assembly may become clogged.
The consequences may be the following:
— violation of the normal operation of the engine at idle (increasing the idle speed control steps more than normal - the speed increases);
— engine oil leaking from under the engine seals (as excess pressure is created in the crankcase);
— oil contamination of the engine air filter and, accordingly, a drop in power plus an increase in fuel appetite;
— contamination of the engine itself with tar deposits.
If, while operating a LADA car, you notice that during load (when the air conditioner is running, the heating is on, etc.) in a traffic jam, the engine begins to operate unstably (troits, pulls poorly, etc.), perhaps the reason lies in the ventilation system crankcase The article proposes to solve the problem by installing a PCV valve from a foreign car.
avtoexperts.ru
Among various auto systems, the crankcase ventilation system plays a significant role in the formation of the air-fuel mixture, stable and economical operation, full power delivery, protection of engine oil and extension of the life of the cylinder-piston group.
In the design of a car, the crankcase ventilation system is the “lungs” of the engine, necessary for its normal functioning. The system is called PCV (Positive Crankcase Ventilation). However, it is the one that is undeservedly given a minimum of attention and maintenance, and many car owners do not even know about its existence. In this article we will try to understand why this system is needed, how it works, its inherent faults and methods for checking its performance.
What are “crankcase gases”?
During combustion, the fuel-air mixture sharply increases in volume, creating enormous pressure inside the combustion chamber. The expanding gases from combustion force the piston to bottom dead center, causing the engine crankshaft to rotate. Some of the gases penetrate through the leaks between the rings and the cylinder mirror into the oil pan, where, mixing with oil vapor, they create pressure that aggressively affects the crankshaft seals and the pan gasket, and the oil dipstick channel.
The expansion stroke is repeated in each cylinder, constantly pumping the next portion of gases into the sump, and if the crankcase ventilation does not work, the gases will either squeeze out the crankshaft oil seals, or “knock out” the oil dipstick and expel the oil from the crankcase, with all that follows.
In addition, particles of unburned fuel, small fragments of soot, and moisture vapor are transferred to the sump along with the gas, which are mixed with the engine oil located in the engine sump. This, in turn, leads to oxidation of the oil, clogging it with wear products, reducing its performance properties and reducing its service life.
System design
In order to minimize the impact of gas pressure, the engine design provides crankcase ventilation systems. Modern cars use a closed ventilation system, which is necessary to comply with environmental standards.
Despite the differences in systems on different brands of cars, they all have three common components, such as:
• Air pipes for removing gases from the crankcase;
• Ventilation valve, responsible for regulating the gas pressure;
• An oil separator that cuts off oil vapors as gases exit the engine sump.
The valve opens when excess pressure appears and closes when there is a vacuum, that is, the principle of its operation is based on the difference in pressure behind and in front of it.
The separation of oil particles is carried out by the passage of gases through a system of labyrinths, vortices and grids in oil separators. The separated oil then flows back into the engine sump. This not only saves oil, but also protects engine parts from carbon deposits. In this case, oil separators can be located inside the valve covers, built into the engine, or made as a separate unit.
Principle of operation
The system works as follows. The ventilation pipe is connected to the intake manifold, where immediately after starting the engine, a vacuum is created, due to which crankcase gases are “pulled” from the pan and passing through the oil separator enter the intake, where, mixing with the incoming air, they enter the combustion chamber and burn out.
Advantages of the ventilation system
The use of crankcase ventilation allows you to reduce the percentage of harmful emissions into the atmosphere, reduce engine oil waste, and maintain stable engine speeds when warming up, since the intake air mixes with crankcase gases and heats up, which generally has a beneficial effect on the operation of the power plant.
Flaws
Despite the presence of an oil separator, the air ducts and intake elements become dirty from the passage of crankcase gases, causing frequent failures of the devices during operation. So, on gasoline car models, the throttle valve assembly and idle speed control become coated, since they have special channels that perform an exhaust function. This can also be observed on carburetor models, for example, with a Solex carburetor equipped with a fitting for crankcase ventilation.
The throttle valve assembly and gas exhaust valve on carburetors are the so-called small branch and are activated when the vacuum in the air filter is insufficient.
Symptoms of a PCV Problem
• The appearance of traces of oil in the air filter;
• Fogging of oil seals and the joint of the engine valve cover;
• Smoke from the exhaust due to oil particles and gases entering the combustion chamber;
• Traces of oil around the filler cap and on the valve covers.
In addition, these symptoms also indicate severe wear or malfunction (valve burned out, rings stuck, piston partitions burst) of the piston group and the need to check them by measuring compression.
Causes of malfunction:
• The crankcase ventilation valve is clogged or faulty;
• The exhaust holes in the throttle assembly or carburetor fitting are dirty;
• Severe wear of the piston group;
Functionality check
To check the operation of the ventilation system, you need to remove the cap from the filler neck with the engine running. If everything is in order, then only individual “shooting” droplets of oil may be observed, or there will be no traces of its appearance at all. Otherwise, engine oil will be thrown out of the neck.
If you cover the hole with your hand, then if the system is working properly, you should not feel any pressure on it, but when the system is under excess pressure, the gas will try to push the palm away and this force will gradually increase.
To check the serviceability of the ventilation valve, which is usually located in the intake manifold, you need to disconnect the hose from the crankcase to the valve, start the engine and close the loose fitting on the valve with your finger. If the valve is working, then the finger will feel the creation of a vacuum, and when the finger is removed from the fitting, a characteristic click will follow. Otherwise, the valve requires replacement.
Device installation
The crankcase gas oil separator is installed depending on the engine type:
- carburetor;
- injector.
In carburetor engines, the device is mounted directly in front of the air filter, which regulates crankcase gases. If it is an injector, the device is connected to the inlet pipe located close to the throttle valve and cylinder block cover.
The system is now ready for use. However, for its high-quality and productive functioning, installation alone is not enough; it is necessary to inspect the device from time to time and carry out regular maintenance. To do this, the device must be disconnected from the system and rinsed thoroughly, completely getting rid of any remaining accumulated oil. In this case, treatment with a solvent will not interfere.
After the maintenance procedure, the crankcase gas oil separator device is put into place and can be used for further operation. There is no need for frequent inspection and maintenance; the frequency can be at least once every two months.
As is already known, oil leakage not only has a negative impact on the efficiency of the engine, but also significantly reduces its service life. A homemade device allows you to eliminate this problem to some extent. However, the lubricant itself also plays a key role. Therefore, you should not save on purchases; it is better to purchase only high-quality products. No engine will put up with cheap oils whose quality is questionable.
Read more: Car antenna triad 55 turbo long-range reviews
A little theory
First, a little theoretical part. In any car engine, even a modern model, each system performs its duties, and there is nothing superfluous. Here we can draw a parallel with a person whose all organs are important and necessary. The main thing is to maintain a healthy lifestyle. Any car in this regard also needs regular maintenance.
The functions of all engine components and assemblies are constantly dependent on each other. And if a part breaks down in any system, the efficiency of the power plant is significantly reduced. The same applies to the crankcase ventilation system, in which a crankcase oil separator is simply necessary.
Oil catcher and crankcase gas filter for VAZ 2110
Good afternoon friends!
I would like to share with you my experience in making an oil trap and crankcase gas filter with my own hands, using the example of a VAZ 21102 produced in 2000. First, a small digression, for those who do not know why this modification is needed.
Many car owners, both domestic and foreign cars with high mileage, have more than once paid attention to oil deposits in the form of a plasticine-sticky mass (which appears when crankcase gases with droplets of oil escape, due to wear of the oil scraper rings, from the “breather”) in the intake path, as well as on the throttle valve, intake manifold, idle air valve, oil also flows into the air filter through the mass air flow sensor (MAF), which can lead to failure of the mass air flow sensor (replacement cost is about 2500-3000 rubles) . And so, if you are tired of suffering from idle problems and constantly carrying out preventive work on cleaning the intake manifold, throttle assembly and changing various sensors, which, firstly, not everyone can do due to lack of knowledge, and secondly, it is necessary a lot of time, tools and of course money
In general, to avoid all of the above, you can install a crankcase gas filter or an oil trap, which can also be bought at a tuning store at a fairly decent price, or you can make it yourself. We will dwell on the latter, that is, the manufacture of an oil trap (crankcase gas oil trap), in detail.
So, to make a crankcase gas filter we will need:
— a hose with a diameter approximately similar to the hose of the interior heating system and a length of about 25-30 centimeters;
— fine fuel filter without settling tank for carburetor cars,
- hose clamp
- plastic clamp for the filter.
First, we disconnect the hose from the valve cover and from the intake tract, you need to make any plug for the hole remaining in the intake tract (I took a technological plug from the new VUT), then we take a hose of the required length (depending on the location of the filter), I took about 30 centimeters, so that the filter is at the level of the air filter housing, we put it on the valve cover fitting and fix it with a clamp, then from the fine fuel filter housing, you need to take out the filter element and put it on the hose, securing it with a plastic clamp.
Now, when crankcase gases escape, the oil will remain inside the filter.
Let's talk about the oil catcher, unlike the crankcase gas filter, this is a more complex system, but the crankcase gases will continue to flow into the intake manifold as intended by the manufacturer, only already purified.
What we need: three plastic bottles (1 liter - 2 pcs., 0.5 liter - 1 pc.), four metal scourers for washing dishes, a piece of foam rubber.
And now, in order.
1
We take two bottles and cut one below the rib and the other above so that the halves fit tightly into each other. From a small bottle we cut off the upper part of the neck with a cap with a hole for a hose, on which there are metal lips and a foam ring on top and lower it to the bottom of a liter bottle. We cut a flange into the top of the bottle for the outlet hose. We begin to assemble as in the photo. This is how we make an oil catcher and crankcase gas filter for a VAZ
Olga and Dmitry from Nizhny Tagil
How to make an oil trap yourself
I decided to post my oil catcher, otherwise there is a lot of incomprehensible information on the internet
They show the finished version, but the most important thing is that it doesn’t show how it works inside. A more correct option is this
The exhaust gases must rise from below and pass completely through the scrapers. You can buy ready-made branded ones, but the cost is surprising.
They also put the tube outside, but you don’t want to breathe gases when the car is warming up, stuck in a traffic jam, or when you turn on the heater in winter.
I put it in my VAZ 2105, drove it 100 km and put it in for repairs, I need to do the engine. It is clear that oil was thrown into the carburetor before the oil sump was installed, now it will be interesting with the new engine how the oil catcher will work.
I created the diagram myself.
mesh so that the scrapers do not fall down into the emulsion
ordinary stainless steel scrapers
At the outlet of the oil catcher, I put a brush in the tube to make sure nothing gets into the carburetor.
Operating procedure
You don't need any special tools for assembly. Everything you need is available in every garage. The work is carried out in the following order:
- The tank is disassembled
. Contents are extracted from it. The filter and 2 springs (large and small) can be put aside; they will not be needed; - We insert a tube with a diameter of 14 mm into the body; it should go down to the very bottom. So the gases will pass through the entire jar without exception;
- We take sponges and, after fluffing them, fill the jar with them. After that, we put a washer and a cotter pin, in the end we get this kind of filter;
- We take the mesh that was in the tank and make a hole for the tube. Then we install it in place;
- The next step is optional. You can paint the jar any color (at your discretion). But this will not affect performance;
- While the reservoir is drying out, it makes sense to clean the throttle valve from dirt; for this you can use any available method;
- We install it under the hood. We connect the hose from the breather to the terminal with a long tube, and attach the hose going to the throttle to the main one.
Product Delivery Options
Pay attention! Below are the shipping methods available specifically for this product. Depending on your shipping method, your payment options may vary. Detailed information can be found on the “Delivery and Payment” page.
Parcel by Russian Post
Available payment methods:
- Cash on delivery (payment (issue of money for any obligation)
upon receipt) - Using cards Sberbank, VTB, Post Bank, Tinkoff
- Yandex.Tools
- QIWI
- ROBOKASSA
Shipping throughout Russia. Delivery time is from 5 to 12 days.
Parcel by Russian Post 1st class
Available payment methods:
- Cash on delivery (payment (issue of money for any obligation)
upon receipt) - Using cards Sberbank, VTB, Post Bank, Tinkoff
- Yandex.Tools
- QIWI
- ROBOKASSA
Shipping throughout Russia. Delivery time – from 2 to 5 days. More expensive than regular delivery by Russian Post, approximately 50%. Parcel weight up to 2.5 kg
Express Parcel EMS
Available payment methods:
- Cash on delivery (payment (issue of money for any obligation)
upon receipt) - Using cards Sberbank, VTB, Post Bank, Tinkoff
- Yandex.Tools
- QIWI
- ROBOKASSA
Shipping throughout Russia. Delivery time – from 3 to 7 days. More expensive than regular delivery by Russian Post, approximately 100%.
Transport companies
Available payment methods:
- Using cards Sberbank, VTB, Post Bank, Tinkoff
- Yandex.Tools
- QIWI
- ROBOKASSA
Delivery is possible to any locality where there is a consulate of the transport company. Delivery time – from 2 to 10 days. Sending large parcels is approximately 50% more profitable than by Russian Post.
| (*16*) |
Courier delivery in Togliatti
Available payment methods:
- Cash upon receipt
- Using cards Sberbank, VTB, Post Bank, Tinkoff
- Yandex.Tools
- QIWI
- ROBOKASSA
Delivery time from 1 to 12 hours.
Pickup from our warehouse
Available payment methods:
- Cash upon receipt
- Credit, installments
- Using cards Sberbank, VTB, Post Bank, Tinkoff
- Yandex.Tools
- QIWI
- ROBOKASSA
Pickup times must coincide with store opening hours.
Source: motorring.ru
Assembly process
There is no particular difficulty in assembly. The first step is to put a plug on one end of the coupling. The result will be something like a glass, but not for tea drinking. During operation of the most effective design of the crankcase gas oil separator, the plug will not have to be removed, and therefore for better reliability it is worth sealing it with a sealant. The next step is to place the metal sponge on the bottom of the cylinder. Just don't fill it out completely. In the upper part of the second plug, you need to drill two holes for the prepared plastic pipes. The edges of the tubes should be treated with silicone grease and installed in the prepared holes.
Looking at the inside of the plug, one of the pipes should be 1 centimeter shorter than the other. The longer one will be the intake one. Now all that remains is to fix the resulting cover in the rubber gasket. That's all - the homemade automotive gadget for catching crankcase gases is ready. If the owner has a delicate taste, then the product can be painted in the desired color and then allowed to dry thoroughly. Only after this can you proceed to further installation.
From a plumbing coupling
This option is also quite simple. The advantage of this device is the ability to drain oil, which extends the life of the filter element. To implement it you will need:
- Transition coupling (plumbing);
- 2 plugs;
- Adapter, fitting made of copper;
- Fitting gaskets;
- Nuts;
- Hose;
- Dish sponges.
Since you plan to drain the liquid, it makes sense to also purchase a faucet for the coolant. Assembly is carried out as follows:
- 2 holes for adapters are soldered into the plug; it is advisable to use sealant for reliability;
- Fittings are screwed into the adapters;
- A hose is installed from the return of one of the adapters. Please note that it is not advisable for it to reach the opposite plug by 12 mm;
- The plug and coupling are assembled, the jaws are placed inside;
- A tap is mounted on the opposite cover. With its help it will be possible to drain the oil collected there;
- We install the resulting device on the car.
Conclusion
Alternative solutions for crankcase gas filter
There are several options. The first is to simply bring the hose with crankcase gases outside, but here you will need to install a filter so that when air is drawn in from the external environment, dust does not get into the crankcase. The hose going to the intake manifold inlet will need to be plugged in this case.
The second option is to use a filter, which should be installed between the crankcase pipe and the intake pipe. This filter is used on some machines as standard, but not on all.
(standard oil trap with Ford Focus 2)
Apparently the ubiquitous savings are making themselves felt. And if this is so, then you have the opportunity to improve your car a little. By limiting the entry of crankcase gases with oil vapor into the throttle assembly, without associated cleaning.
As you understand, we offer you to solve the issue of filtering crankcase gases with your own hands. Next we will talk about these options...