Speakers for viburnum, which ones to choose?
First, let's determine what size the standard speakers in Kalina are.
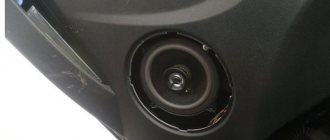
- The speakers in the front doors measure 13cm.
- The rear speakers on the Kalina sedan are 18cm, but you can manage to attach 17cm, or 9x6 pancakes.
- Rear speakers for Kalina station wagon 16″, you can attach other sizes, starting from 13cm.
- The rear speakers on the Kalina hatchback are installed in a shelf; the size for the “pancake” speakers is cut out as desired.
When choosing speakers for Kalina, keep in mind that the front speakers should be the main ones, and the rear ones should be secondary. Therefore, it is recommended to install 16cm instead of the standard front 13cm speakers. In more detail, which speakers to choose. Next, installing speakers in Kalina:
Dimensions of standard car speakers
Round speakers (see photo) are one of the most popular speakers, built under metal mesh in the dashboard, in panels under the dashboard, in the doors, and also on the sides of the rear panel. 16.5 cm is the most popular speaker size.
Oval speakers (see photo) - mounted in mounting panels or on the side on the rear shelf, as well as in doors. 15x23 cm is the most common speaker size.
What is audio preparation
This is equipping the car with wiring, with the help of which in the future the owner of the car will independently install the audio system chosen according to his taste and budget. The car owner installs a radio, speakers, and a subwoofer. An acoustic shelf is mounted as an alternative to standard preparation for speakers.
Such audio preparation is important for those who value high-quality sound and who care about how music sounds in the interior of their car. For those who do not want to waste money on a cheap standard audio system, but want to install high-quality musical equipment.
Preparing the door for installing the column
Audio preparation is carried out by those who prefer everything exclusive and individual. Real car audio requires a special professional approach and attention to detail. Needless to say, such high qualities cannot be achieved at a factory due to conveyor production.
Installing a high-quality audio system yourself does not always lead to excellent sound. This is all due to the fact that the interior of a car is not considered ideal for acoustics. Sound waves from the speakers are distortedly reflected from the windows and other surfaces of the car. And speakers are often installed in the wrong place, since during factory audio preparation, holes are drilled in standard, inconvenient places.
Sound reproduction is also affected by factors such as electrical interference, engine and external noise, and constant vibrations. Fortunately, now all interference can be easily eliminated and the system can be modified, you just need to know how to do it. If your own knowledge is not sufficient to install and modify the audio system, experienced car audio specialists will come to the rescue. The main requirements, after high-quality sound, remain reliability and ease of control of the system.
The ideal sound for a car enthusiast and for a music listener at home has significant differences.
The basis of a car audio system is a player, which must have certain characteristics.
- Supported media format. Ordinary audio cassettes have long since sunk into oblivion, and CDs are already outliving their last years and becoming less and less popular.
- Player output power. It varies from weak (25 watts) to strong, more than 55 watts. Moreover, the price of the system directly depends on the power.
But even the best player will not play music perfectly if it is paired with low-quality speakers. The best sound can be achieved from speakers that are optimally combined with the head unit, that is, the equipment must have the same power.
Audio preparation in the “Norma” package
In this configuration, the option may be called differently:
- Audio system (FM, USB, SD card, Bluetooth, Handsfree), 4 speakers, external antenna
- Audio preparation (cable, external antenna, 4 speakers)
In other words, the “Norma” package is further divided into a number of design options. Four speakers will be installed in the front and rear doors in any case, but the radio will only be available in some versions of this configuration.
The standard speakers for Lada Kalina 2 have a catalog number: front - 2170-7901020 and rear - 2170-7901030. See also the review of the Lada Kalina 2 “Norma” radio.
What exactly will you need to buy?
Having opened the catalog of parts and assembly units of the Kalina-2, we find that the speakers are screwed to the rear doors through spacers. There is a spacer for the left door and for the right one, their catalog numbers: 7901032/33. If you want to use standard facing panels (grids), then know that they are usually sold complete with spacers. Catalog numbers of facing panels: 6102096 (“circle” in the front door), 6102094/95 (overlay for the right and left rear doors).
Speaker Installation Kit
It seems that the car has audio preparation, and it will be enough to just screw on the speakers and connect them. In reality, everything looks more complicated - the door trim in Kalina Standard is blind, that is, there are no holes in the plastic panels. In theory, you can buy door trim designed for more expensive trim levels. This option is the simplest and most expensive. We are not considering it.
The plastic rear door trim can be cut along the contour of the trim panel. How exactly will be shown later. The cladding clings to the cladding with clips, and this fastening is reliable. Something similar may be suitable for trimming the front doors.
Choosing an audio system
First you need to determine the dimensions of the speakers that will be installed in the standard holes prepared for them when assembling the car. All speaker systems that are offered to customers have several standard sizes. Speakers installed in cars by manufacturing companies sometimes have overall dimensions that occupy a middle position between the proposed standards. But it's not scary. In order to switch to selected speakers with a certain standard of overall dimensions, it is necessary to prepare podiums for them, replacing the former standard plastic ones with those chosen by the car owner.
Installation of acoustics on Granta
Speaker in the car door
First of all, you will need to dismantle the plastic pocket that covers the compartment for the stereo system. Use a screwdriver for flat type screws. When the pocket is removed, you will see that behind it there are special sockets where ISO plugs from the future speaker system will be placed.
After this, you need to remove the protective metal frame from the radio. We install it in the vacated opening under the plastic pocket. Successful fixation of the equipment is usually accompanied by a characteristic click.
Now you will need to connect the plugs in accordance with the existing ISO standard, to which the electrical wiring of all international format radios meets. Incorrect connection of the audio system connectors can lead to malfunction of all electrical devices in the car, including the radio.
It is worth noting that many car radio manufacturers make individual connectors for them. In this case, the kit almost always includes a special adapter for ISO standard plugs. If your radio does not comply with the ISO standard and does not come with an adapter, you can consider cutting the wires from the radio plugs or from the car's electrical wiring. After this, you will need to properly solder the wires in accordance with the color pinout.
It is strictly not recommended to resort to simply twisting the wires with adhesive insulating tape. This type of connection is impractical, since in winter the tape freezes and cracks, which can cause the wiring to short out and electrical appliances to fail. For a high-quality connection, you can use terminals that are designed for clamping wires.
ISO standard connectors are prepared only once. After this, you will not have to deal with selecting plugs and pinouts when installing a new radio. This procedure should take no more than 3 minutes.
The ISO standard uses 2 types of connectors: brown and black. The first is intended to ensure the operation of all the acoustics of the car. The second is for special functions of the stereo system and its electrical power supply. The pinout diagram for ISO is shown in the figure.
ISO pinout diagram
How to remove the trim?
This is necessary for installing speakers
Here, the Lada Vesta owner will need maximum care and attention to eliminate the risk of scratching the plastic panels. Using a screwdriver is highly undesirable
It is better to arm yourself with a plastic card.
The fastening of the casing is represented not only by screws, but also by 4 “hedgehogs”. The risk of breaking them is quite high if the owner does not use a specialized tool during dismantling. These “hedgehogs” are borrowed from cars from Renault-Nissan. You can use elements from Grants instead, but minor preliminary modifications will be required. Such “hedgehogs” are stronger and their price is several times lower.
According to these manipulations, the upholstery on the driver's side is dismantled. Removing the trim from the right door panel has its own peculiarities. There is no need to remove the window lift button. There is also no need to look for a self-tapping screw plug. A sufficient measure would be to remove the handle cover.
Plug
As in the case of Vesta, the plug for the Lada X-Ray speakers was taken from the Renault/Nissan Alliance. It is non-standard, and therefore there are only 2 options when installing new speakers:
- Cut it off;
- Install an adapter - it can be found under article number CT55-17 or ZRS-AG-22.
As for the spacers, they were also taken from the Renault/Nissan Alliance models.
As you can see, the design of the domestic crossover uses conventional speakers, supplemented with specific plugs and spacers, and there is also a unique mounting method.
Standard audio preparation - Lada Kalina blog
Using my station wagon as an example, I would like to write a little about the standard audio preparation of the Lada Kalina. As far as I know now, all cars, starting with the “norm” configuration, have audio preparation, which includes:
- Plugs for connecting the radio
- Wires for front speakers
- Wires for rear speakers
Now I will describe everything with photographs and in more detail below. So, the plugs for connecting the radio are located under the plug below the heater control unit. If you remove this plug, there will be two gray and brown connectors.
The radio is connected very simply, gray color is up, brown color is down. As for the wires in the front doors, to get to them you need to remove the front door trim. The example below shows the conclusions already in the door trim cut under the column:
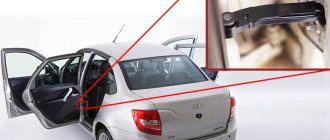
But at first we had to search a little for the rear ones; on the left side the wire was quickly found, since it was located near the trunk light:
And the right one is located under the trunk trim, glued with tape to the metal of the rear arch, so you will first have to look for it with your hand under the trim or remove it altogether. Here is an example of the already routed wires:
Many potassium growers wrote that they don’t have any wires even at the “normal” level, but I was convinced of the opposite. For example, my 2022 Kalina Station Wagon. I tried to connect the rear wires to the speaker, everything works fine, the music flows. So installing music with standard audio preparation is as easy as shelling pears.
About standard speakers (speakers) lada xray
01 December 2022 Lada.Online 59 803
One of the advantages of the Lada XRAY over its competitors and other LADA models is that even in the simplest configuration, the plant equips the crossover with a 2DIN audio system (FM/AM with RDS, CD, USB, AUX, Bluetooth, Hands free) and four speakers. Let's take a closer look at what speakers are installed in the doors of this car.
To get to the standard speakers in the doors, you need to remove the trim.
About the front speakers. They have the article number 28156-3SG0A. These are Renault-Nissan 4ohm MAX 40w speakers measuring 6 inches (16 cm). They are installed on special spacers (from Logan/Sandero), instead of screws there are rivets (they are drilled out).
About the high-frequency speakers in the wind window pillars (articles: 281489095R and 281489095R), 15 W:
About the rear speakers. They are smaller than the front ones and measure 5 inches (13 cm).
About the connector for connecting speakers. Like the Lada Vesta sedan, the Lada XRAY uses a non-standard connector, which was inherited from Renault and Nissan models. To avoid cutting off the block when replacing speakers, it is recommended to use an adapter (ZRS-AG-22 or CT55-17).
About spacers for speakers. They are also borrowed from Renault. Diagram of special spacers for installing speakers:
Are you satisfied with the sound of the standard acoustics in the Lada XRAY? Will you be changing speakers over time? By the way, did you know that you can update navigation maps, watch videos or TV on the XRAY radio?
Keywords: front speakers lada xray | rear speakers lada xray | cassette player lada xray
Share on social networks:
Found an error? Select it and press Ctrl Enter..
Installing speakers in the rear shelf of Lada Granta liftback
The installation process is somewhat complicated by the need to pre-prepare the shelf, cut holes, and install podiums.
- Open the back door of the Lada Granta Liftback, remove the shelf;
- We apply the speakers one by one, projecting their oval silhouette onto the shelf from the back side;
- We cut out holes with a jigsaw and clean them around the perimeter with sandpaper;
- We buy in advance and cut out the podiums for the speakers ourselves. We apply and assemble the structure.
The most crucial moment comes - laying the cable. Some masters practice feeding from side doors, which is fundamentally wrong. As the load on the circuit increases, the speakers will begin to sag. It is best to connect to the ISO connector on the back of the tape recorder.
- We dismantle the plastic linings - thresholds between the front and rear rows of seats.
- We lay the wires from the rear speakers and bring them out to the inside of the dashboard.
- We route the ISO connector and connect it to the free sockets.
- We reassemble the pads.
Provided you follow the recommendations and follow the algorithm, the performance of the speakers is guaranteed. During the warranty period, the buyer has the right to present to the seller any demands provided for by law.
Cutting plastic with a jigsaw
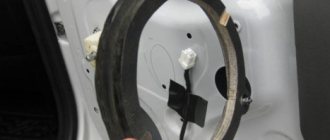
See how part 6102094/95 works. There are clips along its perimeter. After removing the trim from the rear door, we place this part on a plane, face up. Then, you need to mark the attachment points. And then, even if not with micron precision, you need to cut a hole of a suitable shape in the part. Here you will need a jigsaw.
The front door trim is finished in a similar way. Here you will need to cut round holes, but note that you cannot use a ballerina. Working with plastic requires a certain skill, and cutting a sheet with a jigsaw is quite simple.
Speaker size
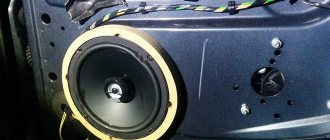
You should not install a large speaker system in a car, since this is not a concert hall. Therefore, as a rule, for a car, speakers with a size of 10-13 cm that reproduce high frequencies, and speakers with a diagonal of 16-17 cm that produce high and low sound frequencies are sufficient (see photo).
Installing speakers in front and rear doors
How to independently install speakers in the door trim of a VAZ car? The designs of the rear doors in the Lada Granta and Lada Kalina cars, as well as in other VAZ cars, are identical, and they provide places for acoustics. But even to install the speakers in standard places, the design will still have to be modified.
Let's consider the standard option for installing speakers in the front and rear doors of modern Lada cars:
- First you need to remove the door trim (see photo).
- Choose speakers, preferably 13 cm in size (see photo).
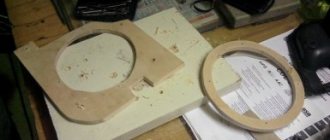
- Prepare podiums for acoustic speakers. You can make them yourself from a sheet of plywood using a stencil (see photo).
- Buy a standard plastic mesh at the store, but it is better to cut it yourself from a mesh made of metal fabric (see photo).
Cars of the Lada Granta, Kalina, VAZ 2107, VAZ 2110 series, produced as standard, are not equipped with speakers and a car radio. But in these car models there is a mandatory place for the speaker system. The doors in various modifications of the Lada Grant and Lada Kalina do not have significant differences, which cannot be said about their trim. In the “standard” version, she is deaf. But, using an electric jigsaw, you can make a shaped slot in the plastic and stencil holes for the standard cladding of VAZ cars, which is located above the speaker system.
If you do the installation yourself, then the most convenient option for placing the acoustics is in the interior doors. This will allow sound to travel in all directions. To do this, you should choose small speakers with a diagonal of 10-13 cm and a sensitivity of about 92 decibels.
The first thing you need to do when installing a speaker system is to try on the speakers before starting work. If their depth turns out to be too great, you will have to slightly modify the plastic substrate in place (see photo). You may need to trim the bottom a little. Next, using nuts and screws, you need to secure the part in the door and make sure that all fasteners fit and are in place. After this, you can install the speaker, securing it with screws. It should be remembered that the speakers must be firmly fixed, which will improve the sound quality of the speakers and prevent rattling. For this purpose, it is best to use a material that protects against vibration.
Next, you need to drill holes in the door to securely attach the mesh. For this work you will need a knife, a file and a drill, since the plastic is thick, and you will have to tinker with it to make the holes even and correspond to the given dimensions. After the work is completed, the mesh must be firmly fixed in the casing using special fasteners (see photo). After this, you can assemble the structure in reverse order.
All that remains is to use the instructions for using the car radio and connecting the speakers and lay the necessary wires in the rear doors of the car. We must not forget about soundproofing the doors so that the acoustic system sounds better and pleases its owner.
Installation of an acoustic shelf
The acoustic shelf is becoming fashionable among Russian car enthusiasts. This is due to the fact that the place where it is installed is optimal for placing the rear speakers of the car audio system.
To mount a shelf, you need to acquire materials such as a sheet of plywood, glue, a jigsaw, a drill, metal scissors, vibroplast and carpet.
Wooden shelf for speakers
First, the body panel is prepared, for which purpose the expected placement of the columns of the chosen shape is marked on a sheet of plywood and the same one is cut out of metal in accordance with the dimensions of the old car shelf. Then holes for the speakers are cut out in the metal blank. Next, the acoustic shelf is covered with vibroplast.
The next step is to cut two shelves from sheets of plywood. In the top sheet, the holes for the columns are cut one and a half centimeters larger. Next, the sheets are glued together and, after preliminary fitting, the speakers of the audio system are attached to them using self-tapping screws. To more securely attach the shelf to the car body, you can treat its lower part with macroflex.
At the last stage of work, the acoustic shelf is covered with any suitable dense material. Another important point is preventing rear window fogging. For this purpose, the acoustic shelf is additionally equipped with several fans.
For those who do not want or cannot make such a design for their car themselves, an acoustic shelf is sold at any large car dealership.
Why is an acoustic shelf installed:
- the sound quality of the speakers improves;
- there is no plastic rattling or squeaking;
- the sound becomes directional;
- the ability to hide all the wires allows you to create a more attractive and neat look for the interior;
- the acoustic shelf is more durable, which allows you to install speakers of any weight;
- You can install a subwoofer.
General information about music in Grant
In this section, we will consider general non-professional points about music in the Lada Granta.
Installing music
If you have a VAZ 2190 in the basic configuration (or Norma) with audio preparation, then installing music will entail the following steps:
- Removing the radio cover - on the back side there are ISO connectors for power and speaker wires. You will have to run the wires to the rear speakers yourself if you plan to install an acoustic shelf, since from the factory the wires are routed only to the doors;
- Installation of a 1-DIN radio (for 2-DIN you will have to farm, cutting out a jumper in the panel and looking for a suitable frame);
- Finding and connecting the plug of the pre-installed antenna - often the antenna wire on the roof is lost under the ceiling trim and it turns out to be easier to install the antenna separately than to find the factory cable;
- Pulling wires into the trunk to connect an amplifier, subwoofer and speakers installed in an acoustic shelf.
- To install the amplifier, you will also need a separate power cable from the engine compartment directly from the battery terminal through a fuse.
Removing the jumper in the panel cladding is mandatory when installing a 2-DIN GU.
If your car does not have audio preparation, you will have to separate the power wires for the radio and the speaker wires in the door.
What kind of acoustics to put in Granta
Common budget music option:
- radio tape recorder within 5000 rubles with the ability to adjust the equalizer;
- 16 cm component speakers with tweeters at the front;
- acoustic shelf with speakers 6*9;
- amplifier with subwoofer in trunk.
Let's look at an example of such a configuration with a price tag in the table (the calculation is for ordinary people, not audiophiles) based on Pioneer devices:
| Example of a Pioneer device | Average price tag in rubles | |
| Head unit (radio) | DEH-S101UB | 4000 |
| Front 16cm acoustics | TS-G1733i | 2000 |
| Acoustic shelf | 1500 | |
| 6*9 “pancakes” | TS-R6951S | 2200 |
| Amplifier 2-channel | GM-A3702 | 4300 |
| Passive subwoofer in a box | TS-WX305B | 5200 |
| Subwoofer installation kit | 1500 |
As a result, we get budget sound in the region of 20 thousand. If we consider professional head units, premium-segment speakers, installation of custom podiums and other delights, the price tag can easily jump over a hundred thousand, amounting to a third of the cost of the car itself.
The choice of podium depends on the type of windows, budget and number of speakers.
Podiums in the front doors
We will not describe the technology for making podiums with our own hands. Next is a selection from various resources for ready-made podiums and manuals for self-production.
- Here is a link to a store with ready-made options and prices. It's not advertising that's a source of inspiration.
- Here is a photo report on self-production with comments.
- This link is just a photo report without comments.
Professional acoustics
For car audio fans who are ready to invest large amounts of money in Granta, we have selected a couple of bright videos. Look what you can build on the Lada base and look decent in the area and at local car audio competitions. Enjoy.
Do-it-yourself installation
Next, we will look in detail at how to correctly install the radio on the Lada Granta manually
If you are not a fan of the standard audio preparation of the Lada Grant, pay attention to this algorithm
As stated earlier, the power wires are initially wired, and all that remains is to understand how to properly connect them to the radio.
After removing the cover that covers the radio, two connectors will be visible in front of you. One connector is intended for connecting speakers in the doors, the second is for power supply.
The black and pink wires indicate ground and plus, and at the same time they are the main ones for power supply. If the connection is incorrect, the audio system will at least not work; in the worst case scenario, you will short-circuit the “–” and “+” terminals, which will result in the fuse blowing.
When connecting directly, be sure to insulate all wires, not just those used, to avoid a short circuit.
After connecting the necessary wires, we secure the speaker with self-tapping screws or screws and close the mesh.
It is recommended to install 5-inch speakers (12.5 cm) on the front doors of Lada Granta cars, but if desired, you can insert 16 cm, as a result of which the sound quality will only increase. Choose speakers so that the glove compartment can open completely. This problem often exists when owners choose larger speakers.
Some craftsmen cut out the trim on the rear doors and install pancakes (6x9), which sound even better. With this option, a teardrop-shaped mesh is purchased in the standard factory place for speakers, and speakers measuring 13 cm are installed.
After doing all this grant-audio preparation, all that remains is to turn on the speaker and wait for the radio to turn on.
Installation of front speakers 16 cm in diameter, installation of speakers without cuts and podiums
Installation of front speakers 16 cm in diameter
I finally got a radio. Inexpensive radio tape recorder SoundMAX SM-CCR3037.
As a friend advised, I took 16, they should have better sound. But the question is how to install it in the door, because the size is standard for 13 speakers. Today I decided to install it myself. Below is a photo report of the installation process of the front speakers. To remove the trim you will need: a screwdriver and an asterisk wrench. Thanks to AvtoVAZ I will have to buy a set of asterisk keys. There are probably many more such pitfalls.
Looking ahead, the plastic, as well as the clips on the doors of the Priora, are not bad, compared with the former two-piece.
There is a standard place for speakers for 13. There is audio preparation - it’s correct to say two wires for the speakers are brought out.
This piece of paper was already included with the speakers, all I had to do was draw a circle in a convenient place.
For the future, you shouldn’t move the hole as in this picture. The outermost clip on the casing will touch the speaker . I made a hole on the second door without moving it higher to the side. It was inconvenient to attach, but the casing fit perfectly.
To securely attach the speaker to the door sheet, I used 9mm as a backing. plywood
To prevent the clip fastening on the casing from touching, I ground down the edge of the speaker.
There was no suitable material for sound insulation, but there was one at hand - foil-coated isolon.
That's not a professional thing to say, I agree. But isolon is better than nothing at all.
Installation of 16 instead of 13 speakers. SHOVE what is not being shoved! Pioneer TS170C
Installation of 16 speakers in Priora without cutting
The process itself is not complicated, I chose the music carefully, but not expensively, I think this option will suit many.
The basis was a Pioneer head, which I got from my father when I was still driving a 99. A nice thing with AUX and Bluetooth. I don’t remember the name, but it’s not so important, because now most tape recorders play “at the level”, that’s enough for me. The most important incident for me was the purchase of speakers, I walked around a lot, listened, and chose. I settled on an Alpine SXE-1750s in the front and an SXE-69c2 in the rear. Good mid-range, non-crunchy low tweeters included (albeit without crossovers, but it doesn’t matter, they pull). I read a huge number of blogs about installing 16″ speakers in the front doors. The vast majority of them in the text seemed to hint that the doors would have to be sawed and spacers made. I decided to buy spacers at the car market so as not to suffer and make a mistake. No problem, I thought, and armed with patience, a tool and a jigsaw, I went to the dacha.
READ Installing an Alarm on a Nissan X Trail T31
Having disassembled the car (doors, sills, back seat), I began to make noise on the doors. For one door, a sheet of foil-coated isolon was enough (forgive me if I named this material incorrectly, the dealer sold it to me under that name). Next, having tried on the column itself in the standard 13″ position, I was pleasantly surprised that the core is almost completely hidden in the door and, together with the spacer, reassures us that there are no hard metalwork sculptures with Zhiguli metal.
Shelf, nothing interesting, cut with a jigsaw without problems, glued well
Having thought about it with my father, we decided to transform the little guy’s spacer, namely, we sawed it under the bend of the door and “oh, miracle.”, the column fit “like a glove,” the only thing was that we had to trim the plastic of the door a little from the inside, because touched a little and could create unpleasant rustling noises when moving.
Plastic, the main thing is not to overdo it and not touch the skin
There was no tool, the plastic was scratched a little, no big deal
The place for tweeters was chosen solely from an aesthetic point of view, because... They don’t give any special highs, and I didn’t want to turn them up on the racks.
The rear speakers installed without problems after a little customization (I just like that word) of the shelf. To support low frequencies, a simple Korean active subwoofer Fusion FBS-AW12 was chosen. There was also no hassle with its installation, I will only say that it is more convenient to throw the power cable not to the battery, but to the fuse block, and this option looks more successful and many times more convenient, and after some manipulations with the block itself, it generally looks like a standard one the wire.
Installation of 16 speakers in a door without podiums
On the top ten, these speakers stood on podiums on top of the casing, which made it possible not to cut the casing or cut out the metal of the door.
But on the Priora, you have to cut the trim for all the podiums, and the podiums that I saw take up a lot of usable space, and some do not allow the glove compartment to open completely.
I decided not to cut the trim, but to cut the doors into the metal (it’s more reliable, and it sounds better at 16 than at 13)
I traced the outline of the new hole using a template.
I attached the speaker , marked it and drilled the mounting holes.
Since the landing plane is not level, I glued it in 2 layers in the depressions, and then glued it on top. The plane is now level
The bezel is a centimeter from the speaker. Just in case, you need to cut it off.
Speakers 16 in the door of Lada Kalina
It’s difficult to compare the sound (because I didn’t glue the door in the top ten), but it sounds decent.
https://www.drive2.ru/l/288230376152566849/, https://www.drive2.ru/l/4035257/, https://www.drive2.ru/l/211248/
Do-it-yourself manufacturing and installation of an acoustic shelf in Lada Priora
articles: 1. Making an acoustic shelf in Lada Priora with your own hands 2. Major installation a
Sources:
https://vazgarage.ru/ladakalina/salonkalina/438-kak-ustanovit-kolonki-na-lada-kalina.html https://replicadisk.ru/doityourself/audiopodgotovka-lada-kalina-raznovidnosti.html https:// xn8sbabr6ahc3e.xnp1ai/tuning-kalina/tuning-kalina-other/335-ustanovka-kolonok-kalina.html https://remont-vaza.ru/index.php/%D0%A3%D1%81%D1%82% D0%B0%D0%BD%D0%BE%D0%B2%D0%BA%D0%B0-%D0%BF%D0%B5%D1%80%D0%B5%D0%B4%D0%BD%D0 %B8%D1%85-%D0%B4%D0%B8%D0%BD%D0%B0%D0%BC%D0%B8%D0%BA%D0%BE%D0%B2-16-%D1%81 %D0%BC-%D0%B2-%D0%B4%D0%B8%D0%B0%D0%BC%D0%B5%D1%82%D1%80%D0%B5-%D1%83%D1% 81%D1%82%D0%B0%D0%BD%D0%BE%D0%B2%D0%BA%D0%B0-%D0%BA%D0%BE%D0%BB%D0%BE%D0%BD %D0%BE%D0%BA-%D0%B1%D0%B5%D0%B7-%D1%80%D0%B0%D1%81%D0%BF%D0%B8%D0%BB%D0%BE %D0%B2-%D0%B8-%D0%BF%D0%BE%D0%B4%D0%B8%D1%83%D0%BC%D0%BE%D0%B2.html
Rear speakers Kalina
If the requirements for music are not high, then you can get by with a standard shelf. If you are a music lover, you will have to buy or make an acoustic shelf.
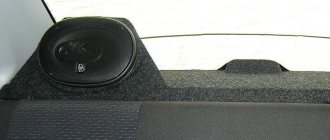
Installing rear speakers on a Kalina Station Wagon: the wiring for the rear speakers is taped under the upholstery. There are no special features of the process, everything is simple and clear. Example, Kalina station wagon, rear speakers in standard shelves measuring 13cm:
Installing rear speakers on Kalina Hatchback. There is also nothing complicated in the process. Holes are cut in the rear shelf to suit the size of the speakers and secured with self-tapping screws.
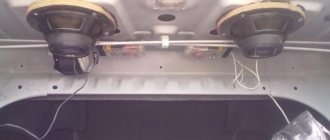
Installing rear speakers on Kalina Sedan. Remove the rear shelf, which is held on by clips. If the speakers are larger than the standard size, for example, 21cm, then we cut out pieces of metal and fix the speakers with self-tapping screws. The shelf is installed using new clips (Author of the photo).
Now all that remains is to install the radio.Is the warranty void if you installed the speakers in Kalina yourself? AvtoVAZ's response says that if the wiring is not damaged during the installation of audio equipment, then the car will not be removed from warranty.
Photo source:
- Xenya logbook
- Logbook vadim-86
- nexus logbook
Audio preparation is the basis of car audio
It is worth understanding what audio preparation is in a car. This may mean both work on installing audio equipment, and the presence of a special place for an audio system, speaker jacks, and wiring for further installation of acoustic equipment. Such a concept as standard audio preparation is an integral part of the car’s equipment. Its level affects the final cost of the new car and the owner’s further costs for acoustics. The manufacturer can install either simply a wiring harness with the necessary plugs and connectors, or additional elements: speakers, a radio antenna and the radio itself. Expensive versions even have high-frequency beepers and audio system control keys located on the steering wheel.
Selecting a speaker system
Having assessed the audio preparation of the car, you can begin selecting equipment.
Depending on personal preferences and financial capabilities, a minimum set is determined - in fact, a radio tape recorder (or, as it is called, a head unit) and a set of speakers. A true car audio connoisseur will select equipment with increased power, as well as taking into account the possibility of installing additional devices: subwoofer, amplifier. Typically such a complete audio system requires the purchase of an auxiliary battery. When choosing acoustics, beginners should consider the following main characteristics of the equipment. For the head unit - available media formats (CD, MP3) and output sound power. It is worth focusing on the average value of 25 W for a standard four-channel device.
For speakers:
- dimensions of standard sockets and the possibility of changing them;
- power (take into account comparability with GI);
- frequency range during playback;
- sensitivity.
Audio system installation
After purchasing the equipment, the question of installation arises. This event is not easy and requires special technical skills. In most cases, in order to avoid unnecessary headaches, car enthusiasts turn to certified service centers, where experienced specialists will perform the necessary work and provide a guarantee. Undoubtedly, there are people for whom everything related to the car is their hobby. For them, self-installation of sound equipment will be not so much saving money as it will be a pleasant pastime with a further reason for pride. In this case, what does audio preparation mean? In a nutshell, the higher the vehicle’s equipment level, the lower the additional costs for acoustics.
Reviews and recommendations
People often ask on forums which set of acoustics to take in order to get high-quality and loudest sound. The advice boils down to the fact that higher-quality acoustics need to be installed in the front, and something simpler is suitable for the rear.
It is desirable that the sensitivity of the “front” and “rear” be the same. The sensitivity of car audio is the number of decibels per 2.83 Volts. Typical values: 89 or 92 dB/2.83 V.
It is impossible to squeeze “real bass” out of five inches. But still, you can notice the following pattern: the higher the sensitivity of the speaker, the less ideally it reproduces bass. So, choose: quiet, but high-quality bass, or loud sound, but without low frequencies. This limitation can only be removed by moving to the “6.5-inch” category. True, then you will need an angle grinder, and some owners also use it when installing a radio.
Features of audio system installation
When connecting the stereo system wiring, it is necessary to take into account certain features of the electrical supply. This is provided using red and yellow wires. The first is responsible for remembering the audio system settings, the second is for turning off the radio, which is controlled by the car’s ignition.
It is recommended to use a parallel connection type for both wires so that the audio system can only be turned off manually. In this case, it will not be affected by the car’s ignition key, but there will be a problem of excessive electricity consumption in parking mode, which is solved by installing a special regulator for the red electrical wire. With its help, you can turn off the radio by hardware when leaving the car for a long time. This regulator can be connected to the alarm system, that is, when the vehicle is locked, the audio system will turn off automatically.
The disadvantage of this system is the extra current consumption, but in any case it is much less than the indicators that provide power to the radio during standby mode.
If the audio system suddenly turns off due to excessive volume, display flickering, or high-pitched sounds, it is not due to a power failure. This situation occurs when the car battery is discharged and the current ceases to be constant. The problem is solved by connecting an additional capacitor, which provides constant power to the radio.
What acoustics should I put in the grant?
Common budget music option:
- radio tape recorder within 5000 rubles with the ability to adjust the equalizer;
- 16 cm component speakers with tweeters at the front;
- acoustic shelf with speakers 6*9;
- amplifier with subwoofer in trunk.
Let's look at an example of such a configuration with a price tag in the table (the calculation is for ordinary people, not audiophiles) based on Pioneer devices:
| Example of a Pioneer device | Average price tag in rubles | |
| Head unit (radio) | DEH-S101UB | 4000 |
| Front 16cm acoustics | TS-G1733i | 2000 |
| Acoustic shelf | 1500 | |
| 6*9 “pancakes” | TS-R6951S | 2200 |
| Amplifier 2-channel | GM-A3702 | 4300 |
| Passive subwoofer in a box | TS-WX305B | 5200 |
| Subwoofer installation kit | 1500 |
As a result, we get budget sound in the region of 20 thousand. If we consider professional head units, premium-segment speakers, installation of custom podiums and other delights, the price tag can easily jump over a hundred thousand, amounting to a third of the cost of the car itself.
The choice of podium depends on the type of windows, budget and number of speakers.
Lada Granta Standard
The audio preparation of the Lada Granta Standard is arranged as follows: the car has power wiring harnesses connected to the head unit. Such wires are present only in the radio; there are no visible outputs of wires for the speaker on the doors.
Therefore, on the basic configuration of the car, the wires do not reach the audio system speakers. Under the panel on the driver's seat side there are wire outlets for the radio.
In order to connect them into one system, you need to find the corresponding audio system wire outputs on the Lada doors. After finding all the necessary outputs, the wires located on the panel are connected to the wires that are built into the doors.
On a car of this configuration, you will need to run the wires to the dashboard alone.
A few words about this configuration. The “Lux” assembly has a factory pre-installed radio with speakers. The radio has at its disposal such additional functions as a 5-inch touch screen, which also has a line input, a Bluetooth headset, and the ability to read flash media.
Types of procedure
New generation Kalina with full audio kit
Depending on the vehicle's configuration, audio preparation may vary.
The “Standard” package involves connecting wires only to the head unit, that is, you can only install the radio. At first glance, it appears that there are no wires on the doors, as well as for the rear of the audio system. In fact, there are wires, but only on the driver's side door, and they are not routed outside. The car owner will have to complete the wiring for the speakers on the doors himself and run the wires for the rear of the audio system.
The “Norma” package includes preparation for installing the head part of the audio system, and the wires in the doors are already completely routed. In this case, the car owner will only have to independently connect the car radio and speakers and cut a hole in the doors.
The “Lux” package differs from the previous ones in that the car already has a pre-installed audio system: a standard head unit and speakers. The radio has built-in Bluetooth, a USB connector with the ability to read information from a flash drive, a 5-inch touch display and a linear output.