The linkage is an important component of the VAZ 2109 gearbox. If it fails or does not work satisfactorily, the linkage can be easily replaced or repaired.
Appearance of the device
There are two types of scenes:
There is no fundamental difference between the two types of units. The advantage of a short-throw is that it provides faster gear changes for a fraction of a second.
Do not believe those who claim that a short walk has a positive effect on dynamics. There is no connection between the rocker and the dynamics of the car. But the short walk has its advantages.
Replacement kit
Reasons for replacement
There are several situations when the owner of a VAZ 2109 has or wants to get into the design of the gearbox and specifically work with the rocker:
- Oil is leaking due to a damaged rocker seal. It must be replaced;
- The old drawstring was out of order;
- I would like to exchange the long-stroke for a short-stroke in view of its advantages.
Now to the question of when replacing or repairing the backstage is a necessary measure.
- The backlash of the gearbox selector has increased significantly.
- Gears change with difficulty, and when changing speed, extraneous sounds appear.
- It is possible to change gears, but with a lot of effort.
- Speeds change incorrectly. Instead of one, a completely different one turns on.
- It is impossible to turn on all or part of the gears at all.
Even if the resulting play is still insignificant, it is advisable to immediately begin repairs or completely change the drawstring.
Replacing the oil seal
If you find that the oil in the gearbox is gradually disappearing, you can suspect the rocker seal. There is nothing else left to do but change the element.
- First, buy a new shift rod seal. It costs about 70-100 rubles.
- Drain the oil from the box, having prepared a clean container in advance. This is in case you refill the same oil. Although this is an excellent reason for you to change the transmission lubricant at the same time.
- To make sure the oil flows out better, first unscrew the filler plug or remove the speedometer gear. After draining the oil, screw the cap back on.
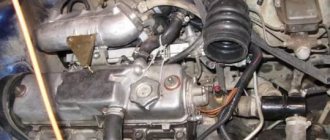
- We climb under the car and disconnect the fasteners of the gearbox lever driveshaft.
- Pull the boot off the cardan, unscrew the bolts securing it to the gearshift rod. Problematic fasteners that you will have to tinker with.
- After removing the cardan shaft, remove the rod boot.
- We remove the damaged oil seal using an awl or suitable available tools. The main thing here is the stock itself.
- We install a new one in place of the old oil seal and press it with a tube of the appropriate diameter.
- Put the boot back in place and rotate the driveshaft.
- Please note that the bolt securing the cardan to the rod is an adjustment bolt. Therefore, screw it in exactly the same way as before dismantling. Otherwise, some speeds may not turn on.
After the work done, do not forget to check the result.
Replacing the cardan
Practice shows that if problems arise with the slide, it is not at all necessary to completely change it.
The instructions for replacing the cardan are as follows.
- Using two 13mm spanners, unscrew the clamp that relates to the speed switch drive rod.
- Pull the boot off with a screwdriver, moving towards the box. If you want, remove it completely. So it definitely won’t interfere with the repair process.
- Using a 10mm wrench, unscrew the fixing bolt on the cardan.
- Apply several gentle, not strong blows with a hammer to knock the cardholder off the shaft. Remove the boot to the side if you have not done so before.
- We replace the old cardan with a part from Kalina. It is more reliable, efficient and durable.
- For reassembly you will need the help of a friend. Do not rush to tighten the clamp immediately at the end.
- The assistant will set the position of the gearshift lever at the optimal points from inside the cabin. First you need to catch the center, then move the lever a little to the right while you tighten the clamps from below.
- Check if the gears engage well. If yes, then we continue assembling the unit and check the updated gearbox under real road conditions.
The experience of VAZ 2109 owners shows that when there are problems with the rocker, the essence often lies in an unsuccessful factory cardan. By replacing it with an analogue from Kalina, you will be able to get rid of discomfort and continue to confidently operate your car. By replacing the cardan shaft, the design of the gearbox will improve significantly.
Adjustment
After changing the link or cardan, you should definitely adjust the operation of the unit.
- Engage reverse gear, loosen the clamp tension.
- Set the gearbox selector to the position in which it should ideally be located when engaging reverse.
- Tighten the clamp back.
- A similar operation is performed with other speeds.
There are situations among VAZ 2109 owners when difficulties arise when engaging reverse gear. This is where adjustment can help.
- Set the gear lever to first gear;
- Loosen the rocker clamp;
- Turn the rocker drive counterclockwise;
- Turn the drive until the selector is pressed against the plastic stopper for the reverse gear. You will feel this without any problems;
- Resting against the stopper, tighten the clamp under the bottom. That's it, the adjustment is done.
Fixing the problem
Let's look at several ways to help fix the problem with engaging reverse gear.
Backstage adjustment
Before you begin solving the problem, take with you everything you might need:
- new gearbox driveshaft;
- speed selector shaft oil seal;
- two ring wrenches 13;
- wrench 10;
- hammer;
- screwdriver.
To fully replace the cardan, you will need to drive into a pit or overpass. In addition, you will need an assistant who will shift the gearbox lever while you adjust it.
Let's start replacing the cardan and adjusting the rocker:
You need to crawl under the bottom of the 2109 and find your gearbox. Take two 13mm wrenches and loosen the clamp located on the transmission drive rod. After this, you can remove the drive from the gearbox mechanism rod. Then take a screwdriver and, with a little force, pull the boot closer to the unit. If you accidentally damage the boot, you can simply dismantle it so that it does not bother you
Now take a 10mm wrench and unscrew the locking screw on the cardan. Next, take a hammer and very carefully knock the gearbox driveshaft off the shaft. Do this carefully so as not to damage the shaft
Remove the cardan boot if you did not remove it initially. If necessary, replace the speed selector shaft oil seal. At this point we can consider that half the work has already been done. Now you need to install the driveshaft of the box. We install the element in the reverse order. First, install the new boot in place, and then place the cardan on the shaft. Remember that the position of the retaining screw must coincide with the recess on the shaft. When the universal joint is in place, tighten the fixing screw and install the boot on the universal joint. You also need to put the gear shift drive rod on the cardan rod, but there is no need to tighten the clamp. Next, you will need the help of another person, since you need to adjust the gearshift lever. Ask your assistant to sit in the driver’s seat: he should set the gearshift lever to “neutral” and move it slightly to the right. In this position, an assistant should hold the lever while you tighten the cardan clamp.
When the cardan adjustment is completed, you need to check how the speeds on the lever are switched on. If the problem that caused the reverse gear to not engage in your VAZ 2109 was in the cardan, which is most likely, then after replacing the element the fault should disappear.
Changing gearbox oil
Also, one of the common reasons why reverse gear in a VAZ 2109 does not engage is poor gear oil. As stated above, the liquid has already lost its properties and its further use does not make sense. But how do you understand that the transmission fluid has already exhausted its service life? This issue should be taken seriously, because the fluid replacement procedure is not that cheap. Therefore, you need to know for sure that the gear oil has lost its properties.
- Pull the dipstick out of the gearbox hole to measure the level and drop a drop of liquid onto a white cloth. If at least one of the following conditions occurs, change the oil immediately.
- The lubricating fluid is discolored and may have a slightly black tint. Also, even in a small drop of oil you can see metal particles or other dust.
- The transmission fluid is opaque and appears very viscous. If you try it by touch, the substance will stick to your hands. In addition, if you drop this oil onto a piece of cloth or napkin, it will be absorbed very slowly compared to new oil.
- Very cloudy or foamy liquid. This may mean that transmission oil has entered the engine. If so, then the problem with engaging reverse gear is the first thing you will notice. If the car continues to operate on poor transmission fluid, then it may be necessary to completely repair the gearbox and the entire transmission system.
Short walker
Many people are still wondering whether it is worth changing their standard factory long-stroke linkage to a short-stroke one.
Make your decision purely on the basis of individual reflections and do not “be fooled” by statements regarding a significant increase in dynamics with the transition to a short-stroke.
The real difference between short-stroke and long-stroke is shown in the table.
Draw your own conclusions from here - do you need such a drawstring or not. There is nothing complicated in terms of replacement. The only question is the purchase.
Is the shift rod seal leaking? How to replace the rocker seal?
Today we will figure out how to change the oil seal with our own hands and we will be able to save N amount of money. There are only two ways to replace the rocker seal of the VAZ 2108, 2109, 21099, 2113, 2114, 2115. The first is to replace the rocker seal in the inspection hole by knocking out the bushing along with the seal. The second method does not require an inspection hole, but will require you to have a certain manual dexterity, body flexibility and the presence of one (two) long self-tapping screws.
We will need: - two 13mm wrenches, - a 10mm wrench, - a wrench or screwdriver for knocking out the oil seal sleeve, - a small hammer, - a 22mm socket, - silicone sealant.
Spare parts: – gear shift rod oil seal – cardan shaft boot
Let's start replacing!
Using two 13mm wrenches, we loosen the clamp of the transmission control rod (the connection between the rod and the driveshaft can be marked in advance, so as not to have to deal with regulating the gear shift later) and disconnect the rod from the driveshaft. If it doesn’t unscrew well, spray everything with WD-40.
Pull the boot back and use a 10mm wrench to unscrew the bolt securing the cardan to the gearshift rod. Remove the cardan and boot. Using a screwdriver, knock out the bushing from the gearbox.
Using the same screwdriver, we knock the oil seal out of the bushing and with a 22mm head, press the oil seal in until it stops. Lubricate the bushing with sealant and press it into the gearbox with gentle hammer blows.
Lada 2109 Harmony Logbook Instructions: Installing the gearbox hinge from Kalina KX rocker
The idea to stage it arose a long time ago. And today I went and bought it. I’ll try to write instructions here, as there were several problems that were not written about on the Internet.
Necessary: - Short-stroke rocker 2108 (there is a difference with 2114, as I understand the differences in the bend of the rocker from the panel that is in the cabin. If you have 2109 with panel 2114, you need the KX from 2114) - Gearbox hinge from LADA Kalina (Cardan, glass )
Welcome: - LADA Kalina hinge boot (from 2108 less. But you can tighten it. Recommended for replacement) - Backstage boot (Optional, mine was torn) - Litol-24 (thick lubricant, useful) - Backstage clamp (Replacement for prevention) — Gear knob support (plastic)
Place of work. The best is a pit or a lift. We made a jack in a regular garage. Adds 5-10 cm to the clearance - it’s easier to crawl up. Hello BPAnu =)
Advantages and disadvantages
Let's start with the pros, let's figure out why the short-throw rocker on the VAZ 2109 is good:
- The advantages of such a rocker compared to a standard rocker (this, at least, applies to the VAZ 09 and 10 families) is that, solely due to its size, it can significantly reduce the stroke of the lever when shifting gears on and off
- In addition, shifts become even clearer
However, there are disadvantages in any tuning, and this thing also has them:
- High price
- Increases effort to shift gears
Also check out
You need to find 2 fragments of the required size and diameter.
Cook everything. You will get a short-stroke link.
This completes its production.
Before installing it, you need to sand the weld with a grinding wheel and paint it black or some other color.
Worth checking out:
Operating principle and manufacturing method
The VAZ 2109 short-throw gearbox came from professionals in motor racing; you will agree what kind of sport it is if a lot of time is spent shifting gears. What does such a scene give:
- Thanks exclusively to it, switching becomes much more pleasant for you, and the lever stroke is significantly reduced by almost half, the result obtained from the installation is simply incredible
- Therefore, smart people picked up this “theme” and launched it into the “masses”
- It turns out that today the VAZ 2109 short-stroke rocker is sold in almost every auto parts store
- Of course, the price is significantly inflated, but this is not an obstacle for most motorists
- There is nothing surprising here, because the rocker is worth it, I myself, like many car owners, was ready to buy it, I liked the short rocker of the VAZ 21093 gearbox so much.
- However, as soon as I saw its design and understood the main point of tuning, I changed my mind about paying for it, because it is possible to make one with your own hands in just half an hour of work
- What I got - see for yourself. Now I’ll tell you in a few words about how the whole mechanism works, also see the photo
The diagram I have given will allow you to understand how the short-throw rocker on the VAZ 2109 works:
- The "O" - "F" line represents the low and high points of your standard lever set to neutral.
- In order for you to engage the gear, you will need to move the rod connected to the lever (point “B” is the point of their connection) to point “A”
- The handle of the gear shift lever will move to point “E”
- You understand that our task is to reduce the “E”-“F” switching distance that the handle travels
- And for this we need to increase the length of the lever to point “H”, which will allow us to raise the rod by the same distance (the segment “C”-“D” is equal to the segment “A”-“B”)
- It turns out that the lever that changes gears will have to travel a shorter distance; in this case, you won’t have to stretch or “search throughout the cabin” for the desired gear and its lever
Let's get down to business
The short-stroke rocker for the VAZ 2109 requires the following tools for manufacturing:
- Grinder and cutting wheel for metal or, at worst, a hacksaw for metal
- A piece of pipe and a piece of flat metal
- Welding (welding machine)
- be sure to purchase a lever drive from Lada Kalina
- The photo shows the places where you will need to make an incision.
- Everything is quite simple: you will need to remove the rocker from the car
- Moreover, it is not necessary to remove everything (I admit, I did just that and regretted it a little - it’s a chore, it turns out) it will be enough to disassemble your ball joint (to do this, unclench the locking metal ring so that the plastic fastening tabs separate and the ball is released)
- Then loosen the clamp near the gearbox and turn off the traction
- After this, carefully pull the rod through the dirt cover and get out of the car.
- Now you need a grinder with a cutting wheel for metal, a familiar welder with a welding machine, or someone who has access to one (you have the machine and know how to weld yourself - generally a test)
- Next, use a grinder to cut the parts according to the marks in the top photo. Then we weld a piece of pipe (with a wall thickness of 2 - 3 millimeters) into the rod and a piece of sheet metal with a thickness of 5 - 6 millimeters
- These pieces must certainly have the same length, otherwise you will have an unpleasant distortion, which is not at all desirable and the drive will only work worse
- For myself, I lengthened it by only 2 centimeters
- However, the space in the cabin allows you to lengthen it by 3 - 5 centimeters
- At first two centimeters was quite enough for me, but then I got used to them and it seems not enough again
- By the way, regarding the pieces, welders have nowhere to put them; as a rule, finding a suitable one does not cause any problems
- The VAZ 2109 short-stroke rocker is installed in the reverse order of removal
- However, among other things, the hinge with a hook, which serves to prevent erroneous engagement of reverse gear, rises automatically and no longer fits into a special slot on the blocking plate
- In order to avoid this, either remove this plate completely (this is for the especially lazy) you can ride without it, or you should move it upstairs to the height to which the hinge has risen
When you have installed the rocker on the VAZ 21093 gearbox, all that remains is to replace the drive shaft to eliminate play in the lever
Why change the driveshaft?
On all VAZ 2108-2110 cars without exception, there is a strong play in the gearbox linkage, as a result of which we get unclear gear shifting:
- We can say with confidence that this is a disease or a deficiency of all cars of this brand
- The cause of this “illness” is the original gearbox driveshaft
- If you want to eliminate such a drawback, then our instructions will help you reduce the backlash of the rocker and increase comfortable gear shifting (especially since you achieved this by replacing the rocker)
- First you need to get to the car market and purchase there (or at a spare parts store) a short-stroke universal joint from a Lada Kalina car
- You should take it complete with a boot, because the boot does not fit on a standard cardan
Why doesn't adjustment help?
It happens that, despite the adjustments, the rocker still rattles.
This problem can be solved by installing a special spring on the rocker. It will hold the lever, eliminating rattling.
|
|
Types of mechanisms
Despite the different design models, only two types can be distinguished:
- Long-stroke (standard, previously installed on cars of model 2109 and similar).
- Short-wheel drive (installed on Kalina cars).
Structurally they are very similar, only different in size. The advantage of short-throw ones is that with their help, gears are engaged easier and faster.
True, many myths have formed around the gear shift: some claim that the dynamic characteristics of the car are significantly improved. This is all wrong; there is no connection between the dynamics of the car and the view of the backstage. But still, the short-stroke one has advantages over the standard one.
Kinds
There are two types of scenes:
- Short stroke;
- Long-stroke.
There is no fundamental difference between the two types of units. The advantage of a short-throw is that it provides faster gear changes for a fraction of a second.
Do not believe those who claim that a short walk has a positive effect on dynamics. There is no connection between the rocker and the dynamics of the car. But the short walk has its advantages.
Why change the backstage?
There are situations when it is necessary to intervene in the gear shift mechanism due to the failure of a component. But there are times when an extreme measure is required - replacing the VAZ-2109 rocker. In these cases, replacement is required:
- An oil leak appeared due to damage to the oil seal. Only the oil seal can be replaced.
- Complete failure of the scenes.
- You have realized the advantages of a short-stroke design and you have the funds for this kind of tuning.
Symptoms of gear shift mechanism failure:
- Increased gearshift lever play. Please note that this behavior may also be caused by a loose cardan. Sometimes the bolt securing it gets screwed out, so to reduce the backlash it is enough to tighten it, and first apply a drop of thread locker.
- Difficult to shift into gear. Sometimes extraneous sounds are heard.
- Gear shifting is not possible.
- Inconsistency between the position of the lever and the selected speed. For example, the back one disappears, and the first one is in its place.
If a slight play appears, it is advisable to carry out diagnostics and identify the breakdown of the unit. Make repairs immediately, otherwise one or more speeds will disappear at the most inopportune moment.
How to replace the oil seal
If you detect an oil leak from the gearbox, carefully inspect the crankcase.
The leak will reveal itself. Lubricant usually leaks out through the CV joint seals and rocker panels. In the latter case, to replace you will need to perform a number of actions:
- Purchase a new VAZ-2109 gearbox seal. Its price is about 100 rubles.
- Drain the oil completely from the gearbox by unscrewing the plug from the bottom using the key “17”. If necessary, you can replace the lubricant later. It is recommended to pull out the upper dipstick to facilitate oil drainage.
- Disconnect the cardan from the rocker arm.
- Remove the boot, use a 10mm wrench to unscrew the bolt securing it to the gearbox rod.
- Using an awl or a thin screwdriver, remove the old oil seal. Inspect it for damage.
- Install the new oil seal using a pipe or large washer to press in.
After replacement, install the boot. Assess the condition of the cardan: if it has too much play, it will need replacement. After carrying out all the work, be sure to check that the speeds are turned on correctly.
How to replace the universal joint
In most cases, it is not the rocker itself that fails, but the cardan. Due to its displacement, even a small one, a failure occurs in the gear shift mechanism.
Standard VAZ-2109 scenes are rarely installed during repairs; similar parts from Lada Kalina are used. The replacement looks like this:
- Using two keys set to “13”, unscrew the clamp securing the cardan to the rod.
- Using a screwdriver, pull the boot towards the box housing. If desired, you can remove it completely, and if it has cuts or other damage, replace it with a new one.
- Unscrew the fixing bolt with a “10” key.
- Knock down the cardan with a hammer, strike carefully so as not to damage anything.
- The Kalinovsky universal joint is much more durable and reliable, so install it instead of the standard one.
- Reassemble the entire structure in reverse order. But do not rush to tighten the bolt on the clamp - adjustment is necessary.
Let's sum it up
In order to operate a car normally and without difficulties, you must always remember the important features of its design. Often, after using a fairly reliable but old foreign car, the owner decides to exchange it for a domestic car, but the reliability habits of some elements do not allow him to use the vehicle normally. Constant sudden shifting of gears and lack of proper inspection of components often lead to the need to replace assembled parts and overpay for service and repair work. With the help of a normal service, you can get rid of virtually any problems.
The cost of repairing the rocker on domestic cars is often more expensive than the cost of the factory mechanism itself. Therefore, equipment replacement is most often used. If we are talking about expensive foreign cars, repairing the gear shift mechanisms in them is often completely impossible. It is impossible to answer unequivocally the question of what to do with a broken slide. You must always take into account the characteristics of the vehicle, the make and model, the year of manufacture, as well as the actual condition of the gear shift element in the car. Otherwise, repair work will be expensive and will not bring the desired results. Has a link ever broken on your car?
Backstage adjustment
There is nothing complicated in the procedure; you can do it yourself, but you will have to run from the pit to the salon.
Yes, it is advisable to do this work in a pit or overpass. You need to act approximately according to this principle:
- Loosen the nut on the clamp.
- Set the gearshift lever to the reverse gear position.
- Set the box rod to the reverse speed position. This is difficult to achieve, so adjustments will have to be made.
- Check how the gears shift. If the rear one is too far to the left, loosen the clamp and turn the cardan counterclockwise. If the fifth speed (including reverse) has gone too far to the right, then the cardan rotates clockwise.
By adjusting the position of the gearshift rocker, you will notice that when the lever is installed in the middle, neutral speed will be engaged. When turning on the fifth gear, the lever should not catch the passenger seat, and when moving in reverse, the driver's seat should not interfere with the movement of the lever.
Comparison of short and long stroke
Car enthusiasts describe the difference in options as fantastic. The renovation dramatically improves ergonomics. The amplitude of movements of the gear shift knob decreases by two to three times, but the force on its tip increases. The increase is quite acceptable, since gear shifting occurs in an unloaded state with the clutch depressed and does not require any serious effort.
Some experts believe that an increase in the shoulder leads to an increase in forces on the gearbox rods and to additional wear on the gearbox. There is no statistical confirmation of this point of view yet. Unfortunately, it is not possible to order a short-stroke configuration from the factory. You must install it yourself at your own risk. AvtoVAZ does not approve of such changes in the design of the Nine.
Independent modernization of the design associated with welding the levers lengthens them, and the height of the gearshift knob above the tunnel increases by about 5 cm. Such alteration requires welding work and the involvement of an experienced specialist, for whom cutting the levers using a grinder, installing a pipe and a strip of the appropriate section , and also welding the levers is not difficult.
The adjustment changes the ergonomics, but due to the reduction in the strokes of the shift knob, it is not perceived as a deterioration.
Short-throw slides for "nine"
Such designs were developed exclusively for sports models, but are widely used in production ones. Advantages of the VAZ-2109 short-stroke rocker over the standard one:
- Easier gear shifting.
- The backlash of the gearshift lever is reduced, especially when using a cardan from Kalina.
- You need to either buy it or make it yourself.
- It takes a lot of force to change gears. Despite the smaller stroke, this type of backstage is more suitable for people who are not only strong in spirit.
But you don’t have to buy a VAZ-2109 rocker in stores; you can make a short-shifter from a regular one with little welding skills.
To do this, cut the old rocker in two places and weld pieces of a metal plate to lengthen the arms. The main thing is for the new drawstring to fit into place, so first carefully study the drawing, which shows the locations of the cuts.
The VAZ 2109 is known as the most successful car of the Volga Automobile Plant after the collapse of the Soviet Union. It is still widely popular among domestic drivers. At the moment, production of the VAZ 2109 and its modifications has been suspended. In addition to 2109, its direct successor 2114 is often found on the roads of our country, as well as the successor to the “eight” 2113, and the “tens” - 2115.
Is it possible to independently manufacture a short-stroke rocker?
Despite the fact that the cost of a short-stroke rocker is not so high, many people prefer to make and install it with their own hands, which, in general, is not so difficult to do. You will need very little to get the job done:
- a piece of pipe having a diameter of exactly 15 mm;
- the gear shift knob from the car for which the rocker is made;
- ball nut;
- backstage repair kit with axle and bushing;
- cardan from the steering mechanism.
The work itself on making a short-stroke link takes about two hours. The ball from the gear shift lever is cut off, its lower edge is adjusted so that a pipe can be installed, which will have to be properly welded. A nut is welded to the lower edge of the pipe and a ball nut is installed. After this, the cardan can be mounted to the gearshift lever.
Perhaps the whole process will seem somewhat difficult to some, but if it takes place under the “supervision” of an experienced mechanic/car mechanic, the success of the endeavor is guaranteed. It is possible to turn a car's standard rocker into a short-stroke one without the need to dismantle it. To do this, you will need to lift the fasteners of the “piece of iron” that extends from the gearbox to the shift lever itself. This is not to say that this procedure will make gear shifting truly sporty, but the free play of the lever will be somewhat reduced.
Tuning the VAZ 2109 transmission
The classic transmission of all VAZs is manual. It is quite reliable, cheap to maintain and well suited for use on domestic roads.
Upgraded car
There are several popular types of tuning for manual transmissions. They appeared as a banal need to improve the performance of the car. The main work packages include:
- Replacing the backstage.
- Conversion from 4-speed to 5-speed.
- Installation of a sports row.
- Modernization of the pedal unit.
- Replacement of the main pair and differential.
Let's take a closer look at one of the tuning options. Replacing the rocker with a short-throw one is a useful tuning that will significantly simplify gear shifting. We all know that the lever of the “nine” and most other VAZ cars is absolutely inconvenient. It has a huge backlash, which simply has a terrible effect on the accuracy of gear shifting. If men with long hands can still cope with it without any critical effort, then women will have a very difficult time with it.
The easiest way out of the situation is to install a short-stroke cardan from the Lada Kalina on the 2109. Such tuning will cost you approximately 1,500 rubles. Along with the cardan, you will have to get a boot from the same model, because it won’t be original with it.
The necessary tools for work are a set of keys, a slotted screwdriver and a hammer. It will also be very good to have an assistant.
The process of replacing the gearbox rocker
Dismantling the old rod
First you need to loosen the clamp on the main rod and remove the hinge from it. To do this, use a 13mm wrench. Next, remove the boot and, using a 10mm wrench, unscrew the bolt on the desired cardan. Usually it is fixed almost tightly, so here you will need a hammer to loosen it a little with gentle blows. By the way, you can immediately check the condition of the oil seal and, in case of any defects, replace it with a new one.
New drawstring and cord from Kalina
Installation of a modified backstage
Having removed the old cardan, you can begin installing the new one. To do this, you must first put on the boot. Next, we place a new cardan on the gear selector rod and secure it with a fixing bolt. Be sure to make sure that the bolt fits into the special recess on the rod. Also, do not forget to apply thread locker to the bot so that it does not unscrew due to vibration.
The next step is to put the drive rod on the rod. For some models, the stem from Kalina will have to be shortened by about 1.5 cm.
Adjustment
Next, you must carefully adjust the position of the lever so that it is centered with a slight offset to the right. Here we will need an assistant who will have to monitor the placement of the lever in the cabin. After installation is complete, tighten the clamp, while an assistant must hold the lever from moving.
And, of course, you yourself should try how conveniently the lever is adjusted and, if something happens, reconfigure it.
By the way, some craftsmen cope with shortening the scenes without buying a new one. To do this, you need to disassemble the slide, as in the previous paragraph, and trim the necessary parts using a grinder. Next, weld a piece of pipe and sheet metal into the rod. If you yourself are not very knowledgeable about this, you can ask any welder. This process can be studied more clearly using a visual video.
Automatic transmission for VAZ 2109
The first model that served as a springboard for the installation of automatic transmission among VAZ cars was 2115. Now automatic transmission is occasionally found on cars 2109, 2110, 2113, 2114, 2115 and 99. VAZ models released in the 00s, Lada Kalina and Lada Granta, became the first domestic passenger cars with factory equipment including an automatic transmission.
Option #1
At the moment, anyone who wants to install an automatic transmission on a “nine”, 2113 or 2114 has two options. The first is to install a contract automatic transmission from Toyota Corona. The undoubted advantages of such modernization:
- A used automatic transmission option is easy to find in almost any car market;
- It has a reasonable price;
- The Toyota Corona transmission does not require special firmware during installation.
Option No. 2
Naturally, the second option for installing an automatic transmission is to contact an official VAZ dealer in your area. Seeing the interest of drivers in such tuning, they also took up its implementation. Peculiarities:
- Licensed gearbox with a 1.5 year warranty;
- The automatic transmission is completely Japanese assembled, produced by Nissan.
It should be immediately noted that the option of ordering an automatic transmission installation from an official dealer is more reliable, but the price is approximately twice as high.
Is the game worth the candle?
With all their advantages, to be honest, automatic transmissions on 2113, 2114, and even more so on 2109 are very rare. On such cars, an automatic transmission can be considered simply an expensive extravagance. Not only does the automatic transmission itself somewhat worsen the car’s performance, it eliminates the main advantage of domestic cars – efficiency. So you will not only lose on the purchase, but your gas mileage will probably increase.
You will learn where to start your auto tuning in our article.
Which acoustics are suitable for your car - read the link https://avtopolza.ru/tyuning/podbiraem-akustiku-v-mashinu/.
Replacing the bushings of the gear lever axis of a VAZ 2110 Lada
- Repair manuals
- Repair manual for VAZ 2110 (Lada) 1996+.
- Replacing the gearshift lever shaft bushings
3.2.11. Replacing the gearshift lever shaft bushings
| EXECUTION ORDER |
↓ Comments ↓1. General information 1.0 General information 1.1. Vehicle Specifications 2. Engine 2.0 Engine 2.1 Possible engine malfunctions. 2.2 Replacing the coolant 2.3 Replacing the engine oil and oil filter 2.4. Installing the piston of the first cylinder to the TDC position of the compression stroke 2.5 Replacing the camshaft drive belt and tension roller 2.6 Adjusting the camshaft drive belt tension 2.7 Removing, troubleshooting and installing the flywheel 2.8. Replacing engine seal parts 2.9 Cylinder head 2.10 Grinding in valves 2.11 Adjusting clearances in valve drive 2.12 Removing and installing engine 2.13. Engine repair 2.14. Lubrication system 2.15. Cooling system 2.16. Exhaust gas system 2.18. Features of VAZ-2112 engine repair 3. Transmission 3.0 Transmission 3.1. Clutch 3.2. Gearbox 3.3. Front wheel drives 4. Chassis 4.0 Chassis 4.1. Checking the technical condition of suspension parts on the car 4.2. Rear suspension 5. Steering 5.0 Steering 5.1 Inspection and check of the steering on the vehicle 5.2. Steering column 5.4. Steering mechanism 5.5 Possible steering malfunctions. 6. Brake system 6.0 Brake system 6.1. Vacuum booster 6.2. Main brake cylinder 6.3. Pressure regulator 6.4. Brake hoses and tubes 6.5 Bleeding the brake system 6.6 Replacing brake fluid 6.7. Front wheel brakes 6.8. Braking mechanisms of the rear wheels 6.9. Parking brake 6.10 Possible malfunctions of the brake system. 7. Electrical equipment 7.0 Electrical equipment 7.1. Mounting block 7.2. Generator 7.3. Starter 7.4. Ignition switch (lock) 7.5. Checking and replacing spark plugs 7.6. Integrated engine management system (fuel injection system) 7.7. Contactless ignition system 7.8. Lighting, light and sound signaling 7.9. Windshield wiper 7.10 Replacing the electric motor of the radiator fan of the cooling system 7.11. Heater electric motor 7.12. Cigarette lighter 7.13. Instrument cluster 7.14 Checking the carburetor solenoid valve control unit 7.15 Possible malfunctions of the EPHH control unit. 7.16 Electrical diagram of a VAZ-21102 car 7.17 Electrical diagram of a car with a carburetor engine 2110 7.18 Engine control diagram 2111 (pin M1.5.4) 7.19 Engine control diagram 2111 (pin MP7.0) 7.20 Control diagram for engines 2111 and 2112 (pin M1) .5.4N, "January-5.1") 8. Body 8.0 Body 8.1 Possible body malfunctions. 8.2. Replacing the buffers 8.3 Removing and installing the radiator trim 8.4 Removing and installing the locker 8.5 Removing and installing the wing 8.6. Hood 8.7 Removing and installing upholstery, trim and windshield frame lining 8.8. Trunk lid 8.9. Side doors 8.10 Removing and installing the front seat 8.11 Removing and installing the upper and lower lining of the floor tunnel 8.12. Seat belts 8.13. Rear view mirrors 8.14. Instrument panel 8.15. Heater 8.16 Anti-corrosion compounds for body treatment 8.17. Features of body repair of models 2111 and 2112 8.18. Body care 9. Applications 9.0 Appendices 9.1 Fuels, lubricants and operating fluids 9.2 Basic data for adjustments and control 9.3 Filling volumes 9.4 Lamps used in the car |