The process of replacing timing rollers on a VAZ 2109 car is quite complicated! Most car owners can easily repair their car. They can quickly check the engine and identify any problem, after which they can easily solve it, no matter how complex it may be.
However, with domestic cars, not everything is as simple as it seems at first glance! If an experienced motorist can easily figure out most problems, he is unlikely to be able to cope with more complex problems without help. The most difficult jobs to perform include:
- Replacing the timing belt;
- Replacing timing rollers.
Most car owners don’t even know what exactly timing rollers are for, why they need to be replaced, and what the risk of their malfunction is. This adds additional complexity to an already complex process.
We independently change the timing belt on a VAZ 2109 - 21099
The gas distribution mechanism (GRM) of an internal combustion engine coordinates the operation of valves and pistons and is driven by a special belt or chain. Replacing the VAZ 2109 and VAZ 21099 timing belt is done every 30-40 thousand km, which will minimize the likelihood of it breaking during operation. Many owners turn to specialized service stations, but due to the maintainability and simplicity of the design of these models, the replacement can be done independently.
When replacement is required
The timing belt is responsible for the operation of the gas distribution mechanism.
Try in every possible way to avoid breaking the belt while driving, otherwise this may negatively affect the condition of the engine and the cost of its repair.
The most dangerous is the contact, the “meeting” between two main elements - the piston and the valve. In this case, the unit becomes deformed, requiring expensive restoration of the car.
There are several main criteria that indicate the need to replace the unit.
| Sign of wear | Peculiarities |
| Natural wear and tear | Each element has a certain resource, a margin of safety, above which it can “jump” only in rare exceptions. For timing belts on nines it is 50-60 thousand kilometers |
| Visual signs of wear | If you examine the condition of the strap, if there are any malfunctions, this will manifest itself in the form of defects, cracks, and peeling along the edges. All this suggests that you cannot continue to operate the car with such a strap; replacement is required. |
| Oil or coolant on the surface | Another sign that the strap is outdated and needs to be replaced. At the same time, do not forget to check for leaks in their cooling system and oil channels |
| Retighten the strap | When the service life has not yet come to an end, the strap may still become loose. To eliminate this, it is tensioned. But over time, the tension reaches its limit, the strap becomes overtightened and is no longer able to return to the desired position. For replacement and only |
| Tooth wear | If there are problems with the teeth, when moving, the belt simply begins to slip while the crankshaft rotates. Here you will have to change the gears and the belt itself |
Crack on the strap
Preparatory work
Replacing the timing belt requires some prep work to get to it. To do this, lift the hood and remove the air filter pipe by unscrewing the fastenings of the retaining clamp with a wrench. Next, the belt protective cover is removed, for which you need to unscrew the three bolts that hold it in place. This is done with a regular open-end wrench. In the opened space, the timing belt will be visible, which needs to be replaced.
The front right wheel and the protection under it are first removed to get to the crankshaft pulley, which drives the gas distribution mechanism via a belt. In the cab, put the lever in the fourth gear position and ask the assistant to press the brake pedal. We install the head 19 on a long wrench so that it is convenient to get to the crankshaft pulley, which we unscrew, which will require some effort. After the bolt is broken, you can put the gear in neutral and not hold the brake pedal.
Important feature! To replace the timing belt on a VAZ 2109 8-valve injection engine or a similar VAZ 21099 model, when removing the crankshaft pulley, you need to hold the flywheel, which is best done with a screwdriver. Otherwise, it will rotate along with the pulley. In carburetor engines this problem does not exist; the pulley is held independently.
From the top of the open hood, the nut that holds the tension of the generator belt is loosened; this is best done using a special cardan on which to place the head of the key. The generator pulley is moved so that the belt can be removed without interference. After this, remove the crankshaft pulley so that the gear is visible.
EXECUTION ORDER
Using a 10mm wrench, unscrew the bolts of the front timing cover:
Step-by-step instructions for tensioning and replacing the timing belt on a VAZ 2109, 2108, 21099 with your own hands using a minimal set of tools. To get to the timing belt, you need to remove the protective cover. To do this, use a 10mm wrench to unscrew the two bolts on the side.
and one in the center
Removing the timing cover
To replace the belt, turn the crankshaft counterclockwise so that the mark on the camshaft pulley moves down from the rear cover antenna by two teeth.
Remove the generator drive belt, the right wheel and the right mudguard of the engine compartment. Using a 19mm socket, turn the crankshaft clockwise using the pulley bolt.
until the mark on the camshaft sprocket aligns with the mounting lug on the rear timing cover.
After removing the rubber plug at the top of the clutch housing,
make sure that the mark on the flywheel is located opposite the slot in the clutch housing cover (the coolant supply hose to the radiator has been removed for clarity).
This is how the mark should be located on the engine flywheel (with the gearbox and cylinder head removed).
We fix the crankshaft from turning by inserting a screwdriver through the hole in the clutch housing between the flywheel teeth. Unscrew the bolt securing the generator drive pulley. Remove the generator drive pulley.
Using a 17mm wrench, loosen the nut securing the tension roller.
We turn the tension roller to a position in which the belt will be loosened as much as possible and remove the timing belt.
When replacing the tension roller, unscrew the nut securing it and remove the roller from the stud.
A spacer washer is installed under the roller.
Install the timing belt in reverse order. We put the belt on the crankshaft pulley. Then we put the rear branch on the coolant pump pulley and place it behind the tension roller. We put the belt on the camshaft pulley.
By inserting a screwdriver between two screws or rods with a diameter of 4 mm installed in the hole of the tension roller, turn the roller counterclockwise, tensioning the belt. Tighten the tension roller mounting nut.
We screw the bolt securing the generator drive pulley into place and using the 19-inch head, turn the crankshaft two turns clockwise by the bolt.
We check the alignment marks of the crankshaft and camshaft.
With the generator drive pulley removed, it is convenient to control the position of the crankshaft by aligning the marks on the crankshaft timing pulley and the oil pump cover. If the marks do not match, repeat the operation to install the belt.
Aligning marks
In order for the engine to work after replacement, it is necessary to set the timing marks. If the belt tensioner roller is noisy, it is better to replace it. Although it is better to do this in any case, so that no problems arise during the life of the belt. But if this is not possible, use a 17 wrench to loosen the nut holding it in order to loosen the tension for subsequent removal of the belt. We find a mark on the main camshaft sprocket and align it with the mark on the cover. To align the marks, unscrew the bolt holding the camshaft sprocket, align the timing belt marks, and then tighten it again.
After this, we align the marks on the crankshaft. To do this, we find a groove on the housing in the area of the oil pump and a point on the crankshaft gear. We put the pulley on the gear and turn it by hand until the marks match. This is easy to do; just hand strength is enough to turn the pulley.
Sometimes the marks on the crankshaft are not visible, then after aligning the marks on the camshaft, you need to make sure that the mark on the flywheel and the notch on the casing match. To do this, you first need to remove a special plug, after which these marks will be visible. If they do not match, after replacing the timing belt the engine will not start, and if it starts, it will run unstably and intermittently. Therefore, this stage is important for successful repair and subsequent operation of the car.
Belt installation
If the marks on the camshaft and crankshaft coincide, you need to install a new timing belt. If there are markings or inscriptions on the belt, they must be oriented clockwise, and the arrows must also be oriented if they are on the belt. Before this, the old belt is removed; if it is intact, by examining it, you can make sure that it is cracked and its operation is dangerous.
First, the belt is installed on the crankshaft gear, and then, with light force, on the camshaft sprocket. When installed, it should go around the drive sprocket and tension roller, making a zigzag.
Checking the timing belt tension is done by adjusting the tension roller, which is best replaced when installing a new belt. This is done with a special key; if you don’t have one, bolts or pins 40-50 mm long that fit the diameter are inserted into the holes. A screwdriver is inserted between them and, turning the roller, the belt is tightened. It should be quite tight, but with the average effort of the hand to turn 90°, if it is overtightened, it will quickly wear out. After this, the tension roller nut is securely tightened.
Why does the belt need to be tensioned?
Because it operates under high voltage, over time the tire that makes up the belt begins to relax and stretch slightly. And when it stretches, problems begin with engine components, because without belt drive they cannot perform their functions.
A loose coil belt can not only jeopardize the performance of engine components, but it can also cause internal damage to the engine itself, and then you will have to completely rebuild your car's engine or, worse, buy a new vehicle.
How can you tell if a track belt is stretched?
Look at the warning light on your car's dashboard - most modern cars have a warning light that shows the battery voltage when you start the engine. If the belt is not tight, it will not be able to rotate the alternator pulley, causing a drop in electrical current to the car's engine, which in turn will cause the warning light on the dashboard to turn on. Attention! The light may be on not because of belt tension, but because of problems with the battery or alternator.
Pay attention to engine temperature - if the timing belt is too tight, it may not supply enough water to the water pump and this will cause the engine temperature to rise, which will not be able to cool effectively. Listen for unusual noises or squeaks in the engine area - Squeaks are one of the first signs that the belt is loose, and if you hear them when you start the car when the engine is cold, or hear them when accelerating, then it's time to think about tightening the belt.
Reassembly
Then everything is assembled in reverse order. First, install the crankshaft pulley. To tighten the bolt, set the fourth speed again and depress the brake pedal, after which the bolt is tightened with a head with great force using a collar. The generator belt is installed in place, the pulleys are moved apart using a pipe, a collar or a small pry bar. This is necessary for good tension of the generator belt, after which the nut is tightened using a wrench with a universal joint. The pulling procedure is repeated several times. This belt should be stretched very tightly and practically not bend under the force of your hand.
Video: Replacing the timing belt VAZ 21099, 2109
After this, the timing belt protection is put in place, for which you will need to install it in the seat and tighten the three bolts again. The air intake is put in place and secured with a clamp. The metal and plastic protection is installed in place and the removed wheel is secured, the car is removed from the jack. After this, you can start the engine. It will start without problems, its operation should be stable, without fluctuations or extraneous sounds. This will only be possible when all the marks match and the belt is tensioned with sufficient force.
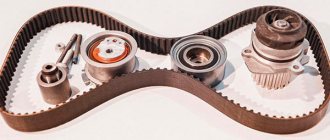
Replacing the timing belt tension roller on a VAZ 2108, VAZ 2109, VAZ 21099
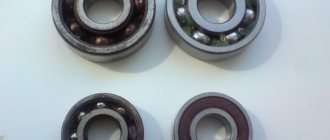
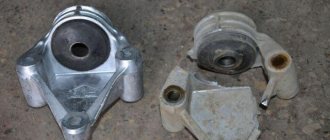
This roller tensions the timing belt. Wear leads to the appearance of various extraneous sounds emanating from the bearing located inside the roller. It is necessary to replace the bearing in a timely manner, otherwise jamming is possible and it will stop abruptly, the timing belt will bite and ultimately the belt will break.
Note! You will need a minimum set of tools and a special key sold at a car dealership. A screwdriver and two thin drills will do as a replacement. You will need wrenches and a socket wrench.
Video location
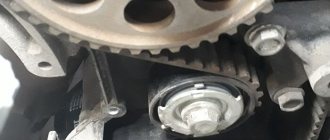
The only way to get to the roller is through the timing belt. You will have to remove the plastic casing (protection) that is secured with three bolts. Once removed, the belt, roller (indicated by the red arrow) and timing pulleys will appear before your eyes.
When to change the roller?
If the noise of the running engine begins to increase, and when you bring your ear to the roller, a distinct noise is heard, then there is a possibility that it has become unusable. It needs to be removed and checked for functionality. Pay attention to the bearing. Holding the roller in your hands, rotate the upper part, if you feel jamming or, much worse, axial play, or the liquid that is poured into the bearing begins to flow out, urgently replace the roller with a new one. At the same time, check the belt: there should be no cracks on it, no oil that could get on it due to worn out seals, no visible deformation.
Preparation for work
To change the timing belt tension roller yourself, you need to prepare a basic set of tools:
- spanners;
- knob;
- union heads;
- socket wrenches or screwdrivers;
- drills or wrench.
Under the protective cover covering the timing belt assembly there is a cover that needs to be removed. A roller and a gas distribution mechanism are hidden under it (however, the timing belt itself is installed inside the power unit, so you won’t be able to see it immediately after removing the protective cover). The tension mechanism is indicated by a red arrow, and the blue arrow indicates the nut that secures the roller.
If you unscrew it, you can completely remove the part from the motor. In addition, you will need to release the belt from the camshaft pulley. Otherwise, removing the roller will become impossible or the work will become inconvenient and difficult.
There is a bearing inside the roller (it can be seen from the outside), which ensures rotation of the product around its own axis after the engine starts. During operation, the part becomes unusable and begins to play. Try shaking the roller by hand, and if it makes squeaking or play, you will need to replace it immediately. Often the structure jams or begins to leak lubricant. This leads to increased engine noise.
Replacing the timing roller on a VAZ 2108-VAZ 21099
Removal
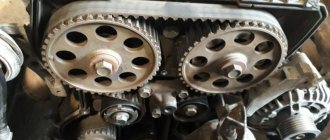
1. First, remove the casing and locate the roller that is secured in the center by one nut. Unscrew it using a wrench, or better yet, a spanner. Then remove the washer located behind, pull the timing belt by hand in the place where it touches the tension roller (look at the large photo) and you can safely remove the roller from the stud, by the way, there is a spacer ring behind the roller (see small photo), it is very important and make sure that it does not fall and is in good condition; if necessary, replace this ring with a new one.
Note! The distance ring provides distance to the roller and the belt fits exactly where the belt passes. Due to this ring, the roller does not touch the belt and spins without much care to the side, so the belt does not fly off and does not come into contact with any parts on the side.
Carry out in the reverse order of removal. After installation, a belt is put on it. Do not forget about the two holes on the roller for a special key; they should be directed not inward, but outward. Thanks to them, the belt is tensioned with a tension roller (for more information about tension, read the article: “Replacing the timing belt on a car,” point 2).
Additional video
We have attached video material on the procedure for replacing and installing a new video, enjoy watching:
Source
Why does the timing belt break on a VAZ 2109?
Many people wonder why the timing belt breaks only after it has happened. You will be lucky if such a breakdown occurs, for example, somewhere in the yards while the engine is warming up, and not on the highway between cities. Therefore, so that you do not find yourself in such situations, you need to know why this happens. There are several reasons for belt breaks:
Let's discuss each point in more detail.
Natural wear of the part.
During operation, the belt not only wears out, but also bends, resulting in microcracks that subsequently grow and lead to belt breakage.
Each node has its own service life. The timing belt of the eight-valve VAZ engine operates for 60 thousand kilometers.
Buying a defective belt.
Don't skimp on critical spare parts. By saving 100-200 rubles you can be stuck on the road for a long time.
Contact with technical fluids on the belt.
Oil or coolant can easily get on the timing belt. Oil gets in due to wear on the camshaft and crankshaft seals, and antifreeze can leak out when the pump wears out.
Malfunction of timing drive parts.
Timing drive parts include:
Over many thousands of kilometers, the timing gears wear out and the possibility of the belt jumping over a gear tooth increases.
Due to a poor-quality belt tension roller or due to its long use, it may jam. Also, do not overtighten the belt. A belt that is too tight begins to whistle and can break very quickly.
During operation, the pump bearings wear out and play appears at the pump shaft, as a result of which the pump drive gear is crooked and the timing belt begins to slip and rub against the protective casing or the block.
Main malfunctions of the timing belt of the VAZ 2109 engine
These include the following:
There are several factors that are also typical for malfunctions of the crank mechanism:
One of the most serious problems that can happen is the so-called stuck valves. Such a breakdown leads to complete engine failure and expensive repairs. There may be two reasons.
Factors that caused the malfunction
The first is operation on low-grade fuel, as a result of which resin is deposited on the valve stems. The second factor is resonance caused by broken springs. In this case, when the piston reaches TDC, the valve does not have time to fully seat itself. This kind of problem is extremely rare, but it doesn’t hurt to know about it.
A common malfunction with a violation of the thermal clearance occurs due to wear of the bearings or camshaft cams. Also possibly the camshaft pulley. Often the cause is incorrect adjustment of the gap or incorrect selection of the washer.
In fact, it is quite difficult to correctly diagnose timing belt faults, since signs may indicate other engine components and assemblies not related to the timing belt.
Therefore, diagnosing breakdowns of the gas distribution mechanism often involves removing the cylinder head cover for a visual inspection of the condition of the elements. A timing malfunction in any case leads to a violation of the valve timing, as a result of which unstable engine operation is observed, the inability to gain power, etc.
Signs of trouble
You can carry out diagnostics yourself if you pay attention to phenomena that clearly or indirectly indicate problems with gas distribution:
For an accurate diagnosis, the best option would be to contact a specialized center. You should not delay with such malfunctions, as the consequences can be serious.
Placing timing marks on a VAZ 2109
Such a part as the timing marks of the VAZ 2109 is the most important element when performing adjustment and repair work on this car model. For example, setting timing marks on a VAZ 2109 is simply necessary when adjusting the valve drive. The procedure is considered quite simple - an ordinary car enthusiast will be able to do all the work with his own hands, without turning to professional craftsmen, but only if he learns how to set timing marks on a VAZ 2109 in detail and taking into account all the details and features. Before you set the marks on a VAZ 2109, prepare a few simple, but at the same time important tools: 1. jack for raising the car;2. a screwdriver, always flat and thin;
3. key for ten. If necessary, it can be replaced with a ratchet head.
The first thing you need to do before placing marks on the VAZ 2109 timing belt is to lift the front of the car so that the wheel is in the air.
In what cases is replacement necessary?
The timing belt is a rubber rim with a toothed inner side. It serves to synchronize the operation of the crankshaft and distribution shaft, and also drives the water and oil pumps. It belongs to consumables that need to be changed regularly. The replacement should be carried out according to the recommendations of the VAZ 21099 manufacturer, who recommends replacing the part after 50-60 thousand kilometers. But this is not the main criterion.
A belt break while driving can cause a major engine overhaul. If the belt breaks, the synchronization of the crankshaft and camshaft disappears. Then the valves begin to hit the pistons and bend, thereby damaging the pistons and cylinder walls. Therefore, the condition of the timing belt should be checked every 15 thousand km. If cracks are found during inspection, it must be replaced.
How to remove the timing belt on a VAZ 2109.
First of all, we engage fifth gear (this is done to make it easier to crank the engine when we align the marks), loosen the nuts on the front left wheel and jack it up. Open the hood, remove the protective cover and look at the position of the mark on the gear.
If you change the belt on a VAZ before it breaks.
Rotate the wheel until the marks on the gear and on the plate match.
After the marks coincide in this place, open the inspection hole plug in the clutch housing and check whether the slot on the housing coincides with the mark on the flywheel.
If there are no marks on the flywheel, then rotate the wheel so that the camshaft gear makes one more revolution. If this time no risk appears near the mark in the clutch housing, read how to change the timing belt on a VAZ 2109 if the belt breaks. If the mark coincides with the mark, unscrew the crankshaft bolt and go to the section “Lower timing mark of VAZ 2109”
If the timing belt on the VAZ 2109 is broken and you are planning to change it.
We remove the wheel, remove the plastic fender liner, if you have one. Unscrew the crankshaft pulley bolt.
If you don’t know how to unscrew the VAZ crankshaft bolt, then I’ll tell you a little trick.
If you have someone to help you, then ask the assistant, without removing the car from fifth gear, to press the brake as hard as possible. Meanwhile, we take the head and the larger lever and twist it counterclockwise with all our might.
If you are alone in this difficult situation, then the steps are as follows: check that the car is in gear and screw in 2 bolts that screw the wheels into the hub and between them insert a crowbar, reinforcement, a strong stick (whatever you find, as long as it doesn’t break) and press it into the ground. Next, take the head, extension and larger lever and unscrew the bolt, making sure that the car does not fall off the jack.
Lower timing mark of VAZ 2109.
After unscrewing the bolt securing the generator drive pulley, look at the alignment of the marks on the crankshaft gear and on the oil pump housing, they should match.
When the marks on the upper and lower gears are set, you can unscrew the tension roller and remove the roller and timing belt.
Replacing the timing belt VAZ 2109 1.5 liter 8 valves with photos and videos
Old VAZ 2109 with a 1.5 8 valve engine, timing belt replacement. In general, it could be a VAZ 2114 or 2110, there is no difference in operation, the eight-valve engine is the same everywhere. Together with the belt, we will change the pump, the tension roller and two pulleys, the camshaft and the crankshaft. If the timing belt breaks, the valves on this engine do not bend, but it is better not to let it get to that point. Changing the pump and roller is a prerequisite so that after a thousand kilometers you don’t have to disassemble everything again. But it’s up to you to decide for the pulley, the price is 150 rubles per pair. There were cars where a slightly bent pulley caused the belt to slip and gradually wear out, reducing its service life. On this car the belt was worn down in half.
We recommend that you periodically check the condition of the belt to avoid annoying consequences and not have to look for someone to take it to a repair shop. Replace every 40,000 kilometers.
And here is the patient himself.
To replace it, we need a key for the tension roller, the price is half a hundred rubles. You can buy it at any auto store. As well as a set of keys and sockets and two hours of free time.
Begin
Everything we need.
We unscrew the three ten bolts securing the protective timing cover and remove it.
Next, loosen the nut thirteen that secure the generator and unscrew the tension bolt ten.
We take the generator to the engine and remove the belt.
Remove the engine protection and drain the antifreeze. We set the camshaft mark by turning the crankshaft clockwise. The ebb on the pulley should be opposite the bend of the protective cover fastening.
Unscrew the crankshaft pulley mounting bolt. We put the assistant in the cabin and force him to engage fifth gear and press the brake. And at this time we easily and naturally unscrew the bolt using a 19 meter head and a pipe of one and a half meters. It must be screwed properly, and some craftsmen lubricate it with sealant and then wait for kind words addressed to them.
On the left side we see the crankshaft position sensor. We will need it to subsequently check the correct installation of the timing belt. We remove the crankshaft pulley and see that the marks match.
Unscrew the nut on the tension roller 17 and remove it along with the belt. Then unscrew the camshaft pulley bolt and remove the last one. Be careful not to lose the key. We unscrew everything that secures the protective metal shield, namely one ten-point nut and a bolt securing the cover, three bolts securing the pump.
Remove the protective cover and pump. Antifreeze remaining in the block may leak out if you have not drained it. Carefully, it's sweet.
We clean all the parts from oil and belt residues, as well as the pump seat from the old gasket and sealant.
Lubricate the gasket of the new pump with sealant and put it in place. We install the metal protection and tighten all the bolts and nuts securing it. We tighten the pump bolts evenly in a circle, then check whether the pump is spinning. Recently a client brought in an original pump, which turned out to have slightly larger petals and after installation it began to bite. I had to modify it with a grinder and take measurements several times. These are the spare parts we have.
We check if the key is lost on the camshaft and install the pulley. We tighten its bolt to seventeen.
Now comes the fun part - installing a new belt.
We check that all marks match. We first place the belt on the crankshaft and pump. Then we tighten the right descending branch of the belt and put it on the camshaft pulley and tension roller. We check all the marks again and tighten the belt with a roller. The tension is considered sufficient if, with the force of two fingers, you can twist the longest branch of the belt by a maximum of 90 degrees. It’s easier to take the right branch of the belt with two fingers and twist it, if more than 90 is not very bad, but less is very bad. An overtightened belt will wear out quickly and will also reduce the life of the pump.
We place the bottom protective plastic cover. And on the crankshaft pulley we mark the twentieth tooth after skipping two teeth. We count counterclockwise.
This mark corresponds to the top dead center of the first cylinder. We put the pulley in place and the mark should be against the crankshaft position sensor. More precisely, against the small iron core of the sensor. Sometimes it gets into the gap between the teeth, this is considered acceptable. We tighten the pulley in the same way as we unscrewed it, with the help of a partner.
We turn the crankshaft two turns and check the marks; this is where our mark on the pulley comes in handy.
If everything is in trouble, we collect everything that we took apart. As they say in smart books, install the parts in the reverse order of removal. Don't forget to add antifreeze.
We start the car, accept congratulations from family and friends and head off to adventure.
Installing a timing belt on a VAZ 2109 injector.
Before installing the belt, check all marks again. When installing the belt, there should be no slack in the belt between the camshaft and crankshaft gears, otherwise the marks will go away. It is best for the belt to be slightly tensioned in this place. It is allowed that the marks differ by approximately half a gear tooth. We install the tension roller. Before him, a washer is put on the bolt, and only then the roller itself.
How to properly tension the timing belt on a VAZ 2109.
The belt can be tensioned either with or without a special key. A special key can replace a screwdriver and 2 nails or self-tapping screws. We insert the nails into the holes of the roller, insert a screwdriver between them and twist counterclockwise. A good tension is considered to be the moment when the belt between the camshaft and crankshaft gears can be twisted 90 degrees with little effort. With the engine running, in this place the belt should run straight like a string, without beating. It should also make noises such as creaks and whistles.
After tensioning the belt, turn the crankshaft 2 turns and see if the marks on the gears match. If everything matches, then we collect the rest in reverse order.
I hope in the article “How to change the timing belt on a VAZ 2109” you found answers to all your questions. If something is unclear, leave your question in the comments.
Installation
Now directly about how to return a new timing belt to its place. There is nothing complicated here either, but we still recommend watching visual videos and studying the instructions.
- As soon as you have examined the condition of the unit and decided to change something, proceed to assembling the mechanism.
- It is easier to do the work so that all the inscriptions are turned in your direction, that is, towards the right wing of the car.
- Replace the pulley unless it needs to be replaced.
- Next, put on the belt. Moreover, it should be put on the lower gear first, and then on the upper one. Not the other way around.
- Make sure there is no sagging.
- Place the timing belt behind the water pump and tension pulley.
- Tighten the tension roller using a special wrench.
- If you do not have such a key, use a simple key and a screwdriver.
- Be sure to adjust your new strap properly. The adjustment is carried out until the moment when you can no longer turn it at an angle of more than 90 degrees. This is the best option for tightening the strap for the VAZ 2109.
- Turn the pulley several times. This will ensure that the marks on the timing gear and flywheel are in the correct position.
- If for some reason the tags do not match, we have bad news. You will have to remove the strap again and adjust the position again.
Crack on the strap
The main difficulty in replacing a timing belt lies not in the complexity of the processes performed, but in the time that needs to be spent on repairs.
A competent approach, attentiveness and the use of a high-quality new belt will allow you to easily restore the operation of the gas distribution mechanism and save hundreds of rubles on visiting a car service center.
Placing timing marks on a VAZ 2109
Aligning the timing marks is a very important step when performing many repair or adjustment work on the VAZ 2109. For example, this procedure is required when adjusting the clearances in the valve drive. This is quite simple to do, but it is worth devoting a separate article to this material in order to show everything more clearly and in detail.
To carry out this work, we will need a few simple tools:
So, the first step is to lift the right front part of the car with a jack so that the front wheel is suspended. The photo below shows an example on Kalina, but there is no difference between the engines, so you shouldn’t pay attention to it:
Next, you need to open the hood of the car and remove the casing, under which there is a drive star for the VAZ 2109 gas distribution mechanism. It is usually secured with a pair of bolts from the end:
Next, remove the protective casing, moving it slightly to the side, as is more clearly shown in the picture below:
Source
How to replace timing rollers on a VAZ 2109 yourself?
The process of replacing timing rollers on a VAZ 2109 car is quite complicated! Most car owners can easily repair their car. They can quickly check the engine and identify any problem, after which they can easily solve it, no matter how complex it may be.
However, with domestic cars, not everything is as simple as it seems at first glance! If an experienced motorist can easily figure out most problems, he is unlikely to be able to cope with more complex problems without help. The most difficult jobs to perform include:
When do you need to change timing rollers?
Most motorists cannot determine in time that the timing belt rollers need to be replaced. It's not the motorists' fault. After all, most of them are accustomed to the fact that the on-board computer informs the driver about the need to replace consumables. It processes data received from various sensors. If necessary, displays a corresponding notification on the dashboard.
In most foreign cars, it is the on-board computer systems that monitor the general condition of the engine. But in this case, the car owner will have to monitor the technical condition of the consumables. The VAZ 2109 does not provide any kind of on-board computer. Everything is the old fashioned way here!
Therefore, you should listen to experienced owners of a car of this model! They recommend replacing rollers when the following symptoms appear:
Don’t be lazy; in this case, it’s best to conduct a detailed inspection of the rollers, belt, shaft gear, and generator gear. It will take about 30 minutes and can save you up to 50,000 rubles. Since ignoring problems with the timing system can completely damage the engine.
The cost of restoration work on the model 2109 engine varies from 45,000 rubles to 78,000 rubles.
modified timing shield
a conventional timing panel is a variant of a modified timing system panel
There are also cases of installing a special double chain instead of a rubberized belt. As a rule, for the operation of this type of system, the installation of a turbine is necessary. Otherwise, it will not have enough power to rotate the chain. Since the chain requires 0.56 times more power to operate than a standard engine produces.
As you can see, the modified timing shield is slightly wider than the usual one. This change in design is due to the presence of an additional number of timing belt tension rollers. As a result, the size of the shield increases.
The modified shield is installed in the form of an overhead panel on the engine. In this case, all gears are removed. Their bushings are inserted into special grooves on the panel. Then the gears return to their place. The panel itself is fixed with 5-8 bolts, depending on the model.
To avoid serious problems and any malfunctions in the engine, you should replace the rollers on the VAZ 2109 in a timely manner. The manufacturer recommends updating these consumables at intervals of 40,000 - 50,000 kilometers.
The actual condition of the rollers must be checked every 19,500 kilometers.
It is worth considering the following things that affect the wear of timing rollers:
When does a timing belt need to be replaced?
The manufacturer has determined the frequency of replacing the camshaft drive belt on the VAZ 2109 every 75 thousand km. However, car owners prefer not to bring the mileage to the specified value, performing repairs after 50-60 thousand km. This is due to the operation of equipment under conditions of temperature changes, as well as due to the unstable quality of components.
To be on the safe side, it is recommended to regularly inspect the condition of the belt. The procedure is carried out annually or after 10-12 thousand kilometers. To carry out inspection, it is necessary to remove the plastic drive cover.
The belt must be replaced in the following cases:
- when abrasions are detected;
- in the presence of tears and delaminations;
- when oiling occurs (it is additionally required to detect and eliminate the source of the engine oil leak).
How to properly check the rollers for serviceability?
Experienced car owners advise checking the serviceability of the rollers as follows:
Experienced car owners advise resorting to the following trick:
If you hear a creaking sound when the belt is operating, do not immediately replace the rollers! You can apply WD-40 lubricant to the inside of the belt. If the creaking fails, then the problem was belt wear. As a result, only it can be replaced.
You should also do some preparatory work:
To carry out technical work on replacing timing rollers, you will need the following tools and consumables:
To ensure that the car owner does not receive any injuries, he must also comply with the necessary safety precautions. It's pretty simple! But following it will allow you to protect yourself from unwanted injuries.
Safety precautions when carrying out technical work on the timing system:
Compliance with all the points described above will allow all technical work to be completed within 1 - 1.5 hours.
How to install the rollers correctly in place?
Not only the operation of the timing belt, but the operation of the entire engine as a whole will depend on how correctly the rollers are installed.
In order to correctly install the timing rollers, you must follow the following instructions:
If you follow the instructions described above, you should take into account: for adjusting the tension rollers, there are special technical marks on the modified timing system plate. They should be used to adjust their position. The car comes with a standard panel from the factory, which does not have any technical data printed on it.
In what cases is it worth replacing the belt? Signs that it is time to change the timing drive.
Replacing and tensioning the belt is carried out in two cases, namely:
- when a routine check of the entire gas distribution mechanism is carried out;
- if repairs were made to elements of the timing system.
To find out if the belt is tensioned correctly, you need to do the following. Take a regular canter and a ruler. Then everything is simple. Hook the canter hook onto the timing belt and pull. The scale dial should show a value of 10 kilograms. At this moment, measure the distance by which the drive has deviated. If the value is less than 5 and a half millimeters, then the tension is normal. When the value is greater than the specified figure, the timing belt needs to be tensioned.
In addition, if, when inspecting the drive, cracks, abrasions, or lack of teeth on the inside are visible, this indicates that the belt needs to be replaced. It is recommended to check the correct tension and inspect the belt every 15-20 thousand mileage. It is easy to tension the belt yourself. This will save money. Moreover, the whole procedure is simple. At the same time, modern cars are equipped with timing belt tensioners. Therefore, it will be enough to monitor their serviceability and the condition of the drive itself.
Step-by-step replacement instructions
The VAZ 2109 car is designed in such a way that if repair work is necessary, it can be carried out by the car owner himself. The process of changing the tensioner roller is quite simple, and it will take no more than 1.5 hours.
Step-by-step instructions for carrying out technical work on the timing system:
If after the work carried out, the car owner has no complaints about the operation of the engine, then the process of replacing the timing rollers in the engine is over.