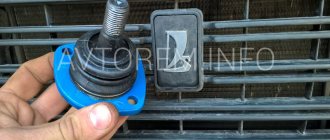
I’ll start with the seal... I’ll say right away that the photos are not mine, but everything will look the same for everyone. There was no opportunity to take photos.
I’ll say right away, it’s easier to find this spare part in a store and buy it. Easier and cheaper
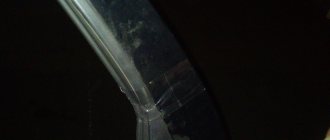
Installing a seal from a Priora on a VAZ 2110 - 12
A very useful modification. Many have probably already noticed that in rainy weather, the side windows on dozens of cars are always dirty. So here’s a solution to the problem. The seal is from Priora. But that’s where the advantages end... The well-known native seal of the VAZ 2110 wipes through the paint while driving , water accumulates and the roof literally rots through.
At Priora, this issue was corrected and the seal there does not touch the paint in any way, much less rub it.
I corrected the consequences quite recently.
ATTENTION! To install this seal, the car must have either a new type frill or a frill from Priora!
With an old-style VAZ 2112 frill, the seal will rest against the frill and simply won’t go into place!
Installation.
According to the instructions, this seal is placed on the removed windshield and then glued in. I didn’t want to change my original windshield just because of the seal and pay 3k for it. There was also our favorite collective farm version.
For simplicity, I’ll show you in the photo:
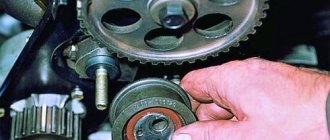
Refinement of gutters on the windshield from Priora
In order to install gutters from LADAPriora on a VAZ 2110 without modifications, two conditions must be met:
If there is rust under the windshield rubber on your VAZ 2110, then the process of removing it can be combined with installing gutters.
If you are not inclined to remove the windshield from your ten, then to install drains you will need to make minor adjustments to the car:
- First, you need to remove the standard rubber side seals of the windshield;
- Secondly, you will need to trim at a slight angle that part of the drain that will later extend behind the glass (shown in the figure below);
- The next step is to apply silicone sealant to the inside of the drain, extending behind the glass;
- At the last stage, we snap the gutters from LADAPriora.
If necessary, in order to avoid detachment of the upper corner of the edging, it may be necessary to trim or glue in certain places (depend on the situation).
If your VAZ 2110 car has an old frill installed, then the bottom of the drain will rest and it will need to be cut in place (although it is better to replace the old frill with a new frill - no alterations are required for this).
What to choose?
Sometimes you are amazed at the imagination and thoughts of those who are trying to save money on car repairs. If we talk about rubber seals, some advise using drip tubes instead, others go the other way, inserting window seals.
Do not follow such advice under any circumstances. They won't lead to anything good.
There are several truly correct and effective options, which we will introduce you to using the table.
| Option | Peculiarities |
| Ready-made kits from the manufacturer | They are designed specifically for the VAZ 2110 model. These are mass-produced rubber bands that fit perfectly on the dozen doors. Their design is double-circuit, which allows you to install additional seals if necessary. |
| Measuring rubber bands for VAZ | In stores you can purchase ready-made or soldered seals for each door. Or a solid tape, from which they will cut you a piece of the required length |
| Seals from Priora | Experts believe that these are the most effective and reliable seals. This is due to the three-chamber design with a steel fixing strip and high quality. These elastic bands do not wrinkle and keep their shape perfectly. |
| Rubber bands from GAZelle | A frequently encountered option that has similar characteristics to the standard elements for the dozen. The price is about the same |
When choosing the length of the required piece of seal, measure the internal length of the installed rubber bands on both doors separately. Take it with a reserve, because you can always cut off the excess.
The fixing elements should be caps and high-quality, effective glue. When purchasing the rubber itself, they will tell you which glue is best to use.
Tools and materials
In order for the replacement of the VAZ 2110 windshield to be as high-quality as possible, you should prepare a set of necessary tools, as well as some chemicals.
To work, you will definitely need a new glass to replace the damaged one, and a mounting string with two handles. You should also prepare a repair kit - it is necessary for gluing the windshield. This kit must contain a special glue - “Sicaflex”, “Dinitrol” or “Terasol”. You will also need a primer, without which special glue cannot be used - this is a primer. An activator is also needed. It is used to glue glass. Additionally, for degreasing you will need white spirit, a plastic spatula and plumbing tools. It should be noted that replacing the windshield of a VAZ 2110 alone is almost impossible - experts recommend using help.
Dismantling works
The entire glass replacement process should begin by removing the damaged glass. First, using a plastic spatula, remove all decorative elements, as well as panels located in the car interior. It is necessary to remove the windshield wipers from the outer part, as well as the frill - for this, the plugs and fasteners are removed. At this stage, the VAZ 2110 windshield washer nozzles can also be replaced.
Next, open the hood and remove the rubber glass seal. To easily remove the sealing element, you need to lightly pull the molding by its edge. Once the molding is removed, it will be possible to remove the rubber triangular gaskets. During the installation of new glass, the rubber band on the windshield of the VAZ 2110 will be replaced.
How a windshield is cut
This way you can get to the adhesive layer that holds the glass to the body. To remove the windshield, the layer of glue is literally cut out using a special tool - a string with handles. The most effective tool will be one that has a square cross-section.
The sawing process is performed in a special way. The layer of old hard glue is pierced with any sharp object. One end of the string is inserted into the hole, and the other is pulled into the car interior. Handles are then attached to this tool.
Two people are more effective
One person must be outside and the other person must be inside the vehicle. To effectively cut glass, you need to remember a two-handed saw - this is how you should run a string along the edge of the glass. In this case, it must be pulled at an angle to the cutting site. The second person should move his end of the tool slightly upward - this will not only allow you to safely remove the glass, but also not damage the paintwork of the car body. The glass is cut from below under the hood. Here you should show maximum attention and accuracy so as not to damage the torpedo in the process of sawing the glue.
When the old adhesive layer is cut off along the entire surface of the edges, the window is completely dismantled. You can begin the process of preparatory work on the now free opening. Then, after preparation, the windshield will be replaced on a VAZ 2110 car.
Preparatory work in the opening
Now that the old broken windshield has been completely removed, you can begin installing a new one in its place. However, the opening must first be prepared. First, it is recommended to remove the old and heavily dried glue that used to hold the glass. If rust has formed under it, it must be removed immediately using sandpaper or any other convenient method. The area that has been stripped to bare metal must be primed. This operation should be performed very carefully. When cleaning glue, experts recommend not removing the entire layer. It will be good if a thin layer remains, which will subsequently help the new composition to better connect to the mounting parts.
After cleaning the glass surface from glue is completed, everything that remains should be very thoroughly degreased. It is also recommended to treat the edge on new glass. After the white spirit has dried, an activator is applied to the grease-free areas. In the future, it will contribute to better adhesion. Before applying the glue, you need to warm it up slightly - then it will become softer and more comfortable. Thus, replacing the windshield on a VAZ 2110 car will be much easier. The glue is packaged in a tube - by lightly pressing the tube, it is applied along the edge of the frame of the car. As for the thickness of the layer, there are no specific recommendations - it all depends on the manufacturer and brand of glue. This is usually indicated in the instructions for the product.
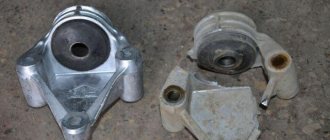
Purpose
Color marks are also drawn in a certain place where there is a filler in the form of a porous rubber rod. The insert in the body of the seal is necessary so that when installing it in the door opening, it does not break and become deformed in the corner of the opening, where the transition is not so smooth.
Thanks to the insert, the product becomes level without breaking, which guarantees a tight fit in this area of the opening, which provides a reliable seal.
Differences
An ordinary, cheap sealant has no filler, and therefore there are no color marks. They are mounted on any side of the doors, both left and right. Ask salespeople at your auto store for universal door seals. They also fit on front or rear doors. The only thing you need is to cut off the excess part at the junction with a margin. Rubber sags over time.
Products with an insert are installed only on a certain side, on the right or left of the car, so that the filler fits exactly on the bend of the door opening.
Replacement
Video author Nik86 auto-construction:
The procedure for installing the seal starts from the middle mark, which is aligned with the vertical joint of the body parts in the opening, where the joint is clearly visible. With this installation, the porous rubber rod hits the corner and prevents a crease from forming.
During installation, the door opening is cleaned of traces of dirt, passed with a damp sponge, dried and degreased with a solvent. It is recommended to treat the seal itself with a silicone compound, especially the inner part, which is installed on the edge of the opening.
Installation of a new
On VAZ 2110 cars, replacing the windshield can be done using a special tool - these are suction cups, but you can do without them. Before you begin installation work, it is important to remember: it is strictly forbidden to disturb the layer of just applied glue. New glass is laid on any surface so that its outer side faces up. Then the VAZ 2110 windshield seal is replaced: the seal itself, as well as the molding, is very carefully placed on the edge. Usually these parts are replaced, but it happens that these elements are preserved in good condition. Then they can be used with new glass. If the seal adheres to the glass with insufficient density, it can be additionally secured with tape.
Then the glass is turned over and laid so that its inner side is at the top. The edges of the panel are thoroughly degreased using white spirit. Before installing the glass in its place, the edge must dry thoroughly.
Advised by professionals
To ensure that the installation process is carried out efficiently and is as convenient as possible for those who perform it, it is recommended to open the hood slightly and lower the front door windows. Hold the bottom of the panel with one hand, and pull it inside the cabin with the other and calmly control the installation process. Then the glass is brought with its lower part onto the frame of the opening and carefully lowered onto the frame with the edges treated with glue. Next, special stops are installed under the lower edge. They will help fix the correct position of the windshield and give it the most symmetrical position. It is also recommended to make sure that the element is installed as level as possible in the vertical and horizontal planes. You can check this by looking at the gaps. If replacing the windshield of a VAZ 2110 with your own hands is done correctly, then they will be the same on all sides. If the glass is positioned correctly, you need to fix its position with tape. You need to pull the glass to the roof of the car. As for the glue, it is important to remember that it dries completely only in 12-15 hours, not earlier. Only after this can you operate the car.
Conclusion
You can replace the windshield yourself - it will be cheaper than at a car service center. So if you don’t want to spend extra money, but have some time to spare, go for it.
The drawing is not mine, but I’ll explain. Look at the picture where there are green and red arrows. You coat the profiles with silicone/vd, whoever uses what, I did it first.
You open the doors, bend the seal on the roof and push the profile marked with a green arrow along the entire length of the glass. From the side of the roof it will turn out a little hunchbacked, just press it down carefully. First you should make sure that the part of the profile (green arrow) that will be under the glass is not too large. If it is too much, it will not allow the profile to fit properly onto the glass and then you will not be able to reach the roof level with an elastic band.
Necessary tool
To ensure that the replacement of the VAZ 2110 windshield goes smoothly, you should get a gluing kit. When purchased through an online store, the TEROSON PU kit will cost approximately 1,150 rubles, but it will quickly pay for itself. Its composition:
- adhesive-sealant 8596;
- cartridge nozzle;
- primer;
- applicator;
- surface cleaning cloth;
- cutting string;
- instructions for use.
In addition, you need to have other devices on hand:
- a set of flat screwdrivers and spatulas;
- several stationery knives;
- solvent for nitro paint;
- new consumable.
With an assistant, changing a part is easier and faster.
Price is not a guarantee of quality! But you shouldn’t take the cheapest materials either: fakes are not uncommon.
Replacing side windows of a VAZ in step-by-step instructions
For those who want to independently replace the side windows in a VAZ 2110 car, you will need step-by-step instructions with explanations.
Note! When performing work, you cannot do without a screwdriver and wrenches of size 8 and 10.
DIY replacement
Note! First, the side glass must be positioned in the upper position.
Note! Usually the upholstery is secured to the door panel with 7 plastic holders.
Types of damage
The structure of the windshield is triplex - an impact-resistant material in which there are two layers of glass and a thin film in the middle. This allows the spare part not to crumble upon impact.
Masters divide damage into two types:
- Chips. Only the top layer was damaged. No immediate replacement is needed.
- Cracks. In this case, supply new material as quickly as possible. The film holds the fragments, but not as firmly as before, and in case of potholes, which are not uncommon on our roads, they will fly apart. This will lead to an accident.
If you can’t change it soon, you can resort to several tricks:
- Make perpendicular cuts along the edges of the “web”.
- Drill holes with a diameter of 5 mm along the edges of the crack.
- “Brew” the damage.
All measures will give a temporary effect, and the spare part will still need to be replaced.
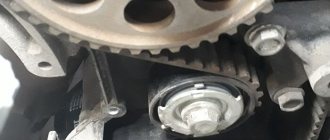
How to remove and install
We have everything we need, we can get to work. We remove everything unnecessary: wipers, trims, etc. Accessories will interfere with the dismantling of damaged material.
Windshield
We start removing the windshield from the top. From any angle, carefully squeeze it out along with the rubber bands. From inside the passenger compartment we pry up the seal with a screwdriver - this makes it easier to dismantle the front glass on the VAZ 2110.
We work with gloves! If the glass shatters, you will need to remove the shards manually. Take precautions!
We clean the grooves from dirt and small fragments. We put a rubber seal on the new glass. If it has dried out and cracked in places, it is better to buy another one.
Removal
When you have obtained the required number of seals for yourself, you can begin to work.
First, the old rubber elements are removed, after which the installation of new parts begins.
Let's tell you more about the dismantling procedure.
- Remove the plastic trim panels installed on your vehicle's door sills. To do this you will need a sealed screwdriver. Remove carefully, being careful not to destroy the plastic caps. But it’s better to purchase new ones in advance if you can’t carefully dismantle the threshold.
- Now remove the old pieces of rubber from the seats. Simply tear off the sections that are torn off by hand.
- Remains of rubber can be cleaned with any available equipment. Just be careful with sharpened objects so as not to destroy the metal and paint layer.
- Very small residues and traces of adhesive can be removed using solvents. Make sure that the solvent you choose will not damage your paintwork.
- Walk along the doorway with a vacuum cleaner, remove all dust and dirt. Be especially careful when removing the lower part. If wet cleaning was used, wait until everything is completely dry.
Removing old glass
Before removing the old windshield from your VAZ, you need to dismantle the mechanisms that interfere with this:
- Remove the frills and wipers so that they do not bother you.
- Remove the plugs and glass fasteners.
- Find two nuts near the ventilation grille and unscrew them.
- Start removing the rubber seal from the engine compartment. Do this carefully. Remove the screws that hold the sound insulation and windshield seal.
- There is a lock in the center of the seal - your task is to pull out the rubber so that it remains in place.
- Under the frill there is a washer hose and a clamp. You need to cut the hose in an inconspicuous place, and then you will mark the adapter there.
- Now you can completely remove the seal, because nothing is holding it in place.
- All that remains is to remove the decorative molding and the glass is ready to be removed.
It is best to dismantle the glass with a partner who will sit in the cabin. You should not knock it out, even if it is almost completely covered with cracks. It's best to use it in a safe way. Remove the handle from the string and push one of its ends into the interior (to do this, use any suitable gap).
You should cut the glass, placing the string at an angle to it. The person on the outside will guide the cutting string, and the person on the inside will pull it through with rhythmic movements. To do this, you need to install handles on the string. Once you have gone all the way around the glass, work with an assistant to carefully pull it out. If you handle the edge, wear thick gloves.
Direct replacement begins with preparing the seat and the glass itself. For this:
- Remove most of the old adhesive, leaving only a thin and rough layer of it for better adhesion of the installation agent.
- Inspect the frame. If you notice traces of rust on it, you will need to remove it and apply a primer to the cleaned area.
- The edge of the new glass and the seat must be degreased. After this, you can apply the activator.
The glass itself must also be prepared before installation: wipe off dust, degrease, and clean its edge with fine-grained sandpaper. You have to install the molding, and if it does not fit tightly, secure it with tape. Mark along the entire length of the molding the places where the glue will be applied.
What you need to prepare
First, you need to purchase a windshield that fits the size. It is selected for VAZ according to article number 21105206016. You can find original or similar ones in stores. If you are looking for a reference glass to replace, then just know its article number - the store will select a suitable option for you. You can buy one of the models:
If none of the listed glasses are in the store’s assortment, then select the appropriate one according to the standard dimensions: 1428 × 862 × 5 mm. According to them, it is not difficult to make it to order in specialized workshops. In this case, you can choose the degree of tint and width of the stripe individually.
In addition to a new windshield, you will need:
You will also need to have a tool for removing old glue, fine-grit sandpaper. It's good to have your own set of suction cups on hand for installing optics, they will make your job easier.
Source