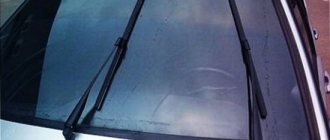
Replacing the motor and trapezium wipers
The front windshield wiper on the Lada Priora has a design similar to the tenth family, so this repair will be similar. But still, some points will be different. So, repair or replacement of some parts usually occurs for the following reasons:
- Windshield wiper motor failure
- Trapezoid failure
- The occurrence of increased play in the operation of the trapezoid
To make repairs or replacements yourself, you will need the following tools:
- Ratchet handles
- Extension
- Head for 10 and 13 mm
- Sharp knife or screwdriver
- Phillips screwdriver
Video “Features of replacement”
How to replace cleaners without a puller and what you need to take into account - learn from the video (author - AssistanceTV channel).
Windshield wipers, better known as windshield wipers, are not vital vehicle systems. But their breakdown causes serious inconvenience in bad weather and threatens traffic safety due to poor visibility. Fortunately, most windshield wiper malfunctions can be fixed fairly quickly with your own hands; repairing them is much easier than, say, repairing an automatic transmission.
Windshield wipers, better known as windshield wipers, are not vital vehicle systems. But their breakdown causes serious inconvenience in bad weather and threatens traffic safety due to poor visibility. Fortunately, most windshield wiper malfunctions can be fixed fairly quickly with your own hands; repairing them is much easier than, say, repairing an automatic transmission.
How to remove the trapezoid assembly
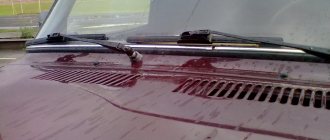
Before proceeding with the removal, it is necessary to remove the wiper arms, as well as the plastic lining at the very bottom of the windshield, which I wrote about in the instructions for replacing the Kalina cabin filter. There you will need just TORX T20.
After these pads are removed from the car, you can begin to unscrew the bolts and nuts securing the trapezium itself. First, unscrew the bolt on the left, as shown in the photo below:
Then in the center:
And you also need to unscrew one nut on the right side, it’s best to use an open-end wrench there:
Now there is nothing holding the trapezoid and now you can tilt it slightly forward:
To remove it from its seat:
And in order to finally remove it, all that remains is to disconnect the power plug of the motor. It was not possible to photograph everything in its original form, but there is nothing complicated there - bend the latch and pull the plug towards you. You will also need to remove it from the hole in the body in which it is mounted on a latch (clip). Here it is after removal:
Here's your trapeze, here's your Boschevsky motor...
Good afternoon I’ll start my story with a prehistory that happened to me back in the spring. I was driving to work, I had already driven 5 km from my house, the car and windows were warmed up and I decided to brush off the remnants of the melted ice. He waved the wipers and bang, the passenger wiper went down, and the driver's wiper froze in the up position. Pipe. I thought! So I suffered from the disease of the trapezius Grant and Kalin - the plastic hinge on the knee was worn out and began to fly out. No problem, I thought. After surfing the Internet and on D2 I found out about the existence of such a repair kit
I found it quite easily in the nearest store from home and it was put aside until better times, or rather free time to install it, because... I lubricated the old knee, put it back in and it fell out quite rarely, well, once a month maximum. But then autumn came, I was just on vacation and decided to take up this issue because... Soon it will rain and snow. I decided to change the bushing on the spot, I read on D2 that this is real. It was quite a hassle to remove the old bushing; I even had to melt the edge a little with a lighter. I heated the new bushing in boiling water, but the stopper did not want to go into place. Tried it 2 times. Everything is in vain. In the end, I decided to try it at idle, not on the trapezoid, to see how the stopper fits onto the bushing. As a result, I pulled it with my hands, of course I had to apply force, but the fact that the stopper stood up without any heating. I decided to perform the same feint on the spot and voila, everything worked out. I cleaned the landing ball, applied lubricants, snapped the bushing onto the ball, tested the operation in all modes - everything is fine, it works as before. But the music didn’t play for long - the repair kit was enough for 2 rains and BANG the bushing fell off again. I thought, told my fortune and decided to replace the trapezoid with a new one by rearranging my motor. I called the nearest auto store and they have two types of trapezoids. OOOO I think this is good! As a result, Sunday came, there is no rain, tinker with the car as much as you like (or rather, until it gets dark). I threw off the trapeze. When I unscrewed it, I was pleasantly surprised - the motor was Bosch from the factory. I took the trapeze and went to the store, taking with me the motor in case. I came to the store, I said, I called you the other day, here I come, give me a trapeze. And then I remembered a good expression - what bad luck is and how to deal with it. There is no trapezoid for a Boschevsky engine! Of the two available options, one does not have the same fastening or mounting hole for the shaft, and the second has a similar mounting hole, but the fastenings do not match. Holy shit... Of course, we discussed with the seller what could be sharpened, could be re-drilled and MAYBE it would fit. As a result, I went looking for all the nearby car stores, fortunately there are 4 of them and they all specialize in VAZs. The verdict is the same everywhere. There is no such trapezoid. After thinking a little, considering all the pros and cons, calculating the finances before payday)))) I decided to take the assembled trapeze. The choice fell on the Valeo trapeze. The issue price is 3130 rubles.
In the end, I installed everything, everything is fine, the trapezoid works without any comments. One thing - it seemed to me that the motor was noisier.
Source
Do-it-yourself replacement of the Lada Granta windshield wiper drive - step-by-step instructions
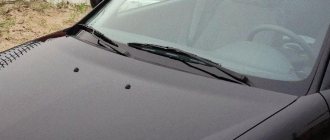
1. First of all, remove the wipers. This is done in the following way: it is necessary to remove two decorative plugs, under which there are mounting nuts with a key size of “13”, they must be unscrewed, and the windshield wipers must be removed from the slots along with the brushes and leads.
Note: After removing the wipers, do not turn them on so as not to have to worry about adjustments during assembly.
2. Next, you need to remove the frill (decorative plastic trim), for this you will need an “asterisk” - TORX T20.
Note: Some mounting screws are hidden under decorative caps.
3. Using a “10” key, you need to unscrew the nut (on the right), as well as 2 bolts (on the left) securing the trapezoid.
4. Now you can turn off the power; to do this, disconnect the wire from the battery and disconnect the connector. Now you can safely remove the entire trapezoid assembly.
5. Next, everyone can do their own depending on the need, some will have to replace everything, and for others it will be enough to wash everything and lubricate it properly.
Come on, get moving: why the wipers stop working and how to fix a trapeze
Just about simple things
The trapezoid of the wipers is the same mechanism due to which the rotational movement of the brush drive motor is converted into their translational movement. At first glance, there is nothing complicated about the trapezoid: several rods, articulated joints and bushings. Moreover, it is not clear what could break there. Usually nothing breaks, it’s just that over time the connections become clogged with dirt, corrode and lose mobility. And in the case of such arthritis in the trapezius, the wipers first walk more slowly, then they simply stand up. There is another scenario: the engine is on fire. It’s better not to wait for this, but to start repairing. Depending on their greed, the services ask for different amounts of money for this work. Some are ready to do it for five hundred rubles (which is rare), others – for one and a half thousand (which is more common). Not robbery, of course, but many will most likely want to tinker with their favorite car themselves. Therefore, we will tell you how to do this. At the end there will be a bonus for those who read the instructions after they have already broken everything. The work has one significant advantage: it does not require complex “devices”, torque wrenches, a lift or a synchrophasotron. For example, we did everything with an ordinary set of tools from a well-known store for 600 rubles. In addition to a screwdriver, keys, hammer and Torx, you will also need graphite lubricant and some kind of liquid wrench like WD40, Valera, Runway or any other - everything is up to your taste.
Almost all trapezoids are constructed the same way and sour in the same place. We will take the Ford Focus as an example, the trapezoid of which has stubbornly turned sour at the most inopportune moment for three generations in a row. Stability, damn it. There is also a whole list of cars in which the trapezoid sours more often than we would like: from the Mercedes W204 to the Hyundai Elantra IV and any Kia Ceed. The principle will be the same everywhere. Therefore, we will tell you how to do everything on a Ford, and if you are lucky enough to buy another car, just carefully project this guide onto your car.
Bolts, latches and flexible pins
First, remove the wiper arms. Everything is simple here: remove the protective caps, unscrew the nuts and pull them off their axles. There is nothing complicated here.
Then we move on to dismantling the plastic frill. Focus has two parts – upper and lower. The top half is attached with simple latches that can be easily moved with a screwdriver. The main thing is to hold them tightly with your fingers, because at the last moment the latch may fly somewhere into the engine compartment. We put the removed latches together with the nuts and washers from the wiper arms, pull out the rubber seal from the groove and remove half of the frill. And again, all this is not difficult to do.
At this stage, the trapezoid is already clearly visible. Some people are already stopping here and taking her out of the car. To be honest, this is not very easy, so let's work with the screwdriver a little more and disassemble the car a little more. It is enough to unscrew just two bolts with Torx heads to remove the lower part of the frill. But access to the trapezoid will be downright chic. Therefore, we spend a couple more minutes and remove this part.
1 / 3
2 / 3
3 / 3
You just have to do this carefully: Ford engineers (damn them for just one hood lock!) for some reason made the windshield heating two-zone, so the connectors for heating the glass halves are visible on the right and left under the frill. If you swing the removed plastic like Taras Bulba with a saber, you can damage the cables.
So now we can see the trapezoid in its entirety.
In our case, the trapezoid is secured with three bolts, which we unscrew. Now you can pull it out, but again, very carefully. There is nothing surprising in the fact that there are wires that connect to the trapezoid motor, which do not need to be torn. You need to remove the terminal, but this is easier to do if you slightly pull the entire trapezoid into the light of day. The length of the wires allows this, and Ford engineers (let them be empty for all the electrics!) placed the connector latch at the bottom. So it is very, very difficult to hold it in place. Therefore, we pull the trapezoid out a little, then remove the terminal.
That's it, the trapeze is in our hands. You can breathe out. But not much, because the most difficult thing awaits us ahead.
A little strength and a lot of skill
Trapezium hinge joints are usually made from polyformaldehyde. It is such a durable material with very low friction. For example, recently mediators for guitarists have often been made from it. And for machines - these are the connections where the friction force should be minimal and wear resistance should be high. It also does not rust, which is also good. Due to all these factors, we can say that it is almost pointless to disassemble the hinges: nothing will turn sour there, and breaking the connection for the sake of curiosity is harmful. Well, if you do take it apart, you can remove the dirt from there. This will not be superfluous.
Now let's move on to our main enemy. The trapezoid sours precisely in these places: these are the bushings with the axles of the leads. No matter how much they try to protect them with all sorts of caps and rings, water still gets inside and does its dirty deed.
The axles must be pulled out of the bushings. To do this, first remove the protective cap and retaining ring. I won’t warn you about the meanness of the latter: everyone knows that it can fly anywhere. But with some skill it is not difficult to remove.
And now the dancing with the tambourine begins. More precisely, with a hammer, a Vedashka and swear words. If the trapezoid has not yet completely soured and the wipers are at least moving somehow, it will be much easier to knock out the axles. Otherwise it will be difficult. In addition, you will have to knock with a hammer on the end on which the thread is cut for the wipers themselves. If you do this with fanaticism, then you won’t be able to put the wiper in its place. And without fanaticism, it is difficult to knock the axle out of the bushing.
Liquid keys will help here (but this is not certain). For those who have not used them before, I will give one piece of advice: it is useless to spray on the axle and hit it with a hammer at the same time. First you need to splash the soured compound, then wait five to ten minutes, then you can knock with a hammer. If the axis has moved even slightly, the procedure should be repeated. There is no such thing as an extra “Vedashka”.
So, let's say that we managed to knock out the axle. All that remains is to lubricate it. Many people mistakenly believe that the same WD-40 softens corrosion so well, removes moisture and works other miracles. And also - that the parts on which it fell never rust. This is wrong. As long as this miracle liquid has not dried, the axle will even rotate quite well in its bushing due to the small amount of oil in the “wheel drive”. But it won’t last long, as is the case with any other “liquid key”. They are poor lubricants, so as soon as the axle dries, it needs to be lubricated. Graphite grease is best. Well, when the axis is generously lubricated, everything can be assembled in reverse order. Anyone who has taken it apart once can always put it back together.
Only one point is important: before installation, it is advisable to place the trapezoid in the position in which it once soured. Otherwise, there is a non-illusory chance that after the first turn on, the revived mechanism will grind both the wipers and itself.
Promised bonus
Unfortunately, for very strong and stubborn people, repairing a trapezoid often ends in its complete destruction with the help of a hammer and their own stupidity. The platform on which the motor stands is often made of a rather fragile alloy that does not withstand the tenacity of the hammer owner. It breaks, and in this case no miracles like Suprotec, blue electrical tape and dimexide will help. There is only one way out - buy another trapeze. New, original, analogue, disassembled, Chinese - a matter of money, preference or religion, the choice is yours. The main thing is that free work will result in spending on new spare parts and unnecessary actions associated with rearranging the engine. You can, of course, buy it assembled, but it will be noticeably more expensive.
And when buying a trapezoid from disassembly, you need to check it thoroughly. In the best case, it will also be sour, and it will have to be disassembled and lubricated in the same way. At worst, it can be broken: over time, the polyformaldehyde connections wear out and begin to play. And it is no longer possible to fight this.
Possible causes of problems
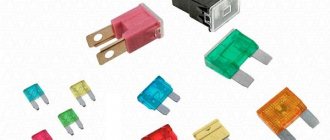
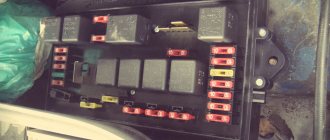
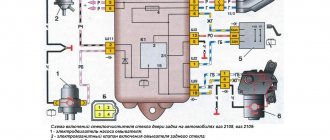
Some experts argue that if the windshield wiper blades do not work when turned on, then the most common reason for this is a failed fuse. In this case, no special efforts will be required to fix the problem. You just need to open the fuse box cover (on the left under the steering column) and find the appropriate fuse. A diagram printed on the inside of the lid will help you do this.
If the wipers do not work intermittently, then the relay may have failed. It is located in the same place as the fuses. It needs to be replaced with a new one. But, as statistics provided by owners of Lada cars show, fuses or relays blow out quite rarely.
A very common reason why the Lada Kalina windshield wiper blades do not work is the destruction of the bushings. As experienced drivers say, plastic bushings fall apart very quickly - their service life is at most 3 years.
Perhaps the reason for their destruction is the quality of the plastic. But, alas, there are no other bushings. The repair kit can be found in specialized auto stores.
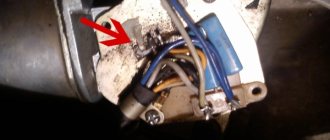
When the wiper drive does not work, the reason may be a failure of the motor that drives them. To find out whether the electric brush drive has really burned out, you need to check whether electricity is supplied to it. This can be done using a tester. If power is supplied, then the overheated motor needs to be replaced.
Why wipers may not work on Lada Granta
Incorrect operation of the wipers is included in the list of five malfunctions for which any operation of the vehicle is prohibited, even driving to the repair site. Therefore, you should take the issues of repair and diagnostics of the wiper mechanism very seriously.
Why might the wipers not work?
The most basic reasons why wipers on a Lada Granta may not work.
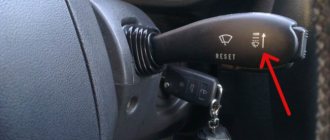
- The steering column switch for the wiper operation mode is faulty.
- The contact relay is faulty.
- The fuse is faulty.
- The wiper mechanism (motor, ramp) is faulty.
- Circuit break.
Let's consider each of these reasons separately.
Fuse blown
The most common situation is a blown fuse. Diagnostics should begin with it; to do this, replace the fuse with another one from the mounting block. The number of the windshield wiper fuse in the mounting block is F4. Detailed diagram of the mounting block is here.
The windshield wiper fuse is indicated by an arrow.
The wiper relay has “decided to live for a long time”
If, after replacing the fuse with a known good one, the wipers still do not work, then check the contact relay. The check is the same, it is replaced with a known good one.
Contact relay number K6.
The windshield wiper relay is indicated by an arrow.
Incorrect operation of the steering column switch
The car's wipers only work when the ignition is on. Therefore, if you try to turn on the windshield wiper with the ignition off and nothing happens, then this is not a breakdown!
How to determine that a trapezoid is “kirdyk”
Kirdyk is a slang word meaning an extremely bad situation.
It happens that the retaining ring of the bushing breaks and the rod simply flies out.
The slightest disturbance in the operation of the trapezoid can lead to incorrect operation of the wipers. Usually this part is replaced with a new one, although in some cases you can get by with installing a repair kit. Its cost is significantly lower than the price of the entire part, although repairs will take much more time. Here is a list of the main signs by which you can determine that a part will soon fail:
- Windshield wipers begin to do their immediate job poorly. This occurs due to the weakening of pressure.
- An unusual noise is heard during operation.
- A backlash appears, which can be determined even visually, since the glass will be difficult to clean.
- It happens that the brushes move in one direction easily, but back with difficulty, constantly slowing down.
All these problems lead to the fact that the windshield remains dirty, with streaks and smudges.
Windshield wiper motor - what is it and how does it work?
Modern cars are equipped with two windshield wipers, which for the front window have a double design (there are two rubber bands on the blade for more efficient operation), and for the rear window - a single version. Most windshield wipers operate in three main modes. These modes are intermittent, slow and fast operation.
A windshield wiper includes in its design an electric motor with a gearbox, a system of levers, brushes and a mechanism that automatically returns the car wipers to their original position. The windshield washer operates simultaneously with the cleaner. When this small but important mechanism stops working, you should not hesitate to fix it, because the weather is rarely predictable.
Also check out
- Remove the plastic plug, unscrew the 2 nuts to “13”, then the wipers with their leads.
- Remove the frill using a TORX T20 socket. Perhaps some of the bolts will be covered with plugs.
- Using a “10” wrench, unscrew the nut on the right side and the 2 fastening bolts securing the trapezoid to the body, and then on the left side.
- Disconnect the negative terminal of the battery, disconnect the connector and the trapezoid with the wiper motor.
- Install a new trapezoid. Reassemble everything in reverse order. At the end of the work, adjust the cleaner brushes.
Replacing a windshield wiper motor - how to remove the device?
Sometimes the rear wiper motor, just like the front one, simply fails. It is unlikely that this will be a frequent breakdown, but if it catches you, there is nothing you can do, you will have to figure it out. In order to repair the device, it must be removed, and this is a rather labor-intensive process. As an example, classic VAZ models are usually given, which most fully demonstrate the entire technical process. So, removing the motor takes place in several stages:
- The nuts that secure the brush arms are unscrewed, after which they can be removed from the cone splines of the drive. If this is difficult to do, a penetrating lubricant can be applied to the splines.
- The drives of the brush levers are dismantled by unscrewing the fastening nuts, and then the plastic bushings and rubber gaskets are removed.
- The block of wires in the harness is disconnected and removed by lifting the edge of the seal through the slot in the partition of the engine compartment.
- The next step is to directly remove the wiper. Then the washer and spring clamp are unscrewed from it, and the rod is disconnected.
- After unscrewing the three mounting bolts, you can remove the motor.
Size
If you do not know which windshield wiper blades are best to choose, then first of all you need to consider the size of the wipers. Today, the domestic market offers many different variations of purifiers. Moreover, the size of the windshield wiper blades determines how well and efficiently the glass will be cleaned. Front wipers should always be larger than the rear ones, since the view of the situation on the road is mainly through the mirrors, not the glass.
Set of frame brushes
When choosing wipers for Kalina, you should be guided by the following dimensions:
- The longer wiper (facing the driver) should be 24 inches long;
- The passenger windshield wiper should be about 16 inches;
- As for the rear window, you can also choose a 24-inch wiper, but for better cleaning it should be rounded.
The principle of operation of the drive, engine and other mechanism components
If the circuit and design of the windshield wiper do not raise any questions, let’s move on to the next point - the principle of operation. The windshield wiper holder, together with the blade mounted on it, moves left and right, which allows you to almost completely clean the windshield. As stated above, using the switch, the driver can adjust the speed at which the wiper blade holder will move. Some modern cars are equipped with hidden cleaners. In this case, the windshield wiper mechanism is installed under the windshield, and when the driver needs to turn on the wipers, the device pushes up this mechanism, which, after being turned off, “hides” back.
In general, windshield and rear window cleaners are almost identical products, but there are differences in their operation. For example, the windshield wiper blade holder can only operate in one mode, without the possibility of adjustment. That is, if the front wipers are part of a whole system that includes many elements and a control unit, then the rear wiper has only one function. One of the main components of the washer is a pump designed to activate the system’s electric motor.
Let's briefly consider the principle of operation of the system:
- The driver presses the steering column switch, giving the control unit a signal to turn on the wipers and also supply water.
- Through the operation of the electric motor, the liquid begins to be transmitted through hoses through nozzles to the windshield or rear window.
- The windshield wiper blade holder begins to rotate under the influence of an electric motor, to which the control device has sent a signal - at what speed the holders should move.
- With a short-term supply of liquid, a certain volume is applied to the glass. When the water stops flowing, the wipers continue to work for some time, usually 1-3 strokes (the author of the video is the Volkswagen channel RUS-LAN center).
What are the causes of breakdowns?
The most likely factor causing the wipers to stop is the blown working element in the fuse. Eliminating this malfunction involves performing the simplest action - replacing the fuse link. It is located in the corresponding mounting block, located on the left side of the steering column. It will be useful to stock up on a fuse diagram, which will help you easily find the insert we need.
When the purifiers stopped functioning intermittently, the control relay most likely became unusable. This component is also located in the previously designated block. When a relay fails, it is replaced with a new analogue. However, we note that according to numerous reviews from owners of domestic small cars, certain statistics have been formed indicating the small number of cases of breakdowns of this kind.
The most common cause is the destruction of bushings. They are made of plastic, so they do not boast a long service life, which reaches a maximum of three years. The process of destruction of elements is primarily influenced by the quality indicator of the material. Here, the only effective measure is replacement, and to carry it out you should acquire a repair kit, which is available at a specialized retailer. In this case, the trapezoid is replaced.