02/04/2022 10,427 VAZ 2106
Author: Ivan Baranov
Replacing the camshaft on a VAZ 2106 may be required for various reasons, but before moving on to this process you need to have an idea of the purpose of this unit. The camshaft is the main timing link and participates in the combustion process of the combustible mixture.
The camshaft is located at the top of the cylinder head. It is connected to a pulley or toothed sprocket of the crankshaft via a belt or chain drive.
VAZ 2106 car near a pond [Hide]
Adjustment or how to set timing marks on a VAZ 2106 yourself
Decoding notes
Without pre-basing the pistons and valves, installing the timing chain on the VAZ 2106 according to the marks is impossible. Therefore, the significance of the marks is not at all conditionally decorative. The signs give an understanding of the position of parts inside the motor:
- The mark on the KV pulley, which coincides with the long line on the front cover, means that the pistons of cylinders 1 and 4 have reached TDC.
- The mark on the RV sprocket, combined with the tide on the bed, informs about the closed valves in cylinder 4 - this is where the compression stroke occurs.
For your information. The numbering of the “pots” starts from the radiator side.
When the marks coincide, the ignition distributor slider is turned towards cylinder 4, and the valves of the latter are closed. By analogy with setting the clutch on a “classic”, the unambiguity of the relative position of the crankshaft and camshaft serves as the basis for adjusting the clearances in the valve mechanism and the ignition setting procedure.
How to restore tag matches
When the chain is pulled out, the marks will go away. The main difficulty is to return them to a position of mutual coincidence. This work is combined with dismantling the old chain. However, there is no need to rush to remove it - misalignment of all factory markers is fraught with danger.
The base is the position of the crankshaft at which the pulley mark coincides with the long line on the front cover. In this case, the drilling hole for the camshaft star should be closer to the high tide. This must be achieved first. It is worth remembering that the transmission is made with a 2:1 ratio - two revolutions of the crankshaft correspond to one revolution of the camshaft.
- Remove the camshaft sprocket, remove all other gears and the chain stopper.
- Take out the chain.
- Put the camshaft sprocket back (without the chain), tighten the bolt, tighten it, securing the part by the teeth with a screwdriver.
- Rotate the camshaft until the marks on the sprocket and bed coincide.
- After fixing the sprocket with a screwdriver, unscrew the bolt and remove it.
- Install a new chain, sprockets, tensioner shoe and damper plate.
Unnecessary fears when dismantling the RV sprocket are not appropriate. The shaft design includes a pin. In addition to transmitting torque, it serves as a fixator of a certain position.
How to put on a chain
Installation of a new chain begins with its attachment to a new crankshaft sprocket. Next, the damper, tensioner shoe, and limiter are mounted. The chain is passed through the drive shaft gear and secured along the way. Afterwards it is mounted on the camshaft sprocket, and its position is adjusted according to the cycle:
- Put it on the shaft.
- Look at the relative position of the drill bit and boss.
- Take off.
- Move one tooth in the desired direction.
The final procedure is to tighten the chain, during which the tensioner is twisted all the way with good force. After rotating the HF key, the final check of the coincidence of the signs is carried out.
Nuances in installing a timing chain according to factory marks on a VAZ 2106: pitfalls
It is difficult to achieve perfect alignment of two pairs of marks. The main reason is the use of components with dimensions within the maximum limit. By the way, adjusting the VAZ 2106 carburetor with your own hands also never follows the ideal scenario - additional recommendations from experienced craftsmen are almost always used.
Allowable elevation shifts
One of the unwritten norms allows for a discrepancy between the sprocket drilling and the camshaft bearing housing boss within a half-tooth in one direction or another. To be more specific, the installation of the timing chain of the VAZ 2106 engine according to the marks is considered complete when the camshaft sprocket is aligned exactly, and the mark of the crankshaft pulley goes slightly forward. This guarantees stable traction throughout the entire speed range.
If the camshaft star is aligned with the mark, and the knee pulley does not reach the TDC mark, the engine operates stably only up to a speed of 100 km/h. After crossing the border, there is a loss of traction and increased fuel consumption.
Extremes
A discrepancy of one tooth between the timing marks and the camshaft sprocket is unacceptable. This is usually evidence of critical chain stretch. When it is new, it is worth inspecting the seat under the key on the crankshaft - perhaps it is broken, hence the excessive play.
Engines with significant mileage are often prone to arbitrary changes in the location of the RV star mark during the rotation of the HF. This leads to:
- Slicked teeth in engagement of the gear shaft of the oil pump drive with the drive shaft (“fungus” with “pig”).
- Play in the distributor.
- Ellipse of timing sprockets.
For your information. Using a split star helps achieve perfect mark placement. It is installed to replace the standard camshaft gear.
Symptoms
To understand that the valves on the VAZ 2110 engine need adjustment, it is enough to know the behavior of the engine
After prolonged use, the car owner may notice that the engine has begun to work somehow differently. This fact should be alarming, because the consequences can be serious.
The main symptoms of a faulty valve mechanism adjustment on a VAZ 2110 look like this:
- the engine is noisy when starting up after a long period of parking (clacks);
- compression in the cylinders disappears (the engine loses its former power);
- Valve cover gasket leaks oil;
- “shots” appeared in the carburetor or muffler;
- fuel consumption has increased.
The listed signs can be diagnosed independently, without resorting to the services of a car service. Before you put the VAZ 2110 in for repairs and begin adjusting the valves, you should prepare a mechanic’s tool: a micrometer, a rack for pressing the pushers and a multi-part feeler gauge. The last thing to measure is the thermal gap between the camshaft cam and the adjusting washer. Instead of a rack, it is possible to use two powerful slotted screwdrivers.
Briefly about the main thing
The technology for setting timing marks on a VAZ 2106 engine is performed with the chain removed. A sprocket mounted on the camshaft without a chain is fixed with a screwdriver and tightened with a wrench. After rotating the camshaft in the desired direction and combining the drilling with the boss on the bed, the gear is again immobilized with a suitable object and dismantled. Next, the new chain is installed.
Perfect alignment of the marks can only be achieved by using a split gear. However, this is not at all necessary to comply with. It is quite possible that the camshaft marks coincide and the crankshaft pulley moves a little forward.
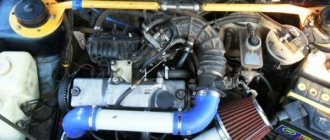
Design and purpose of the camshaft
With all the variety of elements and associated systems of a car engine, the power plant is a rationally coordinated single mechanism. The engine of the “six” is represented by a four-stroke type “engine”, and the alternation of strokes is strictly regulated. This determines the purpose of the VAZ 2106 camshaft, the price of which is relatively high and amounts to 1000-1200 rubles, depending on the manufacturer.
The classic camshaft of the VAZ 2106 is responsible for the sequence (established order) of the operation of the valve elements to open and close the product for the removal of gas products of combustion of the air-gasoline mixture and the operation of the intake fuel line.
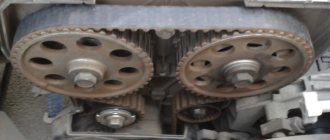
The main working body of the camshaft is the cams, which, through the influence of other elements of the product, including the camshaft chain, “open” the valves at a given frequency. The camshaft chain itself interacts between the gear and the camshaft sprocket of the “six” by means of a chain transmission.
Each valve corresponds to a separate cam, which, when operated by the action of a pusher on the protruding segment, presses on the valve element, which causes it to rise, which is why, depending on the position of the element, either a fuel-air mixture enters the cylinder or exhaust gases are discharged. When the pusher is released from contact with the protruding element, the spring “slams” the valve element with its tensile force.
The VAZ 2106 camshaft support neck is used for mounting the product in a retracted position. The mating parts are hardened using high-frequency current and are lubricated during operation.
Replacing the camshaft in a VAZ 2106 car
Scheduled camshaft replacement is not carried out very often if it is subjected to proper use. The scope of dismantling work is small and does not present much difficulty. Sequence of work:
- We remove the over-valve casing and unscrew the chain tensioner of the gas distribution mechanism drive system.
- We unscrew the camshaft gear; to avoid cases of unauthorized rotation of the shaft, it is necessary to fix the position of the vehicle in the gear position and secure it by installing chocks under the wheels of the car.
- We move the dismantled system to the side in order to continue technological operations.
- We dismantle all the fasteners of the body part (bed) of the camshaft in any order, in contrast to their subsequent installation.
- We dismantle the body part of the product, rocking it somewhat for a more successful descent from the studs.
- To remove the camshaft, unscrew the 2nd nut securing the product to the bed, located in the front part.
- By tapping with the handle of a plumber's hammer, we achieve translational movement of the shaft from the seat.
- We remove the shaft from the housing part.
The technological operation for installing the VAZ 2106 camshaft is carried out according to the opposite scenario. If there is a need to replace the camshaft due to high production, this is carried out together with the rockers. Removing them from their seats is not difficult; you just need to unfasten the spring-type fastener.
Otherwise, when assembling the product, it is necessary to use a torque wrench to tighten the camshaft to correctly determine the tightening torque of the camshaft, i.e. what force needs to be applied for this. As for the repair of the VAZ 2106 camshaft, metal spraying on the cams is rarely used to achieve the required dimensions for the correct operation of the product. Some car enthusiasts install a camshaft from the Niva on a VAZ 2106 to increase power. This, in principle, is an element of car tuning, and gives an increase in power both at the lower and upper speeds of the engine.
The modern sports camshaft on the VAZ 2106 is installed on tuned six engines to achieve different, improved power characteristics. Car enthusiasts should know that engine dynamics are directly related to the performance characteristics of the vehicle’s camshaft. These products, which transmit the moment of movement from the crankshaft of the power plant to the valve group, are produced in one piece with cams.
There is a special adjustable camshaft star (another name for the Vernier pulley), which allows you to set the camshaft “advanced” in such a way that at TDC the lifting point of the intake type valve will be higher than the similar parameter of the exhaust type valve. At the same time, installing the camshaft on the so-called. the moment of “lag” will change the indicator of the intake product. This proportion between the valve lift coefficient at TDC shows the degree of efficiency when operating a camshaft of one type or another.
The theoretical rule can be formulated as follows: the amount of advance of the shaft will shift the power indicator down the rpm range, and the amount of lag will have the opposite effect. Only adjusting the camshaft of the VAZ 2106 will make it possible to increase the power parameters of the vehicle.
Replacing the camshaft on a VAZ 2106 may be required for various reasons, but before moving on to this process you need to have an idea of the purpose of this unit. The camshaft is the main timing link and participates in the combustion process of the combustible mixture.
The camshaft is located at the top of the cylinder head. It is connected to a pulley or toothed sprocket of the crankshaft via a belt or chain drive.
Reasons for installing a split gear
In the opinion of experts, these are the two most significant reasons for installing a split camshaft gear. It should be noted that installing a tuning camshaft without a split gear simply does not make sense. So, the reasons:
- When assembling a standard car engine, the manufacturer allows certain deviations from the drawings. In this regard, the characteristics of engines of one model may differ from the nominal ones with a tolerance of ±10 degrees. This, accordingly, affects the engine power parameters. Installing a split gear allows for adjustment and optimization of torque.
- when installing a sports camshaft, engine power increases, and the use of a split gear, optimizing valve timing, adds 3-5% to the power.
If the camshaft fails
The camshaft on the VAZ 2106 model is rarely dismantled. Typically during repair or disassembly. Sometimes to replace it.
Signs
First, let's talk a little about the signs that indicate that the camshaft is faulty, its journals or beds are worn out. It is difficult to determine whether the shaft or something else is knocking in the VAZ 2106 engine, but it is possible. The knock of the camshaft is dull and clearly audible. As engine speed increases, the knocking becomes more frequent.
Some drivers determine knocking in this unit using a stethoscope or a stick through the valve cover. But often it is difficult for an inexperienced driver to do this. Therefore, the best way to diagnose the camshaft is to remove it, wash it and inspect it.
If the camshaft is faulty, the following symptoms may occur:
- a dull knock, reminiscent of hammer blows;
- it is impossible to adjust the valve clearances; while the crankshaft is turning, the camshaft is constantly in different positions.
What are valve clearances for?
In order for the engine to work at its best and develop all its performance characteristics to the maximum, the valves must move clearly and synchronously. The valves should fit tightly into their seats and open to the maximum.
With correctly set valve clearances, a hot engine works almost the same as a cold one, that is, the loss of power is minimal.
When the car is used a lot, for example, working in a taxi around the clock, the valves quickly lose their settings. Many people have probably heard, they say that the valves are knocking. This is just the time to adjust the valves.
Replacement Guide
The work of removing the crankshaft on a VAZ 2106 is somewhat labor-intensive, but a driver with little experience can do it. We do not need special equipment or special tools to work.
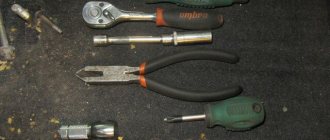
Set of tools
- set of heads;
- ratchet;
- knob;
- extension;
- a set of keys;
- rags.
Sequencing
- To get to the crankshaft, you first need to remove the air filter and housing.
- Next, disconnect the choke cable.
- Gas damper drive.
- Clean and wash the valve covers thoroughly. Usually dust and dirt accumulate on it, otherwise they may get inside the motor.
- Now you need to unscrew all the nuts and remove the valve cover. Experts recommend replacing the gasket when removing the valve cover. When purchasing, buy a rubber-cork one, as it holds oil much better than rubber.
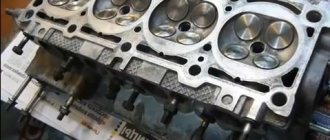
- By removing the cover, we gain access to the camshaft; in most cases it is very dirty.
- Now you need to loosen the camshaft sprocket fasteners. To prevent the motor from turning over, insert a screwdriver between the sprocket and the chain.
- Important! Be sure to align the mark on the crankshaft and the camshaft sprocket. You must strive to ensure that the mark on the crankshaft pulley is against the long mark, and the mark on the camshaft sprocket is against the protrusion on the camshaft bed.
- After alignment, we proceed to removing the chain tensioner.
- Unscrew the nuts with a wrench.
- Remove the tensioner.
- We remove the star, which is located on the guide pin.
- After unscrewing the bolt securing the sprocket, remove the sprocket. A hammer may be needed here.
- We tie it to a chain.
- Now you need to unscrew the nuts securing the crankshaft and remove it.
- By the way, it will be noted that if a stud with a nut is turned out, then it is screwed back in with a special stud turner.
- Next, we inspect the camshaft and replace it if necessary.
- The shaft is clamped according to the diagram. The tightening order must be observed. The tightening torque is also important. On a VAZ 2106 car, the tightening torque is 18.3 N/m.
- When assembling, be sure to check that the marks are aligned correctly. If they are out of order, they need to be set correctly.
- Finally, adjust the tension of the chain and valves.
If you still have questions and do not understand how the installation is carried out, at what torque the tightening is done or how to set the marks, then after reading, watch the video we offer.
On our website you will find:
- current information about Lada, new products in production and news related to the brand;
- statistical data on sales and the place of the Russian automobile industry in both the local and international markets;
- useful tips on operation, repair and maintenance of VAZ cars;
- all the most important information that will help you when repairing VAZ cars;
- reviews of the most common problems faced by machines.
If you have any questions regarding the repair of your car, materials and spare parts for it, you can get advice from a specialist. To do this, go to the CONTACTS section and send your question. You will find this and much more about the features of domestic cars on our portal OLADE.RU
Video “Replacing the shaft”
This video shows how to properly remove and install the camshaft, replace rockers, springs and other shaft components on a VAZ 2106 car. And also at what torque the tightening occurs.
The camshaft on VAZ 2106 cars is removed in exceptional cases. Usually, either during repair and disassembly of the engine, or to replace it. It is not so difficult to remove and for this you will need a tool such as:
- Head for 17 and 13
- Ratchet handle
- Vorotok
- Extension
- Open-end or socket wrench 13
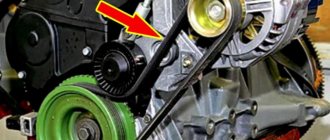
The first step is to completely remove the valve cover from the cylinder head. Then unscrew the timing chain tensioner, which is located on the right side in the front of the engine (in the direction of travel):
After this, we turn off the camshaft gear with a 17 key. To avoid turning, you need to put the car at speed and put stops under the wheels so that it does not roll.
After which we take it to the side, you can slightly pry it with something:
Next, you can begin to unscrew all the nuts securing the housing (case) of the VAZ 2106 camshaft. First, you can slightly loosen them with a wrench, and then quickly unscrew them with a ratchet:
After all the nuts are completely unscrewed, you can grab the shaft cover and pull it up with the necessary force, rocking it a little to the side to make it easier to do all this:
To remove the camshaft from the cover, you need to unscrew two nuts with a 10mm wrench, which are located in the front of the part; in the photo below they are shown with marks in numbers:
Now you can lightly hit the back of the camshaft with at least the handle of a hammer (wooden), and it will move forward:
By carefully pulling it forward, it is finally removed, the result of which is shown in the photo below:
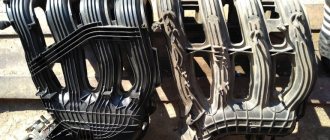
The installation process occurs in reverse order. If the shaft needs to be replaced due to severe wear, then replace the rockers at the same time. They can be removed very simply; you just need to lift each of them up, overcoming the resistance of the spring clamp, and the rocker can be removed freely:
If the shaft will not be changed, and the rockers are still quite suitable for further work, then you need to install them in the same sequence in which they were removed (if you remove them at all):
If the camshaft fails
The camshaft on the VAZ 2106 model is rarely dismantled. Typically during repair or disassembly. Sometimes to replace it.
Signs
First, let's talk a little about the signs that indicate that the camshaft is faulty, its journals or beds are worn out. It is difficult to determine whether the shaft or something else is knocking in the VAZ 2106 engine, but it is possible. The knock of the camshaft is dull and clearly audible. As engine speed increases, the knocking becomes more frequent.
Some drivers determine knocking in this unit using a stethoscope or a stick through the valve cover. But often it is difficult for an inexperienced driver to do this. Therefore, the best way to diagnose the camshaft is to remove it, wash it and inspect it.
If the camshaft is faulty, the following symptoms may occur:
- a dull knock, reminiscent of hammer blows;
- it is impossible to adjust the valve clearances; while the crankshaft is turning, the camshaft is constantly in different positions.
This video shows how you can eliminate longitudinal runout of a camshaft.
The most reliable method for diagnosing problems with the VAZ 2106 camshaft is to dismantle it from the car and wash it. You can wash it in gasoline or other cleaning liquid. Next, you need to hold the shaft and hit the bed, when you hear the slightest knock, we determine whether the mechanism is worn out. Be sure to make sure that the shaft does not move in bed, because when it hits the limiter it will make a dull knock.
Removed shaft
The camshaft has a great influence on the pressure in the lubrication system. If the gaps between the bed and the camshaft are large, then the pressure will be low, and as a result, unsatisfactory lubrication of other parts.
Causes
The main malfunctions that result in the need to replace the camshaft are its wear, the appearance of various scuffs and grooves on the bearing journals. Likewise, replacing the camshaft is necessary if it is found to be deformed or cracked. When such malfunctions occur, the power unit loses power and also begins to function intermittently. Problems with the camshaft are identified by a knocking sound in the cylinder head.
The camshaft on the “six” is rarely removed. In addition to the above reasons for replacing and reconfiguring the power unit. After this, you can notice a significant increase in power, like in sports cars.
Replacement Guide
The work of removing the crankshaft on a VAZ 2106 is somewhat labor-intensive, but a driver with little experience can do it. We do not need special equipment or special tools to work.
Set of tools
- set of heads;
- ratchet;
- knob;
- extension;
- a set of keys;
- rags.
Wrenches for tightening and loosening bolts
Sequencing
- To get to the crankshaft, you first need to remove the air filter and housing.
- Next, disconnect the choke cable.
- Gas damper drive.
- Clean and wash the valve covers thoroughly. Usually dust and dirt accumulate on it, otherwise they may get inside the motor.
- Now you need to unscrew all the nuts and remove the valve cover. Experts recommend replacing the gasket when removing the valve cover. When purchasing, buy a rubber-cork one, as it holds oil much better than rubber.
- By removing the cover, we gain access to the camshaft; in most cases it is very dirty.
- Now you need to loosen the camshaft sprocket fasteners. To prevent the motor from turning over, insert a screwdriver between the sprocket and the chain.
- Important! Be sure to align the mark on the crankshaft and the camshaft sprocket. You must strive to ensure that the mark on the crankshaft pulley is against the long mark, and the mark on the camshaft sprocket is against the protrusion on the camshaft bed.
- After alignment, we proceed to removing the chain tensioner.
- Unscrew the nuts with a wrench.
- Remove the tensioner.
- We remove the star, which is located on the guide pin.
- After unscrewing the bolt securing the sprocket, remove the sprocket. A hammer may be needed here.
- We tie it to a chain.
- Now you need to unscrew the nuts securing the crankshaft and remove it.
- By the way, it will be noted that if a stud with a nut is turned out, then it is screwed back in with a special stud turner.
- Next, we inspect the camshaft and replace it if necessary.
- The shaft is clamped according to the diagram. The tightening order must be observed. The tightening torque is also important. On a VAZ 2106 car, the tightening torque is 18.3 N/m.
- When assembling, be sure to check that the marks are aligned correctly. If they are out of order, they need to be set correctly.
- Finally, adjust the tension of the chain and valves.
If you still have questions and do not understand how the installation is carried out, at what torque the tightening is done or how to set the marks, then after reading, watch the video we offer.
When should you turn on the ignition?
The first thing you need to know is that there are no regulations for this operation, since the ignition timing is set or adjusted only as needed. It may be caused by the following reasons:
- You recently acquired a “seven” on the secondary market and are trying to “bring it to mind.”
- After repairing the engine, which included disassembling it.
- After unscrewing or removing the head ignition distributor (distributor), regardless of the reason why it was made.
- When switching from high-octane fuel to gasoline with a lower octane number and vice versa.
- After replacing the contact group or bearing in the distributor (in cars with an old ignition system).
Note. On VAZ 2107 vehicles equipped with an electronically controlled injector, a prerequisite for checking the spark generation system can be the flashing of the Check Engine display on the instrument panel. True, it behaves in a similar way when a dozen more malfunctions occur. So ignition problems must first be diagnosed by contacting a service station.
In the vast majority of cases, set as a result of a violation of the settings after disassembling or repairing the engine. A separate issue is the transition to high-octane gasoline, which requires ignition with greater advance, for which adjustments are being made.
It is advisable to check the timely formation of a discharge on the electrodes of the spark plugs in cases where unstable engine operation is observed, popping noises are heard in the carburetor and exhaust pipe, accompanied by an increase in fuel consumption. If you have not yet discovered the “gluttony” of the car, then pay attention to the color of the smoke; with high gasoline consumption, it is black, as is the carbon deposits on the electrodes of the spark plugs.