The VAZ-2103, which is still driving around the Russian expanses, is today at a fairly advanced age, by automotive standards. Accordingly, their owners are increasingly faced with the need for repairs, including the engine. According to the manufacturer’s recommendation, the resource of this engine is 125 thousand kilometers. In practice, the Troika’s power units were looked after much more, of course, subject to careful treatment, as well as competent and timely maintenance.
Engine malfunctions and repairs 2103
Engine VAZ 2103 1.5 l. carburetor in-line 4-cylinder with an overhead camshaft, the timing belt of the 2103 engine has a chain drive. The VAZ 2103 engine block is tall, more on that below. The service life of the 2103 engine, with careful operation and timely maintenance, exceeds the 125 thousand km established by the factory and reaches 180-200 thousand km. The main differences between the 2103 engine and the 2101 are the increased block height by 8.8 mm from 207.1 mm to 215.9 mm to allow the installation of a crankshaft with an increased piston stroke, thanks to which the engine volume has increased to 1.5 liters. As noted in previous articles, Lada engines have a problem with camshaft wear. Due to the fact that the chain drive does not have a tensioner, the chain needs to be tightened, the engine also needs constant (every 10 thousand km) adjustment of the valve clearances, this will be indicated by a loud knocking sound in the VAZ 2103 engine when the engine is idling, audible from a standstill driver with the hood closed. Many people have a question, why adjust the valves, the answer is simple - power will decrease, fuel consumption will increase, the valve will burn out and many other pleasures of life. Adjustment of the VAZ 2103 engine valves must be done either by a master or with his own hands. Among other problems, Weber and Ozone carburetors constantly require CO adjustment and cleaning. It often happens that the VAZ 2103 engine gets hot, look for the problem in the pump, 99% this is it. Often when the engine in a 2103 misfires, there can be a lot of reasons, most often a burnt-out valve; in any case, you need to measure the compression and show the car to a mechanic. Many VAZ 2103 engine malfunctions repeat the problems of the 2101, due to their close relationship. For a more complete picture and so as not to miss anything, read about the 2101 motor here. Nevertheless, according to popular opinion, the 2103 engine is the most reliable and unpretentious among the classic line of engines, and given the prices for spare parts for the VAZ 2103 engine, you don’t have to wonder why the classics are still driving along our streets.
Recommendations
Do not forget that high speed is very destructive for a VAZ engine.
Overheating and overloading of the unit can lead to serious damage to parts, after which many structural elements will have to be replaced. You should not push the maximum on the track without installing special parts, otherwise the engine will turn into a cauldron of fire.
If you do not want to frequently repair your VAZ engine, replace worn parts with similar ones. If you install more powerful spare parts, the structure may simply not hold up.
The only option to increase the performance of such weak engines is to install additional parts. In the case of Zhiguli, a good option for increasing power would be to install new pistons and cylinder head, as well as update the exhaust system elements. To do this, you will need to bore the cylinders to 79-82 mm. Other tuning options
Servicing VAZ engines is not difficult if you need to replace parts at home. If you have instructions, you can dismantle and replace almost any element of the engine assembly. But if you are not sure of the cause of the breakdown, it is better to visit a service station, where a technician can identify and fix the problem.
We recommend: How to replace brake discs on a Lada Priora yourself?
Maintenance
VAZ 2103 engine
Considering the design of the internal combustion engine, the manufacturer recommends the following maintenance schedules:
| Maintenance object | Time or mileage (whichever comes first) |
| Valve train chain | replacement after 100,000 km |
| Battery | 1 year/20000 |
| Valve clearance | 2 years/20000 |
| Crankcase ventilation | 2 years/20000 |
| Belts that drive attachments | 2 years/20000 |
| Fuel line and tank cap | 2 years/40000 |
| Motor oil | 1 year/10000 |
| Oil filter | 1 year/10000 |
| Air filter | 1 – 2 years/40000 |
| Fuel filter | 4 years/40000 |
| Heating/Cooling Fittings and Hoses | 2 years/40000 |
| Coolant | 2 years/40000 |
| Oxygen sensor | 100000 |
| Spark plug | 1 – 2 years/20000 |
| Exhaust manifold | 1 year |
Long-term operation
Maintenance is very important for the VAZ model 2103. Timely replacement of oil, spark plugs, fuel and parts significantly extends the operating life of the engine, so serious repairs in such conditions are practically not needed.
Much attention should be paid to the selection of oil. Since mechanical wear of most parts is the main problem that promises early engine failure, you need to choose a good technical fluid with an optimal set of additives. When changing the oil, it is advisable to also replace the oil filter. The amount of fluid when replacing should be 3.5 liters out of 3.75 liters. In addition to mechanical wear, using high-quality oil will also prevent corrosion damage to parts.
Don't forget to change the air filter as well. Both filters should be replaced and checked regularly.
If frequent VAZ engine repairs are not part of your plans, pay attention to the condition of other elements. Replacing sensors, timing belts and spark plugs allows you to maintain the good condition of the entire assembly.
In cases where the engine starts to stall, try changing the brand of gasoline.
Repairing the VAZ-2103 engine is quite possible to do on your own
Engine 2103 1.5l
The design of this power unit is quite simple. Accordingly, many car enthusiasts can do all engine-related repairs themselves. This option helps to save a certain amount due to the absence of the need to pay for the work of the craftsmen. There are a number of signs that indicate the need for repairs. Among them are:
- increased fuel and oil consumption;
- smoky exhaust with a clear bluish tint;
- uneven operation of the engine in idle mode;
- the appearance of soot on candles;
- clearly decreased power and sluggish dynamics;
- tripling;
- “sneezing” of the carburetor;
- “shots” in the silencer;
- constant overheating.
The simplest type of engine repair is replacing consumables. In principle, these works can even be classified as maintenance. If you want the engine of your “troika” to serve for a long time, you should change spark plugs, filters, and oil in a timely manner. Every 10 thousand kilometers it is necessary to adjust the valves.
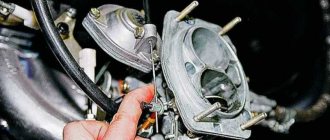
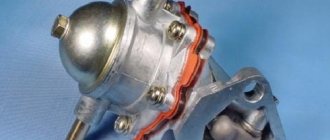
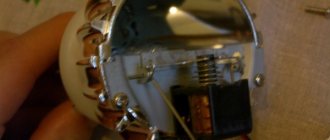
It makes no sense to describe all possible repair options. It would probably be more correct to talk about how the engine is disassembled. Immediately before this, you should remove the engine from the car and wash it thoroughly. Now you can proceed directly to disassembly. We remove the carburetor, having first disconnected the hoses and throttle linkage, then the distributor and fuel pump, coolant temperature sensor. Now you can unscrew the spark plugs. Next comes the turn of all the hoses and pipes of the cooling system.
The oil filter is unscrewed using a special tool. Many Soviet-era car enthusiasts have it in their garages. Therefore, if you don’t have one, ask your friends so as not to spend extra money on the purchase. After unscrewing the filter, you can remove the oil pressure sensor. The next stage is dismantling the crankcase ventilation breather and the entire assembly. Now remove the drain tube clamp and remove the oil separator.
The ratchet can also be unscrewed using a special wrench. Now we fix it from turning and remove the crankshaft pulley. After this, you can begin to dismantle the camshaft drive cover and cylinder head. Next you will need to sweat a little. First, remove the bolts holding the oil pump and camshaft sprockets. Next, remove the chain tensioner and shoe. All that remains is to unscrew the limiting pin and remove the sprockets. That's it - you can pull out the chain.
Now we proceed to dismantling the crankshaft. Here you first need to unscrew the nuts of the studs securing the bearing housing. After this, the latter are removed along with the crankshaft. Next, you need to unscrew the mounting bolts and remove the cylinder head along with the manifolds. From there we remove the oil pump drive shaft, having previously dismantled the thrust flange. Next, we arm ourselves with a special puller and remove the crankshaft sprocket. In order to remove the pistons and connecting rods, first unscrew the nuts of the corresponding bolts. One important point is worth emphasizing here. Experienced car enthusiasts advise to be sure to mark connecting rods, bearings (as well as their caps) and pistons. This is necessary so that when reassembling you do not mix up anything.
After this, you can unscrew the flywheel mounting bolts and remove the washer. Here, in principle, everything is simple. Next, we remove the flywheel itself, after which, using a puller, we pull out the gearbox input shaft bearing from its socket in the crankshaft. However, the last step can be done later. This, as they say, is at your discretion. Now all we have to do is remove the crankshaft oil seal holder, the main bearings (after unscrewing the corresponding bolts), and the crankshaft itself. That's all - engine disassembly is complete.
All you have to do is determine which parts need replacing, buy new ones, and reassemble in the reverse order. As you can see, there is really nothing particularly complicated here. Of course, you will have to spend some time, and not every car enthusiast has the space to carry out such work. Nevertheless, many owners of “threes” prefer to repair their cars with their own hands.
Cold method of pressing a finger into a VAZ connecting rod. Video
The crankshaft has been installed, now we need to knock out the old pistons and install new repair pistons on the connecting rods. It is good to knock out the piston pins on a stump; drill a hole in the stump in advance, or knock it out with a chisel; the piston pin will be knocked out into this hole. It is advisable to knock out the finger with a special beard, or a round piece preferably with a diameter of 21 mm, and a heavy hammer. The piston pins are knocked out when cold; there is no need to heat them up.
Photo. Preparing pistons for installation on connecting rods.
Now we need to install new pistons on the connecting rods, you can install the pistons as is without modification, but I advise you not to be lazy and modify the pistons. First, chamfer the skirt using a sharpener or a file as shown in the photo, second, drill a hole in the piston skirt on both sides as shown in the photo.
Engines with modified pistons are much faster and more economical, since oil flows through the hole between the piston and cylinder skirt and reduces friction. Also, modified pistons do not suffer much if the engine accidentally overheats. The hole in the piston skirt used to be drilled 6mm, now it’s 14mm, so with a 14mm hole the engine turns out even faster.
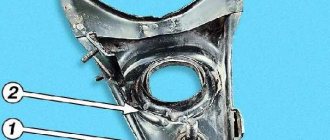
Photo. A piston with a connecting rod, arrow 1 shows the front of the piston (letter P), arrow 2 shows the liner locks.
The photo shows how the piston should be positioned correctly on the connecting rod. You can drive your finger into the connecting rod while it’s hot, but here you don’t need to heat the connecting rod too much; it’s enough to heat it even in water to boiling water. Also, when the connecting rod is heated, you need to hammer in the piston pin very quickly, since if you hesitate a little, the pin will immediately take over the heating of the connecting rod and will become difficult to clog. I hammer it on a cold one, also on a stump, but I put a piece of a wooden block under the piston in the area of the piston pin, lubricate the pin and the hole in the connecting rod with oil, and also hammer the pin into the connecting rod with a heavy hammer. After hammering in the finger, be sure to check so that the finger is positioned exactly in the center and does not come out of the piston under any circumstances.
Design Features
Engine Toyota 2NZ-FE
Initially, at the design stage, a feature for the engine was the overhead camshaft:
- The piston stroke decreased by 5.5 mm compared to the Fiat 124 standard;
- the cylinder diameter increased by 3 mm.
This modernization ensured acceleration and rapid acceleration. In addition, the 2101 engine had the following design nuances:
- timing chain transmission;
- unfinished carburetor models;
- major overhaul after 20,000 km.
Valve train chain
Immediately after the release of the first internal combustion engine of this series, the manufacturer AvtoVAZ released a manual in which it indicated which oil to fill in the engine and provided a description of the internal combustion engine parameters to increase the service life of the engines. Thus, the owners of the next three generations of engines had no questions about what oil to pour and in what quantity.
Timing mechanism
Preparation
Replacing piston rings on a VAZ 2107 requires a choice of two things: either an extensive set of tools, which must include a mandrel for installing them, or good skill and dexterity. Honestly, you can install them with two screwdrivers, but doing it alone is almost impossible. In addition, you need a table on which you can install the cylinder block; it will need to be turned over several times.
You will also need a lot of rags, because the oil, despite the fact that it was drained from the system, still remained there. Metal brushes of various configurations can also be useful, as well as about 5 liters of kerosene, this will be useful in order to remove that very coked deposit on the parts.
Replacing rings
Well, now we have the connecting rod and piston itself in our hands. It would be advisable to immediately assess its condition and clean it of carbon deposits and coked waste. Then carefully remove the piston rings themselves. Don't be afraid to break them - we won't need them anymore.
After all this, we take new rings and start with the oil scraper ring. Let's start by installing the expansion ring. It can be either a rod with a spring or an elastic plate bent into an octagon. Before installation, you need to install the ring into the cylinder, then push it deep into the cylinder and measure the gap in the lock. If it exceeds 0.4 mm, then they must be replaced. If the gap is less than 0.25 mm, then the lock must be sharpened to the required size. After this, we install the rings using a device or improvised means and direct the locks as follows: the upper ring should be facing the front cover with the lock. The subsequent ones rotate 90 degrees relative to each other. This way the piston is installed in place. The procedure is done with everyone else.