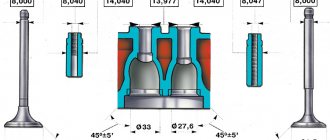
Torsion bolts (plastically deformable)
Part number: 21213-1003271-01-0.
Name: Torx cylinder head bolt
Niva cylinder head bolts, torx
Of course, this name (torsion bar bolts) is completely incorrect, but what can you do if they are called that on all forums and in all stores. According to science, when they say torsion bar, they mean deformation from twisting. When they say Lenin, they mean the party. And in this case, tensile deformation. In stores, these bolts are also called Chevrolet Niva cylinder head bolts. I also came across the name torx or chamomile. These bolts, unlike hardened ones, provide a constant load. That is, in a very primitive way we can talk about the grommet effect, that is, about the constant force to compress the cylinder head gasket in the axial direction of the bolt. These bolts are widely used on imported engines because they avoid human factor errors. In fact, you don't need to tighten with the precision of a torque wrench. The final values are taken as angular values. I don’t really like this approach, but such things are now commonly called “assembly guarantee”.
Summary. If a non-shrink gasket is used, hardened bolts can be used. Deformable bolts can be used with both a metal package and a shrink gasket
Attention: deformable bolts are strictly disposable
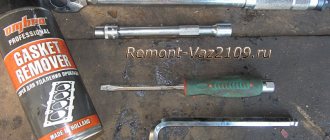
Let's prepare the tool
- ratchet with a set of sockets (we will need sizes from 10 to 17 mm) and an extension;
- open-end and ring wrenches with similar sizes;
- torque wrench operating in the range from 10 to 110 N/m;
- spark plug key;
- a flat screwdriver with a wide blade, a scraper (you can use a narrow construction spatula), with their help the stuck cylinder head gasket is separated;
- circlip pullers;
- desiccant, a wooden block to support valve crackers;
- crown-shaped brush, drill;
- a hammer with a rubber or polyethylene head (for seating valves);
- a syringe with a thick needle (for suctioning technical fluids from hard-to-reach cavities);
- fire extinguisher, rags, containers of different sizes;
- magnet on copper wire for removing fallen fasteners.
If you do not have an air compressor to blow out the cylinder head and other parts of the engine, you can use a tightly inflated spare tire. Connect the nipple to the blow gun using a long hose and you can clear debris from the most difficult to reach niches.
When should you change the cylinder head gasket?
Such work will have to be done when the gasket is damaged. These could be cracks or holes in the gasket. If damaged, the car owner will observe the appearance of air in the cooling system. This will also be indicated by the bubbling of antifreeze.
Crack in the cylinder head gasket.
You will also need to change the gasket when there is not enough compression in the combustion chamber. In this case, the gasket may simply wear out and will no longer be able to perform its functions. Also, when cracks appear, antifreeze will enter the combustion chamber, which will lead to unstable engine operation.
The cylinder head gasket on the Shniva burned out.
In all of the above cases, replacing the gasket will be simply necessary. If you do not replace it in time, the consequences can be dire.
Welcome to VAZ.EE+ Extended Edition
Since May 2013, our portal has expanded the sections of the forum for the exchange of experience aimed at specific topics: subforums have been added: Americans, Koreans, Germans, French, Residents of the Land of the Rising Sun, in connection with the increase in the fleet of our guests.
In addition to the style configuration, our Chat, Mail, Entertainment and photo/video sections, Literature have become built-in and do not require separate registration. Apart from this, there are other useful and pleasant innovations that you can all get acquainted with when visiting the portal.
You can contact the administration with questions and suggestions in a special section of the forum or through the feedback form.
- print version
- Download/Print theme
- Display Modes
- Switch to: Tree-like
- Ordinary
- Switch to: Linear
Replacement process and tightening torque
Required Tools
To carry out this work on replacing the cylinder head gasket of the Niva Chevrolet and tightening the cylinder head bolts, you should prepare:
- Phillips and slotted screwdriver;
- set of open-end wrenches;
- torque wrench.
Without the last element, tightening the cylinder head pulleys will be impossible.
Step-by-step instruction
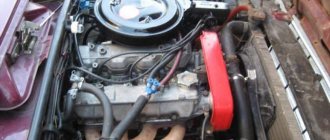
- Initially, of course, you need to dismantle the cylinder head cover itself.
- Then place a container under the bottom of the car to collect the waste refrigerant. Unscrew the drain plug and drain the antifreeze.
- Then you should disconnect the throttle cable from the receiver and assembly.
- After this, the timing pulley should be removed along with the bearing housing.
- Next, we dismantle the valve lever, and then unscrew the lever supports themselves. Also dismantle the engine fluid supply ramp to the hydraulic supports.
- Now you need to disconnect the cable harness from the TPS. In the same way, disconnect the wiring from the idle speed sensor and antifreeze.
- You need to squeeze the plastic clip and then disconnect the connector with the wires that are designed to power the injectors. Here you also need to remember to disconnect the wiring harness from the knock sensor.
- Now disconnect the high voltage cables from the spark plugs. Also disconnect the cable that powers the engine temperature control device.
- Slightly compress and disconnect the exhaust pipe from the intake manifold. Then the upper screw securing the inlet tube spacer and, slightly loosening the lower screw, the spacer should be moved to the side.
- The clamp should be loosened slightly, then the adsorber purge pipe should be disconnected from the throttle assembly.
- The clamps must be loosened and the cooling system pipes must be disconnected from the cylinder head.
- Using open-end wrenches, you now need to disconnect the fuel lines. To do this, unscrew the nuts of the fuel hoses intended for draining and supplying gasoline.
- Now use a wrench to remove the top screw that secures the rear intake tube brace. The bottom screw should also be loosened a little. After these steps, the spacer must be removed to the side.
- When all the above steps have been completed, the camshaft pulley drive chain tensioner should be removed.
- Then dismantle the brackets that secure the power steering device.
- Now you can remove the chain with the timing pulley star.
- After this, using a socket with an extension, you will need to unscrew the screws securing the cylinder head, and then dismantle it.
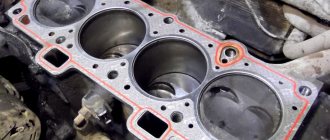
- The cylinder head gasket can now be removed. Mount a new component in its place, having previously lubricated its perimeter with sealed glue. Actually, at this point the work on replacing the cylinder head gasket in the Chevrolet Niva can be considered completed. All further work on assembling the power unit must be performed in the reverse order. But that is not all. To ensure a reliable fit of the cylinder head to the block itself, you need to correctly tighten the screws and maintain the tightening torque.
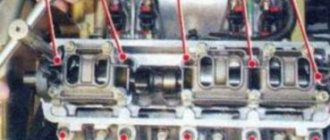
- The procedure itself consists of several stages. First of all, using a torque wrench and following the order indicated in the diagram, you need to tighten the screws from the first to the tenth. In this case, the tightening torque of the Niva Chevrolet cylinder head should be 20 Nm.
- Next, when all the bolts are tightened in turn, you need to tighten all the cylinder head screws again. The tightening torque should now be 69.4–85.7 Nm. The last, eleventh pulley needs to be tightened to 31.4–39.1 Nm.
- After these steps, the screws marked with numbers from one to ten need to be turned 90 degrees, and then, when they are all screwed, you should repeat the procedure and turn them again 90 degrees. At this point, the screw tightening procedure can be considered complete.
If all the steps were performed correctly, then after replacing the component you will no longer have the problem of engine fluid getting into the antifreeze and vice versa. But keep in mind: everything must be done according to the steps specified in this manual.
If, for example, you tighten the cylinder head bolts incorrectly, that is, do not tighten them or overtighten them, then this can result in more serious problems.
If the screw is not tightened, the cylinder head will not fit tightly to the block. This is fraught with engine fluid leakage. If, on the contrary, you overtighten the pulleys, this can cause cracks to form on the power unit. If microcracks appear, then you will have to either weld the cylinder head or replace it. Therefore, before you begin such repairs, think carefully - can you do everything right?
Block head. Options.
- Go to page:
How to find out which head is worth
Post by tema-666 » Jul 19, 2011, 10:26 pm
Block head. Options.
Post by Volzhanin » Aug 25, 2011, 12:48 pm
Re: Need info on cylinder head conversion
Post by wwm » Aug 25, 2011, 12:57 pm
Re: Need info on cylinder head conversion
Post by Volzhanin » 25 Aug 2011, 14:39
Re: Need info on cylinder head conversion
Post by Volzhanin » 25 Aug 2011, 14:42
Re: Need info on cylinder head conversion
Post by Volzhanin » 01 Sep 2011, 15:21
Explain about the cylinder head.
Post 39 RUS » 26 Feb 2012, 02:56
The best religion is faith in yourself! A slight foolishness makes a man virtually invulnerable to attacks from ladies. Especially when there are a lot of them in the family.
Naturally, I’m not a magician, but I can easily transform a half-hour job into a two-day job.
Re: Explain about the cylinder head.
Post by Spiteful critic » 26 Feb 2012, 03:21
Re: Explain about the cylinder head.
Post 39 RUS » 26 Feb 2012, 03:32
The best religion is faith in yourself! A slight foolishness makes a man virtually invulnerable to attacks from ladies. Especially when there are a lot of them in the family.
Naturally, I’m not a magician, but I can easily transform a half-hour job into a two-day job.
Re: Explain about the cylinder head.
Post by Spiteful critic » 26 Feb 2012, 03:44
Please clarify what are the differences between the cylinder heads of the VAZ-2106 and VAZ-21213 engines and is it possible to install the 2106 head on the 21213 engine? The cylinder head 21213 differs from 2106 in 2 features: a different shape of the combustion chamber and the highest compression ratio - 9.3; in addition, it has the highest strength properties (strengthened compared to 2106, because the 21213 engine is stronger). The first means that the new head, to put it mildly, is “not compatible” with the old VAZ-2106 block. Namely, when you try to install it, the 2106 engine receives an extremely high compression ratio and cannot work normally. It would seem that this is not a hindrance - you are interested in reverse replacement - and with a 2106 head, the 21213 motor could simply be somewhat deformed. But the fact is that the working processes in the 21213 engine are the hardest and the 2106 head is not strong enough for them. That is why we consider this option unacceptable. Test engineer at AvtoVAZ engine development department Vitaly VOLOKITIN.
It only confuses me a little that the test engineer uses the designation head 2106.
Source: www.niva-club.net
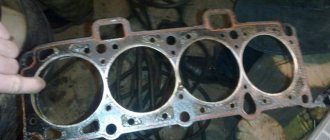
Block plane and gasket penetration
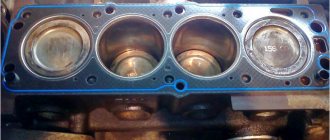
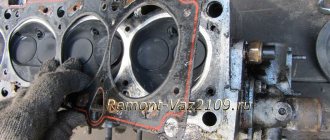
To say that in Niva and Shnivy this is a birth disease is an understatement. At some point they just drove off en masse. At a mileage of 15-25 thousand, the cylinder head gasket was punctured, and so on down the list.....What do they do in the Papuan service center, they buy a "Fritex" metal package, tighten it, and after 10 thousand the client comes back with a new one, with the same question. Or rather, with two. How long? And the classic “what should I do?” It is not the gaskets or bolts that are to blame, it is the factory quality of processing of the block plane and the cylinder head plane that is to blame. Below I publish a photo of one of the blocks. I personally changed the gasket on it twice until I found the optimal set, which I now recommend.
block plane
The metal bag does not help, but rather hinders. It cannot be crimped and does not fill uneven spots. You need a shrink gasket that will completely accept the topography of the block surface and the bolts that will constantly press it. This is the reason why hardened bolts are not rolled here. Of course, there is an option with subsequent broaching, as was the case in all Soviet times, but this is too labor-intensive. For a long time, the plant installed the Yaroslavl metal package “Fritex”, and now they have switched again to shrink gaskets. In normal production, it would probably be easier to update the milling equipment, but with us it’s easier to go back ten steps on the technical line.
Set of "cylinder head installation"
As I promised earlier, at the request of services and mechanics, a kit called “cylinder head installation” was born. This kit includes the gaskets and components that need to be replaced if you are removing the cylinder head/exhaust manifold assembly. This is the most convenient and correct option. The kit includes:
The whole thing is shipped on a rigid plywood backing as there have been complaints about the pads being damaged in transit. I hope this issue will be closed. In the price list, this kit is located in the engine-cylinder head section, and is called “cylinder head installation”.
Source