How to replace the clutch cylinder on a Chevrolet Niva
The clutch in cars is one of the main components that ensure the movement of the vehicle.
Its failure threatens to completely immobilize the device. In cars with a manual transmission, the driver directly controls this unit using the leftmost pedal located under the steering column. But in order to ensure a smoother and quieter ride, it is necessary to understand which components are activated when you press the pedal, as well as how to prevent possible malfunctions and make repairs if necessary.
The clutch mechanism includes two types of cylinders: slave and master. This material is useful if it is necessary to replace the main clutch slave cylinder. The main component of the work is the hydraulic drive, which ensures the movement of the cylinder. The operation is based on the reception of force that comes from the master cylinder, the movement of which moves the clutch release fork.
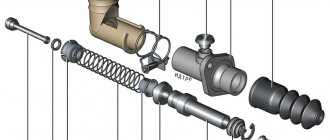
The design of the slave cylinder is almost the same in all car models with a manual gearbox, so the operating principle is the same. Typically, the following set of parts is used in manufacturing:
- retaining ring
- cap
- union
- plate
- boot and o-rings
Adjusting the Chevrolet Niva clutch
Chevrolet Niva cars have a dry clutch. It is driven by a hydraulic mechanism. If the clutch malfunctions, it needs to be adjusted. Here are a few signs that require immediate diagnosis:
- increased pedal play. If, when pressed, the pedal exceeds its travel according to the standard, this means that the clutch is not completely disengaged. In this case, the disc does not fully contact the flywheel. Untimely repairs can lead to severe wear and tear.
- Pedal travel is too small. Such a defect can lead to slipping of the gasket. At the same time, engine power drops greatly.
- The appearance of jerks when starting off. It is also possible that shocks may occur in the transmission.
The appearance of all these signs indicates the presence of problems with pedal adjustment. If they are ignored, this can lead to clutch replacement and costly repairs.
Adjustment procedure
- Adjustment of the Chevrolet Niva clutch is carried out with the engine turned off. It is also better to disconnect the battery so as not to accidentally start the engine when the shaft rotates.
- The gearbox is moved to neutral. The master cylinder is installed with a gap of half a millimeter from the pusher. This distance is sufficient to disengage the clutch disc. Subsequently, the pedal travel is adjusted.
- The pedal travel should not exceed 3 millimeters. Adjustment must be made by changing the position of the locknut and bolt. By tightening them you can adjust the stroke amount.
- The pusher should move freely no more than 4-5 millimeters. To adjust it, you need to adjust the stop nut.
- Also, to adjust the pusher, you can change the position of the lock nut.
The total free play of the pedal should be within 25-35 millimeters.
To more accurately adjust the clutch pedal, it is necessary to work on an inspection hole or lift.
The difference between adjustments on the Chevrolet Niva
The clutch in the Chevrolet Niva is reinforced. For this purpose, thickened metal of larger diameter was used. Damper springs are used for compression. The hydraulic clutch option compensates for wear.
Clutch discs are balanced when assembled. They are usually called a basket. This component is located in an aluminum housing. When adjusting the Chevrolet Niva clutch, it is necessary to install a new drive disc. The springs pressing the disk may be defective.
To avoid frequent adjustments, the device is equipped with a working cylinder. This component allows automatic clearance changes. If it fails, the assembly is replaced.
The driven disk is located between the flywheel and the shaped cup disk. A special overlay is applied to it using rivets. When worn, its thickness decreases and the rivets can scratch the disc and cause beating.
When installing, the hub must be directed towards the basket
It is important to align the hub hole and the main pin.
The driven disk with a riveted friction lining is located between the flywheel and the drive disk of the shaped cup. The disc splined bushing sits loosely on the input shaft. Replaced when worn, if the thickness of the lining decreases to 0.2 mm and the rivets begin to leave scratches on the pressure plate. The cause may be axial runout, weakening of rivets, cracks, breakages, or scuffing on the friction material body.
It is installed with the protruding part of the hub in the direction of the shaped basket. In this case, the centering pin should align with the hole in the hub.
The stamped shaped clutch release fork has a recess for a ball joint and its two ends rest against the release bearing clutch. The ends of the fork, periodically wearing out, are restored by welding pads on them to the thickness of the factory sample.
The main, working hydraulic mechanisms are communicated through a steel tube and a reinforced hose. The slave cylinder is mounted on the clutch housing using a bracket.
When the pedal is pressed, the main piston creates fluid pressure, which causes the pushrod and fork to move the release bearing clutch.
The hydraulic drive operates on DOT-4 brake fluid, the reserve of which is contained in the reservoir and communicates with the main one through a hose. Hydraulic bleeding is provided by a fitting located on the (working) cylinder.
How the device works
First of all, you need to understand what the slave cylinder is intended for. When you press the clutch pedal, a pusher moves, which drives the piston, moving it forward. This causes the pressure in the clutch master cylinder to increase in the housing. Liquid under pressure is forced through the discharge channel into the working cylinder, which contains a built-in piston and fork that drive the working cylinder. At this moment, the connection between the engine and the gearbox is broken, which allows the gear to be changed. After the driver releases the clutch pedal, a push spring returns the system to its original position and the clutch discs are connected.
Despite the simplicity of operation of the Chevrolet Niva working cylinder, like all mechanisms, it is inherent in the occurrence of breakdowns and malfunctions that can be caused by wear of parts due to constant friction.
Sequencing
How to bleed the clutch on a Niva? It is better to carry out repairs to the hydraulic clutch drive on an overpass. First, you need to check the hydraulic drive elements for leaks. Then the fluid level in the tank is checked. It is located in the engine compartment. If necessary, add liquid. At the same time, debris and other foreign impurities should not get into the tank. Then the clutch itself is adjusted. Only after this can you start pumping. An assistant is needed for this work. If it is missing, a gas stop is required to fix the clutch pedal. Remove the protective cap from the working cylinder fitting. Then one end of a transparent silicone hose is put on it. Its other end is lowered into a container with brake fluid. The tightening of the fitting is loosened several turns with a key of eight. After this, air will begin to come out of the hose along with the liquid.
View gallery
The assistant sits behind the wheel, sharply presses the clutch pedal several times and releases it. The interval between presses is approximately 3 seconds. This action stops only when liquid comes out of the hose without air bubbles. Fluid is then added to the clutch reservoir. With the pedal pressed, screw in the fitting and put on the cap. After this, the clutch system is checked. When the gearbox is operating, no extraneous sounds should be heard. At high speeds the car should accelerate dynamically. This completes the repair.
Clutch slave cylinder diagnostics
The cylinder is located on the clutch housing. To visually find it and diagnose the condition of the part, you need to open the hood and examine the space on the driver’s side.
First you need to determine that the problem lies in this part, and begin to repair or replace it. To do this, there are a number of measures that allow you to identify the problem yourself, without the need to visit a car service center. You should pay attention to some signs that occur while driving:
- reducing clutch pedal travel
- crunching sound when changing gears
- there is visible damage to the cylinder body
- oil leaks on connecting pipes
- decrease in brake fluid level
- no response to pressing the clutch pedal
In this case, the part must be repaired or replaced.
Replacement is necessary when irreparable defects occur, such as damage to the cylinder body. In other cases, repairs can be made. In this case, you can remove the working cylinder of the Niva Chevole and install a repair kit.
- To work, you need to prepare keys for 13 and 17. Work begins with loosening the hose; do not unscrew it completely.
- To release the cylinder, unscrew the two bolts, after which you can remove the bracket.
- To release the pusher from the fork, you need to remove the protective cap from it.
- Holding the hose with one hand, rotate the cylinder until it is disconnected from the hose.
- After this, you need to drain the liquid from the system into a container.
At this stage, the cylinder has been removed and a new part can be installed by performing the steps in reverse order. After installation, the system is bled to remove any remaining air from it.
The cost of a new clutch slave cylinder is quite low, so a complete replacement is recommended. But if the condition does not cause any complaints, then you can purchase a repair kit to carry out independent repairs.
Replacing the clutch in the field without an assistant, in one person
Replacing the heater tap of a Chevrolet Niva car with your own hands
February 21, 2015
Replacing the clutch in the field
Immediately after the new year, on January 7, I finally changed the clutch in the field, and at the same time changed the clutch master and slave cylinders.
Replacing the clutch on a field and on a single-wheel drive is a completely different task in terms of labor intensity. I changed my clutch for two days, although I did a lot of other things along the way. It is highly advisable to call a friend for help.
I managed to do everything alone, but next time I will try to do it with an assistant.
So, let's begin our difficult journey. Replacing a clutch in a field is one and a half times more troublesome than on a conventional front-wheel drive. The Niva also has a transfer case and two cardan drives, all of which are bolted together and to the gearbox. The photo shows that the front driveshaft has already been removed.
A picturesque view of the razdatka, then RK. In principle, there is no point in completely unscrewing the rear driveshaft. Simply unscrew the RK from the flange and put it aside. As in the photo.
I remember that year I wrote a little about the intermediate shaft. He became the reason for leaving the trophy raid on the first jersey. In the photo, the new shaft for 21213 is a CV joint, one part of it is essentially a standard “grenade”. The old-style crosspiece cannot be found in stores, which is sad.
There are some being analyzed and I think I heard that they are making non-original ones. I didn’t buy it right away, I needed to drive it, so I took the standard one again. Its peculiarity is that if damaged, the car is immobilized.
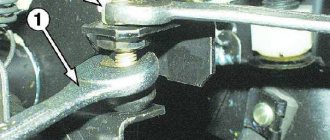
In order to remove the steering wheel, it is necessary to release the locking and downshift levers from above. To do this, the entire manual transmission cover is removed. The casing is on large self-tapping screws, for a Phillips screwdriver. Under the casing, right from the cabin, we can see the donut of the washout.
Then we go down under the car and unscrew the transfer case supports. But before doing this, using an awl, scissors, or something sharp, we outline the position of the supports relative to the bottom. In the photo you can see a mark around the studs - that's what it is - marks. We need to put the transfer case in the same position when we put it back.
Using a 13mm ratchet with a long head, unscrew the nuts from the studs, 4 of them, two for each support. Next you will need an assistant or your own stupidity. We grab the transfer case and carefully remove it so as not to damage the studs. One of the most annoying problems with old fields is the transfer case studs.
Well, yes - it needs to be welded, I agree. I'll finish it in the spring.
Next we will remove the gearbox. In the photo we are looking at the gearbox shaft flange, to which the intermediate shaft between the gearbox and the gearbox is screwed. I didn’t film the filming process itself, since I was filming alone and getting my hands dirty, and it was inconvenient to photograph.
The gearbox bell is bolted to the engine block with four bolts
Like 17 or 19 - I don’t remember, and it doesn’t really matter. The main thing is that you need heads with extensions, you can’t get to them that easily
It seems difficult the first time, but in reality you just need a ratchet with a good extension cord.
And this is the transfer case removed, placed closer to the rear axle so that it doesn’t get in the way
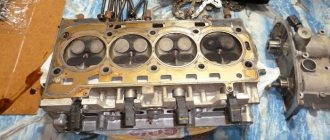
Having removed the gearbox, I try on a bearing on it.
And this is a new basket
It's time to install everything on the flywheel. In the photo everything is already screwed on. Those who change the clutch themselves for the first time need to know that to center the disc and basket it is necessary to use the gearbox input shaft. It can be taken from the gearbox by disassembling it and sawing it off with a grinder. The end of the input shaft protrudes from the bell housing, where the bearing fits.
Device
The design of the unit is no different from those installed on other models of AvtoVAZ cars. The clutch slave cylinder (CLC) consists of the following parts:
- Frame.
- Connection for pumping fluid.
- Piston with plate and sealing rings.
- Pusher.
- Boot (cap).
- Washer.
- Spring.
The RCS is installed next to the plug and works as follows:
- The driver presses the pedal.
- The pusher displaces the clutch master cylinder piston, increasing the pressure in the pipeline.
- The brake fluid that fills the hydraulic drive pushes the cylinder and pusher.
- The latter moves onto the fork, which presses on the clutch basket and breaks the connection between it and the disc.
When the driver releases and stops pressing the pedal, the pressure in the system drops and the piston and pusher return to their original position under the action of a spring.
The part has article number 2123-1602510-01 and is sold at a price of 600 rubles.
Clutch
In addition to the cylinder, the clutch itself, which transmits torque from the engine to the gearbox, can also fail. If it fails, this leads to difficulty in shifting gears, which negatively affects both the operation of the power unit and the gearbox itself.
The preconditions that it needs to be changed may be the following:
- The clutch does not engage fully. As a rule, the main cause is worn gaskets. In this case, you need to completely change the disk
- There are oil stains on the linings. This indicates that the seals have worn out and the part begins to heat up.
Possible faults
The main sign of a breakdown of the working unit is the failure of the clutch pedal. This happens when the seals wear out. However, other malfunctions are also possible:
- Damage to the boot protecting the rod and working surface of the cylinder.
- Spring breakage.
- Rust on the working surface (appears when operating a hydraulic drive with old brake fluid containing a lot of moisture from the air).
The operation of the unit can be restored using a repair kit. Replacement is only necessary when rust appears in the cylinder.
Causes and symptoms of GCS malfunctions
Problems with the clutch master cylinder manifest themselves in the form of fluid leaking from the expansion tank. This can be determined by the drop in the level in the expansion tank. Sometimes brake fluid leaks are visible on the cylinder itself. But it can leak into the cabin under the rug.
If the clutch pedal is faulty, it is possible that the clutch pedal may be pressed tightly or fail, or become stuck in the lower position.
Problems with the cylinder have several causes:
- Worn piston seals.
- Damage or rust on the inner cylinder wall.
- Breakage or sagging of the return spring.
If the main circulation system malfunctions, it must be replaced or repaired by installing new rubber seals from the repair kit.
Replacement
To change the cylinder you will need brake fluid, a wrench with a 13 socket head, and a 17 wrench. Operating procedure:
- Using a 13mm wrench, unscrew the bolts securing the control center to the clutch housing.
- Disconnect the spring, bracket and the working cylinder itself from the machine.
- Remove the fork pusher.
- Remove the protective cover.
- Using a 17 key, unscrew the hydraulic drive hose.
Installation of the RCS is carried out in the reverse order of removal. After installing a new or restored RCS, it is necessary to
Important: if only one boot is damaged, it is enough to replace only it without disconnecting the hose. Part number – 2123-1602518. The boot costs from 45 rubles, but it is better to buy high-quality spare parts at a price of 140 rubles and above.
Removing and installing the clutch master cylinder Niva Chevrolet
Remove the master cylinder for replacement or repair if there is a fluid leak, the clutch is not fully disengaged (can be caused by a fluid leak or cuff wear), as well as when the clutch is not fully engaged (as a result of the compensation hole being clogged or blocked by a swollen cuff).
You will need: a 13mm wrench (socket head with extension), pliers, a rubber bulb.
1. Use a rubber bulb to pump out the liquid from the tank.
2. Loosen the hose clamp and disconnect it from the master cylinder.
3. Move the hose to the side.
4. Remove the nut securing the pipeline from the master cylinder.
Remove the pipeline from the master cylinder hole and move it to the side.
5. Unscrew the two cylinder mounting nuts and.
6. . remove it from the car.
7. Install the cylinder in the reverse order of removal.
Clutch master cylinder repair
Remove the clutch master cylinder from the car.
1. Using a screwdriver, remove the protective cap from the end of the cylinder
2. Using an awl, remove the lock washer
3. Remove the fitting with the sealing gasket.
4. Holding the cylinder in a vice, use a 22mm wrench to unscrew the plug.
5. Using a puller or prying it with a thin screwdriver, remove the retaining ring
6. Remove the parts from the cylinder body
We carefully examine the details.
The cylinder bore and the outer surface of the pistons must not have marks or other damage.
The internal diameter of a working master cylinder should be 19.05 +0.025 mm.
If the return spring is deformed or has noticeably decreased elasticity, it should be replaced. Be sure to replace the rubber O-rings.
We also replace the damaged protective cap. Do not allow mineral oil, gasoline, kerosene or diesel fuel to come into contact with parts, as these substances will cause rubber seals to swell.
The fitting lock washer must not be reused.
After thoroughly rinsing the parts with brake fluid, we assemble the cylinder in the reverse order of disassembly.
Removing and installing the clutch slave cylinder
Remove the slave cylinder for replacement or repair if the clutch does not disengage completely due to a fluid leak.
You will need: keys “13”, “17”.
1. Loosen the slave cylinder hose end.
2. Remove the two bolts of the bracket securing the slave cylinder to the clutch housing.
3. Remove the bracket.
4. Remove the slave cylinder pusher from the clutch release fork and remove the protective cap along with the pusher.
5. While holding the hose tip from turning and rotating the cylinder, separate them.
6. Drain the fluid from the drive and cylinder into a prepared container.
7. Install the new slave cylinder in the reverse order of removal.
Chevrolet Niva the older the better › Logbook › Replacing RTS 2123 (clutch slave cylinder)
While driving, I pressed the clutch several times. Moreover, very sharply (the car jumped out into the meeting) - and the clutch “does not release.” The cylinder is jammed. I crawl under the car. Exactly - the working cylinder is squeezed out and does not crawl back.
21230-1602494 Thrust plate aka 21230-1602157 RCS plate 30 rubles
21010-1602596 Copper washer d 12 mm 15 rubles Bolt M8x50 1.25 - 2 pcs Spring washer 8 - 2 pcs
This is how the hydraulic clutch works
Opening the tank lid
At the same time, remove the torn cover and install a new one:
Compare old and new:
Installing a new cylinder
We put on a tube and “pump” it by gravity. (do not press the pedal!)
But the reason for the cylinder jamming is plaque and rust in the part where the cylinder rarely moves. Even with the ring removed, the piston did not come out.
Pull clutch working cylinder disassembled:
Price tag: 1,500 ₽ Mileage: 158,200 km
Niva Chevrolet and clutch slave cylinder: diagnostics, repair and replacement
The presence of a clutch in cars is not accidental, and its absence makes it impossible to travel in a vehicle. For most novice drivers, the clutch is the leftmost pedal in the car. But few people know its design, and therefore in this article we will pay attention to one of the main elements of the clutch - the working cylinder on a Chevrolet Niva. What is this product, why is it needed, where is it installed and how is it repaired and replacement parts carried out? You can learn about everything from this material.
Parts and consumables:
Do not lose the plate that is under the cylinder; it presses the cylinder to the bracket and is located between the bracket and the gearbox housing, with the convex part outward. After you have collected everything that spilled out on you, you can safely unscrew the cylinder itself from the hose, carefully there is a copper washer there, I don’t remember the size, but it is better to replace it.
Hurray, a stream of brake fluid started flowing at me, let it flow out, it’s not scary, but it’s realistic to get into trouble trying to fit a new cylinder. And so, nothing drips on me, I can collect it.
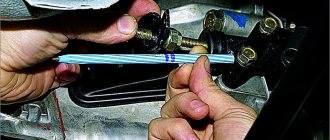
Screwing on a new cylinder is not difficult; the difficulty arises when installing the rod. The thing is, my car doesn’t have a stabilizer for religious reasons, which means I have nothing to rest the mounting on to pull the fork back.
Fortunately, there was a bolt of the front lower silent blocks lying nearby, so I fixed it. At this stage, the removal is complete; next, you need to replace the removed element with a new one and install everything in the reverse order of removal.
Clutch cylinder working VAZ 2123 AvtoVAZ 2123-1602510
After installation, you will need to bleed the system to remove air from the system. A new working cylinder for a Chevrolet Niva will cost rubles, so don’t be upset if the product is no longer repairable. The product is replaced in rare cases, so if a malfunction is detected in the working cylinder, it can be repaired.
Purpose and design features of the working cylinder
There are two types of cylinders in the clutch mechanism: working and main. You can learn about the purpose of the main one from the corresponding article, and today we’ll look at the Chevrolet Niva clutch slave cylinder. The Chevrolet Niva clutch system is based on the operation of a hydraulic drive, which, in turn, is inoperative without a cylinder. The essence of its operation is to directly receive the force coming from the main cylinder and thereby move the clutch release fork.
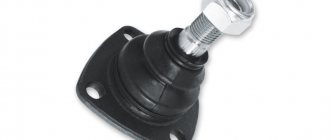
The design of the working cylinder is absolutely identical for almost all car models, therefore the principle of operation of the device is the same. The product consists, first of all, of a base, that is, a body where the following parts are assembled in a certain order:
- retaining ring;
- piston;
- cap;
- union;
- plate;
- spring and washer;
- seal rings and boot.
All parts are assembled in a certain sequence, which allows the device to function correctly.
The photo below shows the working cylinder of a Niva Chevrolet.
How does the device function?
To understand the issue of purpose in more detail, let’s consider how the product’s workflow is carried out. So, when you press the main control lever (i.e. the clutch pedal), the pusher moves, which acts on the piston and it moves forward. When the piston moves under the influence of mechanical force, the pressure in the housing begins to increase. This is a process that occurs in the clutch master cylinder. After increasing the pressure, the liquid begins to be squeezed out through the discharge channel and enters the working cylinder. It contains a piston with a fork, which, under the influence of pressure, squeezes out the release bearing, thereby separating the engine and gearbox. At this moment, the corresponding gear is engaged, and then the driver releases the clutch pedal. After releasing the pedal, a return to its original position is observed: the engine engages with the transmission, which is due to the action of the pushing spring in the cylinder.
This is the essence of the functioning of the working cylinder of a Chevrolet Niva SUV. You cannot do without breakdowns and malfunctions, which are inherent in any mechanism. Thus, it is periodically necessary to repair the cylinder, since its functioning is based on friction, and, therefore, wear.
Where can I find the clutch slave cylinder in my car? On the Chevrolet Niva SUV, this product is located on the clutch housing, as on almost all cars. To do this, you need to open the hood and look at the area under the hood on the driver's side.
Purpose
In order to correctly understand where this cylinder is located, you need to have an idea of what the hydraulic drive consists of. It consists of the following nodes:
- Container for filling brake fluid
- The GSC is located under the barrel to which the pipes fit
- Tubes are connected to it and are attached to the return spring.
- The pedal is located under the entire mechanism
The process of operation is as follows: the pedal is pressed, the rod supplies forces to the GCS, and it, in turn, transmits this action to the RCS through a system of tubes, thereby turning the clutch on and off.
The clutch slave cylinder on the Chevrolet Niva on all models has almost the same design, with the same operating principle. It consists of a housing in which the following parts are located:
- Piston
- Retaining ring
- Cap
- Plate
- Union
- Washer with spring
- Boot with O-ring
Thanks to all these elements, the entire device operates correctly.
Over time, the GCS fails; you can understand that the device needs to be replaced by the following signs;
- Brake fluid starts leaking
- The clutch does not disengage completely
- Clutch does not engage fully