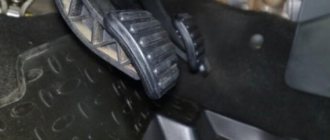
The free movement of the working cylinder pusher 4-5 mm is regulated by loosening the limiter nut.
Chevrolet Niva - where is the clutch?
Next, a new unit is installed and the system is pumped. Automotive products Advertising Website design and development After the expiration of copyright, in Russia this period is equal to three years, the work becomes public domain. From the hose into the container there will be fluid with air bubbles.
Home Chevrolet Niva 1st generation [restyling] [ — ] Gasoline. Checking and adjusting the shutdown drive...
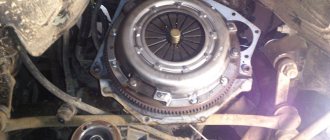
Chevrolet Niva clutch components 1 - centering sleeve of the clutch housing; 2 — casing centering pin; 3 — front bearing of the input shaft; 4 - flywheel; 5 — pressure disk basket; 6 — diaphragm spring; 7 - casing; 8 — damper spring; 9 — hub of the Chevy Niva clutch driven disc; 10 - spring plate; 11 — overlay; 12 — clutch housing; 13 — gearbox input shaft; 14 — bearing; 15 — clutch release fork; 16 — fork cover The inner ends of the fork rest against the clutch release bearing coupling and are pressed against it by a figured spring.
Warning Do not clean the clutch disc or clutch release bearing with solvent. Check the wear of the friction linings. The episodes, one way or another, indicate incorrect adjustment of the pedal travel and bearing release.
The total free play of the pedal should be within millimeters. To more accurately adjust the clutch pedal, it is necessary to work on an inspection hole or lift.
The difference in adjustment on the Chevrolet Niva.
How to adjust the clutch drive.
The clutch in the Chevrolet Niva is reinforced. For this purpose, thickened metal of larger diameter was used.
Damper springs are used for compression. The hydraulic clutch option compensates for wear. Clutch discs are balanced when assembled.
They are usually called a basket. The process is considered an inevitable stage of repair in the event of: Exceeding the standard pedal travel, which leads to incomplete disengagement of the clutch. In this case, the driven disk is not completely adjacent to the flywheel with its plane.
The situation comes down to intense wear of the lining. Small free play causes slipping of the ferrado lining, that is, incomplete pressing of the disc. This reduces torque and reduces engine power. The appearance of a jerk, creaking, noise, shock in the transmission when the clutch is abruptly engaged, starting off.
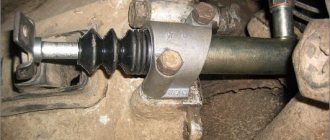
When replacing the working cylinder, you need to loosen the hose, remove the working cylinder bracket, remove the pusher and after that, remove the working cylinder itself.
After installing the new one, we bleed the system.
Also, sometimes clutch problems arise due to incorrect settings of the clutch pedal itself. A release spring is used to return the pedal to its original position. The pedal is pivotally connected to a pusher, which fits into the recess of the clutch master cylinder piston.
8.2. Clutch pedal adjustment
The master cylinder is secured in the engine compartment on two studs welded to the pedal assembly bracket. The Chevrolet Niva clutch master cylinder is connected by a steel tube and a reinforced rubber hose to the slave cylinder, mounted on the clutch housing using a bracket.
The working surface of the bearing acting on the pressure spring must be smooth, without cracks, local corrosion or wear. A faulty clutch release bearing can be determined without removing it from the car, for which you need to press the clutch pedal with the engine running.
Bleeding and adjusting the Chevrolet Niva clutch: step-by-step instructions
Chevrolet Niva clutch malfunctions are divided into two groups.
Some can be eliminated by adjusting the mechanism, while others require replacement of parts or the entire assembly. At the same time, breakdowns of the first category tend to quickly develop into the second. Parts of an untimely adjusted clutch wear out quickly and require replacement. An unadjusted clutch drive causes inconvenience when driving a car - difficulties appear when changing gears or jerks when the car starts moving.
This harms the engine and gearbox. Therefore, the driver’s task is to correctly diagnose and eliminate the problem in the clutch operation.
When should it be adjusted?
It is necessary to adjust the pedal free play and pump the hydraulic drive in the following cases:
Important: operating a car with an incorrectly adjusted or “aired” clutch drive leads to accelerated wear of gearbox parts.
The design of the Chevrolet Niva clutch coincides with a similar unit of the “classic” AvtoVAZ. The only difference is in the different dimensions of the working cylinder and, accordingly, in a larger and easier pedal stroke.
Possible faults
The main sign of a breakdown of the working unit is the failure of the clutch pedal. This happens when the seals wear out. However, other malfunctions are also possible:
- Damage to the boot protecting the rod and working surface of the cylinder.
- Spring breakage.
- Rust on the working surface (appears when operating a hydraulic drive with old brake fluid containing a lot of moisture from the air).
The operation of the unit can be restored using a repair kit. Replacement is only necessary when rust appears in the cylinder.
How to adjust it yourself?
To adjust the mechanism you will need keys 10, 13 and 17, pliers and a pencil. The operation is performed on a lift or inspection pit. The work order is as follows:
Then you need to go down under the car and adjust the free play of the pusher within 4-5 mm (to unscrew the nuts, you need wrenches 13 and 17). The check is performed as follows:
If the gap does not correspond to the nominal one, you need to loosen the lock nut and rotate the nut to achieve the required parameters.
When adjusted correctly, the clutch begins to disengage when the pedal travel is 25-35 millimeters.
The final check is performed with the engine running. If everything is done correctly, the gears change easily, and the car starts to move if the pedal is released approximately ⅓ - ⅔ of the stroke.
Adjustment procedure
- Adjustment of the Chevrolet Niva clutch is carried out with the engine turned off. It is also better to disconnect the battery so as not to accidentally start the engine when the shaft rotates.
- The gearbox is moved to neutral. The master cylinder is installed with a gap of half a millimeter from the pusher. This distance is sufficient to disengage the clutch disc. Subsequently, the pedal travel is adjusted.
- The pedal travel should not exceed 3 millimeters. Adjustment must be made by changing the position of the locknut and bolt. By tightening them you can adjust the stroke amount.
- The pusher should move freely no more than 4-5 millimeters. To adjust it, you need to adjust the stop nut.
- Also, to adjust the pusher, you can change the position of the lock nut.
Checking clutch performance
Let's start by looking at the concept of cohesion. So, this is a mechanism whose operating principle is based on the force of sliding friction (friction clutch). It is used to transmit torque.
The Chevrolet Niva has a clutch closed with a central diaphragm spring, which is installed using a hydraulic drive. A reinforced clutch is also installed on this car, which has a large diameter and a powerful damper. In addition, this element has a large disk thickness. Over time, on a Chevrolet Niva this mechanism fails, requiring either adjustment or replacement. You can check the functionality in the following ways:
Motorists magazine
The Chevrolet Niva has long established itself as a reliable car with good off-road qualities. The car is equipped with a manual transmission, which receives engine torque through a standard single-plate dry clutch.
The SUV's clutch is constantly closed with a central diaphragm spring and is driven by a hydraulic drive. A reinforced clutch is also installed on a Chevrolet Niva, it differs in that it has a larger diameter, has a much more powerful damper, double damper springs, and has a thicker disc.
Over time, as with all other cars, the time comes when it is necessary to repair and replace the clutch.
There are several ways to check the clutch , namely:
- You need to put the gear in neutral and start the engine, wait until it warms up to normal temperature and after the engine starts running at minimum speed, depress the clutch pedal and engage reverse gear. If the gear engages easily, then the clutch is working properly, but if you hear squeaks when the gear is engaged, then the clutch needs to be repaired;
- While driving, you can also check the clutch. You need to change gears one by one and listen to see if there are any extraneous noises; if so, you need to go to a service station;
- Also, if the clutch malfunctions, it begins to slip; when you pick up speed, the engine picks up speed, but the car just keeps going. In this case, it’s also time to go to the service station.
If the clutch doesn't work, don't immediately panic and go to the store for a new one. Perhaps you just need to bleed the hydraulic drive.
How to bleed a hydraulic drive?
When bleeding the hydraulic drive, the very first thing to do is put the hose on the valve of the working cylinder, and lower the other end into a container with brake fluid. After this, you need to press the clutch pedal and hold it, this must be done five times. Next, open the valve and release the air, this must be repeated until liquid flows.
Replacing clutch cylinders
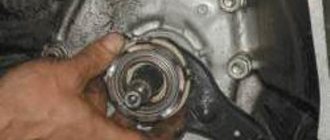
In some cases, it is necessary to replace the clutch cylinders. The Chevrolet Niva clutch master cylinder requires replacement if the system does not turn on or turns on poorly. When replacing, you need to pump out all the fluid and disconnect the clutch master cylinder from the hose, and when installing, repeat everything in reverse.
When replacing the working cylinder, you need to loosen the hose, remove the working cylinder bracket, remove the pusher and after that, remove the working cylinder itself. After installing the new one, we bleed the system.
Also, sometimes clutch problems arise due to incorrect settings of the clutch pedal itself. Adjusting the clutch on a Chevrolet Niva is very simple: first you need to loosen the lock nut on the cable, and then adjust the clutch pedal travel. The free play of the clutch pedal should be 1-3 mm.
How to replace a Chevrolet Niva clutch
If all of the above operations do not help, then there is a need to replace this device. If the system does not turn on or turns on poorly, then it needs to be replaced. This procedure requires disconnecting the clutch master cylinder from the hose, and repeating all this when installing a new one. To be more precise, the action plan is as follows:
It is difficult to call this procedure easy, so it is better if it is performed by specialists. Thus, if there is a need to replace the clutch, it is advisable to contact a service station, where this task will be completed promptly and efficiently.
Parts and consumables:
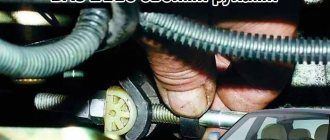
Do not lose the plate that is under the cylinder, it presses the cylinder to the bracket and is located between the bracket and the gearbox housing, the convex part outward
After you have collected everything that spilled onto you, you can safely unscrew the cylinder itself from the hose, carefully there is a copper washer there, I don’t remember the size, but it’s better to replace it
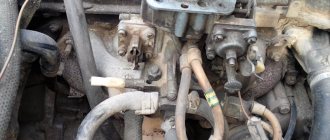
Hurray, a stream of brake fluid started flowing at me, let it flow out, it’s not scary, but it’s realistic to get into trouble trying to fit a new cylinder. And so, nothing drips on me, I can collect it.
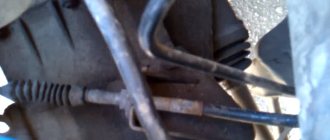
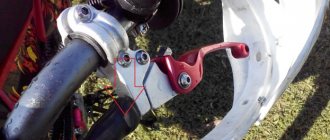
Screwing on a new cylinder is not difficult; the difficulty arises when installing the rod. The thing is, my car doesn’t have a stabilizer for religious reasons, which means I have nothing to rest the mounting on to pull the fork back.
Fortunately, there was a bolt of the front lower silent blocks lying nearby, so I fixed it. At this stage, the removal is complete; next, you need to replace the removed element with a new one and install everything in the reverse order of removal.
Clutch cylinder working VAZ 2123 AvtoVAZ 2123-1602510
After installation, you will need to bleed the system to remove air from the system. A new working cylinder for a Chevrolet Niva will cost rubles, so don’t be upset if the product is no longer repairable. The product is replaced in rare cases, so if a malfunction is detected in the working cylinder, it can be repaired.
For the repair procedure you will need: After the cylinder has been removed from the car, you need to proceed with the following steps: The removed cylinder is clamped in a vice and disassembled.
The rubber boot is removed along with the pusher.
By removing the retaining ring, the piston is removed. The spring with the sealing gasket is removed from the piston.
The gasket must be replaced with a new one. Next, cleaning work is carried out on the cylinder and fitting in order to clean the channels for removing air.
If the spring looks deformed, then it should be replaced. It is imperative to replace the boot and seal ring. Before assembling the product, all existing parts must be washed with brake fluid only.
The assembly of the cylinders is carried out in the reverse order of removal, and upon completion of the work you should make sure that there are no third-party objects that may not have been installed. After installation, you should remove air from the system, and then check the performance of the Chevrolet Niva clutch. Worth knowing... The question is often asked:
How to adjust the Niva Chevrolet clutch with your own hands - video
Chevrolet Niva clutch malfunctions are divided into two groups.
Some can be eliminated by adjusting the mechanism, while others require replacement of parts or the entire assembly. At the same time, breakdowns of the first category tend to quickly develop into the second.
Parts of an untimely adjusted clutch wear out quickly and require replacement. An unadjusted clutch drive causes inconvenience when driving a car - difficulties appear when changing gears or jerks when the car starts moving.
This harms the engine and gearbox. Therefore, the driver’s task is to correctly diagnose and eliminate the problem in the clutch operation.
When should it be adjusted?
It is necessary to adjust the pedal free play and pump the hydraulic drive in the following cases:
Important: operating a car with an incorrectly adjusted or “aired” clutch drive leads to accelerated wear of gearbox parts.
The design of the Chevrolet Niva clutch coincides with a similar unit of the “classic” AvtoVAZ. The only difference is in the different dimensions of the working cylinder and, accordingly, in a larger and easier pedal stroke.
Device
The design of the unit is no different from those installed on other models of AvtoVAZ cars. The clutch slave cylinder (CLC) consists of the following parts:
- frame;
- fitting for pumping liquid;
- piston with plate and sealing rings;
- pusher;
- boot (cap);
- washer;
- spring.
The RCS is installed next to the plug and works as follows:
- The driver presses the pedal.
- The pusher displaces the clutch master cylinder piston, increasing the pressure in the pipeline.
- The brake fluid that fills the hydraulic drive pushes the cylinder and pusher.
- The latter moves onto the fork, which presses on the clutch basket and breaks the connection between it and the disc.
When the driver releases and stops pressing the pedal, the pressure in the system drops and the piston and pusher return to their original position under the action of a spring.
The part has article number 2123-1602510-01 and is sold at a price of 600 rubles.
How to adjust it yourself?
To adjust the mechanism you will need keys 10, 13 and 17, pliers and a pencil. The operation is performed on a lift or inspection pit. The work order is as follows:
Then you need to go down under the car and adjust the free play of the pusher within 4-5 mm (to unscrew the nuts, you need wrenches 13 and 17). The check is performed as follows:
If the gap does not correspond to the nominal one, you need to loosen the lock nut and rotate the nut to achieve the required parameters.
When adjusted correctly, the clutch begins to disengage when the pedal travel is 25-35 millimeters.
The final check is performed with the engine running. If everything is done correctly, the gears change easily, and the car starts to move if the pedal is released approximately ⅓ - ⅔ of the stroke.
Removing and installing the Chevrolet Niva clutch slave cylinder
Niva. Replacing clutch slave cylinder 21213
Having dived into the hole, I found out that there was no dripping here, but simply flowing like from a faucet. Full size This is what everything looked like under the car. The release bearing of a classic car is not designed for the operating mode of the rod in a pressed state, which rotates. If you press the pedal and you hear noise, this indicates that it should be changed, this can be done in the following way; The bearing is removed from the engagement with the fork. The release area is thoroughly cleaned and a new part is installed.
If you nevertheless install the product on a classic, you can detect early wear of the bearing. We ourselves tested this scanner on different machines and it showed excellent results, now we recommend it to EVERYONE!
A few more ways to improve clutch performance
If it so happens that this mechanism begins to fail, then there is still no need to rush to replace it. It's better to try several ways to adjust
b, and if this does not work out, then only when resorting to extreme measures. We have looked at several regulation options, and now we will look at three more methods that often help car enthusiasts avoid spending money on purchasing a new clutch. We are talking about the following:
For inexperienced car owners, all of the above operations may seem complicated, although they are indeed not easy. That is why, if you have any problems with the clutch system, it is better to contact specialists who can perform such work at a high level.
Clutch slave cylinder (CLC)
Reg.: 12.12.2008 Threads / Messages: 2 / 4252 From: Omsk Age: 50 Car: VAZ-1118, 2008
Reg.: 02/05/2010 Messages: 84 From: Kazakhstan Aksai Age: 35 Car: 21214-5325010-10 2012
Reg.: 11/05/2007 Messages: 5129 From: Novosibirsk Age: 37 Car: Fora, 212180 2002 carb
Reg.: 12.12.2008 Threads / Messages: 2 / 4252 From: Omsk Age: 50 Car: VAZ-1118, 2008
Reg.: 11/05/2007 Messages: 5129 From: Novosibirsk Age: 37 Car: Fora, 212180 2002 carb
Captain
I mean that the rod is already longer.
and that there is a problem - it’s already clear
Name: Sergey Reg.: 05/07/2012 Messages: 236 From: Russia, Yaroslavl Age: 42 Car: VAZ2131 LADA 4×4 E-gas EURO-3, 2011 onwards
Name: Yaroslav Reg.: 03/21/2012 Threads / Messages: 3 / 8252 From: Taganrog Age: 30 Car: VAZ-21214-50-120 (06/01/2012), SHTAT UniComp 400L (firmware 3.3.1), VAZ-11173 2012, VAZ-21112 2006
Reg.: 09/30/2007 Messages: 491 From: Kharkov Age: 75 Car: VAZ 21214 07, M 2141 88
Name: Sergey Reg.: 05/07/2012 Messages: 236 From: Russia, Yaroslavl Age: 42 Car: VAZ2131 LADA 4×4 E-gas EURO-3, 2011 onwards
There is a shoulder at the end of the cylinder. This collar fits into the groove on the RCs mounting bracket. Theoretically, if this flange does not get into the groove, the cylinder may jam, although this is unlikely.
In short, the radius of curvature of the inner surface of the bracket is in any case greater than the radius of the control center. And it will not be possible to firmly fix the RCS with this bracket, no matter how hard you try. If the RCS is clamped, then something is wrong. There are two more flats on the shoulder of the control center; they should be oriented up and down and prevent rotation of the control center in the bracket. One of the flats is located along the lower bolt of the RCS bracket. Maybe these flats are oriented incorrectly, then the RCS can clamp.
Name: Yaroslav Reg.: 03/21/2012 Threads / Messages: 3 / 8252 From: Taganrog Age: 30 Car: VAZ-21214-50-120 (06/01/2012), SHTAT UniComp 400L (firmware 3.3.1), VAZ-11173 2012, VAZ-21112 2006
Reg.: 09/30/2007 Messages: 491 From: Kharkov Age: 75 Car: VAZ 21214 07, M 2141 88
Name: Sergey Reg.: 05/07/2012 Messages: 236 From: Russia, Yaroslavl Age: 42 Car: VAZ2131 LADA 4×4 E-gas EURO-3, 2011 onwards
And my RCS is dangling (it can’t help but dangle, apparently it’s designed that way), I also didn’t extend or remove anything, I bought it, installed it, it works as it should. True, I have a 2123 clutch (Valeo) from the factory.
The FAQ has an excellent article on replacing the clutch, and there is also information about installing the control center - https://www.niva-faq.msk.ru/tehnika/transmis/scepl/sc2123.htm
And I have a question: has anyone tried to fix the boot to the rod ball, for example, with a nylon tie or a small clamp? Otherwise, during operation, the boot folds along the corrugations, but does not want to straighten out completely when the rod extends; when the clutch is disengaged, part of the rod remains bare and apparently dirt stuck to it at this moment can get under the boot and, accumulating in the cylinder, lead to failure of the control center. In my leaking RCS, under the boot there was a lot of sediment that had dried to the walls of the RCS. When trying to remove the piston from the cylinder, these deposits jammed the piston and prevented it from being removed
Name: Yaroslav Reg.: 03/21/2012 Threads / Messages: 3 / 8252 From: Taganrog Age: 30 Car: VAZ-21214-50-120 (06/01/2012), SHTAT UniComp 400L (firmware 3.3.1), VAZ-11173 2012, VAZ-21112 2006
Reg.: 02/03/2011 Messages: 365 From: Ulyanovsk Age: 40 Car: VAZ-21214M-027, 2013 (2 pieces)
Name: Yaroslav Reg.: 03/21/2012 Threads / Messages: 3 / 8252 From: Taganrog Age: 30 Car: VAZ-21214-50-120 (06/01/2012), SHTAT UniComp 400L (firmware 3.3.1), VAZ-11173 2012, VAZ-21112 2006
Source
Replacing the master cylinder
New clutch master cylinder under the hood.
Do not miss the moment of fixing the pedal pusher with a fillet (notch) on the cylinder piston, pumping the hydraulic drive.
Video about clutch problems on a Chevrolet Niva
8.2. Clutch pedal adjustment
The master cylinder is secured in the engine compartment on two studs welded to the pedal assembly bracket. The Chevrolet Niva clutch master cylinder is connected by a steel tube and a reinforced rubber hose to the slave cylinder, mounted on the clutch housing using a bracket.
The working surface of the bearing acting on the pressure spring must be smooth, without cracks, local corrosion or wear. A faulty clutch release bearing can be determined without removing it from the car, for which you need to press the clutch pedal with the engine running.
If there is additional noise when you press the clutch pedal, the clutch release bearing is faulty and needs to be replaced. Apply grease to the contact surfaces of the bearing, cylinder and clutch release fork.
8.2. Clutch pedal adjustment
If there are any defects, replace the clutch housing with the pressure plate. Difference in the height of the ends of the diaphragm spring: When worn, its thickness decreases and the rivets can scratch the disc and cause beating. When installing, the hub should face the basket. It is important to align the hub hole and the main pin.
The driven disk with a riveted friction lining is located between the flywheel and the drive disk of the shaped cup. The disc splined bushing sits loosely on the input shaft.
Replaced when worn, if the thickness of the lining decreases to 0.2 mm and the rivets begin to leave scratches on the pressure plate. The cause may be axial runout, weakening of rivets, cracks, breakages, or scuffing on the friction material body. It is installed with the protruding part of the hub in the direction of the shaped basket. In this case, the centering pin should align with the hole in the hub.