The correctness and stability of the operation of all vehicle electronics depends on the serviceability of the generator, because it powers all devices after the engine starts. Therefore, it is important to maintain the generator in “combat” condition, which means servicing it correctly. Periodically checking the generator with a multimeter will identify possible malfunctions of the device and increase its service life. More details on how to check a car generator with a multimeter (with and without removing the device) will be discussed in this article.
Reasons for generator failure
Without specialized equipment, it is not always possible to determine the exact cause of a unit failure. But most often the problem is caused by:
- Bearing jamming . Due to drying out of the lubricant and gradual wear, the bearings jam. First, the belt usually breaks, which necessitates rebuilding the assembly.
- Winding burnout . Most often, the winding burns out due to the penetration of chemicals and salts used to sprinkle the road in winter.
- Brush wear . Graphite brushes wear out gradually, so they need to be replaced periodically. If they are not replaced in time, the unit may fail completely.
- Relay malfunction . The device is designed to prevent battery overcharging. If it malfunctions, the generator does not start.
To prevent breakdowns, scheduled vehicle maintenance should be carried out in a timely manner.
Device for mounting AvtoVAZ electric generators
Sometimes, to check the functionality of such devices, it is necessary to completely dismantle them. Before checking a generator removed from a VAZ 2110 and other cars from the same manufacturer with a multimeter, you should understand the structure of the generating unit.
The design may differ slightly depending on the modification of the device. But the main components of electric generators include the stator, rotor, aluminum covers, pulley, brushes, and bearings.
Rotor design features
The part is made in the form of a shaft with a corrugated surface, pressed steel bushings, and beak-shaped poles. Together these elements form an electromagnetic core.
Between the poles on the bushing there is an exciting winding protected by a plastic housing. A cooling impeller and a generator pulley are attached to the front of the shaft. The rotor is installed on bearings. The rear ball bearing is pressed onto the shaft. The front one is fixed with special washers on the cover.
Generator stator structure
This device is made of thin plates (up to 1 mm thick) made of electrical steel. The inner surface of the stator has grooves for laying three-phase windings. Each winding includes 6 coils.
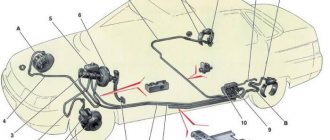
Mounting the VAZ electric generator
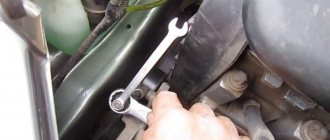
When servicing such devices, it is often necessary to remove them. The generating units are fixed using special brackets secured with bolts. It is more convenient to unscrew this mount while under the car.
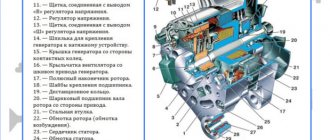
Drawing of the VAZ 2108-2115 generator
The electric generators are also attached to the drive belt tensioner plate. Fixation is carried out using a nut. Different AvtoVAZ vehicles are equipped with different types of drive belts. For example, model 2108 (and its modifications) has V-belts, and VAZ 2111 has poly-V-belts.
This difference is due to the different configuration of the internal combustion engines of VAZ cars. Newer models (for example, 2114b 2115) are equipped with powerful air conditioning systems and electric power steering. Therefore, they require better adhesion of the belt to the pulleys, as well as a current output of 80 A or more.
Check Features
When checking the generator of a VAZ 2110, 2107 and others for serviceability, the following conditions must be met:
- An accurate multimeter should be used for diagnosis.
- The normal voltage is 12 V.
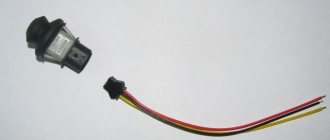
- If it is necessary to replace the wiring, you must use wires with the same cross-section as the original.
- Before checking, you should check that all fasteners are connected correctly and the belt tension is correct. If necessary, the connections should be adjusted to normal, the belt should be loosened or tightened.
During the verification process it is prohibited:
- short circuit the wires;
- connect terminals that differ in purpose and parameters, connect terminal 30 or B+ to ground;
- diagnose a generator without connected consumers.
Common breakdowns
Generator faults can be electrical or mechanical. These include:
- loss of functionality of the voltage regulator;
- breakdown of the rectifier unit (diode bridge);
- short circuit of stator windings;
- current short circuit in the rotor winding;
- wear of bearings and brushes.
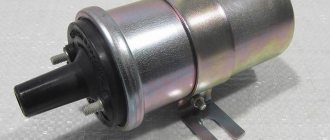
Voltage regulator
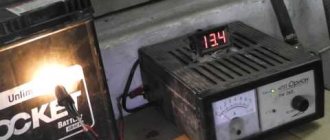
The purpose of this unit is to normalize the voltage before feeding it into the automotive electrical circuit. You can check the serviceability of the regulator by checking the voltage that it supplies to the battery terminals. This indicator depends on the model and brand of the vehicle and varies between 13.5-15.5 V. Therefore, you should find out in advance what voltage your particular type of regulator produces. This can be done by studying the manual for using the machine. For example, you can take a VAZ 2107 or 2110 car, since these vehicles have the most typical faults associated with the integral and relays.
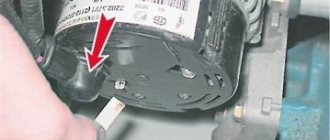
Using a Multimeter
To check the VAZ 2110 generator with a multimeter, you need to switch the device to voltmeter mode. Then you need to connect its probes to the battery terminals. The most important thing is to observe the polarity and turn off the car engine. The voltage normally varies from 12 to 12.8 V. Next, the procedure should be repeated, but with the engine running. The voltage readings should rise to 13.5-15.5 V. Lower and higher voltage values indicate a malfunction of the generator.
Checking the generator without removing it from the car
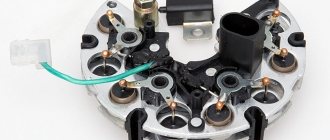
A bridge of diodes performs the functions of a kind of alternating current converter. It contains three negative and three positive diodes.
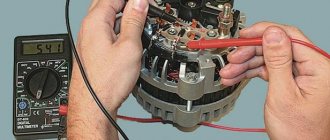
Before checking the bridge, you need to disconnect all the wires coming from it and from the voltage regulator. You also need to remove the ground anchor from the battery in advance. First you need to check the rectifier for short circuits. We activate the ohmmeter mode on the multimeter and connect the red (positive) probe to the positive contact of the diode bridge, and the negative probe to the surface of the housing of the generator itself. If the rectifier is fully operational, then the readings of the measuring device will go to infinity. In other cases, the rectifier will be inoperative.
Testing of stator and rotor windings
A common breakdown of a car generator is a short circuit in the windings. It occurs when current surges are too intense, brushes wear out and liquid gets in.
So, you need to remove the rotor and find a pair of slip rings on its structure that will need to be ringed. Having started the ohmmeter mode on the multimeter, we connect the probes to these rings. Normal resistance is 2-6 ohms. If you get large values, then there is a loss of contact between the slip rings. If the device shows lower values, then an interturn short circuit has occurred.
The starter has several windings at once. They need to be checked separately. However, first you need to disconnect the wires that connect the diode bridge and the winding terminals.
Then you should measure the resistance between zero and the terminals of the windings. The normal value is no less than 0.3 Ohm.
Wear of brushes and bearings
If you have already disassembled the generator, then it is advisable to check the condition of the brushes. They can wear out or break due to misalignment of the rotor shaft. If the brushes are damaged, they should be replaced with new ones.
Inside a car alternator there are a pair of bearings. One is fixed on the rotor shaft, the other is in the center of the cover. The whistling and hum of the generator when the engine is running is a clear sign of bearing wear. In this case, the generator housing can become very hot. If you notice such signs, it is better to replace the bearings immediately, otherwise you may encounter more serious problems.
Diagnostics of the VAZ generator without removal and special tools
This is not the most reliable and reliable method, but it allows you to determine whether the generator is functioning or there are malfunctions. The use of any specialized tools, including a multimeter, is not required. There is no need to remove the generator.
To diagnose, start the engine and turn on the low beams. In operating condition, the negative terminal must be disconnected from the engine. The uniform light of the headlights and the stability of the engine stroke indicate normal operation of the generator. If malfunctions are observed or the brightness of the light changes, the VAZ generator is probably faulty; in-depth diagnostics need to be carried out.
Symptoms of malfunction
may indicate a generator malfunction :
- the warning light on the dashboard is constantly on;
- The battery began to discharge quickly, and recharging does not save the situation;
- there are malfunctions in the functioning of electrical equipment (ventilation and heating, multimedia devices, alarm system and lighting), even if the motor is working properly;
- there was a smell of something burnt in the car interior;
- the generator began to whistle or rustle.
If you notice these symptoms, you should immediately go to a car service center for a thorough diagnosis. However, you can check the functionality of the generator on your own, especially if you have the skills to use an autotester.
Voltage Regulator Diagnostics
To check the voltage regulator on a VAZ 2114, 2106 car, you should perform the following steps:
- Start and warm up the engine by turning on the headlights. Warm up the engine for about 15 minutes. For diagnostics, a multimeter or voltmeter capable of taking measurements in the voltage range 0-15 V is used.
- Measure the voltage between ground and terminal 30. For most cars in normal condition, the reading will be within 13.5-14.6 V. A value less than 13 V means the unit needs to be replaced.
Dismantling and installation of an electric generator
The procedures for removing and installing the generating unit will be considered using the example of VAZ 2108, 2109. Algorithm for the dismantling procedure:
- Disabling the car battery.
- Disconnecting the generator terminals (located on the right).
- Loosening the drive belt tension adjustment nut (located on top).
- Removing the strap from the pulley.
- Removing the adjusting bar (the same bar where the nut was loosened).
- Unscrewing the bracket mounting bolts.
After this, the generating unit can be removed. You can remove the generator, for example, on a VAZ 2114 with a 16-valve internal combustion engine from Super Auto according to the same sequence. The device must be installed in reverse order.
Checking the return current
Diagnostics is carried out with the engine running at high speeds. It is necessary to measure the current consumed by the vehicle components. The probe is pressed against the wire from terminal 30 or B+.
It is necessary to turn on the electrical appliances of the car one by one and record the indicators. The resulting values should be summed. Then you need to turn on all the devices and measure the current indicator. The resulting indicator should be compared with the summed value of previous measurements. The final value should be approximately 5 A below the summed value. A higher value confirms that the node is faulty.
Beginning of work
Multimeter device
To start testing, no special preparations are required. You just need to prepare the multimeter itself. It is also advisable to check the generator - inspect the generator stator, diode bridge, voltage regulator, etc. This makes it possible to identify faults at an early stage. In addition, an external inspection of other elements of the vehicle's electrical circuit should be carried out. No further work may be required.
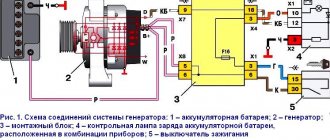
Generator circuit
So, the test includes several stages:
- Inspection of the relay regulator.
- Checking the diode bridge.
- Checking the stator.
- Checking the rotor.
Checking the windings
First you need to visually inspect the windings. If there are no visible defects, you should use a multimeter. First you need to do the following:
- Remove the brush holder.
- Disconnect the voltage regulator.
- Clean the slip rings.
- Diagnose the winding for defects.
The resistance measurement function on the multimeter should be activated. The measurement is taken between the slip rings and the stator. In normal mode, the value will be from 5 to 10 ohms.
Multimeter - what is it
A multimeter is a measuring device used to measure resistance, current or voltage. Also, using such a device you can check the wiring for breaks. Each of these measurements involves the use of separate measuring instruments, such as a voltmeter, ammeter or ohmmeter. Therefore, a multimeter is considered a universal tool (mulmeter = voltmeter + ammeter + ohmmeter). In practice, analog and digital multimeters are used.
What is a multimeter
Analog
This multimeter is equipped with a special hand, like on a watch, by the movement of which the measurements are read. The analog multimeter is also equipped with a measuring scale with resistance, current and voltage values. The device is inexpensive, so it is very popular. The disadvantages of an analog multimeter include measurement errors (this mainly applies to products made in China).
Analog multimeter
Digital
Unlike an analog multimeter, a digital multimeter has an LCD or LED screen that displays data. These devices are easier to use and also have high accuracy, which cannot be said about cheaper analogues.
Digital multimeter
Note! Some types of digital multimeters can work in conjunction with a computer, transferring data obtained as a result of measurements to it.
Video - How to use a multimeter
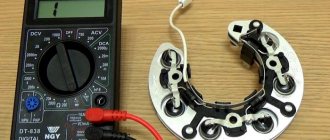
Diagnostics of a removed generator
To check the generator removed from the VAZ 21, you should use a multimeter in ohmmeter mode. The probes are pressed against terminal 30 and the body of the unit. If there are contaminants and strong oxides on the case, they should be removed first, as they can affect the readings of the device.
You need to measure the resistance of each generator unit in turn. Parts that do not have the required resistance have become unusable. Most of them can be replaced at home using a minimal set of tools. To replace, you need to buy the same parts as those originally installed in the generator.
Didn't find the information you are looking for? on our forum.
How to charge the battery
There are four ways to charge the battery. Each of them has its own advantages and disadvantages. Let's look at them.
A car battery is the basis for all electronics in a car. It is recharged by a generator and constantly powers all electrical elements in the system. Its malfunction can lead to improper operation of the car, so it is worth monitoring its performance.
Battery voltage is one of the main indicators of its performance. Therefore, you need to regularly check it and monitor the charge level so that it does not fall below normal. This will be discussed in our article.
Nuances
When replacing a generator with a Niva 21213, 2121, 21214, a number of subtleties arise, and one of them is the location of the generator unit. It is located at the bottom of the engine compartment.
Actually, this is why problems arise with the operation of the structure: while driving, various contaminants get on the generator, and coolant drips. If you don’t want to constantly change the generator unit, it is recommended to move it upstairs.
To ensure that no problems arise during the operation of the car, it is important to monitor the condition of the car. First of all, it is recommended to regularly inspect the generator.
So, when the “battery” light blinks on the dashboard, if suspicious noises or creaking sounds occur, you should be wary and think that the generator is not working correctly.
Timely inspection will help to avoid unpleasant situations in the form of breakdowns of the constituent elements of the generator, and as a result, failure of entire electrical systems.
Read news about the new Niva
- How to check the generator yourself: checking the generator without removing the relay regulator, diode bridge from the car
- Niva Chevrolet where is the starter relay located?
- Generator Niva 2121, 21213, 21214: which one is installed, replacement
- Generator Niva 2121, 21213, 21214: which one is installed, replacement
- Generator Niva 2121, 21213, 21214: which one is installed, replacement
- Generator Niva 2121, 21213, 21214: which one is installed, replacement
- Moving the generator to the top 21214
- Generator Niva 2121, 21213, 21214: which one is installed, replacement