How does a mechanic diagnose a p0441 code?
- First, the mechanic will connect the OBD-II scanner to the vehicle's diagnostic port and read all the stored data and error codes.
- He will then clear the error code from the ECM and test drive the vehicle.
- If P0441 appears again, have a mechanic visually inspect the evaporative emission system.
- The mechanic will then check the fuel pressure sensor in the fuel tank for damage.
- He will also check the fuel cap.
- He will then check the operation of the vacuum switch and purge valve.
- If no problem is found, the mechanic will perform a thorough check of the evaporative emission system to check for leaks.
Decoding combinations
Below we will look at the decoding of error codes. We will not consider all codes: only the most common combinations that indicate a breakdown are given.
Self-diagnosis
So, what codes can be seen when self-diagnosing Lada Kalina.
Code Explanation of error 2 Code 2 means excess voltage in the vehicle's on-board network. 3 This code indicates a malfunction of the gasoline level sensor in the fuel tank
Possible circuit break. 4 When this code appears, the car owner needs to pay attention to the operation of the antifreeze temperature sensor. There is also a possibility of a circuit break. 5 There is a problem with the outside temperature sensor. 6 The control unit (CU) detected engine overheating
It is recommended to deal with this problem before further operation of the car. 7 Emergency lubricant pressure in the internal combustion engine is reported. 8 If you see this code on the dashboard, then you need to check the functionality of the brake system. The on-board computer recorded an error or breakdown in its operation. 9 The on-board computer reports that the battery charge is too low. It is recommended to perform a more thorough check of the battery. E An error has been reported in the data packet stored in the EEPROM.
Diagnostics using equipment
First, let's look at what the letters and numbers mean.
- B - indicates a malfunction of the body, that is, we are talking about airbags, central locking, electric windows. Of course, this is true for Lada Kalina cars equipped with these devices;
- C - means an error in the operation of the chassis;
- P - indicates a malfunction in the functioning of the engine or automatic transmission.
What does the second number mean:
- 0 – common code for OBD-II;
- 1 – number of the car manufacturer;
- 2 – number of the car manufacturer;
- 3 – reserve code.
The third symbol directly indicates the type of malfunction:
- 1 – malfunction of the fuel system or air supply;
- 2 – malfunctions in the fuel system or air supply are also reported;
- 3 – malfunctions in the ignition system were detected;
- 4 – auxiliary control;
- 5 – malfunctions in idle speed;
- 6 – malfunction of the ECU or its circuit;
- 7 and 8 – errors in the operation of the transmission system.
| Code | Decoding |
| P0036 | Errors in the operation of the oxygen sensor are reported. It is recommended to check the device for operability, and also check the circuit for opens and short circuits. |
| P0102 | This error code tells the driver about a malfunction in the mass air flow sensor. It's also worth checking the chain. |
| P0441 | Incorrect air flow through the canister purge valve was detected. You should check the valve itself, as well as the entire gasoline vapor recovery system. |
| P0444 | The control unit registered a break in the wiring of the canister purge valve. The circuit should be checked. |
| P0445 | The on-board computer reports a short circuit in the control wiring to ground or the on-board circuit. |
| P0480 | A broken fan relay wiring has been detected. This code can also directly indicate a relay failure. |
| P0504 | A problem has been reported with the brake pedal sensor. |
| P0830 | Malfunctions have been reported in the operation of the clutch switch. It is necessary to diagnose the clutch and identify the breakdown. |
| P2187 | Literally means: the fuel supply system is too lean at idle. Here, first you need to adjust the idle speed. If this does not help, then look for the problem in the fuel supply system itself. |
| P1115 | Incorrect data was recorded in the operation of the oxygen level control sensor. The circuit should be checked. |
| P1123 | In idle mode, the on-board computer registered a too high combustible mixture index. |
| P1124 | At idle, the on-board computer reported that the fuel mixture was too low. |
| P1127, P1128 | The control unit reports too high or too low a fuel mixture indicator in partial engine load mode. |
| P1135 | The Lada Kalina control unit has detected a short circuit or an open circuit in the heater circuit of the oxygen level control sensor. |
| P1136, P1137 | The fuel mixture level is too high or low in low load mode. The internal combustion engine should be checked. |
| P1141 | The on-board computer detected malfunctions in the functioning of the heating device of the oxygen level control sensor. |
If you have discovered and eliminated a breakdown, you can reset the error code so that it does not appear again during the next diagnosis. To do this, hold down the daily mileage button and hold it in this position for more than three seconds.
Malfunctions in the fuel vapor recovery system of the Lada Kalina
Since the solenoid valve itself is not a complex device, it has few malfunctions as such - it may not open or close when necessary, or may freeze in a certain position. But the culprit of the breakdown may not only be Evap-Solenoid; the gasoline vapor recovery system does not work correctly for other reasons:
- connecting pipes are pinched or clogged;
- normal vacuum is not created in the system;
- due to an open circuit, there is no voltage on the valve;
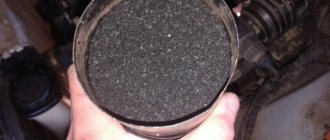
- the carbon filter is completely clogged (which is rare);
- The control unit malfunctions.
If the CPA is stuck in the open position and does not block the channel, the following defects may occur:
- the fuel mixture becomes richer, causing “blackness” to appear on the electrodes of the spark plugs;
- the engine begins to operate unstably, this is especially noticeable at idle;
- gasoline consumption increases;
- The throttle response of the internal combustion engine decreases.
When the EVAP channel is constantly blocked by the purge valve, excess vapor pressure is created in the gas tank, due to this:
- there is a risk of fuel pump failure;
- The fuel level sensor may fail.
It should be noted that purge occurs in a certain mode after starting the engine, the program is executed depending on the crankshaft speed, and the system does not work at idle. An impulse arrives at the CPA if:
- the coolant has heated to a temperature of at least 75 degrees Celsius;
- the throttle valve is open at least 4%;
- the car is moving at a speed of more than 10 km/h (but this is not a necessary condition).
Problems in the electrical part of the EVAP are detected by the control unit, and the Check Engine warning lamp lights up on the instrument panel. The fault code can be determined using a special diagnostic scanner or a computer with a program installed; the most common errors in the vapor recovery system detected by the diagnostic device are P0441 and P0455.
New Lada: Is it worth doing anti-corrosion treatment on the car?
auto electrician
Code P0443 Canister purge valve, circuit faulty
Code P0443 is entered if: with the engine running, self-diagnosis of the canister purge valve driver has detected a malfunction.
The malfunction indicator lights up 2 drive cycles after the fault code occurs. Description of checks
1 Checks for a permanent fault. 2 Check for an open circuit in the control unit control circuit. 3 Check for a short to ground in the control circuit of the control unit. 4 Check for a short to the on-board network in the control circuit of the control unit. Diagnostic information The controller uses a canister purge valve driver that has a self-diagnostic function. It can detect the presence of faults such as an open, short to ground or power supply to the canister purge valve control circuit. You can control the state of the valve using a diagnostic tool in the mode: “2 MI Control”.
canister purge valve electrical circuit
location of the canister purge valve
adsorber location
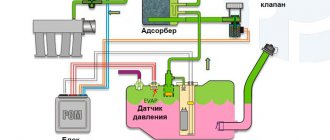
The gasoline vapor recovery system (VAPS) consists of a carbon adsorber with a purge solenoid valve and connecting pipelines. Gasoline vapors from the fuel tank are supplied to a collection tank (activated carbon adsorber) to retain them when the engine is not running. Vapors enter through the pipe marked “TANK”. The controller, by controlling the solenoid valve, purges the canister after the engine has operated for a specified period of time from the moment it switches to the closed-loop fuel control mode. Air is supplied to the adsorber through the “AIR” pipe, where it is mixed with gasoline vapor. The mixture thus formed is sucked into the engine intake pipe for combustion during the operating process.
The controller regulates the degree of purge of the adsorber depending on the engine operating mode, sending a signal to the valve with a variable pulse frequency (16 Hz, 32 Hz). The controller constantly monitors the effect of purge (the state of the canister being filled with fuel vapor) on engine operation using signal information from the oxygen sensor. If the adsorber has a high % filling with fuel vapor, the controller reduces the fuel supply (a factor characterizing the degree of filling with fuel vapor FUCOTE_W is about 2%, respectively, if the % filling with fuel vapor is low - FUCOTE_W is about 0%). During each trip on a warm engine, the controller checks the condition of the canister purge valve, closing it completely and opening it to a value higher than that set for the given engine operating mode. Based on the deviation of the fuel supply correction factor, the controller determines the condition of the canister purge valve.
Related pages:
- Error P0444 Lada Priora, Kalina, 4x4 - ME17.9.7 /…
- Errors P0458, P0459 Lada Vesta
- Error P0444 Lada Granta and Kalina 2, canister valve
- Error P0458, P0459 Lada Priora, Kalina, 4x4 -…
- Error P0459 Lada Granta and Kalina 2, purge valve circuit
- Error P0458 Lada Granta, Kalina 2, valve shorted
Error p0441
Owners of Lada Kalina often note that during the operation of the car, error P0441 appears, indicating that the gasoline vapor purge system is not operating correctly (the air flow differs from the norm). The cause of this malfunction may be:
- inoperative adsorber valve;
- clogging of the air line from the control unit to the air filter;
- air leakage through connecting pipes.
What should not be immediately considered is the line from the gas tank to the adsorber; here, a breakdown does not in any way affect the readings of the computer or diagnostic scanner. Still, most often Evap-Solenoid fails; this is a characteristic “disease” on Kalina.
If the EVAP valve stops functioning normally, it is not at all necessary that the engine will lose power, the fuel pump will fail, and so on. Mainly due to problems with the control gear, exhaust toxicity increases, and the Check Engine on the dashboard periodically lights up. There are car owners who do not pay attention to the diagnostic warning light, continuing to operate the car, but do not experience any great inconvenience.
Design of the VAZ Kalina adsorber purge valve
KPA is present on all modern injection internal combustion engines, and Lada Kalina is also no exception. The purge valve (another name is Evap-Solenoid) is connected on one side to the carbon filter, on the other to the intake manifold, when there is no electrical signal to the control unit, the pipeline channel is closed, and vacuum is not created in the system.
If the check shows that the Evap-Solenoid is faulty, the part must be replaced (catalog number - 11181164200). There is no point in repairing the device:
- the price of the valve is in the range of 400-800 rubles;
- You can buy the device in almost any store that sells VAZ spare parts;
- changing the KPA is very easy and simple.
But before making a replacement, it would be a good idea to check the control circuit; quite often the valve does not work due to a break in the wires going to it. To complete the work, you will not need a pit or a lift, and the procedure itself will take no more than one to two hours, even if the operation is performed by an inexperienced worker without metalworking skills.
We change the valve as follows:
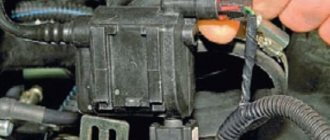
- turn off the ignition, raise the hood;
- we find Evap-Solenoid, it is located just below the air duct, on the air filter housing (indicated by an arrow in the figure below):
- just in case, disconnect the negative terminal from the battery;
- move the plug tab to the side and disconnect the wires;
- so that the air flow sensor does not interfere, use a Phillips screwdriver to loosen the clamp securing the air duct, and move the pipe to the side. For convenience, the air flow sensor can be removed;
- Now access to the valve is free, all that remains is to gently pull it up to pull it out of the grooves;
- but that’s not all - since the tube on the valve itself is sealed, we do not touch this connection for now, it is necessary to release the other end of the hose, to do this we remove the latch and pull the pipe out of the connection;
- We dismantle the valve together with the tube, and the disassembly is almost complete.
Replacing the purge valve could be considered a very simple task, if not for one “but” - it is very difficult to remove the plastic tube from the CPA without damaging it, and it does not come with the new valve. There are two options here:
try to carefully heat the connection with a hairdryer and pull off the pipe; cut the tube at the connections, and instead buy an ordinary fuel hose with a diameter of 8 mm and two clamps. Having measured the required length of the hose, cut it, connect it to the valve and connector, we get approximately the same design as in the figure below
Having measured the required length of the hose, cut it, connect it to the valve and connector, we get approximately the same design as in the figure below.
We install everything in place, start the engine, and test the car on the move.
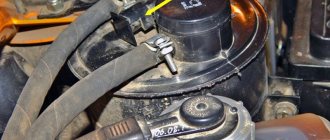
Many owners of Lada Kalina cars are faced with a problem - while the engine is running, an incomprehensible clattering sound is heard from under the hood; when identifying the cause of the noise, it turns out that the sound comes from the purge valve. Although the knocking does not affect the operation of the car in any way, some car owners are annoyed by it, and car owners want to get rid of it. You can “overcome” the unpleasant clattering sound; you just need to do the following:
- remove the valve and inspect it carefully;
- Find the adjusting screw on the side; it will be filled with epoxy resin on top;
- pick out the epoxy, tighten the screw half or three-quarters of a turn;
- install the valve in place, check for changes in the operation of the internal combustion engine.
You cannot tighten the screw any more, in this case the control panel will stop opening, and the engine diagnostic lamp on the instrument panel will record an error. It is also worth noting that some drivers confuse the clatter of the solenoid valve with detonation, but in principle, the sounds can be distinguished. You just need to take into account that detonation occurs under load, for example, when a loaded car is moving uphill, in this case they say “fingers are ringing.”
Common Problems Causing Code P0441
- In many vehicles, including VW, Audi, Nissan and Mazda, a bad purge valve is the most common culprit for code P0441. The purge valve (also called the purge solenoid) is easy to replace in most vehicles.
- Often when the canister begins to fail, carbon granules are drawn into the purge line and clog the purge valve or purge lines. If there are a lot of carbon granules stuck inside the purge valve, the canister may also need to be replaced.
- In many Toyota and Lexus cars from the 90s - 00s, there is an EVAP VSV valve and vacuum hoses on the canister that need to be checked. Often the VSV fails, or one of the vacuum hoses becomes clogged with carbon granules from the adsorber.
- Unfortunately, Toyota sells the EVAP VSV valves as one piece with the canister, but they can be purchased separately from a third party. In any case, all vacuum hoses connected to the EVAP VSV valves must be replaced, and metal vacuum lines must be checked for blockages and cleaned.
- The 2003 Toyota Technical Bulletin (TSB) also mentions an inoperative Canister Vacuum Switching Valve (CCV VSV) as a possible cause for codes P0441 and P0446. The CCV VSV should be checked and replaced with an updated part if it does not work.
- In 2002-2007 Dodge and Chrysler vehicles, it is quite common for the NVLD device to fail and cause code P0441.
Diagnosis of faults using the dashboard
Owners of the Lada Kalina need not only to know the fault codes by heart, but also to understand how to diagnose the health of the car using the dashboard, on which the analyzed codes are displayed.
To run diagnostics you need to do the following:
- activate a button that calculates the car’s mileage per day;
- continuing to hold it, turn the ignition key;
- if everything is done correctly, the arrow of the electronic elements will begin to move from the current position to the designated one;
- after the arrow reaches its final position, you will need to activate the button located on the wiper switch so that the received information is switched to the screen;
- When this button is activated, the functionality of electrical appliances will be displayed on the panel, which will allow car owners to quickly identify the malfunction and quickly fix it.
According to this scheme, you need to update the information on the instrument board three times so that you can visually familiarize yourself with the error codes, which are indicated by numbers:
- 2 indicates a problem with the mains voltage;
- 3 warns of a breakdown of the sensor that monitors the fuel level;
- 4 shows that the cooling system sensor has failed;
- 5 warns that the temperature sensor has failed;
- 6 warns of engine overheating;
- 7 indicates that the oil pressure has dropped significantly;
- 8 warns of problems in the brake system;
- 9 indicates that the battery is low.
Diagnosing faults using car controllers: what to do
You can diagnose faults for the Lada Kalina not only using the dashboard, but also with the help of separate automobile controllers, which are responsible for the operation of a specific component or unit of the car.
You can find out how the code is decrypted in a reference book or using a special software program. After all, remembering all the codes by heart is not so easy, especially for novice car enthusiasts.
Let's look at a few of the most common codes that the diagnostic system can show:
- Lada Kalina error 0441 will indicate a breakdown of the oxygen access sensor.
- Code 1602 will indicate that the computer is not receiving voltage from the network.
- Code 0363 indicates a breakdown of the car coil.
- The controller marked Bosch-ME-7.9.7 will report an engine malfunction.
It is worth noting that the diagnostic system does not always accurately indicate the element that has failed; most often, this system indicates the area in which the problem occurred. That is, such a system prompts the car owner about a malfunction in a certain component, so that the car owner corrects the breakdown in a timely manner, having first made a more accurate diagnosis of the defect. For example, if error code 0504 is displayed, this will indicate a malfunction in the system responsible for the brakes, and what kind of malfunctions have occurred can only be determined after a thorough study of the performance of this system.
Principle of operation
Gasoline vapors generated in the tank rise upward and first enter the separator through an opening at the neck of the tank. There they condense and flow back into the tank. That part of them that does not have time to turn into condensate, through the gravity valve through the steam line, goes directly into the absorber, where it is absorbed by activated carbon. This happens when the engine is not running.
Otherwise, while the car is moving, with the engine warm, the control system opens the solenoid valve and the absorber is purged. Gasoline vapor, together with air entering through another valve, is blown into the engine intake pipe, where it is burned.
It turns out to be a kind of double effect.
- firstly, the atmosphere is not polluted by unnecessary, harmful fumes;
- secondly, we have, albeit small, fuel savings. After all, if there were no absorber, the fuel would simply evaporate.
In a word, everything was described as an ecologist, everyone is fine, everyone is happy.
Standard EVAP ECM system leak test:
- 1. When performing an EVAP system leak test, the vehicle must be stationary for at least four to eight hours to ensure that the engine and outside air temperatures are the same. The tank should also be between 15 and 85%.
- 2. When the test begins, the charcoal canister exhaust valve closes to prevent fresh air from entering the EVAP system. The purge valve is also hermetically sealed.
- 3. The leak detection pump creates a vacuum in the entire evaporative system. After a certain period of time—usually about ten seconds—the purge valve closes and the vacuum level in the system is measured by the fuel tank pressure sensor.
- 4. After this, a countdown is initiated, during which the rate of vacuum drop in the system is measured. If the rate of vacuum loss is less than indicated in two consecutive tests, the engine control module will detect a failure of the EVAP system and record a P0444 fault. Most modern EVAP systems will fail a leak test if there is a 0.5mm hole anywhere in the EVAP system.
EVAP system components
The main components of the fuel vapor recovery system are:
Fuel tank
Has some expansion room at the top to allow fuel to expand on a hot day without overfilling or leaking the EVAP system.
Fuel cap
Typically contains some type of relief valve for ventilation on older vehicles (pre-OBD II), but is completely enclosed (no vents) on newer vehicles (1996 and newer).
Gas tank separator
Located on top of the fuel tank or part of the expansion tank. This device prevents liquid gasoline from entering the adsorber.
Gas tank separator
Liquid gasoline should not be sent directly to the canister because this would quickly overload its ability to store fuel vapor. The separator is relatively problem-free. The only problems that can occur is that the fluid return becomes clogged with debris such as rust from the fuel tank.
Some separators use a slightly different approach to prevent liquid fuel from entering the canister vent line. A float is installed inside the separator. If liquid enters the device, the float rises and the valve closes the tank vent.
If there is a blockage in the separator or in the vent line between it and the adsorber, the fuel tank will not be able to “breathe” normally. Symptoms include fuel starvation or a warped fuel tank.
If you hear a significant "poof" sound when you open the gas cap, suspect poor ventilation. You can check the tank venting by opening the cap and then disconnecting the fuel tank vent line from the canister. If the system is clear of any blockages, you should be able to blow through the vent line into the fuel tank.
Blowing out with compressed air can sometimes clear the blockage. If not, you will have to inspect the vent line and possibly remove the fuel tank to diagnose the problem.
Ventilation valve
The ventilation valve controls the flow of outside air into and out of the adsorber. In some vehicles it is called the Canister Closing Valve (CCV).
One side of the ventilation valve is connected to the adsorber. The other side is connected to a ventilation hose that has a filter or mesh at the end and is attached to the body or frame of the car.
On some vehicles, the vent valve is attached to the canister. In others, it is installed separately.
Ventilation valve
The ventilation valve is controlled by the engine control unit. Normally the valve is open. It closes when the controller checks the EVAP system for leaks.