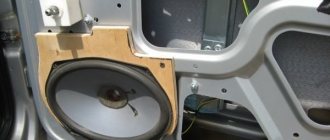
Good day. The time has come to install the sub in the car, I read on the Internet how best to do it, the official Lada website tells you how and where to connect everything. I ordered a mini ISO cable from aliexpress, here is the link if anyone needs it ru.aliexpress.com/item/Mi...=2114.13010608.0.0.cLHB80, waited for the parcel and started the installation
I started the installation by looking at the engine compartment, it turns out that AvtoVAZ took care of the owners and left free space for connecting the positive wire, it was very nice)
To post a reply you must log in or register.
Messages 4
1 Topic from SinySenya 2014-09-24 14:43:25 (2014-09-24 14:47:24 edited by SinySenya)
- BlueSenya
- New member
- Inactive
- Messages: 6
- Thank you: 0
Topic: Installing a subwoofer or what kind of bass do we do in Vesta?
Hello guys, the car hasn't come out yet, but I'm already thinking about installing a subwoofer in the trunk of the Lada Vesta. Maybe someone has already installed high-quality bass in the basins? I'm looking at them, can anyone give me some advice?
I want it to swing normally
2 Reply from Axel 2016-02-20 16:38:25 (2016-02-20 16:42:35 edited by Axel)
- Axel
- Participant
- Inactive
- Messages: 973
- Thank you: 139
Re: Installing a subwoofer or what kind of bass do we do in Vesta?
Connecting an amplifier and subwoofer to the standard radio
AvtoVAZ equips modern Lada cars (Granta, Kalina, Priora and Vesta) with standard push-button radios, and in the top version (Luxury trim levels) with more modern multimedia systems (MMS) with a touch screen. In this article we will tell you how to connect an amplifier and subwoofer to the standard radio and MMC of Lada cars.
Connection diagram for an external amplifier in a car
Stretch a separate +12 V (red thick wire) from the battery to the amplifier, installing a fuse next to the battery. Route the ground (black wire) from the body to the amplifier. Connect the amplifier to the subwoofer and speakers. Stretch the speaker wires from the amplifier to the radio, laying them separately from the standard car wiring.
How to install
Installation of the radio on the Grant should be done in the standard socket provided by the manufacturer. After this, the speakers and additional parts are installed. The presence of a factory communication harness ensures the fastest and easiest connection.
Car radio
If a standard-sized head unit is selected, the process of installing a radio in the Lada Granta consists of the following steps.
To remove the latches from the front frame, you need to hook the plug pocket by its edges. The electrical wiring plugs are carefully disconnected. The glove box housing needs to be folded down. The travel stops, mounted at the top of the rear wall, are disengaged from the instrument panel. The cover is dismantled - to do this, you need to carefully pull it towards you. To route the cable to the player, lift up the car's floor covering, which is located next to the passenger seat. The standard slides required for installing the head unit are installed using bendable elements.
Acoustics
After you have managed to install the radio in the standard connector, you need to install speakers. Lada Granta liftback cars with basic equipment are equipped with standard wiring for acoustics. It is laid under the decorative door trim.
The speakers should be placed in the doors. For this purpose, the metal frame of the doors on the Lada Granta already has holes with a diameter of 16 cm. However, there are no holes provided for this in the trim - the car owner will need to make them himself. In this case, the diameter of the hole in the casing must be equal to the size of the diffuser.
After installation, the speaker ring should be secured to the trim using screws. The top is covered with a decorative mesh.
Some difficulties may arise during installation. When the car owner decides to install speakers whose diameter does not exceed 13 cm, he will need to “build up” the missing plane. When choosing front speakers for the Lada granta liftback, experts advise giving preference to those models in which the metal grille and plastic frame have a minimal protrusion above the door surface. Otherwise, it may be difficult to open the glove compartment.
The car enthusiast can choose compact or enlarged rear speakers. In the latter case, they are built into the luggage compartment shelf. The diffusers in this arrangement are protected by original meshes - they are offered by the car plant.
Touch panel of the Vesta multimedia system
This technology combines many options and has an mms screen of almost 18 cm diagonally. Matches with vehicle panel. Multimedia in Lada Vesta includes all the parameters of standard equipment. Such panels are used in foreign cars and VAZ models. The display is designed on a resistive basis. The mms screen does not pay attention to changes in temperature in the cabin. Switching options in mms, updating and controlling is carried out even in severe frost without removing gloves.
Installing speakers in the front doors on a Lada Granta
Installation of a multimedia system is not limited to installing a car radio. For normal operation of the entire audio system, it is also necessary to install acoustics and speakers in the doors of the Lada Granta. To cut holes in the plastic door trim, it is better to remove it from the car.
We remove the door handle, then dismantle the plastic casing of the door opening lever and the glass position adjustment lever.
The front door trim already has a hole for the speaker, equal to 16 cm. Next comes connecting the speaker and installing it in its original place using 4 screws, followed by installation of the door trim and installation of the speaker grille
Lada Vesta radio
The standard radio for the Lada Vesta is a Russian development and includes a telephone. On its panel there are call and reset keys. There were incidents in the operation of the device due to the input of many options. The equipment was overloaded.
To correct malfunctions, you need to press the “RESET” toggle switch using a sharp object and hold it for 10 seconds.
Radio menu
You can control the equipment parameters from two display pages, the first one contains:
- radio control key;
- audio transition key;
- connecting a telephone;
- area navigation map.
On the second:
- Photo mode - you can view photos;
- Play video from another media via the AUX connector.
There is a USB connector under the glove compartment and near the cigarette lighter. The USB unit memory is 1024 MB. Through the USB socket you can charge your mobile device; the current it produces is 1.5A.
How to install
Installation of the radio on the Grant is carried out in a standard socket located above the climate control controls. Thanks to the use of a factory wiring harness, accelerated connection of acoustic equipment is ensured. Laying additional lines is required when using a low-frequency loudspeaker in the luggage compartment or high-frequency tweeters mounted on the front roof pillars.
All installation work is carried out indoors with artificial lighting; in clear weather, installation in open space is allowed. For safety reasons, it is necessary to disconnect the standard battery from the vehicle's on-board network.
Car radio
Step-by-step instructions for installing a radio in a Lada Granta of the “standard” or “norm” modifications:
- Hook the central pocket-plug by the edges to remove the latches from engagement with the front frame.
- After removing the element from the socket, it is necessary to disconnect the plugs of the factory wiring harness, located in special sockets on the rear part. The car has 2 8-pin connectors for connecting power and speakers.
- Fold the glove box housing down; there are travel stops on the upper part of the rear wall that need to be disengaged from the dashboard frame.
- To expand the working area, it is recommended to remove the cover by pulling it towards you.
- Raise the decorative floor covering of the car along with the soundproofing mat near the passenger seat. Pull out the factory antenna cable equipped with a plug that needs to be extended to the installation location of the player.
- Place standard slides for attaching the radio using special bendable elements.
- Further installation of the radio in Grantu is carried out after switching the loudspeakers.
Installing the stock radio is slightly different from the procedure described above:
- Since the standard frame is designed for 1DIN size equipment, a replacement unit is required. To do this, you will need to carefully pry and remove the plastic climate control controls. The frame itself is fixed with latches, which are removed one by one from the mounting sockets using a plastic spatula.
- For final dismantling, it is necessary to disconnect the connectors connected to the control buttons for the air conditioning, hazard warning lights and heated rear window. It is necessary to make notes that will allow you to correctly connect the plugs on the new panel.
- Remove the keys, climate control parts and ventilation deflectors from the center console, which are transferred to the new unit.
- The “luxury” version of the cladding, designed for mounting a 2DIN radio, consists of 2 sections. The lower part is equipped with additional fastenings with screws, under which it is necessary to install counter elements. The parts are placed in standard places around the perimeter of the instrument panel in the upper and lower parts of the landing window.
- Place a separate adapter frame, which is supplied with the head unit, in the mounting socket of the radio.
- Place the cladding in place, securing the part with latches and screws. The switching cables for acoustic equipment and control buttons are routed through the corresponding holes into the car interior.
- Install a standard player into the guide slides, having previously connected it to the on-board network and antenna. The assembly is secured with side latches; if dismantling is required, the clamps are bent with a screwdriver.
- Install a horseshoe-shaped decorative cladding located around the perimeter of the central part of the decorative panel. Reinstall the plugs for the hazard warning, air conditioning and heated glass buttons, and then place the keys in the standard sockets.
Setting up the Lada Vesta radio
First you need to apply power by pressing the device's power key or encoder knob. Switching off is carried out automatically after turning off the ignition.
There is a battery in the panel to save radio stations when the battery is low for ten days.
The band is supported by FM/AM. Frequencies are selected in two ways: automatically and by selecting the encoder knob, RDS AF, RDS PTY, RDS REG keys. There is a noise reduction function.
Audio adjustment is carried out in the following order: equalizer, bass tone, treble tone, balance, front/rear balance, loudness, output.
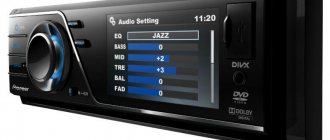
The equalizer adjustment on the video is as follows: EQ JAZZ, EQ POP, EQ CLASSIC, EQ VOCAL, EQ USER. In the time section, the hours/seconds of the required time zone are set.
The hands free function allows you to connect your phone via Bluetooth. The connection is established in the setup menu on the touch panel.
Provided operating modes
Touch panel capabilities:
- Radio mode remembers eight different frequencies and saves them in memory.
— A communication channel is used to transmit messages in the VHF range;
— audio mode provides musical performance from flash drives, mobile devices, hard drives;
— work is done through the “Hands Free” phone function. Turns on "
Bluetooth" and you can implement this technology;
— when installing a USB drive, you can view images and video files with a resolution of 320X240 through *video mode*;
— the navigator function works in the new audio system using the installed City Guide 7 program. In combination with new developments by Glonass, the system received a lot of feedback from car enthusiasts. It is possible to connect cards from other manufacturers. What people liked most was that the car has a rear view camera function.
It turns on simultaneously with reverse speed. This creates convenience when parking the car.
If you want a subwoofer
When connecting acoustics, it is better to look at the connection diagram provided by the manufacturer. They stretch the wire from the battery to the amplifier; the connection is made through the fuse. The cord is also pulled, connecting the mass of the receiver and the body. Acoustic cables are laid separately from the main wiring.
The ISO connector connects the subwoofer of the standard Lada Vesta radio. It connects to the high level input of the radio and goes to the speakers installed in the car. Simple installation is available for the average driver.
For those who perceive sounds sensitively, if you are not comfortable with a lot of wiring, connect an mmc audio amplifier using a mini iso plug. Such connection must be made with shielded wires. This circuit will provide clear sound inside the car.
Currently, we are developing a model in which the sound will be heard when the sensor goes out.
How to install a head unit on a car with basic equipment?
Since the Lada Granta base is not equipped with musical equipment, and only a push-button radio is installed on board, the question justifiably arises: how is the standard radio installed in the cabin? In reality, this is a simpler procedure than it might seem at first. The occurrence of problems during installation is excluded, since a seat is already provided for the standard device on the Lada Granta panel, regardless of the level of equipment.
You can purchase the device in a retail chain or on an Internet site, where you can actually find an improved version, equipped with a navigation system with a detailed map of the Russian Federation. Don't forget to buy an additional luxury panel. Although multimedia will fit into the standard panel without any problems, the appearance will not be so beautiful. The price for this device reaches 2.5 thousand rubles.
Next comes the installation of the radio. The design feature of the landing niche in the Grants panel does not provide for the need for additional wiring.
- The first step is to remove the plastic pocket in the audio system opening. This is done using a flat-profile screwdriver. There is access to several connectors that involve connecting a radio.
- We remove the frame from the head unit and fix it at the location of the pocket.
- Next we move on to the connection. To do this, connect a couple of connectors and install the device in the landing niche.
- After this, you can install the speakers in the front door cards. The procedure involves the need to dismantle door trims with unlocking handles and adjust the position of the glass. Using a special template, we begin cutting out the mounting holes.
We attach the speakers to the cards using self-tapping screws. We insert the cables from the speakers into the input connectors intended for this on the rear panel of the car radio. We install the decorative door panels in their original places and evaluate the sound provided by the standard head unit. Thus, the radio is connected.
Why do you need to adjust the valves in the engine?
Tweeters
These are tweeters needed to reproduce high frequencies. Lada Vesta tweeters not only have a positive effect on sound quality, but also make the sound image more rich.
Tweeters are factory installed in Lada Vesta, but only in the top trim levels Comfort Multimedia and Luxe Multimedia, which, however, is not surprising, because these acoustics are usually available in expensive versions, where maximum attention is paid to sound.
Factory tweeters are only available in high quality versions
However, the lack of such components does not stop sedan owners who install tweeters themselves in the Lada Vesta.
Instead of a total
- If we install a simple radio, the size should be no more than 178 * 50 mm. Installation requires plastic spatulas or a screwdriver. Adapters and slides are included .
- To install 2 din, you need a new overlay on the console, a decorative frame on the GU itself, wire cutters and a metal blade to adjust the installation location.
- Are we replacing the standard speakers with another of the same size? Still need a new decorative frame . Otherwise, gaps in the panel will be visible.
More articles about Granta here.
- How to enable aux on a Sony radio
Removing the device according to the instructions
The algorithm for removing the radio if you have the keys is outrageously simple. It is worth considering in order to understand how to act if they are lost. The order is as follows:
- Remove the front panel of the player and the decorative plastic frame, prying it up with a flathead screwdriver if necessary.
- Insert the first key into the gap between the housing and the mounting frame, located at the end. You should feel slight resistance as the tool bends the latch.
- Repeat the same action with the second key.
- Grasp the radio with your hands by the protruding parts on the sides of the case and carefully remove it from the niche.
To remove the radio, 2 keys are used
Reviews
| № | Positive |
| 1. | Victor, 39 years old: after buying the car, he did not change the radio, despite the push-button control option. The sound quality is good, the radio reception is excellent, that's enough for me. |
| 2. | Konstantin, 41 years old: bought the car second-hand, second owner. I didn’t change anything, I left the original radio. The functionality is good, the build quality is also good, it reads from a flash drive. |
| 3. | Vasily, 44 years old: I listen to the radio more, the reception in the city is good. True, it causes interference near metal structures, but this is natural. |
| 4. | Kirill, 36 years old: I work as a taxi driver, on wheels all day. The standard tape recorder saves the day, it works properly. My friends recommended replacing it with a touchscreen model from the new Granta, but so far the old one hasn’t failed. |
| Negative | |
| 1. | Victor, 38 years old: the standard audio module, although not bad, seemed to me not enough, so I replaced it with a foreign one and supplemented it with an amplifier. Now the volume is good, the quality is high. |
| 2. | Mikhail, 42 years old: I work as a courier, I drive for the entire shift. I expected more from the standard radio, so I had to replace it with a new one. The volume suits me, I plan to connect an amplifier - a crossover. |
| 3. | Ivan, 33 years old: I bought the car second-hand, immediately replaced the audio module, the reviews are not good. New and high-quality equipment from Trinity, no problems. |
| 4. | Vladlen, 40 years old: friends gave me a gift in the form of a radio with touch control for our anniversary. Before this there was a push-button one. Can't compare, quality, sound, control, functionality at a high level. |
Conclusion The opinions of motorists on the functionality and sound quality of the standard radio are divided, which is obvious. Everyone evaluates according to their own criteria. Some people care about sound, others about functionality, and others about control. Regardless of the type of radio: push-button or touch-sensitive, the workmanship is good. No massive breakdowns or defects were recorded. Maintenance is not expensive, parts and components are available both at official representative offices and on the Internet. Now it will not be difficult for the owner to remove the radio on the Granta liftback with his own hands without contacting a service station.
Outdoor antenna
Before connecting the antenna to the car radio, you should check whether the cable entry point into the car body is sealed. This is necessary to protect against the penetration of precipitation into the device. Then you should remove the radio from the dashboard, lay the cable under the latter and secure it.
Care should be taken to avoid excessive kinking or pinching of the antenna wire. This will allow you to avoid damage to the cable and problems associated with such a malfunction in the future. After this, the plug of the external receiving device is inserted into the corresponding socket of the car radio. If the shape does not match the plug of the accessory, then an adapter must be used.
Make a beacon yourself
If you are confident in your abilities, then you should try to make the part yourself. In fact, the creation process is very simple. At the preparatory stage, you need to study the following information: • The car is constantly in motion, and this is important when designing a beacon. Ordinary ground beacons will not work. Therefore, a special approach is required in assembling the structure. • Is frame construction a suitable option? How it should be routed under the rear window seal. • How to design a part that is tapered at the top. There is a capacitor in the center; it adjusts the frequency on the channels. There are only two receiving frequencies - 27 and 65 MHz or 28.2 and 68.
Materials
It is necessary to have the following elements: wire MGTF 0.5; capacitor; two cables, 45 cm long; soldering iron
Manufacturing process
On the rear perimeter of the glass, lay out a trapezoid with MGTF 0.5 wire (top border 56.5 + 56.5 cm, bottom – 66.5 + 66.5 cm, side – 22.5 + 22.5);
- Place the pluses where the matching capacitor wires are added, remove the signal with cable RK - 50;
- Draw two wires in the middle of the glass, where they are fixed along the axis of a tuned capacitor (5 - 25 pF).
- Fold the wires in a zigzag;
- Solder the cable from the cut side.
- There should be no gap on the opposite side;
- Connect the device through the connector used by the communication equipment.
Connecting an active subwoofer
As we have already said, an active sub combines an amplifier and a passive sub. Connecting such a system is even easier. This is explained by the fact that the amplifier is already connected to a speaker inside the active subwoofer housing. Otherwise, the connection process is no different from the “amplifier - passive subwoofer” system.
When purchasing an active sub, check the standard wires that are included in the kit. They may not meet the requirements for cross-section and material from which they are made. In this case, by replacing them in accordance with the recommendations outlined above, you can significantly improve the quality and volume of playback.
Internal antenna
Connecting an internal radio antenna for a car also has its own characteristics. For example, some in-cabin receivers have an additional ground wire. It can be connected to the common terminal of the amplifier board. This wire can also be connected to protective dipoles, which are located between the receiving ones.
The ground wire of the internal antenna should be connected to the body as securely as possible and close to its installation site. If it is located near the sun visor, then this wire can be placed under one of the fastening screws inside the interior accessory.
After this, the level of atmospheric and industrial interference that occurs when listening to weak FM radio stations in a car should decrease. Thus, car antennas are connected in almost the same way. There are only minor differences associated with the design features of different receiving devices.
On a Lada Vesta car, the antenna is usually mounted on the roof, above the windshield. Which increases the risk of breakdown when clearing the car, for example from snow. When the antenna breaks down, you need to contact the official representative (dealer) of Lada Vesta with the problem. Replacement of the part or repair will be done free of charge, using the warranty certificate. The main thing is to have all the parts of the antenna with you, otherwise repairs may be reasonably refused. Antennas on cars are used to catch: radio; body signals; satellite signals for navigation. A Lada Vesta car can be purchased initially without a radio if you do not plan to use a music system. However, when you decide to install a radio, you will have to install the antenna yourself.
How to perform a flashing?
The stock firmware for the Lada Granta radio has become very popular among car enthusiasts. This does not require installation of a new type of radio. This function does not have any effect on the sound quality, but it allows you to provide the interface with additional options that are not available for the standard version of the radio. For example, you can generate a convenient touch keyboard that allows you to communicate with the Internet.
To flash stock multimedia, you should get an SD card formatted in “FAT” or “exFAT”.
- First, download the firmware from the network. It’s easier to find her among the “Grantavod” members of the forum.
- After downloading, we copy the necessary files to the root directory of the card itself, having previously saved them on a flash drive.
- We insert the card into the corresponding slot of the car radio and reboot it.
- After filling out the download status scale, we use the updated interface with expanded capabilities.
To resume options: “Radio” and “Bluetooth”, remove the SD card and reboot the system again.
Automotive forums will delight with the developments of many craftsmen who, as a result of experiments, offer firmware versions with the presence of updated radio software and other functions in the menu. There is an opinion that these “specialists” have learned the secret of reading and decoding data from the CAN bus combined with the MMC. Sometimes the firmware requires you to calibrate the screen before communicating with an alternative interface.
Antenna Top Mount
Next, use the following algorithm of actions:
- At the very beginning, you need to remove the lampshade behind which you will see the mount;
- Then remove the front passenger handrail;
- Remove the sun visor and the plastic panel on the right pillar;
- Next, loosen the inner headliner and insert the wire;
- It is important not to use a screwdriver or other metal tools. To avoid scratches and other consequences. It is better to use a plastic card.
When the device plug is connected, it is necessary to reassemble in reverse order.
Why is the standard option not suitable?
The standard instructions contain information about the connectors installed on the rear wall of the radio. The signal connector, which is designated by the letter “C,” contains three groups of contacts. Group “1-6” is just what you need to connect external equipment. Taking the signal from pins 1 and 2, it can be applied to the low-voltage inputs by extending the ground conductor from pin 3. This option is standard.
Wiring out the touch radio connector
However, do not rush to buy a terminal block suitable for the specified connector. We won't need it. According to reviews, the standard connection option has disadvantages:
- Any external device (amplifier), along with the useful signal, receives high-frequency interference. We are talking about using connector C;
- It would seem that HF interference is not dangerous for a subwoofer. However, by connecting its inputs to pins 2/3, you can observe the following effect: when you start the motor, a hum comes from the speaker.
These defects are irreparable. However, no one bothers you to use high-voltage outputs (connector B). But since the subwoofer is equipped with a low-voltage input, matching will be required. Looking ahead, let's say: a transformer is supposed to be used.
There really can be no complaints about the quality of the products produced. If you connect the radio outside the car body, these defects are absent.
Installation of Lada Granta car radio
Tools:
- Open-end wrench 10 mm
- Small flat screwdriver
- Knife (if necessary)
- Soldering iron (if necessary)
Parts and consumables:
Notes:
Initially, in this car model, the calculation is made for a 1-DIN radio. If the owner wants to install another type, a newer one, for example 2-DIN, he will need to start sawing the partitions in the console itself. And if the size is not suitable, then a suitable cantilever frame will have to be cut into the panel. This is much more complex than the first type of installation listed. In the second option, it is better to entrust the installation to a specialist, because there is a high risk of damaging the interior trim.
Here is a description of how to install a 1-DIN radio.
1. Remove the negative terminal from the battery.
2. Remove the plastic pocket installed in place of the future radio using a flat-head screwdriver.
3. Having taken out the pocket, on the back of it you will find slots where ISO connectors will be inserted to connect the radio. Disconnect the connectors to completely remove the pocket.
4. Now remove the metal frame from the radio and install it in the place where the plastic pocket was. Unbend the frame's tendrils to lock it securely in place.
Note:
There should be a click to confirm that the frame installation was successful.
5. Connect the connectors to the radio.
Note:
If you connect the radio to the connectors incorrectly, all car systems may fail, including, of course, the sound system.
Some radio manufacturers make custom connectors. Most of them come with an ISO plug. But there are times when none of the types are suitable, then the last option remains - cutting the wires. You remove the original plugs of the radio and the plugs of the car wiring and solder them together, but be sure to match the color.
A mistake many car enthusiasts make is twisting the wires and wrapping them with adhesive-backed insulating tape. In winter, the same electrical tape cracks due to frost. As a result, a short circuit may occur in the wiring, which will lead to the failure of all electrical systems of the car.
6. Insert the car radio into the previously installed frame.
Where can I buy?
If you live in a big city and don’t really understand these things, the easiest way is to go to a large car audio store and choose tweeters for Vesta there. It would be a good idea to consult with the seller, who will recommend the best option.
However, many do not have the opportunity to go to a large store or know what they need in the first place. In this case, it would be wiser to order the product online. Some people use Aliexpress because they can find acoustics cheaper there, but not everyone is happy with long delivery times, and therefore sometimes it’s much easier to pay a little more and buy everything in a Russian online store.
As for the cost, it depends on many factors, including the prestige of the manufacturer, power, sensitivity, resistance and other characteristics. In general, the cost increase is very high - from several hundred to several tens of thousands of rubles.
The table shows some tweeter options for the Lada Vesta, indicating the manufacturer, model and some features:
Brand name
Price, rub.)
As for standard Lada Vesta tweeters, they can be found under article number 281489095r.
As you can see, the range is impressive, and the items presented in the table are only a very small part of the products.
In addition to the tweeter itself, you also need to purchase terminals for plugging into Vesta’s factory wiring or a special adapter.