VAZ 2109: central locking - purpose, operating principle, installation method
The central locking unit of the VAZ 2109 ensures the safety of the vehicle, which is one of the most important factors for the driver. There are different anti-theft security systems for car safety. An important role is played by installing door locks. The main purpose of the device is to simultaneously close and open doors in a car. In addition, on the VAZ 2109, central locks control the luggage compartment and fuel tank lids.Granta and Starline - all options
I have long been planning to install an additional button for locking/unlocking the central locking in the driver's door of the Lada 2111. I reviewed several articles with photos - they suggest using the same button as for unlocking the trunk. (large, with power contacts).
It is installed into the door handle with difficulty and loss - you need to bend the contacts, trim the moving parts of the opening mechanism. In a word - a completely unacceptable option for me!
A short excursion to radio parts stores and the button was found.
Thread diameter - 12mm Overhang (depth) of the internal part with contacts - 14mm Height (outer) - 8 mm Normally open contact without fixation. Just what you need!
Momentary button
Theory
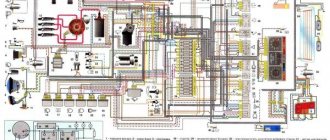
Before starting the installation, I want to warn you about the characteristics of my particular VAZ 2114 car (2006 model year, “Lux” equipment, the wiring under the dashboard is numbered as “VAZ 2115-...”), since I myself, from personal experience, have seen “four” and “tags” of the same year of manufacture, the same configuration, but with completely different wiring (I assume that this was due to different supplies of wiring to the conveyor).
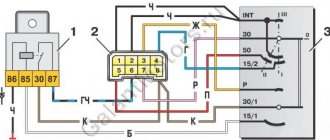
After looking at the information on the Internet, I came to the conclusion that the overwhelming number of people install the control unit according to the incorrect diagram “D”, from the instructions, which will not fit the Samar family (VAZ 2108/09/99/13/14/15) , since the opening and closing of doors (or rather, the supply of a signal to the BUDU (Door Lock Control Unit)) in Samara is controlled by a “minus”, and according to the “D” scheme, control occurs by supplying a “plus” to the BUDU. As I found out, this scheme only works when the standard BUDU is removed and the BU works every other time and only one button on the control key works. In my case, when connecting circuit “D” (I tried to connect it together with the BUBD), I burned several fuses and started looking for another connection method.
Introduction
I went online to search for information on how people connect these Chinese units to a VAZ and came to the conclusion that everyone installs such units in a terribly artisanal way, removing half of the wiring, adding some of their own, and in the end, all this does not “successfully” work. Among the makeshift connection instructions, I came across the only normal article by Soliderus, who installed a similar control unit on his Chrysler; his article helped me a lot. But since we have a harsh domestic auto industry, we had to invent our own connection diagram, but first things first.
Please read this entire article first before disassembling the machine; you may not have any parts on hand or may be missing some of the original wiring.
Installing a central lock on a VAZ 2109 car
On the VAZ 2109, installation of the central lock is carried out in two stages:
- Front door lock device.
- Installation of wiring and connection of the main central locking.
Advice: Before carrying out work, it is necessary to change the drive connection wires for the window regulator.
To carry out the work you will need:
- Upholstery holder.
- Corrugated tube.
- Set of central locking elements.
- Knife terminals.
- Set of wires.
- Heat-shrinkable cambric.
It is advisable to install the VAZ 21093 central locking control unit in a garage or other place where no one will interfere. Instructions for doing the work yourself:
- The screws securing the handle are unscrewed, which is then removed.
- The handle lining responsible for opening the door is removed.
- All operations are repeated for the other door.
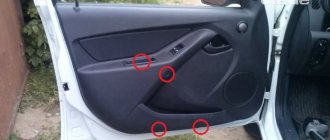
- The upholstery is removed. To do this, pry it off from all sides of the doors with a screwdriver.
- The installation location of the locks is determined.
Tip: The best installation location is the lower left corner. In this case, when lowering the glass, it does not touch the lock and does not interfere with the driver.
- Several holes are made.
- The lock is screwed on with self-tapping screws.
- The same actions are performed with the other door.
After carrying out these preparatory work, you can begin installing the door lock rods to the central locking rod:
Tip: The stroke of the lock rod is slightly greater than the length of the central lock rod, resulting in a difference of approximately six millimeters. Therefore, you need to combine the centers of thrust and there will be no problems. Sometimes the thrust from all sides does not reach by about two millimeters. In this case, you need to tighten the screws very firmly, but so as not to damage their heads.
- The dashboard is removed. For this:
- Several points are pierced near the mounting screws.
- The wires are located inside.
- The places of their passage are determined.
- Here, new wires are laid for the central locking, after getting rid of the old elements.
- Connecting the lock wires. In this case, the wire is insulated and pulled into the door.
- After wiring the wires, they are pushed through the holes located under the dashboard.
- A pass-through tube is installed into the rack on each side. Care must be taken to ensure that the tube is not damaged.
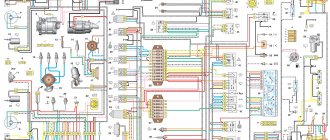
- All wires are connected to the connectors.
- The fuse is attached.
- The connector and the central locking unit are connected.
- All wires are hidden under the dashboard.
- The place where to connect the VAZ 2109 central locking in the car body is determined.
Tip: If the wire is not enough, it needs to be extended.
How to remove it in detail
The 5-wire electric drive with its mounting was removed from the driver's door, and the wiring was also redone at the same time - the length of the harness in the driver's door was reduced, the 3-pin block under the central locking from the passenger's door disappeared. The pull from the lock has been removed. And away we go - alarm installers create whatever they want...
In our case, it looked like this:
The hole in the lock where the white rod from the microswitch is inserted and there is an old factory place where the rod is attached to the lock, is much more favorable from the point of view of kinematics than what the servicemen chose.
A smart solution, if you really don’t want to buy anything at all, would be to remove this rod, make a hole inside it in the center and insert a rod from an electric drive there, followed by attaching it to the main rod using a tie. I did this before converting it to the factory version.
We went a different way...
We unscrewed the 2 screws securing the microswitch housing...
... and took it apart out of curiosity
And here are the missing components:
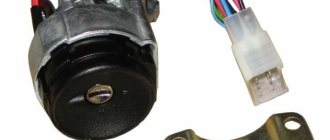
- bushing for the door lock (2101 - something there), is easily available for sale - 5-wire electric door lock drive (21093 - something there, you can use any 5-wire one) - electric drive rod (set of 4 x pieces were ordered at one time from Tolyatti) - electric drive fasteners (rubber bushing + plastic bushing, 2 pieces, also from Tolyatti
The bushing was pressed into the lock. The bushing is pressed while heated, otherwise you will simply cut off one of its sides. Heated it with a heat gun.
Close-up of electric drive fasteners:
It’s in the door: — first the rubber parts
- then in them - plastic
That's all, factory parts are back in service, which are guaranteed to open the door to the summer heat and winter cold.