Today, all modern cars are equipped with an on-board computer (BC). This device allows for more comfortable control and adjustment of basic vehicle parameters. If your car is not equipped with a BC, this does not mean that you cannot install it yourself. You will learn more about how to install an on-board computer on Kalina and what is required for this from this material.
What should you know about BC for Lada Kalina cars?
Let's look at the functions that State computers have for the Lada Kalina.
After reading the information below, you will find out what the bookmaker shows:
- The Plasmer option is a plasma heating of spark plugs. The essence of the function is to apply a pulse of 150 hertz to the electrodes of the spark plugs, and the pulse energy is 0.04 J. During the time the function is working, the spark plug allows you to release about 60 joules of energy, this makes it possible to reduce the possibility of failure to start the power unit. And this is true when using the car in cold or high humidity, as well as when filling spark plugs with fuel.
- Option Afterburner or resetting the parameters in the control unit memory to factory settings. The Fast and Furious function allows you to remove errors and get rid of the cause of the malfunction.
- Quality control of the fuel used. The device displays the quality ratio as a percentage using the “-” or “+” buttons. If you configure the engine parameters function, you can get a clear picture of the condition of the car's engine. You will be able to know about the time it took to warm up, the battery charge level, as well as the amount of voltage supplied to the tidy sensors.
- Most modern bookmakers have a screen customization option. Thanks to this function, the car owner can display on the device display those parameters that are important. This option allows you to adjust the brightness, color and contrast of the screen.
- A useful option is the ability to diagnose the fuel pump. This function allows you to monitor the pressure as well as the power in the system. It allows you to determine the condition of each car engine injector.
- Option Tropic. With its help, the cooling system fan will be activated when a certain temperature of the car engine is reached. It is important to use this function in the hot season, since it will prevent the engine from overheating (video author - 13domovenok).
The following are the main fault codes that the BC can issue:
- P0134 - lack of signal from the lambda probe (oxygen sensor);
- P0201 - the computer detected damage to the electrical circuit for controlling the injectors of the power unit;
- P0301 - the system has detected misfire of the air-fuel mixture in the engine cylinders;
- P0335 - no signal from the crankshaft sensor;
- P0560 - the voltage in the vehicle’s electrical network is too low, this may affect the operation of electrical equipment.
Functionality of BC State Kalina XD
The fuel quality control function allows you to find out the quality of the filled fuel. A very useful feature when traveling long distances, when you have to refuel at unverified gas stations.
The “PLASMER” function is plasma heating of candles. The effect is achieved by applying high-voltage pulses with a frequency of 150 Hz and an energy of 0.04 J to the electrodes of the spark plugs. During the exposure time, energy of about 60 J is released on each spark plug. In this case, the air in the cylinders is ionized, the electrodes of the spark plugs and their insulators are heated. After such preparation, the probability of failure to start the engine in severe frost or high humidity conditions, as well as in the event of unacceptable filling of spark plug electrodes with gasoline, is reduced several times.
The FORCAGE function resets (clears) the controller memory to factory settings. This function erases not only information about errors, as was the case in previous versions of the On-Board Computer, but also removes the cause of the error, thereby resuscitating (correcting) the vehicle’s electronic control unit. New automobile controllers, such as BOSCH MP7.0, BOSCH M7.9.7, JANUARY 7.2, have an operating algorithm based on comparing a mathematical model of the engine with real parameters. All deviations from the mathematical model are recorded in the controller’s special memory and taken into account in further work - this is the so-called self-learning of the controller. If the car is operated for a long time in an “unusual” mode, this can lead to undesirable consequences in the future. The engine may operate unstably, gain speed poorly, and experience detonation overloads more often. This happens, for example, when operating on low-quality gasoline; in monotonous mode (mainly at low or high engine speeds); in high load mode, etc. Most often this happens when changing the type of fuel from gasoline to gas or vice versa.
Eg:
If the engine has been running on gasoline for some time, then when switching to gas, the controller does not notice this and continues to control the ignition according to the “gasoline” algorithm, the parameters of which are stored in the learning memory. Resetting this memory will force the controller to immediately respond to all changes and write new gas parameters into memory.
Second example:
Your car has a bad connection to the battery terminal. Any vibration of the car while driving can cause emergency operation of the engine of your car, causing unstable operation of any of the electronic components. When “resetting errors” you will extinguish the “Check eng” indication, but will not get rid of the emergency condition of the car without resetting it to zero - EQU RESET. The Fast and Furious function will allow you to carry out repairs without leaving the salon.
The “TROPIC” function turns on the cooling system fan based on the engine temperature you set. This function is especially useful in the summer in hot weather, when the car is stuck in a traffic jam in the city, because... will help avoid engine overheating.
State 118 xd has emergency light and sound alarms.
This means that if the engine overheats or the voltage is unacceptable, the computer will warn you with a light alarm along with voice guidance. With the appropriate connection, if the alarm is triggered, the BC can reduce the volume of the radio.
This on-board computer is capable of taking into account fuel consumption corrections when running on natural gas. This allows the owner of a Lada Kalina car to install gas equipment or, briefly, LPG equipment on their car.
The XD staff has a non-volatile clock with a calendar; the clock continues to work after the power from the BC is completely disconnected.
The trip computer has two independent mileage and consumption counters with the ability to view previous parameter values (before reset) for one type of report.
The on-board computer has a “TAXI” mode, which allows you to display the cost characteristics of the trip and the cost of fuel consumed.
The Kalina XD staff has a “DYNAMICS” mode, which allows you to measure and display the dynamic characteristics of the car.
(BC) today all modern cars are equipped. This device allows for more comfortable control and adjustment of basic vehicle parameters. If your car is not equipped with a BC, this does not mean that you cannot install it yourself. You will learn more about how to install an on-board computer on Kalina and what is required for this from this material.
Onboard Device Options
The modern market offers consumers a huge range of computerized devices.
Only the most popular models are listed:
- Multitronics UX7;
- State X1 Universal;
- X1 G;
- State Kalina XD;
- Multitronics C900;
- Multitronics MPC800;
- Multitronics RC700;
- UniComp 600;
- Multitronics GL550;
- Multitronics VC 731;
- Multitronics VC 730;
- Multitronics TC750.
Video “Main functions of the BC X-5 M in Kalina”
The video below demonstrates the options that the device performs (the video was filmed and published by the channel In Sandro’s Garage).
Many experienced car owners, when purchasing a new Kalina 2, immediately notice a significant drawback of this car - it does not have a coolant temperature indicator. Fortunately, solving this problem is quite simple using the on-board computer (BC). The most popular bookmaker for the new Kalina is State X1-G. This on-board computer was developed for the Granta, but due to the structural similarity of these cars, it is also suitable for the second generation Kalina. The manufacturer himself recommends this particular BC for Kalina 2, so no problems should arise.
On-board computer functions
The BC State X1-G in the new Kalina is connected to the diagnostic column, so it receives all possible data about the car:
- Fuel level in the gas tank, l;
- Forecast of mileage on remaining fuel, km;
- Fuel consumption per trip, l;
- Mileage per trip, km;
- Average fuel consumption per trip, l/100 km;
- Average travel speed, km/h;
- Diagnostic codes of the electronic engine control system and automatic transmission;
- Coolant temperature, degrees Celsius;
- Voltage in the on-board network, Volts;
- Tachometer, rpm (x1000);
- Throttle position, %;
- Current fuel consumption, l/h or l/100;
- Speedometer, km/h;
- Engine overheating indicator;
- Accident indicator in the on-board network;
- Speed control alarm;
- Indicator of side lights not turned off;
- Automatic fan control;
- Drying and warming up candles, seconds;
- “FAST AND THE FURIOUS” function.
As you can see, the list of on-board computer functions is quite extensive, so installing it would be advisable in any case. More details about each function and error codes can be found in the instructions for this equipment.
Lada-Kalina on-board computer
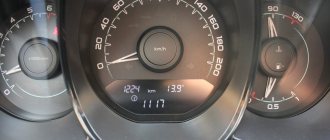
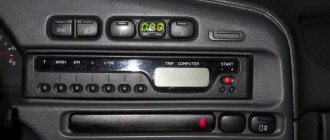
The LCD of the on-board computer is located on the dashboard and contains two lines:
- the top line displays the total/daily mileage counter;
- the bottom line displays: current time;
- outside air temperature;
- car driving time;
- average fuel consumption;
- instant fuel consumption;
- approximate remaining power reserve;
- average car speed;
- amount of fuel consumed.
To switch between display modes of the bottom line, use the keys on the steering column wiper switch: the keys located at the end of the switch switch functions “in a ring” forward and backward; The “Reset” key located at the bottom of the switch resets the values to “zero”.
The top line readings (total/daily mileage) are switched by a button located on the right side of the dashboard (under the fuel gauge). If the daily mileage counter is displayed, then to reset it, you must press and hold the button for 3 seconds.
The procedure for setting the clock on the Lada-Kalina:
- To switch from the current time indication mode to the setting mode, you must press and hold the “Reset” key for more than 3 seconds, while the hours and minutes will begin to flash;
- The minutes are set by pressing the “ring forward shift” key located at the end of the steering column wiper switch;
- The clock is set by pressing the “ring back shift” key located at the end of the steering column wiper switch;
- When you press the key once, the minutes/hours value increases by “1”; to change the values faster, you need to press and hold the key;
- When setting the minutes, the seconds counter is reset to zero (setting the hour counter does not affect the seconds counter);
- To return from the installation mode to the indication mode, you must briefly press the “Reset” key or, in the clock setting mode, do not press any key for 1 minute.
Detailed information about the displayed functions (their ranges) of the Lada-Kalina on-board computer:
- current time
(hour, min) - 0:00-23:59 (resolution 1 minute); - outside air temperature
(°C) — -40°C..+70°C; (resolution 1°C); - vehicle driving time
(hour, min), defined as the time during which the engine has been running since the last reset - 0:00-99:59 (resolution 1 minute; to reset, you must hold the “Reset” key for 3 seconds) - average fuel consumption
(l/100km) - 0.0-19.9 (resolution 0.1l/100km; after zeroing, the first 500 meters of the distance traveled are not indicated); - instantaneous fuel consumption
(l/100km) - 0.0-19.9 (not displayed if the speed is less than 1 km/h); - approximate remaining power reserve
(km) - 999-30 (resolution 5 km); - average car speed
(km/h) - 0-250 (resolution 1 km/h; after zeroing, the first 500 meters are not displayed); - amount of fuel consumed
(l) - 0-9999 (resolution 1 l; to reset, you must hold the “Reset” key for 3 seconds).
Top of page
Installation of on-board computer BC State X1-G in the new Kalina
To install BC State in Lada Kalina it will take only 5 minutes. All you need to do in advance is to gain access to the Kalina 2 diagnostic block, which is located at the passenger’s left foot.
The procedure for connecting and installing BC State X1-G:
1. Remove the instrument panel plug (item 1), this can be done using a flat-head screwdriver; 2. Stretch the BC wiring harness to the diagnostic block (located under the glove compartment on the left side (item 2)) and connect the BC harness block to the diagnostic block according to the connection diagram. 3. Connect the 6-pin block of the BC harness to the on-board computer and install it.
DIY installation instructions
Now we suggest that you familiarize yourself with the manual for installing the BC in Kalina with your own hands.
To complete this task you will need:
- two screwdrivers - with a flat and a Phillips tip;
- stationery knife;
- electrical tape (the author of the video is the Auto World channel).
Stages
Let's look at an installation example with the State X-5 M device. This device is equipped with a 9-pin output, but there is no point in connecting all of them. For normal operation of the device, you can connect only 6 contacts out of 9, this is enough.
How to install the device in Kalina:
- First you need to disconnect the car battery and remove the audio systems from the center console, since it will interfere with the installation. Disconnect the connectors connected to it and move the radio to the side.
- You also need to disconnect the connector connected to the light alarm button, since four of the six contacts will be connected to it. According to the diagram, you need to figure out which wires are connected where. The circuit itself should come with the computer. When disconnecting the wires from the connector, a problem may arise, since the contacts themselves are secured using plastic chips. You need to press the latch itself a little; to do this, you will need to insert a thin flat-blade screwdriver all the way from the side of the wires and turn it left and right. Then, using a thicker screwdriver, on the other hand you will need to press on the end of the wire, this will lead to the fact that it can be removed, albeit with difficulty.
- Then take the new wiring from the BC and connect it to the required plug on the block instead of the removed one. Then, along the second end of the wire coming from the main cable, you need to connect the one that was removed from the connector. It is recommended to rewind all chips with electrical tape to avoid possible rattling.
- Once you have connected all four cables to this connector, you need to start tapping into the pink wire located on the rear block of the control panel. The block itself is located in a rather inaccessible place, so if you need to gain access to it, you will have to dismantle the mounting block with fuses and pull it.
- Having done this, you will be able to see a large plug behind the block, usually it is painted gray. There are several wires connected to this plug; you will need the pink one, since it is responsible for the volume of gasoline in the car’s fuel tank. You can simply peel off the insulation from the cable with a utility knife and tape the wiring from the device to it, and then wrap the connection with electrical tape. When performing this task, it is not necessary to disconnect the connector; the main thing in this case is not to mix up the wires.
- All you have to do is connect one more plug to the diagnostic connector located under a special plastic cover just below the cigarette lighter. This is where we will place the computer itself, since this place is the best option. You need to connect a black wire from the device connector to the block, and follow the connection diagram.
- When the steps are completed, the entire winding will need to be pulled directly under the center console and placed securely so that it does not dangle or fray. To do this, you can unscrew the fastening bolts and dismantle the ashtray, and the bundle itself with the wiring can be threaded down. Then remove the right floor tunnel cover and thread the computer connector to the diagnostic socket. After that, all you have to do is connect the battery back and check how the BC itself works.
Instructions BC State X1-G
Download the instructions BC State X1-G for the on-board computer State X1-G. Also on our website there are other useful instructions for repairing Kalina 2 and upgrading this car.
This article is dedicated to such a useful device as the on-board computer of the Lada Kalina car. Why is it needed and what functions does it perform? This element of the on-board electronic system has become an indispensable attribute of a modern car, because it has been able to replace many obsolete sensors and recording devices. The on-board computer has genuine practicality and enviable functionality, which made it popular among car enthusiasts. All these statements are true for the domestic Kalina model. Many car owners are interested in which controller to install in their car, as well as how to use it later?
Description of the on-board computer State Kalina XD
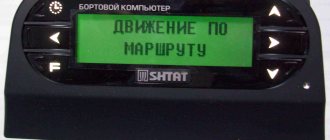
Installed in a standard place in the car, next to the diagnostic connector.
The trip computer State "Kalina" XD, unlike the BC of older models, has a PLASMA/BOOST button added. The button, displayed as a separate option, allows you to enable this function without searching through the menu. This is especially important in sub-zero temperatures when display visibility is low.
Computer State 118 Kalina X-5XD, unlike its predecessor computer, has a diagnostic tester that allows you not only to read errors and operating parameters of the ECM, but also to read errors in additional electronic units of the car, such as ABS, electrical accessories and fuel system.
The State Kalina XD on-board computer has flash memory for recording data received from the ECM about engine operation. This data can be transferred to a personal computer for analysis.
What is the purpose of the on-board computer?
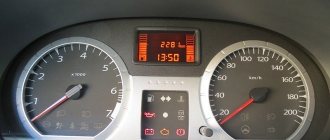
The domestic model Lada Kalina we are considering has a simplified on-board computer. However, even this functionality turned out to be enough to register system processes occurring in the electronic components of the car and provide information through the display available in the device. The interface allows the driver to access readings of various parameters, which are displayed digitally on the screen.
In the Lada Kalina, the controller is capable of reproducing information about nine primary indicators that characterize the state of the car’s systems per unit of time. Two criteria are displayed on the screen, providing the driver with operational information. The first is permanent and is in continuous broadcast mode in the top line of the display. The second is located below it and is changed by switching to each of the eight specified parameters in accordance with the desire of the driver. Switching the values of the second criterion is carried out by pressing a special control module, which is located on the steering column switch on the right side. This module contains three buttons, the functionality of which allows for full control of information supply modes. The first button is responsible for the “Reset” function, which implies the ability to reset the parameters. The remaining two keys allow you to scroll through the menu.
On-board computer instructions Lada Kalina
Lada Kalina is equipped with a simple on-board computer, the functions of which are quite sufficient for normal use. The on-board computer displays 9 readings on the screen - one, in the top line, is shown constantly, the rest, in the bottom line, can be selected. Next, we will consider all these indications in more detail.
The top line displays the total mileage of the vehicle in kilometers.
In the second line, display information can be selected. This process is controlled using 3 buttons located on the right steering column lever:
The “RESET” button can reset some parameters, the other buttons are responsible for scrolling through them (up/down).
The first parameter is the time in 24 hour format. To set the clock, hold down the “RESET” button until the dial starts flashing. Now, scrolling down, we set the hours, and up, we set the minutes. After setting, briefly press “RESET” to exit to the main menu.
The next parameter shows how much fuel the car consumed during the last trip. This parameter must be reset before leaving. I didn't reset it for about a month, so it read 140 liters.
The next item on the on-board computer is the average speed of the last trip. It also needs to be reset. If you do not do this, it will calculate the average speed for the entire time since the last reset. On average, this figure is 30-40 km/h.
The next parameter displays the number of kilometers that you can travel with the remaining gasoline in the current driving mode.
Next comes the instantaneous fuel consumption reading. Readings from 0 to 19.9 liters. When stopped, the computer will display dashes.
Next comes the average fuel consumption. It can also be reset.
The next indicator shows the time spent on the road. The countdown starts from the moment of the last reset.
Well, the last parameter shows the outside air temperature.
Parameters that are displayed on the controller display
The standard on-board computer present in the Lada Kalina allows you to quickly display information that displays such important parameters.
- Distance traveled. Traditionally expressed in kilometers. The value is positioned in the top line of the display. It is this indication that appears as an unchanging criterion, because it is constantly present on the display.
- Time. Information is provided in a 24-hour format. The parameter needs to be configured correctly to combine the readings with the actual passage of time. To set the values, use the “Reset” button. Here you need to hold it pressed until the flashing “time” symbol appears on the screen. After this, we set the required value of the indicator.
- Fuel consumption during the last trip. This parameter needs to be reset regularly. The driver performs this action, since the device is not capable of this on its own. This must be done immediately before the start of the trip, otherwise the reading will be cumulative, which is incorrect.
- An indicator of the average speed during the last trip. This parameter also needs to be constantly reset. This is necessary so that the computer does not count the speed from the moment the readings are reset to zero.
- Power reserve. This indicator is formed based on several factors. Based on fuel reserves, driving pace and other aspects, the computer calculates the distance that can be covered before coming to a complete stop. If the driving style changes or the driver replenishes the fuel supply, the computer will immediately recalculate this indicator and display a new value.
- Instant consumption. This is a parameter of fuel consumption in the current unit of time. The value can vary from 0 to 20 liters. This is influenced by the level of load on the motor at a given moment.
- Average consumption. The on-board controller calculates this parameter independently, based on the speed indicator, driving pace and other factors.
- Travel time. The value needs to be systematically reset. The calculation is carried out from the moment you leave the parking lot, subject to the reset of the parameter for the previous trip.
- Air temperature. The indicator is recorded using sensors integrated into the device, after which the information is sent to the screen.
About replacing the device and the list of required tools
Which computer should I install? There are models of trip computers on sale that are specially adapted for the LADA Kalina electronic control system and have more advanced functionality. Manufacturers include instructions with the controller, which are an indispensable assistant during installation.
To quickly and efficiently install (replace) a new device in the LADA Kalina panel, you will need to acquire the following set of traditional tools:
The instructions provide detailed information regarding the functionality of the new device and techniques for its correct installation. A detailed diagram of all electrical connections is also provided. We recommend that you carefully follow the manual while performing the entire list of installation procedures. After installation, the owner of a LADA Kalina car receives more detailed information about the state of important systems that are included in the overall electronic complex of the car. The instructions also describe in detail how to use the device.