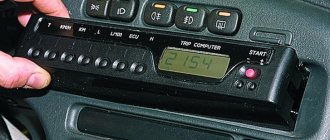
The dashboard of the VAZ-2115 has a pre-designed space for the subsequent installation of an on-board computer. In this case, if you need to install a control device in a car, then there is no need to change the design of the torpedo, but rather use a standard socket.
The on-board computer provides comprehensive information to the driver about the following indicators:
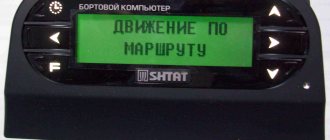
- Vehicle movement mode.
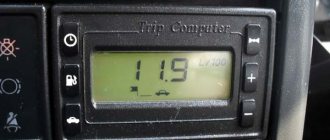
- Gasoline consumption.
- The state of the car's electrical network and so on.
In addition to information capabilities, such a device is capable of diagnosing the state of the internal combustion engine control system. Certain types of on-board vehicles can be installed on cars with carburetors. However, for everything to work, you will need to additionally install a number of sensors.
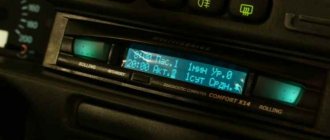
In the modification of the VAZ-2113, a computer is installed that interacts with the controller of the internal combustion engine control system. Its task is to process all incoming information and display the main indicators on the screen in an understandable form.
Automotive stores today sell a wide variety of such devices, which differ in their functionality and location in the car.
All functions of the device in question are divided into two parts:
- Informational.
- Diagnostic.
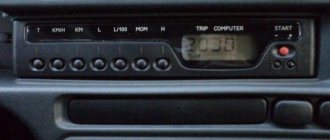
To enable the required operating mode, use seven buttons on the device panel:
- Pressing this button tells the computer that the ride has begun. The same element resets the accumulated information in memory.
- + and – are designed to adjust the values of various characteristics when the device is in setup mode, as well as to study information about the state of specific components of the car.
- In addition to display functions, the on-board computer can produce sound signals when the actual parameter values exceed the maximum permissible standards. This is a kind of emergency signal.
These are not all the functions of the device in question, but only the main capabilities. Next, we will look at the process of installing a computer in a car.
General principles for connecting a computer
Basically, an on-board computer is an inexpensive device, but quite useful. We have already mentioned this. Now we will look at the process of installing the BC into the car.
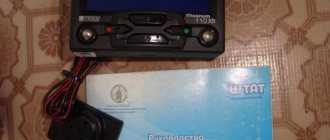
If you have not purchased a device yet and are wondering what to choose, pay attention to Multitronics and the State. We will look at the connection process using the Multitronics X140 as an example. Note that there is now a similar modification on sale, which is equipped with a color display.
Buy an on-board computer in online stores. In car markets, the cost of such products is often greatly inflated.
The following wires need to be connected to any on-board computer:
- Power supply +12 V.
- Power when the ignition is turned on to start the computer.
- Power that appears when the side lights are turned on. This will cause the BC display to go dark at night.
- Weight.
- Signal from the fuel level sensor. Some device modifications allow you not to connect this wire. Multitronics X140 calculates the remaining gasoline based on instantaneous consumption.
- Connect the diagnostic line from the K-Line controller.
For the first four points, a 4-pin block is used, specifically designed for connecting a BC. Accordingly, it is enough to connect it with the adapters that come with the computer. If this is not possible, then the first point is connected from the cigarette lighter, the second - from the ignition switch, 3 - from the cigarette lighter backlight. The ground is connected from the body of the same cigarette lighter.
It is very important that before any actions with electrical wiring you need to reset the negative terminal on the battery. This will protect you and your car from short circuits and other troubles. The signal from the fuel remaining sensor is taken from the gasoline level indicator. Its location can be found in accordance with the wiring diagram of the machine.
The diagnostic line (K-Line) is connected to the EURO-3 block in the seventh socket.
Car diagnostics
Of course, it is impossible to detect a malfunction in the operation of a vehicle without diagnostics. This can be done using special equipment, which can be found at every specialized service station. But you can also check your car for faults on your own. Note that when checking the car yourself, the error codes will not be the same as when diagnosing on the equipment.
Car VAZ 2115 tuning
So, how can you independently diagnose the state of the VAZ 2115 on-board computer? This question came to the mind of every owner of these car models. Now we will tell you about this in more detail. But diagnosing the car is half the battle, because the resulting combinations of faults also need to be deciphered.
Self-diagnosis of VAZ:
- Find the odometer button on the instrument panel. You need to clamp it down.
- Then turn the ignition key to position 1.
- Having done this, the odometer button will need to be released.
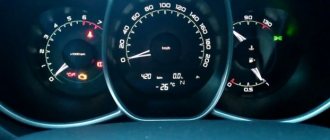
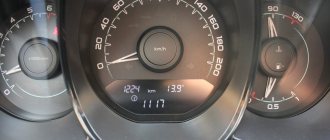
- When you release the button, the arrows on the instrument panel will start jumping.
- Press and release the odometer button again. Numbers will appear on the speedometer indicating the firmware version of the on-board computer.
- Finally, hold and release the odometer button for the third time and you can see the fault combination. In the case of self-checking, error codes will be presented in two-digit form, in contrast to diagnostics on equipment, where faults are presented in four-digit form.
Pressing the odometer button to carry out self-diagnosis of the VAZ 2115
Step-by-step installation of a computer on a VAZ-2115
The device will read information from the engine ECU.
- Initially, turn off the power to the vehicle's on-board network - remove the terminals from the battery.
- The car already has space for mounting the BC. All necessary wiring is already connected to this location.
- After removing the plug, you will see the wiring harness and plug - connect everything to the appropriate sockets on the computer and secure the panel.
- At this point, the connection process can be considered complete.
It is recommended to check the correct operation of the device at the stage of purchasing the bookmaker. The seller must do all diagnostic processes free of charge - it is his responsibility to sell you a quality product.
Meaning and decoding of codes
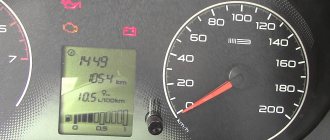
During self-diagnosis of a VAZ 2115 with an injector, only numbers or flashes that code the error will be shown on the instrument panel. When reading trouble codes from an electromechanical instrument cluster, it is necessary to record the number of flashes and calculate error numbers from them. Their purposes can be deciphered using a special list. Most of these faults can be resolved independently by replacing failed sensors.
Self-diagnosis codes
When performing diagnostics, it is necessary to take into account that the number on the screen may indicate two summed errors. For example, 9 indicates the presence of two faults - numbered 1 and 8.
| Numeric combination | Decoding |
| 1 | ECU problem |
| 2 | Incorrect data from the fuel level sensor |
| 4 or 8 | Network power problems |
| 12 | Malfunction of the error lamp circuit in the instrument cluster |
| 13 | No signal from lambda probe |
| 14 or 15 | Incorrect data from temperature sensor |
| 16 or 17 | Problems with the network power supply, it is necessary to check for short circuits |
| 19 | Motor shaft position sensor error |
| 21 or 22 | Throttle sensor error |
| 23 or 25 | Incorrect operation of the intake air temperature sensor |
| 24 | Speed sensor faulty |
| 27 or 28 | No signal from lambda probe |
| 33 or 34 | No air flow data available |
| 35 | Idle speed control sensor is faulty |
| 42 | Ignition control circuit problem |
| 43 | Knock sensor failure |
| 44 or 45 | Violation of the composition of the mixture |
| 51 or 52 | ECU memory errors |
| 53 | Error in CO setting sensor (installed on cars without converter) |
| 54 | Octane corrector sensor (installed on cars without a converter) |
| 55 | Violation of the composition of the mixture |
| 61 | Failure of the lambda probe |
An example of error 14 appearing on the panel
Table of decoding codes for flashes calculated during diagnostics.
| Error code | Flash combination | Decoding |
| 12 | Long-pause-two short | Diagnostic circuit malfunction |
| 14 | Long-pause-four short | Engine temperature sensor malfunction |
| 15 | Long-pause-five short | Likewise |
| 16 | Long-pause-six short | Abnormally high mains voltage |
| 17 | Long-pause-seven short | Abnormally low mains voltage |
| 19 | Long-pause-nine short | Crankshaft position sensor failure |
| 21 | Two long, pause, one short | Incorrect data from the throttle position sensor |
| 22 | Two long, pause, two short | Likewise |
| 24 | Two long, pause, four short | Problem with the speed sensor |
| 27 | Two long, pause, seven short | Lambda probe failure |
| 28 | Two long, pause, eight short | Likewise |
| 33 | Three long, pause, three short | Air flow meter needs to be checked |
| 34 | Three long, pause, four short | Likewise |
| 35 | Three long, pause, five short | Idle speed outside the tolerance range |
| 43 | Four long, pause, three short | No signal from knock sensor |
| 51 | Five long, pause, one short | Memory error in block |
| 52 | Five long, pause, two short | Error in controller |
| 53 | Five long, pause, three short | Memory error in block |
| 61 | Six long-pause-one short | No signal from the immobilizer |
The data obtained allows you to quickly find the faulty element and eliminate the cause of the error.
The video from the Garage channel shows diagnostics on a VAZ 2115 using a scanner and laptop.
We recommend: Errors 84 and 89 on Chevrolet Cruze: what they mean and how to get rid of them
Controller errors
The most common controller errors encountered during diagnostics are listed in the table.
| Program error number | Decoding |
| R 0030-0038, 0141 | Malfunction of the lambda probe heating system |
| R 0102 and 0103 | Incorrect signal from the air supply sensor |
| R 0112 and 0113 | Error in data from intake air temperature sensor |
| R 0115-0118 and 0217 | Problems detecting engine temperature or overheating |
| R 2122 and 2123, 0222 and 0223, and 2138 | Incorrect signal from the gas pedal and throttle position sensor |
| R 0171-0172 | Incorrect mixture parameters |
| R 0201-0204 | Faulty injectors (each cylinder has its own code) |
| R 0261-0272 | Problems with injector control |
| R 0130-0134 | Problems with the functioning of the lambda probe before the converter |
| R 0136-0140 | Problems with the functioning of the lambda probe after the converter |
| R 0300 | Multiple misfires |
| R 0301-0304 | Cylinder misfires |
| R 0326-0328 | Knock sensor failure |
| R 0351-0352, 2301 and 2304 | Monitoring the operation of ignition coils |
| R 0422 | Failure of the neutralizer |
| R 0691-0692 and 0693-0694 | Failure of the first and second cooling fan start relays |
| R 0560-0563 | Problems with power supply |
| R 0627-0629 | Indicates incorrect operation of the fuel pump control circuit |
| R 1602 | Malfunction in the engine parameters control controller |
Reset errors
After self-diagnosis, finding out the cause of the problem and correcting the breakdown, the errors can be reset.
To do this, go to the error viewing menu, press the odometer reset key and wait a few seconds. The number 0 will light up on the screen - the error has been reset. In this case, data about problems is stored in the unit’s memory and must be deleted. If left, the “Check Engine” light will light up in the instrument cluster. In addition, self-diagnosis may not read all electrical system errors; the error removal procedure will show whether a more detailed analysis of the vehicle’s electronics is needed.
To reset the error, do the following:
- Turn on the ignition.
- Open the hood and remove the negative terminal from the battery. Wait about a minute, connect the wire back and close the hood.
- Turn off the ignition.
- Turn on the ignition again and start the engine. The Check Engine light may come on briefly and then go off.
If the symbol remains illuminated, there is an ongoing problem with some sensor or wiring in the vehicle. It can only be found out using a special scanner. It is necessary to conduct additional diagnostics to determine the problem node. Then carry out repairs and clear any existing errors using a computer diagnostic program for the ECU.
Resetting errors on cars with an electromechanical instrument cluster is carried out by disconnecting the negative terminal of the battery from the on-board network for 10 seconds. The ignition must be turned off.
What capabilities should an on-board computer have?
In the following list we present the most important functions that every bookmaker should have:
- Remaining fuel in the tank.
- Battery voltage.
- Time.
- Antifreeze temperature.
- Temperature outside.
Additionally, the following options are available:
- Average gasoline consumption per 100 kilometers.
- Quality of engine oil.
- Worn spark plugs.
The Multitronics X140 diagnostic computer, in addition to the above capabilities, has voice guidance. This function warns the driver in time about various changes in the car. For example, when fuel runs out, the system instantly notifies you if there is less than 5 liters of gasoline left in the tank. In cold weather, the computer reminds you that there may be ice on the road.
According to reviews from experienced drivers, some are very annoyed by the display backlight when driving in the evening/at night. But after some time of use, everyone gets used to this device, and driving without it becomes no longer so convenient.
Diagnostic capabilities of Multitronics x140:
- Gasoline consumption while driving and parking.
- Antifreeze temperature. This indicator allows you to monitor the proper operation of the temperature sensor. It also determines the process of warming up the internal combustion engine.
- The voltage of the car's electrical network in volts. Thanks to this parameter, you can timely track various generator malfunctions, belt slippage and other breakdowns in the on-board system.
- The tachometer displays the crankshaft speed when the engine is idling. If the deviations are significant, this indicates that there is a malfunction in the vehicle’s fuel system.
- Throttle position. Using this characteristic, you can monitor the health of the sensor (TPS). In addition, the driver knows about the depth of travel of the gas pedal. When the engine is turned off, but the ignition is on, when you press the pedal, the indicators should smoothly change from 0 to 100 percent.
- Speed. Duplicates the traditional speedometer, but here the readings are more accurate.
- Malfunctions of the injection system.
Thus, the on-board computer in question receives all diagnostic fault codes and interprets them on its display in a form understandable to the driver. BC allows you to reset accumulated information.
basic settings
Read
Briefly about the main parameters of the computer:
- The device shows the speed at which the car is moving. You can also use it to determine the remaining fuel in the tank and the driving time at a certain interval.
- BC shows the number of engine revolutions.
- Thanks to this device you can always find out the engine temperature.
- The device determines fuel consumption in a certain area, kilometers traveled and number of kilometers.
- In addition, the device allows you to determine the voltage level in the vehicle's on-board network.
- Throttle position.
- As stated above, with the help of the BC, personnel can identify possible faults present in the power supply.
- Another parameter determined by the computer is the cyclicity of air flow circulation.
- Average car speed.
- Information about the time when it will be needed.
- Information about the need to change certain parameters.
- Based on the model and the data stored in its memory, the device can calculate the next time the car owner will pay for insurance.
- Various information from the organizer.
Hazard warning light - practical or not
Emergency notifications play a fairly important role in modern car computers. In particular, the driver can be promptly notified of the following:
- Motor overheating when the temperature exceeds 115 degrees.
- Changes in the vehicle's electrical network. The signal appears when the voltage drops or exceeds permissible limits.
- Exceeding the speed limit at a preset threshold.
Also, on-board computers inform the driver about the need for maintenance. During the process of setting up the computer, indicators are indicated at which it is necessary to change the oil, air filter, and so on.