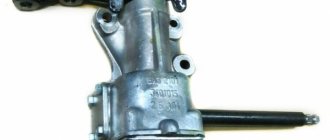
The pendulum lever (also known as the “ pendulum”) on the VAZ 2107 is designed for one simple function - synchronous rotation of the front wheels through the steering mechanism. It is thanks to him that the left and right wheels turn in the direction desired by the driver simultaneously, without delay, when turning the steering wheel. This ensures vehicle stability when cornering.
A malfunction of the VAZ 2107 pendulum worsens the vehicle’s performance when maneuvering and can lead to an accident. Therefore, at the first sign of its malfunction, it is necessary to repair or replace the unit.
Swing arm location
The steering pendulum of the VAZ 2107 is located at the bottom of the engine compartment. You can see it by opening the hood and looking deep down. But optimal visibility and ease of repair are provided from the inspection hole or when using a lift.
The bipod coming from the pendulum controls the rotation of the front wheels of the car when the steering gear rotates.
Note: sometimes “lever” is used instead of the term “bipod”, but only the first definition is correct.
Selecting new trapezoid parts
Since production of the VAZ 2107 car has been discontinued, finding original spare parts is becoming increasingly difficult. On the roads of the CIS countries, steering rods quite often become unusable, so the supply of “original” spare parts has long been exhausted. Recently, trapezoid sets have been supplied to the market by several well-known manufacturers:
A special feature of tie rod repair is that worn ends can be replaced one at a time. Few Zhiguli owners put on full sets due to a broken ball pin. As a result, the “seven” trapezoid is often assembled from spare parts from different manufacturers.
The quality of steering rods from these manufacturers is approximately the same, as evidenced by reviews from motorists on the forums. Therefore, choosing a new spare part comes down to the following 3 rules:
- Beware of fakes and do not buy spare parts from dubious outlets.
- Do not buy tie rods from unknown manufacturers at a bargain price.
- Do not confuse the left long tip with the right when changing parts of the trapezoid.
Signs of a malfunction of the VAZ 2107 pendulum
The first sign of a pendulum failure is knocking noises when hitting bumps, falling into holes or hitting a bump. Another sign is a large amount of play in the steering wheel (free play of the steering wheel).
Failure of the pendulum may also be accompanied by a large load when turning the steering wheel.
Important: these signs appear not only when the pendulum arm is faulty, but also when the bolts are loose or the adjusting nut is overtightened. Before repairing or replacing the pendulum, it is worth checking the tightness of the bolts and nuts.
Arrangement of rods and tips
The one-piece central trapezoidal element has the simplest design - an iron rod with two loops at the ends. The pressure pins are inserted into the second holes of the bipod (counting from the end of the lever), screwed in with 22 mm castle nuts and secured with cotter pins.
Note: The center link rod is bent forward slightly to prevent shifting. If you place the part backwards, problems are inevitable - the bend will begin to rub against the gearbox housing, which will make it very difficult to drive the car.
Not all service station mechanics know the correct installation of the central trapezoidal rod. My friend was convinced of this when he came to the service center to change a VAZ 2107 steering rod kit. The inexperienced master installed the middle section with a bend back, so it was not possible to go far - exactly until the first turn.
The side bars consist of the following parts:
- short ball point (external;
- long sock (inside) with zipper;
- connection clamp with 2 bolts and nuts M8 for 13 mm wrench.
The element is removable for adjusting the toe angle of the front wheels. The length of the lever can be changed by turning the threaded clamp and thus adjusting the position of the wheel for straight movement. The threads of the tips and inside the clamp are different - right and left, so when rotating the rod lengthens or shortens.
The design of all articulated ends is the same and includes the following parts (the numbering coincides with the diagram):
- Ball pin with M14 x 1.5 thread for 22mm castle nut. The radius of the ball is 11 mm; a hole for a cotter pin is made in the threaded part.
- The cover is rubber (or silicone), splash-proof, also known as a boot;
- Metal body welded to M16 x 1 threaded rod.
- The support insert is made of composite material, otherwise it is a burglar.
- Spring.
- The lid is pressed into the body.
Some lever manufacturers insert a small attachment called a grease gun into the cap for periodic lubrication.
The short outer ends of the side rods are the same, but the long ones are different. You can identify the part by its bend - on the right side there is a lever bent to the right. The side link ball pins are attached to the first holes of the swingarm and gearbox.
A well-known automotive technician suggests distinguishing between long points as follows: Grasp the loop with your right hand, pointing the ball finger downward, as if you were holding a gun. If the muzzle is bent to the left, you have a left-handed pusher tip.
Video: design of the rod end for VAZ 2101—2107
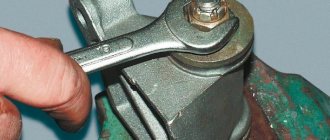
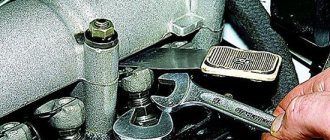
Removing the pendulum arm of the VAZ 2107
To work you will need two 17mm wrenches and a standard set of keys.
The procedure is as follows:
- disconnect the two steering rod ball joints from the VAZ 2107 pendulum;
- using a pair of wrenches, unscrew the connections of the pendulum arm (to do this, you need to sequentially hold the fastening bolt from turning with one key, and unscrew the nut with the second);
Note: There are washers under the mounting nuts and bolts. You should remember their location and number on each of the bolts in order to put them in place during assembly. Otherwise, the pendulum mechanism may become distorted.
- remove the bolts and remove the pendulum lever from the “seven”.
Article: 2101-3003080, additional articles: 095943
Order code: 014452
- Buy with this product
- show more
Buy analogues
Passenger cars / VAZ / VAZ-21021 drawing
» href=»/catalog/vaz-3/legkovye_avtomobili-30/vaz_2102-4/privod_rulevoiy-164/#part8095″>Lever with bracket Front axle / Steering drive
- Passenger cars / VAZ / VAZ-21041 drawing
- » href=»/catalog/vaz-3/legkovye_avtomobili-30/vaz_2104-5/privod_rulevoiy-129/#part14931″>Lever with bracket Front axle / Steering drive
- Passenger cars / VAZ / VAZ-21061 drawing
- » href=»/catalog/vaz-3/legkovye_avtomobili-30/vaz_2106-7/privod_rulevoiy-141/#part21305″>Lever with bracket Front axle / Steering drive
- Passenger cars / VAZ / VAZ-21011 drawing
- » href=»/catalog/vaz-3/legkovye_avtomobili-30/vaz_2101-3/privod_rulevoiy-164/#part3611″>Lever with bracket Front axle / Steering drive
- Passenger cars / VAZ / VAZ-21031 drawing
- » href=»/catalog/vaz-3/legkovye_avtomobili-30/vaz_2103-106/privod_rulevoiy-130/#part11672″>Lever with bracket Front axle / Steering drive
- Passenger cars / VAZ / VAZ-21051 drawing
- » href=»/catalog/vaz-3/legkovye_avtomobili-30/vaz_2105-6/privod_rulevoiy-129/#part18037″>Lever with bracket Front axle / Steering drive
- Passenger cars / VAZ / VAZ-21072 drawings
- » href=»/catalog/vaz-3/legkovye_avtomobili-30/vaz_2107-8/privod_rulevoiy-178/#part25500″>Lever with bracket Front axle / Steering drive
- » href=»/catalog/vaz-3/legkovye_avtomobili-30/vaz_2107-8/privod_rulevoiy-179/#part25530″>Lever with bracket Front axle / Steering drive
There are no reviews for this product yet.
Today, the next article in the series “Crystal VAZs or typical breakdowns of domestic cars” is dedicated to the “classics”: VAZ-2101, 2103, 2104, 2104, 2105, 2106 and 2107. These cars have been driving along our roads for decades and, despite Despite all the shortcomings that we will talk about, their popularity is still high.
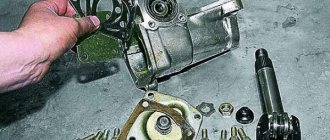
Repair of the VAZ 2107 pendulum
After removing the unit, you can not replace it, but repair it. Repair of the VAZ 2107 pendulum is carried out as follows:
- place the pendulum in a vice and clamp tightly;
- Using pliers, remove the cotter pin, which prevents the nut from unscrewing spontaneously;
- Unscrew the adjusting nut using a wrench;
- remove the washer located under the adjusting nut;
- Using a screwdriver, remove the large diameter washer located on the axis of the pendulum arm;
- remove one of the bushings and the sealing ring;
- remove the bracket from the pendulum axis;
- the second o-ring is removed;
- remove the second bushing by prying it with a screwdriver;
- check the condition of the parts (bushings, washers, sealing rings, lever axle).
Note: The presence of defects in the lever is unacceptable. It should not be deformed. The lever axis should not have noticeable wear.
Reassembling the pendulum arm parts is done in the reverse order. Before assembly, it is necessary to lubricate the lever axis and the hole under it with “Lithol” or other grease.
After assembly, it is necessary to adjust the tightening of the lever nut so that the bipod rotates with a force of 1-2 kg*s. This can be checked with a torque wrench.
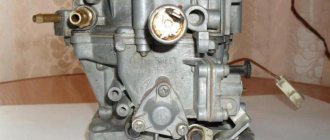
Purpose and operation scheme of the trapezoid
The lever system acts as an intermediary between the steering shaft and the steering knuckles of the front hubs. The purpose of the mechanism is to synchronously turn the wheels in one direction or another, obeying the rotation of the steering wheel. The trapezoid is located under the engine at the level of the bottom of the car, attached to the body stiffening elements: the lower side members.
The steering part in question consists of 3 main parts:
- the central link is screwed to two bipods: the pendulum arm and the wheel arch of the worm gear;
- the right link is attached to the swing arm of the pendulum and to the steering knuckle of the right front wheel (in the direction of travel of the car);
- The left link is connected to the gearbox bipod and to the stamp of the left front hub.
The method of connecting swivel brackets to trapezoidal parts is that a conical pin is inserted into the connecting hole in the bipod and secured with a nut. The pendulum and gearbox are rigidly fixed to the side members with long bolts.
The central link is a hollow metal rod with two hinges. The two side rods are prefabricated elements consisting of two ends - long and short. The parts are connected to each other by a threaded clamp secured with two bolts.
How does a trapezoid work:
- The driver turns the steering wheel, turning the transmission shaft and rod. The worm gear transmits fewer revolutions to the bipod, but increases torque (force).
- The bipod begins to turn to the right, dragging the left and central rod with it. The latter transmits force to the right rod through the pendulum bracket.
- All 3 elements move in one direction, causing the front wheels to rotate synchronously.
- The pendulum, attached to the second spar, acts as an additional hinged suspension for the system. In old versions of pendulums, the bipod rotates on a bushing, in new elements - on a rolling bearing.
- Ball pins at the ends of all links allow the trapezoid to move in one horizontal plane regardless of the compression of the front suspension springs.
The increased torque from the worm gear eliminates the need for hydraulic and electric power steering. On the other hand, the driver physically feels problems with the chassis: the ball joint or the end of the stem has to sour, and it becomes much more difficult to turn the steering wheel.
Replacing the outer short tip
Since access to the outside of the trapezoid is possible from the wheel side, disassembly can be done without an inspection hole. What tools and materials will be needed:
- 13 and 22 mm keys;
- pliers;
- hammer;
- extractor - “glass” type of perforation;
- a ruler at least 20 cm long or a tape measure;
- wheel pullers - jack, wheel wrench, wheel wedge;
- rags, fabric gloves.
Also, before you begin, prepare a new cotter pin, WD-40 spray lubricant, and a wire brush to remove any dirt from the shaft.
Why is it customary to replace nozzles rather than repair them:
- High-quality factory parts are made non-separable; in a garage it is impossible to remove a worn rattle - the hinge cover is pressed tightly into the body.
- Homemade collapsible rods using a lathe are considered unreliable. The reason is the “lap” profile inside the body; under load, the ball axis can squeeze out the cover and jump out.
Preparatory stage
Before removing the nozzle, perform a number of preparatory steps:
- Secure the car to the platform and unscrew the desired wheel. For maximum access to the tip, turn the steering wheel left or right as far as it will go.
Take this opportunity to check the condition of the boots on the other tips. If you notice cracks, completely disassemble the trapezoid and install new silicone covers.
Disassembly instructions
Dismantling the old part and installing a new drill is carried out in the following order:
- Using a 13mm wrench, loosen the circlip nut closest to the wheel. Do not touch the second nut.
Some car enthusiasts, instead of measuring the length, count the turns when they unscrew the tip. This method is not suitable - the length of the threaded part on parts from different manufacturers may differ by 2-3 mm. I had to personally encounter this problem: after the replacement, the car began to climb to the right and “eat” the edge of the tire. The issue was resolved at a car service: the technician adjusted the wheel alignment angle.
If you can't find the extractor, try removing the pin from the flapper by hitting the pin with a hammer. Method two: Lower the wheel hub onto the block, thread the nut onto the pin threads, and hit it with a hammer through the wood spacer.
Disconnecting is not the best way to unmount a connection. Accidental rivet of the wire is possible, in addition, shocks are transmitted to the hub bearing. It is better to buy an inexpensive puller - it will come in handy with replacement hinges.