Replacement of the pendulum lever of VAZ 2107, VAZ 2104.
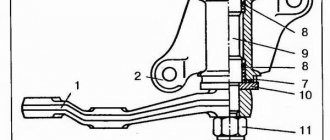
Pendulum design for VAZ 2104 – VAZ 2107
1 - bipod; 2 — bracket body; 3 — washer; 4 — adjusting nut; 5 - cotter pin; 6 — upper washer; 7 - seal; 8 — bushing; 9 – axis; 10 — lower washer; 11 - lock nut.
Many owners of VAZ 2104 - VAZ2107 cars buy, make repairs and change the pendulum themselves.
To do this you need:
This must be done carefully so as not to strip the threads or flatten the castle nut, so it is better to screw on another nut.
- remove by unscrewing two nuts, while on the other side you need to put on an adjustable wrench that will keep the bolt from turning;
- unscrew the top nut;
- remove the axle from the bracket. During assembly, add lubricant to the pendulum arm bracket.
- The bushings should fit tightly in the bracket, and the axle should have no radial play. When the bushings are worn out, replace them with new ones.
- check the turning torque of the axle - by tightening or loosening the nut, observe while turning the bipod. When turning, the bipod should “walk” easily and without effort. The lighter this force, the less it will be transmitted to the steering wheel.
Do not turn the wheels when the car is stationary!
In the past, when not every car had a hydraulic power steering system, none of the drivers even had the desire to turn the wheels while the car was stationary. Firstly, it is very difficult. And secondly, the steering wheel has to be turned with such force that it seems that some steering element is about to break.
But now everything has changed, power steering and electric amplifiers are found on Ladas, and on old Opels, Mercedes and other cars of the 90s and even 80s generation. Servos only require a little finger pressure to turn the wheels, which is the biggest problem with tie rod ends! At these moments, their joints are having a hard time!
Remember that the destructive forces in modern cars during such standing maneuvers are even greater than before, as cars have become heavier and tires have become wider.
In this case, forces arise corresponding to a weight of up to 1 ton (!) with each movement of the steering mechanism. Under such circumstances, it is almost a miracle that a relatively small link such as a terminal joint can withstand such overloads. But still, after about 100,000 km, it is better to check the joints - perhaps one of them has already failed and needs to be replaced.
Remember what you were taught in driving school: turn the steering wheel only when the car is moving.
How to repair the pendulum arm, also known as the pendulum, on a VAZ 2101-VAZ 2107?
Disassembly: 1) First, remove the swingarm from the car. (For information on how to remove it, see the article linked just above, under the heading: “Where is the pendulum lever?”)
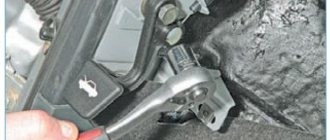
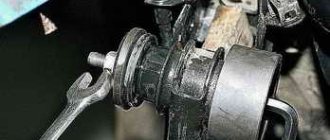
2) Now, without removing anything from it, place the removed pendulum in a vice and then clamp it as shown in the figure. Then, using pliers, remove the cotter pin that will hold the nut from unscrewing (in the photo this cotter pin has already been removed). And after the cotter pin is removed, take a wrench and use it to unscrew the adjusting nut.
Note! After removing the adjusting nut, pay attention to the washer located under it, which you will also have to remove!
3) Next, when the small washer is removed, use your hand or take a screwdriver and then pry up the large washer and then also remove it from the lever axis.
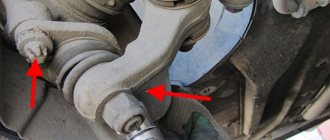
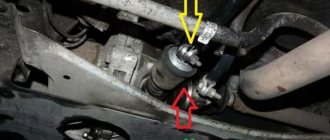
4) Next, again, pry up with a screwdriver, but only this time one of the main bushings (indicated by a blue arrow) and thereby remove it, as well as remove the o-ring that is located under this bushing and which is indicated by a red arrow.
Electrical equipment main causes of malfunctions
The on-board network of the VAZ 2107 is powered from the battery, and after starting the engine from the generator. The most common causes of electrical equipment failures:
- Failure of the voltage regulator, significant wear of the brush assembly and slip rings, and the generator drive belt.
- Undercharging a battery for a long time causes sulfation and destruction of the plates, which leads to a decrease in its capacity.
- A breakdown of the solenoid relay or damage to the stator or rotor winding makes it difficult to start the engine.
Any malfunctions of the VAZ 2107 car are diagnosed by employees of service stations or independently. The method of restoring the functionality of systems and mechanisms usually involves replacing failed parts. Experienced car enthusiasts can fix most breakdowns on their own using illustrated repair manuals.
Blow, more blow and bumps
The tip, and in particularly difficult cases, the steering rod can be destroyed by running over an obstacle. A stone on the road, a log or a hole - it doesn’t matter, there can be one outcome - a bent rod or a failed tip.
“As a standard, our specialists carry out routine diagnostics of the suspension at each subsequent maintenance. It also includes checking the tie rods and ends. It doesn’t matter how much the car had driven at the time of servicing - 15 or 150 thousand km; in rare cases, the rod ends can be “killed” even on a new car with low mileage.
Also interesting: How to replace the glass and window lifter of a VAZ-2121 car door
Communities › Lada Niva Car Lovers Club › Blog › [INFO] Steering pendulum repair
We service the pendulum with our own hands. It is dismantled with a hammer and light blows on the screwed nut, or rather on its back side - a self-locker.
Next, we knock out the remaining bearing and press new ones - with the same nuts and a couple of spacers - I had one from Gena and an M20 nut
If the bearings on the finger do not fit tightly, then you can cap the finger and ride some more
Bearings can be purchased at any VAZ store - Niva/Classic crankshaft bearings
Comments 15
Regarding the issue of piercing, this is a temporary measure; over time it will break again. If the housing is normal, then maybe replace the shaft along with the bearings?
Of course it’s temporary, but it’ll be enough to get to a replacement
Well, if from this perspective, otherwise it turns out to be extra work.
It’s worth doing this if it’s not a press fit, but by hand, when the size is already about 5 hundred square meters gone, you fill it up and drive it until the next replacement, and then, sorry, it’s just in the trash. I don’t know if the shafts are sold separately and I don’t know the price, to be honest, but our pendulum costs about 2000 for a shniva, here it’s better to have a reinforced one, it’s 3000
At first I thought it would be easier to just buy a new one, but after looking at the prices I was blown away. Pendulum 21213 costs 540 rubles, and 2123 is more than 3000... I don’t understand this pricing at all. The differences between the parts are minimal and there is nothing there that would increase the price by 5-6 times...
Even 3000 more? Wow. I know that it’s very expensive, that’s why I wrote)) but so...
Of course it’s temporary, but it’ll be enough to get to a replacement
Well, before pressing the bearings into the housing, I removed the boot and additionally lubricated it with CIATIM.
It’s not easier to replace the assembly or install a reinforced one and forget about it
Change it. My pendulum is very ancient - one of the first. Although the case is made of aluminum, the metal is good + thermally insulated, it is 13 years old and with merciless use it did nothing, why the hell should I pay 4000 for a new reinforced one? Strange comment
What’s strange about it? I didn’t suggest you go to a service center and change your car.
If you don’t need it, pass by and don’t teach others. Don’t the bearings fail on the reinforced one? They go out. How does he move? Also. Are there any other questions?
Source
Lada 4×4 3D 2009, engine Gasoline 1.7 liter., 80 hp, AWD drive, Manual – DIY
Comments 18
I changed it to a new one, I took it not on bushings but on industrial bearings.
I also wanted one on the underside, but I didn’t choose the company, and it was confusing that the bipods were different 01 21 213 and 23 That’s why I went through
Why do you need it? No problem with lubrication. And it’s in stores.
the same story, it needs to be changed, but I’ll probably give it to the servicemen with a new part) well, this is a bitch))
Sex is sometimes good for health, especially when you have a second car and there’s really no hurry)))
here’s another question) I sold the second one, I’m already fucked with this one)))
I also wanted bearings, but the agony of choosing a manufacturer led to the repair of the pendulum)))
Source
Installation of a new pendulum
Before installing a new pendulum on a car, make sure that it has been assembled correctly; to do this, clamp the pendulum in a vice so that its bipod is directed strictly horizontally. In this position, under the weight of its own weight, the bipod will have to stand in one place, not moving anywhere. It will only have to move under the influence of a force of “1-2 kg” applied to the part on which the right tie rod joint will be installed, in other words, to the tip of the bipod as shown in the figure:
Didn't find the information you are looking for? on our forum.
Rods, bipod, hinges - where is it all?
The main parts and steering components of the VAZ-2107 and other rear-wheel drive models are shown in the figure below. To understand what is faulty, let’s remember “who is who”. You also need to remember that breakdowns of steering parts and assemblies are very dangerous and, in most cases, lead to serious accidents! For example, if the steering rod breaks, the front wheels lose contact with the steering wheel and the car flies into a ditch or into oncoming traffic. To prevent this from happening, let's check the condition of the steering of our “classic”.
Steering VAZ-2107
1 – lateral thrust. 2 – bipod. 3 – medium traction. 4 – Pendulum lever. 5 – adjusting clutch. 6- lower ball joint of the front suspension. 7 - right steering knuckle. 8- upper ball joint of the front suspension. 9 - right steering knuckle lever. 10- bracket for the pendulum arm. 11- bearing of the upper steering shaft. 12, 19 - steering shaft mounting bracket. 13- pipe of the steering shaft mounting bracket. 14- Upper steering shaft. 15 - steering gear housing. 16- intermediate shaft. 17- facing casing. 18- steering wheel. 20- fixing plate of the front bracket. Pinch bolt for fastening the universal joint. 22- body spar.
Inspection and testing of the VAZ-2107 steering
You need to check your steering if your car has the following signs: -increased play (free play) of the steering wheel; -knocks in the area of the front wheels; - difficult (tight) rotation of the steering wheel. It is better and more convenient to perform all work in an inspection ditch or on a lift. Be sure to invite an assistant; you can’t handle the check alone. Before work, the car must be thoroughly washed from below. Set the steering wheel to the position for driving in a straight line. Turning the steering wheel left and right, we check one by one: - the play of the steering wheel along the rim is 18 – 20 mm; - there should be no knocking in the hinges and joints; - the fastenings of the steering gear housing and the pendulum lever are not loose; - there is no play in the ball joints of the rods and in the bracket of the pendulum arm, and the bipod does not move in the axial direction; - steering force does not exceed 20 kgf; - the adjusting couplings of the side rods are securely secured with clamps; -all protective caps and rubber covers have no cracks or tears.
Ball joints of steering rods are considered to be in good condition if the axial movement (along the axis of the fingers) is no more than 1.5 mm. When you press the mount on the hinge, you should feel the resistance of the spring.
Trouble-shooting
Loose threaded connections must be tightened, damaged and worn components and parts must be replaced. The most common parts to be replaced are tie rods with joints and a pendulum arm. A stiff steering wheel or knocking noise in the steering mechanism can be eliminated by adjusting the worm gearing. After replacing the rods, you need to adjust the camber and toe angles of the wheels.
Read, it may come in handy: Instructions for bleeding the brake system of a VAZ 2107
Source
Steering problems
The steering mechanism, like any other vehicle component, wears out and requires repair over time. To simplify the troubleshooting, there are certain signs that allow you to find out the nature of the breakdown and fix it in a short time.
Oil leak
On a classic, the problem of a “wet” steering gear is quite common. There can be many reasons for this:
- oil seal wear;
- leakage from under the gasket;
- loosening of the fasteners that secure the mechanism cover;
- Corrosion of the input shaft.
If the oil seal and gaskets can be replaced and the bolts tightened, then if the shaft is damaged, the part will have to be ground.
Tight steering wheel
Sometimes it happens that to turn the steering wheel it is necessary to apply noticeably more effort than usual. Several reasons can lead to this malfunction:
- incorrect wheel alignment;
- failure of one of the elements in the steering mechanism;
- the gap between the worm and the roller is broken;
- The pendulum axis fasteners are too tight.
Steering play
One of the reasons for free play in the steering mechanism is wear on the shaft crosspieces. In addition to them, play appears in the gearbox itself. If the unit has a high mileage, then it is advisable to disassemble it, inspect the condition of all the elements, replace parts with high wear, and then carry out adjustments.
Knock and vibration
If you feel feedback on the steering wheel while driving, there can be many reasons for this phenomenon. Driving a vehicle in such a technical condition leads to rapid fatigue and reduces the level of safety. Therefore, the steering mechanism needs diagnostics.
Table: causes of vibrations and knocking on the steering wheel and ways to eliminate them
| Cause of steering failure | Troubleshooting method |
| Increased clearance in front wheel hub bearings | Adjust the front wheel hub clearance |
| Loosening the tie rod ball pin nuts | Tighten the tie rod ball stud nuts |
| Increased clearance between the pendulum arm axis and the bushings | Replace the swingarm bushings or bracket assembly |
| The adjusting nut of the pendulum arm axis is loose | Adjust the tightness of the swingarm nut |
| The clearance in the engagement of the roller with the worm or in the worm bearings is broken | Adjust the gap |
| Increased clearance in steering rod ball joints | Replace tie rod ends or tie rods |
| Loosening the bolts securing the steering gear housing or the pendulum arm bracket | Tighten the bolt nuts |
| Loosening the swing arm nuts | Tighten the nuts |
Types of pendulums for VAZ 2104–2107
In the manufacture of pendulum levers, bushings are used, and the bearings on which the lever axis rests. They are designed to provide longer service life for moving parts. Manufacturers believe that bushings are more durable because, unlike fragile bearings, they are not subject to influences other than abrasion. However, both materials are subject to wear. If the elements are worn out, the driver will feel more tension in the steering wheel than usual, and it becomes difficult to control the car due to increased play. When hitting a hole or bump, extraneous knocks begin to be heard from the side of the pendulum, and the steering wheel travel increases. And if the mechanism itself is damaged, the bolts are loosened, or the adjusting nut is overtightened, then the wheel will rotate more tightly.
The designers tried to make the pendulum airtight and isolated the internal cavity of the body with two rubber rings, but usually after traveling 45–90 thousand km it has to be completely changed. When a car drives onto country roads, all the dirt is pulled inside.
Rolling bearings solve this problem; they are little subject to wear from contamination and do not require additional lubrication. But, unfortunately, not all manufacturers supply high-quality products to the market.
VAZ 2109 - replacement of steering rods and ends
Increased free play of the steering wheel in most cases indicates either a violation of the adjustment or failure of the steering rods and steering tips. As a rule, when they fail, a corresponding knock appears in the front of the car, which is especially noticeable when driving on a bumpy road. A final inspection must be carried out before we proceed to replace them. First of all, it is necessary to check the condition of the rubber boots of the steering tips; if they are torn, then replacement is required and it is advisable to change not only the boot itself, but also the tip. If the anthers are not damaged, then we check for the presence of axial play; to do this, we rest a small crowbar or mounting blade against the steering tip and swing it. If there is a gap and it is large, then you will feel dull knocks in the hinge body, which also indicates their malfunction.
To carry out repair work to replace steering rods and steering ends on a VAZ 2109 car, prepare a standard set of tools and you can begin work, the procedure for which is as follows:
- First of all, brake the car by placing it in first gear and placing thrust blocks under the rear wheels.
- Now we need to disconnect the steering ends from the steering knuckle. First, clean the pin mounting nut from dirt using a wire brush. Next, we unbend the antennae of the cotter pin and pull it out. We completely unscrew the nut securing the pin and install the puller, after which we compress the pin from the steering knuckle.
We move to the engine compartment. Here we need to loosen the bolts securing the steering rods to the steering rack bracket. Then loosen the bolts.
Next, unscrew one bolt completely and move the connecting plate to the side so that it does not interfere. Then we disconnect the steering rod from the steering mechanism and pull it out.
Clamp the rod in a vice and loosen the locknut of the tip. Then we unscrew the tip, while counting the number of turns by which it was screwed. Knowing the number of revolutions is necessary so that when you subsequently install a new tip, install it to the same length, which will allow you to approximately return to the same wheel toe values. Since when removing them, adjustment of the toe angle must be carried out without fail.
At this point, the repair work on removing the steering tips and steering rod of the VAZ 2109 is completed. Perform subsequent installations in the reverse order of removal.
Back in 2007, I exchanged my VAZ 21065 for a new miracle of the Russian automobile industry called Kalina. I couldn’t just ride it for a long time... and since a poor student has no capital at all, it all started gradually (or rather, after the second accident).
First I installed foglights, put on R14 wheels and 185/55 tires, the brakes were pleasing, but I wanted more. I changed the backlighting of the instrument panel, completely redid the dials for adjusting the stove and made it red. Made eyelashes (grid in progress). Covered the roof and hood in gloss black, the pillars in black matte, and the taillights in the color of the car. Replaced brake discs with Italian ones, Brembo and Lucas pads (front, rear). Wheels R15, Marangoni tires 195/50/R15. Bank, zero. Now I’m looking for springs... Music in Kalina: - Pioner 5900 head - Prology 16″ front - Prology 20″ rear - Kicks 350 Watt sub In the near future: - shortened springs - camshaft - 52-54mm throttle - modify the head - chips - body kit - emphasize the style 11 stars on the left door (the number of cars that drove into my car
Sources
- https://wertes.pp.ua/2017/08/31/zamena-rulevyx-nakonechnikov-vaz-2114-2/
- https://remont-vaza.ru/index.php/Lada-Kalina-LRL.html
Major body repair
Buying a VAZ body is a great chance to save money on expensive major repairs or buying a new car. It has long been proven that it is more desirable to immediately send a decrepit body for scrap than to periodically repair it in services where they charge quite a lot of money for services of this kind.
Also interesting: The Chevrolet Niva engine works properly if you look after it
To protect himself from problems, a caring driver uses preventative measures. These, in addition to anti-gravity treatment and other procedures, include strengthening.
All operations related to strengthening and restoration of the car body are very complex, take a lot of effort and time, but give an excellent result.
Let us immediately note that strengthening the side members in front is more important than ever if stiffer shock absorbers, springs and larger wheels are installed on the Niva. It is also recommended to do this after installing power bumpers and winches.
Body repair of a VAZ 2121 consists of several types of work.
Due to the specifics of its operation and design, the VAZ 2121 requires increased attention, namely increased monitoring of the condition of the body
In general, if you are the owner of a used Niva, and you intend to use it for its intended purpose for at least another couple of years, carefully examine the condition of the VAZ 2121 body, the repair of which and the strengthening of its individual elements is more a necessity than a precaution
Problem areas that you should pay special attention to are:
- The bottom, namely its corrosion and through holes in the floor (very often the car overcomes water obstacles without subsequent proper drying);
- Spars, namely for the presence of cracks (consequences of impacts with corresponding metal fatigue).
Cracks in side members usually occur in the area of the fastenings:
- Steering gear;
- Pendulum;
- Engine beams;
- Front shock absorber upper bracket;
- Rear shock absorber mountings;
- Long jet rods to the very bottom of the floor;
- “House” of “Ponara” traction.
Restoration of the rear part of the front spar
Rear arch before repair
Front spar before repair
New, shiny - just like the real thing
Cracks in the most unexpected places
Complete loss of body parts
Since the work associated with restoring and strengthening the body is very labor-intensive and takes a lot of time and effort, the restoration of a car from an economic point of view can be considered profitable only when it is done with one’s own hands. This means that when buying a rotten car, even when its price is mere pennies, it is necessary to take into account the considerable future costs of restoring it. Reinforcement and replacement of parts of the floor and side members are usually carried out with patches of sheet metal 3-4 mm thick.
Ready-to-install spar patches/reinforcers
Ready-made car floor with reinforced side members
Instead of Ponar thrust
A - shaped lever
Read news about the new Niva
- Polishing with toothpaste - how to polish headlights, plastic, glass and wheels with your own hands
- Is it possible to put a dog guard on a car?
- Do-it-yourself Niva tuning - 95 photos of new products with the best options!
- How to bleed brakes on a Chevrolet Niva correctly
- Tuning for Niva
- VAZ 2121 Niva: description, engines, automatic transmission, technical characteristics
- UAZ "Bukhanka" 3741 - official dealer of UAZ cars in Arkhangelsk and the Arkhangelsk region
- UAZ on low-pressure tires - stages of car modification
Installing a lift kit on Niva 2121
Hello, dear friends! Today I propose to talk to you about the elevator kit for the Niva. This could be a Chevrolet Niva, that is, series 2123, or the more “our” Niva Urban, 2131 or 4x4, and representatives of the 2121 series, that is, 21213, 21214. It all depends on what kind of car you have at your disposal.
Russia, Ukraine, Belarus and a number of other countries are the greatest admirers of Niva cars. They are affordable and provide many benefits.
Some people prefer to do everything themselves. I can’t say that modifying the front and rear suspension of a Niv car will be an easy job in a minute. No, you will have to spend a lot of effort, time and patience on this.
Increasing the ground clearance of the VAZ 2121 (lifting) allows you to increase the vehicle's off-road capability. Thanks to simple manipulations, the ground clearance increases significantly by changing the suspension height (the Niva lift kit will help you here, which makes the work very easy to do even with your own hands without the help of a service center) and installing slightly larger diameter wheels.
Also interesting: Tuning Niva 2121 with your own hands: body, interior, suspension
Lifting - increasing the vehicle's ground clearance by upgrading the suspension. Performed in order to increase cross-country ability.
We propose to consider this issue in more detail.
As a rule, a lift kit for Niva 2121 includes:
- Rear and front springs.
- A set of spacers for the upper ball joint.
- Front oil shock absorber.
- Adjustable Panhard rod.
Replacing the swing arm
If repair is not possible, you can install a new swingarm and secure it. The procedure is the reverse of removing the pendulum from the car body.
During serial production and mass use of the “seven”, vast operating experience was accumulated. The most typical malfunctions of the VAZ 2107 car and methods for eliminating them are described in sufficient detail in the technical literature. For the convenience of car owners, the most common causes of failures are systematized and tabulated.
This information is relevant for owners of VAZ 2107 cars, who for the most part service their cars themselves. It should be especially noted that there are several modifications of this model, differing mainly in engine design. Since 2006, cars have been equipped with injection systems. Accordingly, they have different types of failures than cars with a carburetor.
Improved Niva
The injector installed on the Niva, although it reduces fuel consumption, is still not the most economical option in urban conditions with traffic jams and other delays. On the highway and during long trips outside the city, this is not felt so much, since the car works without stops and downtime.
Due to the unprofitability of cars in urban environments, drivers are thinking about a good and effective replacement for the old injection-type engine in their car. The best option would be a diesel engine for the Niva. It has approximately the same power characteristics, but its fuel consumption is comparatively lower. Also, diesel is less capricious in terms of fuel quality. What options from this category of motors are worth detailed consideration?
The first and most worthy candidate is the XUD 9 SD from Peugeot. This engine was used to create a modified version of the Niva - model 212151 with a French engine. It can be installed on the Niva without any problems - the fastenings of the parts and the assembly are identical, the motor fits perfectly in size, and in addition, there are some advantages from its installation.
Purpose
The steering rods are located in such a way that the Chevrolet Niva steering linkage has three rods, one middle and two side. There is a tip at the ends of each; the connection occurs through threaded couplings, which are held in place by clamps. At the end of each there are ball joints, which are secured with several nuts. Thanks to this design, the wheels rotate. In order for the SUV to remain stable and feel great on the road, you need to check the gap at the ball joints as often as possible, and if it is large, you need to replace the tips. The condition can be checked by driving the car into an inspection hole, and if there is any play or gap, you can try to eliminate it by tightening all the clamps; if this does not help, then you need to make a complete replacement.
Changing the pendulum on a VAZ 2107
A pendulum on cars is a unit that allows both wheels to turn when the need arises. This is a kind of lever that ensures a synchronous change in the angle of both front wheels. When you turn the steering wheel to the left or right, the wheels change direction accordingly. If the pendulum arm were absent, the wheels would change the direction angle asynchronously, which would lead to a number of unpleasant consequences. In this material we will look at how to replace the VAZ 2107 pendulum, where this part is located, and how to determine its malfunction.
Causes of joint wear
During operation, the working pair of the tip (plastic insert and ball pin) experiences loads from the steering rack, which pulls or pushes the steering knuckle depending on the direction of movement of the car. Another type of load affects the element from the side of the wheel falling on uneven road surfaces.
In the first case, the force is applied perpendicular to the axis of the ball pin and acts on the fracture; in the second, the forces tend to pull the part out of the socket. There is a third type of load - the friction force that arises in the unit when the wheels turn. Since the finger is rigidly fixed in the eye of the fist with a nut, it rotates inside the plastic bushing and rubs against its walls.
Due to the impact of these loads, the hinge joint wears out as follows:
- Over time, the walls of the liner wear out, a gap forms between them and the ball, which is why a quiet knock is heard when moving over small uneven surfaces.
- Abrasion of the side walls of the bushing leads to loosening of the pin, because it is pressed by the spring only from below.
- When the spring and heel are unable to remove the play resulting from wear of the plastic, the ball pin moves easily in the bushing, causing the steering tip to knock heavily.
Such defects must be identified in a timely manner, otherwise the damaged tip will quickly become unusable.
Basic engine malfunctions
VAZ 2107 cars are equipped with three main types of power units with a displacement of 1.5, 1.6 and 1.7 liters. The second engine is equipped with a distributed injection system, which differs significantly from carburetor engines. During long-term operation, parts and components of the unit are subject to wear, which can cause the following malfunctions:
- Failure of the power supply system: fuel pump, low or high pressure pipelines.
- Clogging of the main fuel or air jet, damage to the starter membranes or other mechanisms.
- Failure of the ignition system: high-voltage wires, spark plugs, distributor or other mechanisms.
- Oil pump failure, filter clogged.
- Extreme wear of parts of the cylinder-piston group, crankshaft or camshaft liners, timing belt.
Diagnosis of injector or ECU malfunctions is carried out using a special tester, which is available at specialized service stations. Repair and restoration work on the engine is classified as complex and requires high qualifications and special skills.
How to repair the pendulum arm, also known as the pendulum, on a VAZ 2101-VAZ 2107?
Disassembly: 1) First, remove the swingarm from the car. (For information on how to remove it, see the article linked just above, under the heading: “Where is the pendulum lever?”)
2) Now, without removing anything from it, place the removed pendulum in a vice and then clamp it as shown in the figure. Then, using pliers, remove the cotter pin that will hold the nut from unscrewing (in the photo this cotter pin has already been removed). And after the cotter pin is removed, take a wrench and use it to unscrew the adjusting nut.
Note! After removing the adjusting nut, pay attention to the washer located under it, which you will also have to remove!
3) Next, when the small washer is removed, use your hand or take a screwdriver and then pry up the large washer and then also remove it from the lever axis.
4) Next, again, pry up with a screwdriver, but only this time one of the main bushings (indicated by a blue arrow) and thereby remove it, as well as remove the o-ring that is located under this bushing and which is indicated by a red arrow.
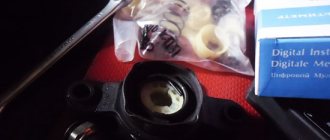
Pendulum lever assembly on bearings SITEK PROFI VAZ 21213-2131 /Niva/
- We guarantee fast processing of your order during business hours (we work from 11-00 to 20-00, Saturday and Sunday are days off).
- We guarantee reliable packaging of your order (when sending it by Russian Post or transport company).
- We guarantee the fastest possible dispatch of your paid order (within 2-4 business days after receipt of payment).
- We guarantee a refund or exchange for another product (with recalculation) within 14 days from the date of receipt of the order (the product must be in good condition, without traces of installation, delivery costs are not reimbursed).
- We guarantee a free exchange of goods (transportation costs at our expense) if the purchased goods turn out to be defective.
Disassembly, troubleshooting and assembly of the Chevrolet Niva pendulum arm
Tools:
- Key to 19
- Puller for pressing the pendulum arm
Note: The swingarm is disassembled to replace damaged or worn parts.
1. Remove the protective cap of the pendulum arm axle.
2. Unscrew the upper nut of the lever axle
Please note that there is a flat washer installed under the nut. Don't forget to install it during assembly
3. Unscrew the nut securing the lever to the axle.
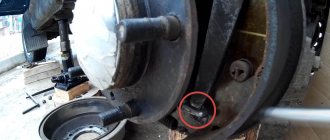
4. Knock out the lever axis together with the lower bearing with gentle hammer blows.
Note: To avoid damaging the threads of the swing arm axle, screw the nut flush with the end of the axle.
5. Remove the axle from the bracket.
6. If necessary, use a puller to press the pendulum arm off the axle.
7. Remove the pendulum arm, spacer ring and lower bearing from the axle.
8. Using a suitable drift, knock out the upper bearing from the bracket.
9. Check the condition of the pendulum arm and its axis. The lever should not be bent, and the lever axis should not have any signs of visible wear.
10. The axle bearings should not have any play or local wear on the race tracks.
11. The pendulum arm bracket must not have cracks, deformations, etc.
12. Assemble the pendulum arm in the reverse order of disassembly.
Warning: When pressing a bearing into the bracket, apply force only to its outer race, and when pressing onto the axle, apply force to the inner race. Otherwise the bearings will be damaged.
Details of the pendulum lever with bracket: 1 – bracket cap; 2 – self-locking nut; 3 – upper washer; 4 – bearing; 5 – bracket; 6 – axis of the pendulum lever; 7 – spacer ring; 8 – pendulum lever.
The article is missing:
High-quality photos of repairs
Replacing the swing arm
The pendulum arm, or simply the pendulum, is a rather vulnerable unit in the steering, and it has to be changed frequently. Our story today is about how to replace a pendulum yourself.
The reasons for the short life of the pendulum lever are prosaic - this is a tribute to the pedigree. When designing the Niva, the maximum number of minds and units was taken from the light subcompact VAZ-2106. As a result, the original Niva front suspension with a powerful beam and forged arms on indestructible silent blocks, with a reinforced hub unit, was crossed with the steering of the Fiat-124, a prototype of the VAZ-2101-06. From this car, the Niva received (adjusted for the difference in the track) all the steering rods, joints and steering mechanism with a pendulum lever. As a result, the steering parts were subject to significant overloads. The experience of extreme operation of editorial Nivas has shown that the pendulum arm lasts less than other steering components. Impacts from road unevenness are transmitted to it, amplified by significantly larger wheels than the classic ones.
The main faults are: bending of the lever itself (bipod) and wear of rubber bushings or bearings (depending on the type of pendulum), causing play in the lever axis. Driving with a bent arm results in rapid, uneven wear on the front tires due to changes in wheel alignment.
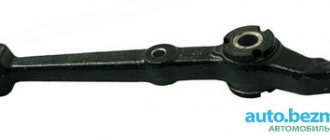
If the Niva is “led away” from its trajectory and the wheels are pointing in different directions, carefully inspect the lever. You should have a good idea of its correct shape. On the VAZ-2121, the lever has a characteristic step between the holes for the steering fingers (see photo on the right). On BA3-21213 there is no step, and the holes are almost in the same plane
Attention: levers are not interchangeable! on working levers the axes of the fingers are parallel. If the fingers seem to cross, the lever is bent and must be replaced
Which lever should I buy? Levers on rubber conical bushings and bearings are available for sale. Bearings theoretically reduce steering force. But in practice, no significant difference is found. An obvious drawback of the bearing lever is that its bearing can fail if there is a sharp blow to the body. The pendulum on bushings is not afraid of such impacts. In addition, it can be repaired by replacing worn bushings
If you bought a pendulum with bushings, use its collapsible design. Pull out the cotter pin, unscrew the nut and remove the lever along with the axle from the silumin housing (see photo below). The “planted” surfaces of the axle (larger diameter) for the rubber bushings are processed with a cutter and, as a rule, are not ground at the factory. The bushings in the hook lever will quickly be “eaten up” by the rough axle. Polish the surface with fine sandpaper, lubricate the axle with lithol and assemble the lever. This will extend the life of the unit.
Replacing the beacon lever
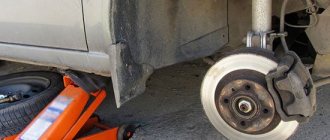
1. Place the car on a secure jack (photo 1) and remove the right front wheel
2. Unscrew and unscrew the nuts of the middle and side steering rods. The tool is a 22mm head with a cardan and an extension (photo 3-4).
For convenience, you can first dismantle the air filter housing by removing its cover and unscrewing the four nuts from the long studs of the carburetor with a size 8 wrench (photo 2). This will make it easier to access the pendulum from above.
3. Disconnect the steering rods from the pendulum.
To remove the tie rod pins, you can, of course, use a special puller with a multi-digit designation, but we liked the faster method. The fingers are knocked out using a 800-1000 g hammer and a drift 50-60 cm long and 20-30 mm in diameter, which can be easily made from a steel rod (photo 5).
The main thing is that the impact is directed along the axis of the steering rod fingers. Possible damage to the first turns of the thread on them can be easily eliminated with a triangular file (photo 8).
By doing this, you will save a lot of time.
4. Having secured the nuts on the pendulum body with an open-end wrench 17 (photo 6), using a socket head and an extension, unscrew the two bolts securing the pendulum to the spar.
5. Remove the old swing arm and replace it with the new one. Reassemble in the reverse order (photo 9-10).
To make subsequent repairs easier, we recommend lubricating all threaded connections with graphite lubricant. If the case is not advanced, then wheel alignment adjustment will not be required.
Now your pendulum will swing only where it is supposed to. And your Niva is obedient and flexible, to the delight of its owner. Happy renovations!
Time spent replacing the lever:
Tools and equipment:
jack, wheel wrench (preferably “cross”), wrenches and sockets for 8, 10, 17, 22, extension with cardan, hammer, triangular file, pliers, drift
Video
Design, features, operation and lift of the front suspension of the VAZ 2121
The service life of the upper silent blocks of the front suspension on the Niva is quite high. However, signs of wear may appear already after a mileage of 70-80 thousand km, or even earlier if the car is operated on a dirt road. The first sign of a worn silent block is a creaking and knocking sound when driving over uneven surfaces.
In the most advanced cases, a worn silent block will affect the car's handling and ability to keep a straight line; increased uneven tire wear and yaw along the road in a straight line are possible. The easiest way to determine the condition of the silent block is visually - there should be no cracks or chips on the surface of the rubber, and there should be no delamination or play.
Front suspension lift for VAZ 2121 Niva
Spacer above the top ball 40mm. under the platform 30mm, 28mm, 23mm, 11mm. Shock absorber gas oil KYB excel-g shniva.
Independent Wheel Bearing Clearance Repair
If you feel or feel vibration in the steering column while driving, then most likely the clearance on the front wheels in the bearings of the hub itself has increased, so their service life will be reduced, and the tires will begin to wear unevenly. And if there is no gap at all, then the hub will rotate tightly, which will also lead to a decrease in service life, so its gap should be greater than zero fifteen ml. Adjustment of the front bearings is carried out using a wheelbrace wrench, a twenty-seven wrench and a hammer.
- A wheel that is in a suspended state should be rocked; if there is play, the gap must be adjusted. After this, press the brake pedal and rock the wheel; if there is no play, then there is a gap in the bearings.
- It is necessary to dismantle the decorative cap and unscrew the lock nut from the hub, and hold it with a wrench to prevent it from turning. When repairing the chassis while adjusting the hub, it is advisable to install new hub nuts, since even after adjustment there is a high probability that the old ones will take their original place, which will not allow them to be properly locked. If this is not possible, then you can take the nut from Drugov’s car.
- Then you need to twist the hub nut so that the torque is 19.6 Nm. turning the hub several times, ninety degrees in two directions, will install the bearing itself. After this, loosen the adjusting nut and tighten it to 6.8 Nm. Having done all this, simply unscrew the nut twenty-five degrees.
- After everything is done, change the collar of the nut on the pin of the external drive joint.
- After the adjustment is made, check how the wheels rotate; if they rotate easily, then everything is fine. The final check can be made only after driving several kilometers without braking, assessing how the hub heats up.
Features of the front suspension of Niva 2121, VAZ 2131, Lada 4x4
The front suspension of the VAZ 2121 is independent, on steel wishbones, with coil springs, double-acting telescopic hydraulic shock absorbers and a stabilizer bar.
The upper and lower arms of the VAZ 2131 have a similar design: at the ends of the “fork” there are cylindrical eyes for rubber-metal hinges (silent blocks), and on the opposite side there is a platform with three holes for attaching a ball joint. On the front branch of the upper arm there is a boss into which the rebound buffer rests at maximum suspension travel, and on the lower arm there are four holes for attaching the lower spring support cup.
The ball joints of the upper and lower arms are interchangeable and unified with the upper ball joints of the suspension of rear-wheel drive VAZs. The support is attached to the lever along with the boot and the pressure plate with three bolts with spring washers and nuts. The threaded ends of the pins of both the upper and lower bearings point downwards and fit into the tapered holes of the steering knuckle.
The suspension arms, in turn, can rotate on their axes within the range of the rubber-metal hinges of the VAZ 2131 (limited by their elasticity). The upper arm axle has two holes and threads on both ends. Bolts pass through the holes, securing the axle to the suspension cross member. There are washers installed on the bolts between the axle and the cross member to adjust the camber angles and the longitudinal inclination of the wheel axis (see below).
The threaded ends of the axle fit into the rubber-metal hinges of the lever. There are washers on both sides of each hinge: the smaller one (flat) is on the inside, the larger one (convex outward) is on the outside. The self-locking nuts of the upper arm axle are finally tightened only when the suspension is compressed (on a loaded vehicle), otherwise the hinge will not be installed correctly and will quickly fail.
The lower arm axle is a bolt that passes through a bushing in the suspension cross member and the rubber-to-metal joints of the arm. Just like the upper ones, the lower hinges are tightened between two washers, but another thrust washer (thick) adjacent to the bushing, and several adjusting ones (thin) are added between the inner washer and the bushing.
The thickness of the washers package is selected at the factory; when dismantling the suspension, you must remember their number and location. Changing the number and location of washers is permissible only if it is necessary to restore the suspension geometry of the VAZ 2121, Niva 2131 (for example, after an accident, replacing a cross member, etc.). In this case, the distance between the outer washer and the flange of the bushing of the rubber-metal hinge after tightening its nut should be in the range of 3–7.5 mm.
The cross member of the VAZ 2121 suspension is a curved steel tubular beam, to which forged steel brackets are welded on both sides. In the lower part of the bracket there is a bushing for the lower arm axis, and the upper part is made as a vertical platform with four pairs of holes for mounting bolts.
The top pair of bolts secures the upper arm axle to the crossmember. The second one from the top tightens the engine mount bracket, cross member, spar and rebound buffer bracket. The third pair of bolts secures the engine mount bracket, cross member, and upper suspension spring mount. And finally, the fourth is the cross member and the upper suspension spring support. To ensure reliability, the nuts securing the upper suspension spring support are welded to the protruding threaded part of the bolts after tightening.
Replacing the central steering rod of Niva Chevrolet
To replace the middle tie rod on a Chevy, you will also need a 22mm spanner, a puller or hammer and pliers. Before starting work, remove both front wheels, press the side link ball joint pin out of the steering gear bipod and move the side link to the side
Removing the tie rod on a Chevrolet Niva is hampered by the front axle gear housing, so disconnect the front axle gearbox from the stabilizer by unscrewing the four nuts securing the stabilizer brackets to the gear housing. Under its own weight, the gearbox will rotate on the front supports, and a gap will open between it and the rod, sufficient to remove the rod
Unsplit the nut securing the middle link ball joint pin to the steering gear bipod and unscrew the nut
Install the puller and press the ball joint pin out of the steering gear bipod boss, then remove the steering rod. Installing a new transverse link on a Chevrolet Niva is performed in the reverse order of removal.
Assembly of the unit
After removing the old rods, take a tape measure and measure their length. The problem is that you will have to adjust the wheel alignment - you won’t be able to do this yourself, it’s better to go to a service station and do diagnostics on a computer stand. After replacing the steering tips of a VAZ-2107, even if you have achieved the same length with the new elements, it is necessary to carry out diagnostics. Otherwise, when driving, tire wear will occur much faster.
Installation of new tips is carried out in the reverse order. Insert the ball pins into the steering knuckles and holes in the bipod, tighten the nuts and secure their position with cotter pins. It is advisable to purchase new cotter pins, as old ones are usually covered with a layer of dirt and rust.
Source