Replacing the ball joint race for a VAZ 2110 gearbox
To work, you need to have a new clip, a set of keys, several screwdrivers, thick lubricant and about half an hour of time.
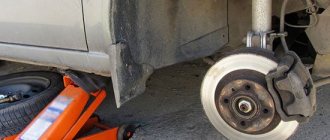
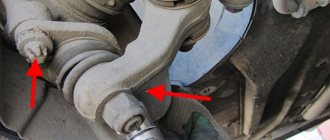
- First of all, we climb under the car and unscrew the torque rod from the ball joint. To do this, unscrew the four fastening points (two bolts and two nuts with a “13” wrench). Here you have to get a little used to it because the exhaust gets in the way. If the bolts are rusty or won't budge, use WD-40 penetrating fluid.
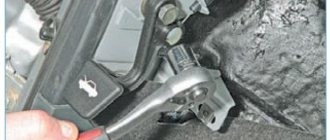
- Next, we remove the lever itself in the cabin. To do this, take a flat screwdriver and pry off the decorative cover.
- Once you have access to the fasteners, you can begin dismantling the lever itself. We unscrew the screw with a Phillips screwdriver, preferably an “L-shaped” one, which can easily fit into the limited space of the tunnel. Then take the key and unscrew the nut securing the lever.
- Now, using a flat-head screwdriver, remove the retaining ring of the gearbox ball joint cage, after which you can try to pull out the shift lever, as well as the “butterfly” itself.
- Next, we take a new “butterfly”, remove the retaining ring from it and take out the plastic bushing. We take lubricant such as “Litol”, “Solidol”, etc. and generously lubricate the friction points. We put the bushing on the lever, then install it all in the holder and secure everything with a locking ring.
Further assembly is performed in reverse order. We tighten the previously unscrewed bolts in the same sequence as during dismantling.
At this point, the process of replacing the gearbox ball race on a VAZ 2110 can be considered complete. We assemble the tool and check the result of the work done. Thank you for your attention, see you again at VAZ Repair.
If you liked this article, as a thank you to the author, you can share a link to it with your friends using the appropriate buttons below. We will be very grateful for your contribution to the development of our resource.
How to repair a gearbox shifter
Let's look at the removal and repair of a gearbox using the example of a manual transmission selector. The automatic transmission gear shift lever is removed in the same way.
Since the design of the lever is quite complex, and its repair requires the use of special tools, the best option would be to contact a car service center.
If you decide to repair the gearbox yourself, stock up on a 10-size wrench, a 12-size wrench and socket head, a 6-size hex key, an extension cord, a wrench, and pliers.
Before starting repairs, remove the gearbox rocker as follows.
Dismantle the lining of the floor tunnel, disconnect the ends of the transmission control drive cables from the levers with which gears are selected and shifted, remove the bracket that secures the cable shells in the sockets of the gearbox selector rocker, remove the cable ends from the sockets of the mechanism.
Next, you need to unscrew the bolts used to secure the gearbox rocker to the base of the body and dismantle the mechanism. Repair of the mechanism is carried out according to the following algorithm.
The tightening of the nut on the selector axis is loosened, while the axis is kept from turning using a hex wrench. The nut is unscrewed, the spring and flat washers are removed from the axle, the axle is removed from the holes in the rocker, as well as the flat and spring washers, the selector lever is removed along with the return spring and the flat washer placed under the lever.
The rubber damping bushing of the return spring is removed from the threaded end of the bolt that secures the transmission lever support cover. If the bushing is significantly deformed, torn or in a hardened state, it should be replaced.
The nut that tightens the bolt that secures the gearbox selector support cover is loosened. Then it is unscrewed, while the bolt is held from turning with a second key, the spring and flat washers located below are removed, the bolt is removed together with the flat washer from the holes of the rocker.
The cover of the manual transmission selector support is dismantled, the lever is removed from the rocker support.
If necessary, plastic crackers are removed from the ball ends of the gear selector knob.
Dismantled parts are carefully inspected. In case of deformation or weakening of the return spring, significant wear of the plastic bushings of the gear selector lever, deformation of the lever, wear or damage to the cotters of the manual transmission lever, they do not need to be repaired, but replaced.
If it is necessary to replace damaged or hardened bushings of the gearbox support, the spacer metal bushings are removed from the holes of the rubber bushings, and then the rubber elements are removed from the holes of the gearbox rocker.
After repair, assembly and installation of the transmission lever linkage is carried out in the reverse order.
Features and purpose of the scenes on the VAZ-2110
The easiest way to get acquainted with the principle of operation of the backstage is to study the photo drawing of the product. This functional unit is directly connected to the operation of the gearbox and, through a lever transmission, allows you to switch the gears of the driven shaft. Thus, the driver can change the gear ratio of the drive and driven shafts of the gearbox. It's no secret that thanks to this you can change the speed of the car and accordingly adjust the torque that creates traction force on the drive shaft of the wheels. Thanks to the rocker, reverse gear is also engaged and the movement of the vehicle can be completely blocked.
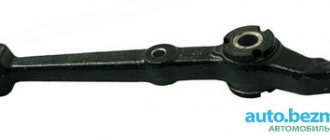
VAZ 2110 backdrop
Naturally, the rocker plays one of the key roles in the car control system. If the gearshift lever is faulty, full-fledged driving in real road conditions becomes difficult, and sometimes even becomes impossible. Unfortunately, this functional unit can break down quite often. Surely, you will be interested to know why this happens and how to prevent the malfunction of the link in time. The next section of our article is devoted to these issues.
How to adjust the correct operation of the scenes on a VAZ 2110 - 2112
On VAZ 2112 cars, the rocker is configured in the same way as for the tenth model (see schematic photo of the unit). The work is easy and simple for one person to do independently in their own garage. If you're lucky, the setup can be completed in literally minutes. You'll soon find out why.
By the way, the VAZ 2110 rocker also needs to be adjusted after replacing the gearbox and repairing it, as well as simply over time due to loosening of the fastening connections or after replacing the driveshaft.
The procedure for setting up the scenes using the “ten” as an example will be as follows:
- 1. Drive the car into a viewing hole, overpass, or raise the bottom with a jack. In the latter case, do not forget about reinsurance.
- 2. The first gear at the gearbox must be engaged. Make every effort possible to achieve this.
- 3. Next, we slow down the car using the handbrake. To ensure that it does not work, we place safety anti-roll bars under the rear wheels of the car.
- 4. Go down under the bottom of the car and find a fastening clamp there that holds the tip of the cardan. You loosen it up.
- 5. Now you need to push the gearshift lever knob to the extreme left position (any other displacements are not allowed). Hold the scenes in this position.
- 6. Having gone down under the bottom of the car, fix the clamp back on the tip of the hinge.
- 7. If everything is done correctly, congratulations, the setup is complete. You can check the operation of the gearbox.
Adjustment
The backstage adjustment should be made in several cases:
- after dismantling the gearbox;
- when the cardan has been replaced or the fixing clamps have become loose;
- if the linkage rotates on the hinge.
Of course, this will also be advisable if you have recorded signs of a malfunction of the element, which are described in the previous paragraph.
What to cook?
Before you begin repairs, prepare in advance:
- wrench to loosen the clamp;
- wheel chocks or bricks.
Universal wrench
You will need wheel chocks...
...or the most ordinary bricks
Step by step instructions
To perform repairs, that is, adjustments, you need to perform the following steps:
- First, drive your VAZ 2110 into a garage with a pit or onto an overpass.
- Place bricks or special wheel chocks under the car. Apply the handbrake.
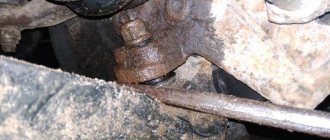
- Climb under the bottom of the car and find the clamp that secures the linkage and hinge.
- Use a wrench to loosen the clamp.
- Then sit in the driver's seat and put the car into reverse. Remember that the lever must be in the extreme left position. Therefore, set it the way you think it should ideally be when engaging reverse gear. It is advisable to do this work with an assistant so that he holds the gearbox lever in the position you set it.
- Now again climb under the bottom of the car and firmly fix the clamp in this position.
Reach under the bottom and loosen the clamp, then set the gearbox lever to the reverse gear position
This completes the adjustment of the device. Take a test drive and check the operation of the unit. If necessary, repeat all steps again.
Backstage adjustment:
Note! Before you go to the auto store and buy a new rocker, be sure to try to adjust the old one first so as not to waste money, maybe everything is fine with the old rocker!
1) At the very beginning of the operation, we will tell you why the adjustment of the rocker may go wrong, namely, after removing the box, after replacing the cardan shaft, or after unscrewing the nuts and bolts that secure the tension clamps of the rods that come from the rocker, and in other cases.
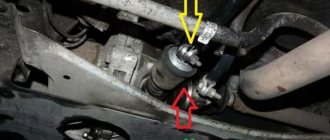
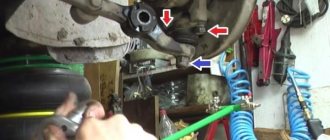
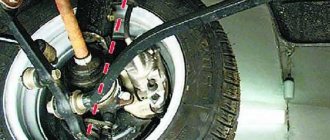
2) Now let’s move on to the actual adjustments, firstly, you will need to first drive the car into a pit or lift it using a lift, then climb under the bottom of the car and there you will find the boot under which the driveshaft itself is located (the boot is indicated by a red arrow), next to with this cardan and the boot that covers it, the end of the rod coming from the rocker itself will be attached, and this end will be attached using a tie clamp, so take two screwdrivers in your hands and with their help loosen the bolt nut a little (the nut is indicated by a blue arrow, and the bolt green), while when you loosen, hold the bolt itself with one wrench so that it does not turn, and with the other at this time loosen the nut, after the nut is slightly loosened, take a screwdriver in your hands and insert it into two holes, namely in the hole between the tie clamp (Indicated by a yellow arrow) and into the hole of the rod itself (Indicated by a white arrow), thereby widening both holes (In fact, these are not holes but a groove, so in the future we will use this word) so that the link rod can easily move relative to gear selector rod.
Note! Before you crawl under the car, put the car into first gear!
3) After you loosen the tension clamp, get out from under the car and return to the car interior. In the cabin, move the gear shift lever all the way to the left, but forward or backward and do not even try to pull it.
4) And to complete the operation, again climb under the car and tighten the nut of the same bolt that secured the tie rod of the rocker link.
Note! When all the operations are completed, test the gearshift lever for functionality, namely, check whether all gears engage clearly, start the car, drive it a little and if the shifter is working, then everything will be fine and you won’t even need to change anything!
By the way, another way (almost the same method) of adjusting the rocker, see the video clip below, in this video an example is shown on a VAZ 2109 car, but don’t pay attention to this, since the entire gear shift mechanism is on front-wheel drive cars VAZ, including the top ten, is practically no different from each other!
Briefly about the procedure for replacing the scenes
If the VAZ 2112 rocker cannot be adjusted, all that remains is to replace it. Special repair kits are available for sale that allow you to save on product maintenance. Although, it often turns out to be a much simpler and more reliable solution to buy a complete device and replace it.
The procedure for replacing the rocker for cars of the tenth family involves the following steps (by the way, there are a large number of photographs on the Internet illustrating this process):
- loosen the clamp securing the cardan under the bottom of the car;
- remove the protective cover of the gearshift lever inside the car;
- dismantling the floor air tunnel;
- actually, dismantling the scenes and replacing them.
You can see a schematic photo of the unit. Although, in general, the process is no more complicated than assembling and disassembling the designer and is intuitive, therefore it does not require additional explanation.
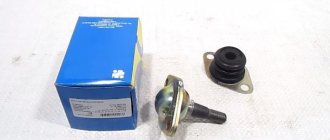
Backstage repair kit for VAZ 2110
Now you can examine the mechanism of the old rocker for malfunctions. Very often, problems with the lever arise as a result of wear on the ball joint race. Other moving structural elements, the hinge mechanism and its protective boot are no less susceptible to physical aging. After installing the new rocker, be sure to adjust it.
That's all. We wish you only a comfortable ride on the road, reliable operation of all power units and success in repairs. Take care of your iron horse and it will definitely thank you with its stable work.
Repair
Regardless of what exactly you do with the rocker - repair, adjust or change, you will still need to disassemble this unit.
Disassembly is performed as follows.
- Remove the cover from your gear shift knob.
- Place the car on a pit, or raise the front end with a jack.
- Remove the front console. It is held in place by mounting bolts.
- Now remove the curtain itself. To fix it, AvtoVAZ used 6 bolts in the case of the VAZ 2110 model.
- When carrying out dismantling work, be sure to examine the condition of all elements.
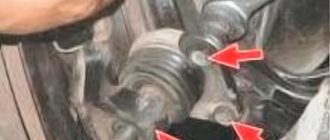
- By bending the boot, you will gain access to the support, oil seal and cardan shaft.
Changing the boot
Now regarding the repairs. There may be several recommendations in this regard, depending on the current state of the node and its components.
- At best, repairs will require the use of a repair kit for the backstage. It doesn't cost much.
- If the bushing is deformed, it will need to be replaced with a new one.
- Check the lever shaft bore for wear.
- Make sure there is no play in the driveshaft. Otherwise, a regular repair kit will no longer be enough, that is, a complete replacement of the entire backstage will be required.
- Often the culprit of extraneous noise and rattling when shifting gears in gearboxes is the rocker pad. Changing it is quite simple, and even a beginner can perform the operation.
Replacing the oil seal
Quite often, VAZ 2110 owners are faced with a situation where, after parking under the car, they find traces of oil. There are two options here - the oil filter has worn out or there are problems with the oil seal.
As you replace the oil seal, you will be able to simultaneously inspect and change such elements as the cushion, cardan shaft, and boot.
Dismantling works
But let's talk about everything in order. First of all, check whether it is really an oil seal and not a filter. If everything is fine with the filter, then we drive the car into a pit or find another way to end up under the bottom of your VAZ 2110. Beforehand, it would be a good idea to watch video materials regarding your current situation.
- Carefully inspect the boot. If oil leaks from the gearbox through the oil seal on your car, traces of it will definitely remain on the boot.
- Bend back the boot. This way you can get to the cardan, disconnect it and gain access to the cuff.
- You first need to dismantle the cardan from the lever, and only then from the rocker itself. Not the other way around.
- The cardan has been removed, so we move to the oil seal.
- The cuff is removed from the gearbox using a hook and an awl. Therefore, make sure you have these tools at hand in advance.
- Now a new one is installed in place of the old oil seal. Craftsmen have adapted to using ordinary plastic bottle caps. If you get used to it, it turns out to be very easy to change the oil seal.
- After replacing the element, return all dismantled components to their places. If some of them need replacing or signs of wear are already visible, it is better to replace them immediately. It is unlikely that you will want to repeat the same operation in a couple of weeks and lie under your own car.
Repair will not give the desired result if the adjustment was carried out with errors. To do everything carefully and competently, use the help of a partner. One will work under the car, the second will help from inside.
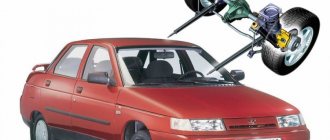
The gearbox is one of the most complex components of a vehicle. However, this does not mean that its repair cannot be done at home on your own. Now we will tell you what the VAZ 2110 rocker is, what may be the reasons for its malfunction and how to repair the mechanism.
Why does the VAZ-2110 need a rocker?
The rocker is located in the gearbox (gearbox), which, in turn, is necessary to change the speed of the vehicle and indicate the direction, for example, reverse or forward. The slide also allows you to turn off the power unit and completely stop the VAZ-2110.
Now about what the node is needed for. It is designed to transmit rotational movements, starting from the crankshaft and ending with the chassis of the car. In order for the gear to engage at least at a minimum, the small circle gear must engage on the drive shaft with the large sprocket of the driven shaft. Using a lever located on the gearbox, moving parts with sliders are switched, and therefore the speed of movement of the VAZ-2110 is changed.
The gearbox cannot operate properly if there are malfunctions of the rocker. Why is the slide built into the gearbox? It is responsible for the simultaneous movement of the sliders and the random movement of 2 gears at the same time.
If the rocker is configured and adjusted incorrectly or the old part cannot be repaired, then the performance of the gearbox will suffer greatly.
Frequent breakdowns of the scenes
A breakdown of the rocker in a VAZ-2110 is accompanied by the following main symptoms:
- A faulty gear lever play means that the part cannot be repaired, only replaced.
- If you hear a ringing in the wings, then perhaps the VAZ-2110 has a built-in part with a manufacturing defect. Sometimes the ringing appears after repair work has been carried out; you cannot leave the car in this condition; the mistakes made will have to be sorted out and corrected.
- If the driver notices that the speed is turned on poorly, use one of the following solutions to the problem - try to repair the rocker, or maybe it’s better to replace it right away.
- When reverse gear turns on instead of first speed, the problem is absolutely not in the rocker; the real cause of the breakdown will still have to be determined.
- Does the gearbox lever vibrate very much while the car is moving? This means that there is significant play inside the gearbox knob hinges.
Differences between a short-stroke link
The main differences can be seen even in photographs. We see that the short-stroke rocker has smaller dimensions, namely length. To reduce the stroke length at startup, the length of the transmission under the hinge should be increased. Due to this, we can not only get shorter gears, but also maintain the traction axis in its original position.
The photo shows a self-modernized backstage. As an alternative, you can use a part from other VAZ models.
It is worth understanding that after such tuning, you will need to put more effort when changing speeds. After upgrading, switching will resemble joystick control, which is undoubtedly a plus. In addition to the rocker, you can install a backlash-free cardan, which will also have a positive effect on the smooth operation of the gearbox.
Features of adjusting the scenes on the VAZ-2110
You can understand whether you need to change the scenes on a VAZ-2110 or not only after carefully adjusting the part. If the exact cause of the problem is not identified, you can spend a lot of money on a new link, replace it, but in the end nothing will change.
Specialists at the service station recommend replacing the part in the gearbox on a VAZ-2110 if the following malfunctions are observed:
- you had to remove the gearbox;
- if a new cardan was installed or there is a loosening of the fixing clamps;
- the drawstring rotates to the sides on a hinge.
When a part is being adjusted and guided, even minimal turns and clearances can make or break the situation significantly.
Adjusting the VAZ-2110 backstage consists of the following sequential actions:
- Set up a raised platform in the garage and drive the car, trying all possible methods to engage first gear.
- Leave the gear lever untouched - let it be in first gear.
- Engage the handbrake and install the wheel chocks.
- Go down under the VAZ-2110 and feel the clamp, which is the connecting element between the hinge and the rocker on the car.
- Loosen the clamp.
- Sit behind the wheel and push the lever of the part you are replacing towards the left.
- Go under the car again and secure the position of the clamp.
- Check if the gearbox is working properly. If everything is not so smooth, repeat the procedure again.
Alternative supports
Replacement cushion for VAZ 2110
Considering the long-standing problem of Samara and a dozen, the manufacturer immediately released a whole series of alternative pillows:
- OJSC-BRT;
- SS-20;
- "Assomi".
Let's now consider their features:
- The support of JSC-BRT and the peculiarity of its structure is contained in a hinged product, which replaced the bearing in this place. At first glance, it looks like a panacea, since the general principle of operation seems to be clear: the creators of this technical innovation used an element that has increased rigidity in the radial direction. At first glance, the sounds should disappear and the car should become silent on uneven roads, however, conflicting reviews from the motorists themselves do not allow us to completely agree with this fact.
- An alternative to OAO-BRT is SS-20, where a steel bushing was installed in place of the standard bearing, which was completely welded into a rubber damper. The manufacturer of this new product claims that the SS-20 will completely eliminate the appearance of elevators and extraneous sounds. Moreover, the manufacturer directly promises that the SS-20 will be able to guarantee the classic behavior of the rocker (see Replacing the rocker on a VAZ 2110 on your own): regardless of the topography of the road surface, the lever will be stable and without extraneous sounds.
- The developers of "Assomi" boldly claim that the use of a special prescription rubber mixture will completely smooth out all impacts and sound noise, thereby significantly increasing the overall level of comfort of the car.
VAZ 2110 gearbox rocker
So, you need to choose who to trust, because there are a huge number of manufacturers to choose from, who all guarantee the high quality of their products. And most importantly, they guarantee that they managed to create a universal high-tech product that is most effective from a practical point of view.
Note. But it’s not entirely clear why some manufacturers of backstage cushions use rubber ears that quickly break?
Practical Feature of Alternative Choice
Unfortunately, “Assomi” and SS-20 are quite difficult to find in local stores; in the future they will go on wide sale, however, it is impossible to answer exactly when this will happen. It all depends on the store owners. The motorist is mainly offered imported products, as well as from national manufacturers, but only standard ones. It should be objectively understood that the quality of imported products varies significantly in comparison with national standard factory models, as does the price. Therefore, if you are pressed for time, it is best to order your own national alternative via the Internet, which is much lower in price than its foreign counterpart, and the quality is almost identical.
When to change your pillow
VAZ 2110 backdrop
Factors that indicate the need to replace the wing cushions:
- extraneous sound during movement, the irradiation of which can even spread to the body of the vases;
- traces of hardening or cracking of the rubber cushion are visible, as well as if it is separated from its metal base;
- there is a pronounced increasing vibration that has not previously been observed;
- in case of unsatisfactory backlash length, etc.
Instructions for replacing the rocker on a VAZ-2110
If adjusting the part does not give positive results, there is only one thing left to do - replace the part or try to resurrect it through repair, but in the latter case you will need the help of knowledgeable repairmen.
Replacing the VAZ-2110 backstage looks like this:
- Prepare the necessary tools in advance so that you don’t have to be distracted from your work later. What you will definitely need:
- screwdriver;
- side cutters;
- set of wrenches.
You won't be able to cope without a repair kit designed specifically for the VAZ-2110.
- Now that everything is at hand, open the hood and find the nut connecting the transmission rod and the tip of the handle.
- Remove the special protective cover from the nut and tighten the turnbuckle.
- Get back into the car and take out the frame that fits the lever that controls the transmission. Clamps may interfere with this work, but you can’t get rid of them, spend a little time and everything will work out.
- Turn the cover inside out.
- Using a sharp knife, cut the clamp to secure it and remove the cover. It's okay if you couldn't avoid damaging the integrity of the clamp. It is disposable, so the clamp will still have to be replaced with a new one.
- Get rid of the tunnel lining on the floor.
- Disconnect the axle retaining part from the gearbox handle.
- Pull out the gear knob by pulling the lever up.
- Slide the sleeve inside the lever, which is responsible for the direction of the part.
- Remove the 4 mounting bolts holding the guide bushing in place.
- Remove the housing and remove the shaft.
- Now look at the nodes. If there are signs of wear on the rubber part, the bushing cannot be repaired and must be replaced. If the hole located under the handle axis is severely worn out or the play is noticeable to the naked eye, it’s time to change the link.
- Return all parts to their original place and adjust the operation of the gearbox.
Video on how to replace the rocker on a VAZ-2110:
How to choose a new backstage?
What kind of rocker should I put on a Niva Chevrolet? This question came to the mind of every Niva car owner who had to deal with a malfunction of this element. In fact, there is nothing difficult in choosing a component.
In practice, many car owners of the above car models install mechanisms from classic Fiat cars on their vehicles. According to reviews on the Internet, these devices are completely suitable for installation in a Chevrolet Niva. However, there is also a negative side. In practice, Niva cars equipped with a mechanism from Fiat cars require more careful adjustment of the element. In addition, despite Italian quality, these components of the transmission system are more susceptible to wear and tear.
Therefore, when choosing a mechanism, you should not “be fooled” by the stories of handicraft “garage” craftsmen and come up with a new headache for yourself. For installation in a Chevrolet Niva, it is better to purchase a standard rocker, which is equipped with basic models of Niva cars.
New rocker for Niva ChevroletReplacing an element
As a rule, the need to repair this component arises after installing or repairing the gear shift drive. If you have replaced the drive, but when driving you feel how the vibration of the gearbox lever remains, then, most likely, there is increased play in the lever hinge mechanism. This means that the hinges should be repaired, and accordingly, it may be necessary to replace the rocker.
Read more: Steering wheel anti-theft lock
If you decide to replace a component at home yourself, then prepare in advance everything that you may need during the work process. In particular, we are talking about:
- wrenches on "12";
- wrench set to “14”;
- socket wrench at “10”;
- clamp for securing the gearshift lever cover;
- stationery knife;
- Phillips screwdriver.
Of course, you will also need a new mechanism if you decide to replace it.
First of all, open the hood of your Chevrolet Niva and find the connection between the tip of the gearshift lever and the gear shift rod. Once you see this connection, take the appropriate wrench and loosen the nut of the mounting screw. After this, remove the turnbuckle and its protective cover. Now get into the car and remove the front part of the floor covering. Next, remove the gearshift lever cover frame
Be careful, you will need to remove it carefully to avoid damaging the clips. Next, you will need to turn the shift lever boot inside out. Having done this, you will see the cover fastening clamp
Take pliers or a regular stationery knife and cut through this clamp. After this, the cover can be removed from the lever. Please note: the gearbox lever mounting clamp is disposable. That is, if you bite it with pliers or cut it with a knife, you won’t be able to reinstall the part in its original place. Therefore, when assembling the parts, you will need to install a new clamp. Next, you will need to remove the front portion of the floor tunnel lining. Depending on the year of manufacture of your Chevrolet Niva, the instructions for dismantling the floor tunnel lining may differ. Therefore, we recommend that you use the instruction manual specific to your car. Now look at the gearshift lever. You will see that the axle lock is attached to it: this element must be disconnected from the lever. Having done this, the lever axis can be dismantled, simultaneously removing this axis from the holes of the gear shift lever and the rocker. When the axle is removed, you need to remove the gearshift lever. To do this, you will need to pull the lever itself up. Then take a screwdriver and push the plastic bushing inside the gear lever housing. You need to move this element along the shaft. Now, using a wrench, you need to unscrew several screws securing the gearshift lever housing to the car body. By unscrewing and dismantling the bolts, you can remove the housing and remove the gearbox shaft from it. Next, remove the guide rod from the shaft. Now you will see your backstage. If you see a large play in the hinges of the element that cannot be adjusted, or the hole for the lever axis is too worn, then you need to remove the mechanism and replace it with a new one. Since the process of replacing this element is not so easy, we recommend that you visually inspect all dismantled parts. If you have any doubts about their performance or reliability, it is better to replace them immediately. After replacing the backstage, all parts must be assembled in the reverse order. Don't forget to install a new shift lever clamp.
After installing the rocker, you will need to adjust the gearbox shift drive.
The gearshift lever of the VAZ 2110 dangles and plays - we eliminate the reasons
Even ardent supporters of the Russian automobile industry cannot help but be annoyed when the gearshift lever on a VAZ 2110 dangles; moreover, it also produces the most unpleasant rattling sound. Those with stronger nerves put up with it as an inevitable “side effect”; some even got used to constantly holding the gear shift knob with their own hand.
However, this cannot continue forever, especially if the vibration gets to the point that the lever begins to miss when shifting gears, confusing second with fourth and third with fifth. But in order not to take the situation to an extreme, let's talk about what to do to avoid rattling the gearbox handle.
Choosing a quality ball
You can buy any ball joint at the nearest store and drive it for quite a long time, but this is a matter of chance. Therefore, let's look at what a high-quality ball should be:
- Ball joint housing. It must be welded in two parts. The seam should be visible on one side, but not on the other.
- Ball joint pin. Must be hardened, gray in color, must have scale and no paint on it. Rolled thread.
- The ball should rotate with great effort, but not bite. It is often very difficult to turn the finger with your hands - you have to take a knob.
- The kit should include a boot and a nut.
- Remember - most VAZ 2110 owners install Track balls on their car. Also good options are BelMag, Trial-Lux and others.
Determining the cause
So, while accelerating or idling, your gear lever is shaking like crazy, making an annoying rattling noise. But no other faults related to the gearbox were found. What could be causing this?
- An engineering miscalculation by the creators of the VAZ 2110. They simply forgot to think about the fact that the metal bushing for connecting the lever to the rod “clings” to the edge of the rod while driving, which is why rattling occurs;
- You have tuned the lever using a Lada Kalina. This replacement brought you several positive aspects, and one that was not very pleasing. When the car is in motion, vibration occurs in the driveshaft from Kalina, which transmits rattling through the traction of the entire mechanism. Many who have carried out such tuning claim that even if the lever is removed altogether, it still does not eliminate rattling;
- The retaining spring could have broken, or it might not have been there at all. In this case, rattling is inevitable;
- Often the VAZ 2110 gearshift knob rattles due to wear on the engine and gearbox mounts. It is also possible that other parts responsible for eliminating chatter (damping vibrations) have worn out.
If the gearshift lever dangles, and difficulties of various kinds arise when shifting gears, then a little tuning will not help here; repair and adjustment is needed not only of the handle, but also of the gearbox itself.
Repair or replacement
Before deciding whether repair, adjustment or replacement of the link is necessary, it will have to be disassembled.
- Remove the cover on the gear shift knob;
- The machine must be installed on a jack or on an overpass (pit);
- Remove the front console, which is bolted on;
- Remove the rocker by unscrewing 6 bolts.
During this procedure, carefully inspect all parts. You definitely need to bend the boot and inspect the condition of the support, cardan shaft, and oil seal.
It may be necessary to use a rem. kit, and perhaps a more complex repair is needed.
If the bushing is deformed, it needs replacement. If the cardan has play, as well as if the hole in the lever axis is worn, a complete replacement of the link and repair belt is necessary. the kit clearly won't help.
It happens that the rocker pad is to blame for the rattling noise when changing gears. Replacing a pillow is a simple operation, but can be beneficial.
Eliminating rattling
Some people don’t even realize that eliminating the rattling of the gearbox lever in a VAZ 2110 is a completely feasible task, and does not even require special skills. Of course, you will have to tinker a little, but then being in the car will become much more pleasant. We also remember: what helps one car may not be useful for another car. Therefore, we experiment.
The simplest solution is to install a spring, which is designed to hold the gearbox lever, preventing it from dangling. This type of tuning has a particularly nice feature - you don’t need to disassemble almost anything! Many people wrap the handle with a medical tourniquet before installing the spring to make the fixation tighter.
Repair kit for the scenes of VAZ 2110
A car's transmission is one of the key components when driving. Since it transmits torque and power directly from the engine to the wheels and serves as the necessary transmission link.
The transmission structure is heterogeneous and includes many additional components and assemblies, among which the linkage (jet thrust) plays a special role. Such a detail also plays an important role in the correct operation of not only transmission systems, but also the correct operation of the engine (albeit indirectly).
The drawstring is also not a homogeneous part, as many people think. In general, the automotive environment has largely formed a misconception about this part. Car enthusiasts with little driving experience in many cases are not even aware of its existence, and more experienced colleagues sometimes attribute the rocker to the gear shift lever itself, which is fundamentally incorrect.
When typical malfunctions occur, drivers with little experience clutch their heads and think that the breakdown occurred in the gearbox, although the symptoms are characteristic exclusively of the shifter.
This part is necessary for reliable connection of the gear shift lever with the gearbox cable and reliable fixation of the selected gear.
Possible signs of malfunction
A typical malfunction of the rocker for the VAZ 2110 model is:
- Some looseness in the shift lever.
- A very large free play of the handle also indicates a breakdown of the transmission thrust.
- The most typical example is the ability to change gears without squeezing the clutch. Some may decide that in this case it is even easier to drive the car - there is no need to use the third pedal, but this situation does not last forever and leads to major damage to the gearbox.
On video, the repair kit for the VAZ 2110 wings:
Malfunctions of the backstage also include:
- Difficulty engaging first or fifth gear . This condition is caused by mechanical failure of the components of the slide, which do not allow the lever to move in the required direction;
- Independently changing gears without selecting them . If the driver has chosen first gear, and it suddenly turns out that it is now reverse gear, there is an obvious malfunction of the rocker.