Hello everyone, this article will be useful for beginners, here you will learn a detailed description of the instrument cluster of the Lada Largus car. In short, devices are needed to monitor the characteristics of a car.
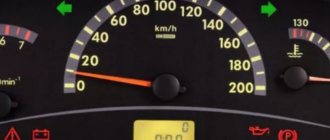
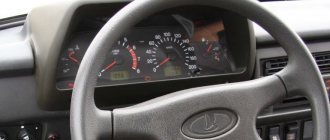
- Tachometer. Shows engine speed
- Speedometer
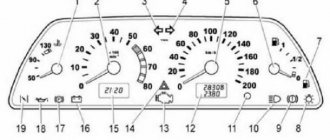
Lada Largus instrument composition icons
1 - ABS indicator. Lights up when the engine starts and goes out. Lights up when problems with the anti-lock braking system appear.
2 — Front safety pad. It lights up when a malfunction occurs, you should contact a specialist.
3 — Seat belt reminder. Lights up when you start the engine and glows if you are not wearing a seat belt.
4 — Signal lamp for disabling the front passenger airbag
5 — Heated rear window. Lights up when the rear window heating is turned on.
6 - Low beam. Lights up when the close beam mode is turned on.
7 - Distant light. Lights up when high beam mode is turned on.
8 — Rear fog lights. Lights up when the rear fog lights are turned on.
9 — Fog lights. Lights up when the fog lights are turned on.
10 — Designation electric amplifier. Lights up when there are dilemmas or when the electric amplifier is turned off.
11 - Warning lamp for door(s) not closed.
- Fuel level indicator lamp. Illuminates when the fuel level is low
- Turn signal indicators. They light up when they are turned on.
- Engine cooling water temperature indicator. Lights up when overheated.
- Engine oil pressure and level. Lights up at low level, pressure
- Warning light for the electrical engine start immobilizer system.
- Indicator for pre-heating system (glow plugs). Lights up when there is a fault.
- Battery warning lamp. Lights up when the battery charge is low.
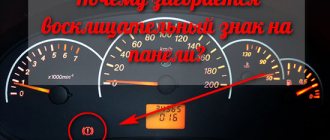
9. Parking brake warning light and brake system fault warning light.
10. “CHECK ENGINE” indicator - check the engine. Lights up when there is a malfunction in the engine control system. You should contact specialists.
- Fuel level indicator.
- Dashboard firmware version
- Cooling water level indicator.
- Clock and time
Specifications
| Characteristics | 1.6MT | 1.6MT |
| Engine's type: | Petrol | Petrol |
| Engine capacity: | 1598 | 1598 |
| Power: | 106 hp | 87 hp |
| Acceleration to 100 km/h: | 13.1 s | 14.5 s |
| Maximum speed: | 165 km/h | 156 km/h |
| Consumption in the urban cycle: | 11.5/100km | 12.3/100km |
| Extra-urban consumption: | 7.5/100km | 7.5/100km |
| Combined cycle consumption: | 9.0/100km | 9.3/100km |
| Fuel tank capacity: | 50 l | 50 l |
| Length: | 4470 mm | 4470 mm |
| Width: | 1750 mm | 1750 mm |
| Height: | 1636 mm | 1636 mm |
| Wheelbase: | 2906 mm | 2906 mm |
| Clearance: | 145 mm | 145 mm |
| Weight: | 1260 kg | 1260 kg |
| Trunk volume: | 560 l | 560 l |
| Transmission: | Mechanical | Mechanical |
| Drive unit: | Front | Front |
| Front suspension: | Independent – McPherson | Independent – McPherson |
| Rear suspension: | Semi-independent – torsion beam | Semi-independent – torsion beam |
| Front brakes: | Disk | Disk |
| Rear brakes: | Drums | Drums |
| Production: | Tolyatti | |
| Guarantee: | 3 years or 100,000 km |
Take advantage of the opportunity to save up to 70,000 rubles on your purchase by trading in your old car under the exchange program.
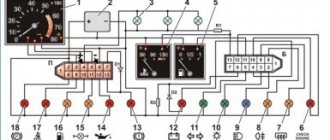
Composition of electrical devices Largus / Largus (norm)
Dear customers, in order to avoid errors when sending a composition of devices P8450000921, in the “Comment” line indicate the “Normal” or “Lux” equipment, the model of your car, the year of manufacture.
Before shipping, we check all compositions for functionality, excluding the possibility of defects.
Compositions of vehicle instruments are designed to process and display information about the multifunctional and technical condition of components, assemblies, systems and vehicle movement characteristics.
The control and measuring instruments of the Lada Largus car are combined into a single instrument cluster. It contains a speedometer, on-board computer screen, tachometer, signaling devices, and backlight lamps. The composition of the devices is not repairable, therefore, in the event of failure of the devices, it is replaced as an assembly.
1 – left overlay; 2 – screw securing the visor of the instrument composition; 3 – visor of the instrument composition; 4 – right overlay.
A distinctive design feature of the instrument composition is its unique design with a screen.
The electrical composition of the P8450000921 NORM devices makes it possible to display all the characteristics of the car that the driver needs. The composition of the instruments merged all the control and measuring instruments - backlight lamps, control lamps, indicators of the level and temperature of the cooling water, fuel level indicator, speedometer, tachometer, clock, temperature indicator, total and daily mileage counter of the car.
Decoding the functions of the Lada Largus FL on-board computer
Lada Largus FL (facelift from 2022) received a number of exterior and interior updates. For example, the car received a new instrument cluster with an on-board computer (OB) function. The capabilities of the BC are presented in the Lada Largus FL operating manual.
- The functions of the on-board computer are displayed on the information display of the instrument cluster (Fig. 3.3.1).
- The on-board computer is controlled using buttons on the end of the right steering column lever (Fig. 3.3.2).
When you briefly press the “Up” or “Down” buttons on the right steering column switch, the following information is displayed sequentially on the on-board computer display:
A – “Total mileage counter”; B – “Trip mileage counter No. 1” (from the moment the readings are reset); C – “Total fuel consumption” (from the moment of group zeroing of readings); D – “Average fuel consumption” (from the moment of group zeroing of readings); E – “Current (instantaneous) fuel consumption”; F – “Calculated (approximate) range on remaining fuel”; G – “Trip mileage counter No. 2” (from the moment of group zeroing of the readings); H – “Average speed” (from the moment of group zeroing of readings); I – “Setting tire pressure” (in a variant); J – “Set value of the speed limiter or cruise control when the speed limiter or cruise control function is turned on” (in a variant); K – “Indication of outside air temperature”; L – “Indication of the current time” (optional).
Examples of data displayed on the on-board computer display:
* In conditions of insufficient airflow to the ambient temperature sensor (in a parking lot, when driving in a traffic jam, etc.), the readings may not correspond to the actual temperature. When the ambient temperature readings are from –3 to +3 °C, the “°C” symbol starts flashing, warning the driver about the possibility of ice. Recommendations for driving in icy conditions.
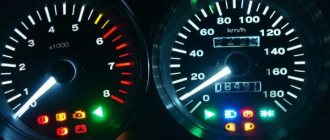
Designation of icons on the dashboard
Below is a visual representation of how the dashboard icons are interpreted.
Legend for Photo 1:
- ABS indicator. Lights up when the engine starts and goes out. Lights up when tasks with the anti-lock braking system appear.
- Front safety pad. It lights up when a malfunction occurs, you should contact a specialist.
- Seat belt reminder. Lights up when you start the engine and glows if you are not wearing a seat belt.
- Signal lamp for disabling the front passenger airbag
- Heated rear window. Lights up when the rear window heating is turned on.
- Low beam. Lights up when the close beam mode is turned on.
- Distant light. Lights up when high beam mode is turned on.
- Rear fog lights. Lights up when the rear fog lights are turned on.
- Fog lights. Lights up when the fog lights are turned on.
- Designation electric booster. Lights up when there are dilemmas or when the electric amplifier is turned off.
- Warning light for door(s) not closed.
- Fuel level indicator lamp. Illuminates when the fuel level is low.
- Turn signal indicators. They light up when they are turned on.
- Engine cooling water temperature indicator. Lights up when overheated.
- Battery warning lamp. Lights up when the battery charge is low.
- “CHECK ENGINE” indicator - check the engine. Lights up when there is a malfunction in the engine control system. You should contact specialists.
- Parking brake warning light and brake system fault warning light.
- Engine oil pressure and level. It lights up when the oil level is low. You should contact a specialist.
- Indicator for pre-heating system (glow plugs). Lights up when there is a fault.
- Warning light for the electrical engine start immobilizer system.
Emergency and service warnings:
— Warning about starting to move with low beams off;
— Warning about insufficient oil pressure when the engine is running;
— Motion warning with active handbrake;
— Warning about loss of communication with the ECM;
— Warning about starting to drive with an unfastened seat belt;
— Warning about low brake fluid level;
— Warning about lack of battery charge from the generator;
Diagnostic mode for Largus tidy
100% satisfied with the machine
I decided to update the recording of my own bortovik made when I still owned Logan!
so here it is for: To enter the diagnostic mode, you need to insert the key into the ignition switch, press the pin on the instrument panel, and without releasing it, turn the key to the ignition position, while holding the pin for several seconds until the numbers appear on the display, after which he needs to be released. The existing mode has four windows with information that appear one after the other when you press the pin slightly:
1. The 1st screen indicates the firmware version of the on-board computer;
2. The 2nd screen diagnoses the performance of all parts of the LCD monitor, including them all at once. If there is a malfunction, one of the parts will not light up. I note that one of the parts on the left on the clock display is missing on all cars, because... with both types of time designations (12-hour and 24-hour) this element is not used;
3. The 3rd screen indicates the remaining fuel in the tank with an accuracy of up to a liter and provides more accurate information than a regular graphic bar. If there is a fault of the “open circuit or short circuit” type, “- – -“ is displayed on the screen. It is important to note that the fuel level sensor located in the gas tank does not reflect the amount of fuel filled above the 50 liter limit. Those. if you filled the gas tank with 51 liters or more, then the BC in diagnostic mode will still show only 50 liters;
5. The 5th screen informs about the presence or absence of defects in the cooling water level sensors, the fuel level sensor and the fuel consumption information system. If there are no existing or stored defects, “- – – – -“ are displayed on the monitor. – Stored and existing malfunctions of the cooling water temperature sensor are displayed on the screen in the form “- – -TO” with an open circuit, “- – -TC” with a small short circuit. Malfunctions of the cooling water temperature sensor are not critical; You can not focus on the “TO” malfunction if the engine is cool. – Stored and existing faults of the fuel level sensor are displayed on the screen in the form of “-JO- -” when the circuit is open, “-JC- -” when there is a small short circuit. – Stored and existing malfunctions of the fuel consumption information system are displayed on the screen as “D- – – -” in the absence of a fuel consumption signal. Malfunctions of the fuel consumption information system are taken into account only if the car is equipped with an on-board computer. All “stored sensor faults” listed on the page are defects that were found, but which no longer appear. If there are several stored or existing defects, they are shown on the same line.
To delete stored defects from the memory and exit the self-diagnosis mode, press and hold the pin pressed for several seconds;
and here is a video taken from YouTube by our forum member Dim X :
Source: largusladaclub.ru
Do-it-yourself overexposure of buttons on a VAZ 2114
Replacing the standard button backlighting on a VAZ 2114 will require the preparation of certain tools, materials, as well as some time. To work you will need the following list of necessary things:
- soldering iron with a thin tip;
- solder;
- tweezers;
- small knife or flat screwdriver;
- LED elements of the desired color.
Which LEDs and in what quantities should I buy?
The buttons installed on the dashboard of the model in question come in old and new styles. In the first case, small light bulbs or LEDs are used as a backlight element, and in the second, boards with sealed SMD LEDs are used.
Each button is equipped with two LED elements: one is responsible for illuminating the button itself, and the second indicates the activation of a particular function. The exception is the low beam headlight button - it does not have a power indicator LED. Therefore, if you plan to replace the LEDs on all five buttons, you will need to purchase 9 backlight elements. The type of the latter can be determined only after disassembling the button. The old model requires 12 V LEDs with a diameter of 3 mm. The new sample uses elements marked 0805. When using standard LEDs, it is recommended to additionally install a resistor with a resistance of 500 Ohms to 1 kOhm along the power circuit (directly in the button), which will prevent the element from burning out.
How to remove buttons
To remove the buttons on the front console, do the following:
- Remove the negative terminal from the battery.
- We take out the plug of the on-board computer or the BC itself, if it is installed. To do this, just hook it with your finger and pull it towards you.
- We put our hand into the hole formed and feel the back of the buttons.
- Carefully press the buttons out.
- We remove the blocks with wires.
- Having completed the necessary actions with the buttons, install them in the reverse order.
Replacing the backlight of the front panel buttons
Since replacing LEDs on old and new button versions is somewhat different, each process should be considered separately.
Overexposure of old-style buttons
After removing the buttons from the instrument panel, perform the following sequence of actions:
- Pull the top of the button and remove the lid that is pressed.
- Insert a flathead screwdriver into the button and remove the inner part. You need to remove it carefully so as not to lose the springs.
- Use a multimeter to determine the polarity of the LEDs.
- We bend the leads and dismantle the LED element.
- We bend the leads of the new LEDs and insert them into the button body, observing the polarity, after which we shorten the leads with side cutters to the required length.
- Reassemble the button in reverse order.
Overexposure of new buttons
On modern buttons we change the LEDs this way:
- We disassemble the button, as in the previous paragraph.
- After opening we find a board with installed LEDs. We determine the polarity of the elements and solder them with a soldering iron with a thin tip.
- In their place, we carefully install new SMD LEDs of the desired glow color.
- We reassemble the button.
Video: overexposure of VAZ 2114 buttons
Modernization of the buttons for turning on the headlights and low beam
The buttons for turning on the headlights and low beam headlights are made as a single element. The absence of an LED indicating that the headlights are on low beam causes inconvenience to many motorists. This is due to the fact that it is often unclear whether the headlights work or not. To solve this problem, they resort to modernizing the button. In addition to the tools listed above, you will need a similar button from which the necessary parts will be removed. The finalization process itself consists of the following steps:
- Remove the button from the panel.
- Using a minus screwdriver, we pry up the keys, take them out and see that the LED is initially missing.
- We disassemble the button housing by pressing on the latches with a screwdriver. At this stage the buttons should be in the pressed position.
- We remove a couple of pins and contacts from the spare button, and then install them in the body of the element being modified.
- We take out the board with two LEDs from the spare button and replace it with the board with one LED element.
- Using a soldering iron, we connect the board to the new terminals.
- To supply power to the new contacts, we connect the contacts with copper wire according to the photo.
- Using a sharp knife or screwdriver, make a hole in the button cover.
- We assemble the part in the reverse order and install it in place.
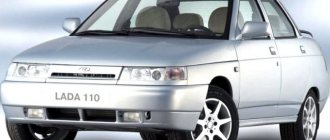
THE SAME “LOGAN”, ONLY “LARGUS”
“Everything here breathes Logan,” I involuntarily paraphrased a contemporary, as soon as I saw Largus. Although there are still differences between station wagons of foreign and Russian assembly. On the outside, for example, in addition to the unique front bumper and radiator mesh with a boat (by the way, the updates benefited the exterior), plastic linings were used on the wheel arches for the best protection of the body; The anti-gravel coating on the bottom has become thicker and approaches almost the door openings. By the way, “Largus” is protected from corrosion better than other models produced by AVTOVAZ: all body panels are galvanized outside and inside, the most modern painting equipment is already being installed in the new workshop (for now they are temporarily using capacity for the production of “Kalina”), and hidden cavities in This is the first time for local cars to be filled with wax.
One of the interesting differences in the cabin are the unique seats. With their simple forms, they resemble those installed in Logan, but they differ in both manufacturer and design. In the best configuration, which, by the way, was rolled out for testing, you can additionally adjust the lumbar support and the height of the pad. This set is completely enough to take a comfortable position. At least to those whom the Creator did not endow with an unusual figure. During the 400-kilometer run, my employee and I never remembered the seats. The best confirmation that you have a successful system under you.
As I remember, it was more spacious for me in the back seat in the Logan. No, the Largus is not cramped, but it’s not so easy on the legs. There is plenty of space on the shoulders, and even more so above the head. What's the matter anyway? The answer came from the front seat. The tall employee noted the longest longitudinal adjustment. In general, whoever doesn’t like it in the 2nd row should go to the “gallery”. I don’t remember a car that would be so comfortable and have a lot of space. Naturally, buses don't count.
Removal instructions
Sequencing
Using a Phillips screwdriver, remove the 3 screws that hold the left side of the panel near the gearshift lever. Removing the left panel at the gear lever VAZ 2114
After removing the screws, you should pull the bottom edge of this panel out of the bracket in which it is located. You need to act carefully, since there is a high risk of breaking a fragile part. The right side of the panel near the gear lever is secured with 5 self-tapping screws. They also need to be unscrewed with a Phillips screwdriver. It is better to hold the panel itself. Removing the right panel at the gear lever VAZ 2114
The panel can now be removed. During the process, you need to make sure that it does not get caught on the wires located behind it. At this stage, the mass is necessarily disconnected from the battery. If the car has a radio, it must also be disconnected from the rest of the wiring by removing the terminal block. If not, then the wires are simply removed from their regular places. It is also necessary to turn off the cigarette lighter and remove the light bulb for illuminating the ashtray (it is most convenient to remove it together with the socket). Now you should remove the handles from the heating throttle control levers. The best way to do this is to pry them off using a flathead screwdriver. The throttle handles of the heating system are pryed off with a screwdriver
Next, remove the stove fan handle. You just need to pull it towards you. Removing the fan handle of the VAZ 2114 stove
Now, using a Phillips screwdriver, unscrew the screws that secure the dashboard to the brackets. There are 4 self-tapping screws - 2 on the left, 2 on the right. Removing screws from the center panel brackets
There is a plug on the upper right corner of the dashboard. It should be carefully pryed off with a flat blade screwdriver, removed, and then unscrewed the screw located behind it. It is also necessary to unscrew the 2 screws on the trim to the right of the steering wheel (they hold the lower part of the trim). After removing the cover, the switch wires will become visible.
All these wires should be disconnected (and at the same time it is very important to remember where which wire was located, or even better - to mark them with something). Disconnecting the wires behind the central panel of the VAZ 2114
There are several bolts on the steering wheel bracket. We unscrew them. Now you need to release the lower bracket fastening
It is attached to bolts that can be unscrewed with an 8-mm open-end wrench. Unscrewing the lower fastening of the VAZ 2114 panel bracket
Use a Phillips screwdriver to unscrew the screw holding the light guide. Now you can remove the fastener that contains the vehicle heating control unit. After this, you can remove all the decorative inserts on the dashboard and the lighting for the hydraulic corrector. Now you can get to the screws on the upper and lower panel fastenings. The cross member also unscrews from the left side of the steering wheel. Once the bolts are removed, the VAZ-2114 dashboard can be removed. Complete removal of the dashboard of a VAZ 2114 car
As can be seen from this article, the designers did a disservice to car owners. On the one hand, the dashboard has really become more ergonomic. On the other hand, it has become much more difficult to remove it. But if you use the instructions suggested above and be patient, even a novice car enthusiast will be able to do this task.
ALONG THE MOTHER VOLGA
With these ideas we went out onto public roads. Yes, you don’t notice a lot when cutting circles around a high-speed oval. For example, how well the suspension handles bumps of various sizes. The smoothness of the Largus is reminiscent of the similar Logan and Sandero. Small road imperfections simply dissolve on the way from the wheels to the body, and large ones, which are scary to even look at, are happily swallowed by the suspension, allowing you not to slow down. It’s comfortable, and with all this, the car reacts correctly and completely promptly to the driver’s commands. If you expect the reactions of a sports car from a hard-working station wagon with a high center of mass and energy-intensive suspensions, stand in line behind the rest of the car. There are sensitive tilts and slight delays in steering movement, but in general the car behaves predictably, at least at speeds allowed by our Traffic Rules.
Is 105 “horses” not enough for a car with a gross vehicle weight of under two tons? Those who expect acceleration, like during the take-off run of an airplane, go to the same line where lovers of refined maneuverability stand: the economical car has never been given extra power. I’ll tell the rest that with a half load (as annoying as it may sound, it was not possible to fill all the seats), the efforts of the sixteen-valve engine are completely enough for a brisk overtaking. The elastic motor pulls out from all speeds, and perfectly selected gear ratios in the boxes also simplify the planned maneuver. True, in order to spur the Largus, due to the closeness of the gear ratios in the box, you often have to jump not one, but two steps down. At first it’s not out of habit, but automaticity comes quickly. And along with it, the fuel gauge on the instrument panel is rapidly falling. As annoying as it may sound, short gears and average aerodynamics do not contribute to a moderate appetite. With fairly economical driving on country roads, fuel consumption for various drivers ranged from 8.5 to 10 liters per 100 km.
“Largus” is the first car in which you don’t remember that it was manufactured by AVTOVAZ. He is the first whose name is not ashamed to write in Latin. And for which I am not sorry to pay my hard-earned money. But most Russians look at it with distrust, because the most fundamental question remains open - about reliability in operation. Almost everyone in recent years was badly burned by buying models from the Volzhsky Automobile Plant, and, disappointed, went to their rivals. Maybe Largus can return them?
Misha RYABOV, presenter of the project “Auto on the BO platform”:
Instructions for replacing the backlight
So, if you decide to change the color of the control panel lighting, then first of all you need to go to the store and buy diodes or LED strip.
- First of all, disconnect the terminals from the battery.
- Sit behind the wheel of a car, move the seat back, if possible, lower the steering wheel.
- The next step will be to remove the tidy itself. The dismantling process will be individual for each car, so at this stage we recommend using the service book for setting up and operating your car. It should describe in detail all the nuances of this process. But in general, this procedure usually does not cause difficulties for car enthusiasts - you just need to unscrew the bolts or disconnect the clamps, and then disconnect all the wires connected to the device.
- Then the glass is detached or peeled off. If it is fixed with glue, then a hairdryer may be required to unstick it; you should treat the tidy around the perimeter with hot air.
- When the glass is disconnected, you can check the functionality of existing lighting sources using a tester. Of course, this is necessary if you are just replacing burnt out bulbs and not all LEDs. Now we change the lamp itself - for this, first of all, the base is dismantled - it can be unscrewed by hand or with pliers, counterclockwise. This procedure is repeated in a similar way with all other light sources.
- If the light bulbs themselves are soldered to the device, then you will need a soldering iron to remove them. Unsolder all light sources one by one. In this case, you need to be very careful, since when changing the backlight and replacing lamps, you can accidentally damage the tracks on the panel.
- When all light sources are sealed off, the procedure for installing new diodes is performed. Now you just need to solder them into the seats and check their functionality.
Price issue
The cost of diode light bulbs today averages from 20 to 150 rubles per piece, depending on the type and manufacturer. As for the tape, its average price is about 100-200 rubles per meter.
Misha RYABOV, presenter of the project “Auto on the B0 platform”
Today we have reached a localization level of 62% in terms of price. The list of devices produced here (mostly in Togliatti) includes stamped body parts (almost all are supplied to Avtoframos), all chassis parts, and interior elements - from the instrument panel to rubber mats. By the end of the year, we plan to increase the localization rate to 72% by launching motor creation. Naturally, localization will affect all cars on the B0 platform that will be produced by AVTOVAZ. These are two Renault models, one Nissan, two under the Lada brand. Changes in the Largus design caused by specific Russian operating criteria will also affect single-platform vehicles. For example, the next news under the Nissan brand will receive engine protection and reinforced front suspension arms.
Source: www.zr.ru
Resetting trip mileage counters and other parameters to zero
To reset the trip mileage counter No. 1, use the “Up” and “Down” buttons on the right steering column lever to select mode B “Trip mileage counter No. 1” in the on-board computer menu and press any of the “Up” or “Down” scrolling buttons ", hold it for a while. The selected value will first flash and then reset to zero.
Resetting the trip mileage counter No. 2 is possible only together with resetting a group of other on-board computer readings: – C “Total fuel consumption”; – D “Average fuel consumption”; – G “Trip mileage counter No. 2”; – H “Average speed”.
That is, when one of these readings is reset, the entire group is reset to zero. To reset a group of these readings, use the “Up” and “Down” buttons on the right steering column lever to select any of the modes C, D, G, H in the on-board computer menu and, by pressing any of the “Up” or “Down” scrolling buttons, hold it for a while. The selected value will first begin to flash, and then all four readings in the group will be reset to zero.
In addition, if the maximum value of the trip counters is exceeded, the parameters are reset automatically.
Tuning the dashboard of Lada Samara (VAZ 2009)
On foreign cars and Russian cars of the latest modifications, internal illumination of panel instruments is installed. This arrangement of the light source produces a subdued LED flux that evenly illuminates the panel screen, and graphic characters are clearly readable.
Professional tuning of the VAZ 2009 instrument panel is not a simple replacement of “Ilyich bulbs” with LED ones, but involves a fundamental replacement of side surface lighting with matte internal LED radiation.
Ready-made dashboard tuning designs are widely available in car dealership stores. High-quality tuning can be ordered from the service department. If you wish, you can carry out this simple work yourself. Let's take a step-by-step look at the process of installing interior lighting for a panel niche.
For the upcoming work, you need to buy a special light-transmitting overlay and LED strip.
Step-by-step description of tuning the Lada Samara instrument panel
- First of all, you need to carefully remove the panel.
- We remove the indicator instruments and release the old trim.
- We make holes in the new LED strip for the flow of light.
The holes are cut with a hot knife blade or burned with a soldering iron. The number of “holes” in the overlay must match the number of measuring instruments and also correspond to their location. - Cut the LED strip into pieces.
It is recommended to stick strips in three layers onto the holes of the tachometer and speedometer, this way you will achieve stronger illumination of these important instruments; and for the remaining meters (gasoline level indicator, coolant temperature indicator) it is enough to stick one layer. - We do not change the factory location of the backlight bulbs, but glue an LED strip lightly shaded with a black marker around it. This is done to neutralize active light and produce a muted blue-blue light flux.
- We connect the contact wires.
Check the polarity of the contact. To stabilize the current flow, we power the diodes using the driver. - Having connected the 12 V power supply, we check the overall operation of the suspension and adjust the instrument needles.
Tuning the Lada Samara dashboard
Notice the difference? There is now no side light, striking from the right and left, and powerlessly not reaching the central part of the scoreboard. Smooth, internal illumination pleases the eye and clearly informs about the condition of your iron horse.
You have done the tuning of the dashboard of your Lada Samara yourself.
Source: https://remontauto-vaz.ru/page/tjuning-paneli-priborov-lada-samara