Instructions for removing the steering wheel
Removing the VAZ classic steering wheel is necessary in the following situations:
- to repair the horn button or steering mechanism;
- to align the transverse bar after the camber procedure - toe-in of the front wheels;
- in order to replace the standard steering wheel with another, more comfortable or sporty one.
Thin and uncomfortable steering wheel of the VAZ 2101-02
Reference. On classic models, the manufacturer installed 3 types of steering wheels - a “two-spoke” one with a thin bar (VAZ 2101-02), the same with a thickened cross member (VAZ 2103, 06) and a “four-spoke” one with a massive central part (VAZ 2104.05, 07).
The steering wheel on the six is prettier, but just as uncomfortable
All of the listed elements can be removed equally easily, although there are minor differences in the disassembly technology, which is carried out using this set of tools:
- 2 types of screwdrivers - flat and Phillips;
- 24 mm nut head, extension spacer and knob;
- rags.
The most comfortable steering wheel was installed on the fourth, fifth and seventh VAZ models
Also, keep some thick grease of the “Solidol” type for applying to the splined part of the shaft.
Disassembly procedure
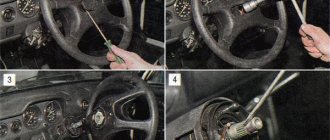
Removing the steering wheel on any classic VAZ model is performed in the following sequence:
- Place the car in a garage or on a level area so that the front wheels are as level as possible. Secure the car with the parking brake.
- Disconnect the battery from the on-board network by removing the negative terminal. During the disassembly process, you will probably touch the horn several times, which will buzz when there is tension.
- Sit in the driver's seat. In VAZ 2101-02 models, carefully remove the thin steering lining by prying it off with a flat screwdriver. The soft insert is pulled out from the VAZ 2104-07 steering wheel in the same way. Only on the “four”, “five” and “seven” this trim is located in the center (the AvtoVAZ logo is stamped on it). In the third and sixth models, the decorative trim is held in place by 2 screws, the heads of which are recessed into holes on the back side of the strip.
- Insert a 24 mm socket with a knob into the opened hole. While holding the steering wheel, loosen and unscrew the nut. Don't screw it all the way.
- Grab the steering wheel with both hands and pull it towards you with a sharp movement. If the part does not jump off the splines, tap it on the back side with your palms and in this way knock off the steering wheel.
- Unscrew the nut completely and remove the steering wheel.
Removing the decorative trim on the fourth model
Note. The nut holding the steering wheel must not be completely unscrewed for safety reasons. When you pull on a loose steering wheel, you can injure your head if it suddenly comes off. The nut will prevent the element from completely flying off the shaft.
If you unscrew the VAZ 2104 trim from the back, it will come off entirely
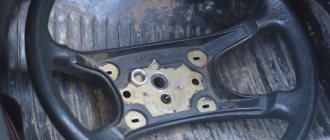
You can get to the nut of the “four-spoke” steering wheel of the VAZ 2107 in another way, by unscrewing 2 screws on the back of the wheel. Then the entire signal button made of plastic, equipped with springs, will be removed. After dismantling, take a rag and carefully wipe the shaft splines to remove old grease that has hardened in places. Now you can begin repairing or installing a new steering wheel.
On a penny, the signal key can be easily removed by hand
Advice. If you remove a part for repairs and plan to put it back, then before dismantling it is recommended to mark the end of the shaft and the steering wheel hub with a marker. This will help you immediately place the element in the correct position during assembly.
On the six, to remove the trim you need to unscrew 2 screws on the other side of the steering wheel
Photo of removing the steering wheel
Markers that will make it easier to install the steering wheel back
The steering wheel is pulled off the shaft in one sharp movement
Do not unscrew the fastening nut completely
Disassembly process on video
What steering wheel should I put on a VAZ classic?
It must be admitted that the steering wheels installed on the first modifications of Zhiguli leave much to be desired in terms of convenience and aesthetics. Of the entire line of classic models, only the “four”, “five” and “seven” had a nice steering wheel with a comfortable grip for the hands. Accordingly, the owners of “kopecks” and “sixes” sought to purchase and install the same one for themselves.
Nice factory steering wheel Lada Kalina
At the moment, there are other options for replacing the steering wheel on the “classic”:
- steering wheels from front-wheel drive VAZs of later years of production - VAZ 2115, Kalina, Priora.
- various steering wheels made in China;
- tuning sports steering wheels from famous brands - Sparco, Momo and so on.
This is what the sports steering wheel looks like on a VAZ 2106
Note. Tuning and sports steering wheels available for sale are universal. That is, they are installed on different cars using an adapter designed for a particular car model.
It is strictly not recommended to install cheap products from unknown Chinese brands on rear-wheel drive Zhigulis. The fact is that in the first VAZs the front wheels are turned by a worm mechanism, and not by a rack, as on new cars. Since there is no power steering there either, situations often occur that require the driver to put more pressure on the steering wheel. By installing a low-quality product, you run the risk of ending up with a steering wheel in your hands and a broken car - at best.
Adapter for mounting a sports steering wheel
Hence the conclusion: in addition to convenience and ergonomics, the steering wheel must meet safety requirements. These include factory parts from AvtoVAZ, properly tested, and steering wheels from well-known European brands.
Advice. Do not rush to buy products of a smaller diameter, in which the steering wheel itself is not moved forward relative to the central part. Firstly, such steering wheels are not comfortable for everyone, and secondly, out of habit, you will begin to touch the steering column switches with your hands when turning. If someone you know already has a small steering wheel on their car, test it and make sure that it will be convenient for you.
Sports steering wheel Sparco forward
Installation instructions
First of all, before assembly, lubricate the shaft splines with grease, then proceed in the reverse order:
- Place the steering wheel onto the splines, aligning the previously made marks. If the task is to level the position of the bar or install a new product, try to install it as evenly as possible.
- Place the nut inside the head, slide it onto the threads using the extension and tighten.
- Hold the steering wheel and tighten the nut with a wrench.
- Connect the battery and try driving the car 50-100 m on a road free of traffic. This way you will make sure that the steering wheel position is set correctly. Otherwise, unscrew the nut again and move the element 1 tooth to the right or left.
- Reinstall the top trim.
The position of the steering wheel can be fixed using a ruler
When installing a sports steering wheel, use an adapter for VAZ 2101-07 cars, which is a cylinder with holes for bolts (included in the kit) and a splined part in the center. It is installed simply: screw the steering wheel to the adapter, and then put it on the shaft, as described above.
Reassembly video
Signs of breakdown of the gearbox and other elements of the steering system
The steering gearbox on a VAZ 2106 very rarely fails alone. As a rule, a gearbox failure is preceded by the failure of several elements of the steering system, after which the gearbox itself breaks down. That is why it is better to consider the problems of this system as a whole. We list the most well-known signs of a breakdown of the control system on the “six”:
- when turning the steering wheel, a characteristic grinding or loud creaking sound is heard from under the steering column;
- the driver observes a constant leak of lubricant from the gearbox;
- turning the steering wheel began to require more effort than before.
Now let’s look at what exactly can cause the above symptoms and how to eliminate them.
Steering system noise
Here are the main causes of noise behind the steering column:
- The clearance on the bearings installed in the steering wheel hubs has increased. Solution: adjust the gap, and in case of significant wear of the bearings, replace them completely;
- The fastening nuts on the steering rod pins have become loose. It is these nuts that usually cause loud squeaking and grinding noises. Solution: tighten the nuts;
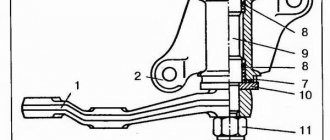
- The gap between the bushings and the pendulum arm of the steering system has increased. Solution: replacing the bushings (and sometimes you have to change the bushing brackets if they are very worn);
- The worm bearings in the gearbox are worn out. A grinding noise when turning wheels can also occur due to them. Solution: replace the bearings. And if the bearings are not worn out, it is necessary to adjust their clearances;
- loosening the fastening nuts on the swing arms. Solution: tighten the nuts after placing the car wheels straight.
Leakage of lubricant from the gearbox
A lubricant leak indicates a violation of the seal of the device.
Oil leaks are clearly visible on the steering gear housing
Here's how it happens:
- The seals on the bipod shaft or on the worm shaft are completely worn out. Solution: replace the seals (sets of these seals can be purchased at any spare parts store);
- The bolts holding the steering system housing cover have become loose. Solution: tighten the bolts, and they must be tightened crosswise. That is, first the right bolt is tightened, then the left, then the top bolt, then the bottom, etc. Only such a tightening pattern can guarantee the tightness of the crankcase cover;
- damage to the sealing gasket under the crankcase cover. If the above tightening pattern does not lead to anything, it means that the seal under the crankcase cover has worn out. Therefore, the cover will have to be removed and the sealing gasket replaced.
The steering wheel turns hard
If the driver feels that it has become very difficult to turn the steering wheel, this can happen for the following reasons:
- Incorrect alignment of the steering wheels. The solution is obvious: install the car on a stand and set the correct toe and camber angles;
- one or more parts of the steering system are deformed. Steering rods are usually deformed. And this happens due to external mechanical influences (flying stones, regular driving on uneven roads). Deformed rods will have to be removed and replaced with new ones;
- the gap between the worm and the roller in the steering gear has increased (or vice versa, decreased). Over time, any mechanical connection can become loose. And worm joints are no exception. To eliminate the problem, the roller gap is adjusted using a special bolt, then the gap size is checked using a feeler gauge. The resulting figure is checked against the figure specified in the operating instructions for the machine;
- The nut on the swing arm is too tight. The peculiarity of this nut is that over time it does not weaken, like other fasteners, but rather tightens. This occurs due to the specific operating conditions of the pendulum arm. The solution is obvious: the nut should be slightly loosened.
Installation of a sports steering wheel without an adapter on a VAZ 2104-07
If you are not too concerned about the steering column trim in the cabin, then a tuning product from the Sparco brand, equipped with a quick-release device, can be put in “four” without using an adapter. The essence of the method is to use as the last part the central part of the standard steering wheel with a wide platform and slots, and simply cut off the rest. To work you will need:
- electric drill with a 6.5 mm drill bit;
- long M6 bolts – 6 pcs.;
- hammer and core;
- grinder with a circle on iron;
- hex wrench to suit the size of the bolts;
- caliper, ruler.
The flange of the quick-release mechanism fits well on the central part of the standard steering wheel
The first step is to cut out the central part of the standard steering wheel with a grinder and carefully process the edges. Then the order is as follows:
- Having taken the dimensions from the quick-release mechanism, where there are 6 holes for fastening, mark the cut part for them. The central holes of both parts must match.
- Trim the ends of the cut element so that they do not interfere with the tight fit of the new steering wheel.
- Drill holes, having previously marked them with a core.
- Bolt the resulting part to the sports steering wheel mechanism.
Holes are drilled on the old steering wheel for a new flange
As a result, the splined part of the old steering wheel will serve as a mount for the new one. Then install and configure it as usual.
Sparco sports steering wheel with the core from the factory steering wheel
Problems when paying with bank cards
Steering wheel braid
Sometimes difficulties may arise when paying with Visa/MasterCard bank cards. The most common of them:
- There is a restriction on the card for paying for online purchases
- A plastic card is not intended for making payments online.
- The plastic card is not activated for making payments online.
- There are not enough funds on the plastic card.
In order to solve these problems, you need to call or write to the technical support of the bank where you are served. Bank specialists will help you resolve them and make payments.
That's basically it. The entire process of paying for a book in PDF format on car repair on our website takes 1-2 minutes.
If you still have any questions, you can ask them using the feedback form, or write us an email at [email protected]
Video on installing a Sparco steering wheel on the “four”
As you can see, removing the steering wheel is not difficult. Even an inexperienced car enthusiast will cope with the task within half an hour, no more. Problems may arise when installing a steering wheel that does not fit the design of the car and the adapter. In such cases, you need to take an individual approach to find the right solution.
- Author: ratico19
Rate this article:
- 5
- 4
- 3
- 2
- 1
(3 votes, average: 3.7 out of 5)
Share with your friends!
Substitutes
| vendor code | Price, rub.) | vendor code | Price, rub.) |
| Delphi 65140 | 850 | Finwhale 23593 | 800 |
| LS1219/S | 850 | VR311 | 800 |
| Bosch 17888 | 950 | TRW 26401 | 800 |
| 986487217 | 850 | GS8164 | 850 |
| HZTS 79927 | 800 | 2101-3502090 | 800 |
| Start 63275 | 800 | 21010-3502092 | 850 |
| MASTER SPORT 2103-3502093 | 850 | 030137-02332 | 800 |
The lists are presented for informational purposes. Before purchasing, be sure to consult with a specialist from a service center or auto store to determine the compatibility of the catalog article with the make/model of your car.
Required Tools
- Head for 17 and 30
- Long and powerful crank
- Mount
- Hammer
- Ratchet handle
- Regular open-end wrench 17
So, the steering mechanism (column) is located on the left side of the space under the hood of the VAZ 2106, it turns out in the very bottom left corner. It is worth noting that before you start replacing it, you first need to remove the steering shaft.
