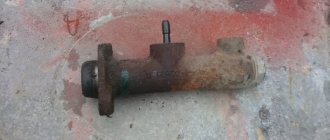
CLUTCH MASTER CYLINDER VAZ 2107
The VAZ 2107 hydraulic clutch drive is the best option for rear-wheel drive vehicles. An important role in the hydraulic drive system is played by the clutch master cylinder (MCC).
PURPOSE OF GVC
The GCS converts the force of pressing the pedal into working fluid pressure (WF), which is transmitted through pipelines using the working cylinder piston (WCC) to the fork rod. As a result, the latter rotates on a hinged support and moves the pressure bearing, turning the clutch (MC) on or off. Thus, the GVC performs two functions:
- converts pressing the clutch pedal into fluid pressure;
- transmits pressure to the working cylinder.
PRINCIPLE OF OPERATION OF GVC
To create pressure in the hydraulic system you need:
- working environment;
- cylinder with piston;
- the force that causes the piston to move.
The VAZ 2107 MS drive uses brake fluid (ROSA DOT-4 is recommended), which practically does not compress and does not have a negative effect on rubber products.
The piston moves through a rod connected to the clutch pedal. The pressure in the system is created by analogy with a medical syringe due to the fact that the piston and the hole through which the gas is ejected have different diameters. The system differs from a syringe in that the GCS provides for the forced return of the piston to its original position. In addition, the heating of the fluid and moving parts during operation is taken into account.
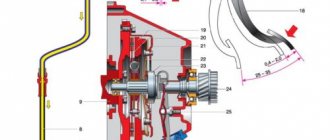
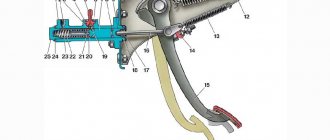
The pedal moves the pusher, which, in turn, moves the piston and creates pressure in the hydraulic drive system
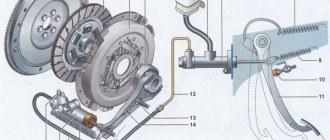
The GCS works as follows. Working fluid through hole 19 is supplied from the tank into the working cavity 22 in front of the piston. When you press pedal 15, pusher 16 moves and, resting against piston 7, moves it forward. When the piston closes holes 3 and 19, the pressure of the liquid in front of it will begin to increase sharply and will be transmitted through the pipelines to the RCS piston. The latter will turn the fork through the pusher, and its front ends will move the clutch with the release bearing (VP) forward. The bearing will press on the friction spring of the pressure plate, which, moving towards the VP, will release the driven disk, and the clutch will disengage.
When the pedal is released, the reverse process will begin. The pressure on the piston will disappear, and due to the return spring 23 it will begin to move to its original position. At the same time, the RCS piston and the fork return spring will also begin to move in the opposite direction and create pressure in front of it, which will be transmitted back to the RCS through the pipeline. As soon as it becomes greater than the force of the return spring of the GCS piston, it will stop. Through the bypass channel in piston 21, the inner surface of the floating sealing ring 20, which acts as a check valve, will be under pressure. The ring will flatten and block the bypass hole 3 in the cylinder body. As a result, a slight excess pressure will remain, which will remove all the play resulting from wear of the pushers, fork eyes and release bearing. As the temperature in the working chamber of the cylinder increases, all parts and working fluid will expand. The pressure in front of the piston will increase, and it will move back a little, opening compensation hole 3, through which excess liquid fluid will flow into the tank.
This explanation is necessary in order to understand how important it is to monitor the serviceability and cleanliness of the GVC. If the compensation hole in the piston or housing becomes clogged, the temperature inside the cylinder will quickly rise, which will create excess pressure in the master cylinder. It can squeeze out the gaskets and fluid will begin to leak. The pedal will become stiff and the O-rings will wear out faster.
LOCATION OF GVC
Since the pusher must be positioned horizontally and fit exactly into its piston, the GCS is mounted on the front partition of the engine compartment on the left side. It is impossible to install it any other way - it is screwed onto two studs welded to the partition. No additional conditions are required to dismantle it. Access to the fastening nuts, pipeline fittings and reservoir hoses is provided by simply lifting the hood lid. At the same time, the main brake cylinder should not be confused with the main brake cylinder (MBC), which is located nearby, a little further from the sidewall of the left wing. The GTS is larger and more complex; more tubes fit into it.
Symptoms of problems
The general technical condition of the car (including the brake system) can be checked using a personal diagnostic adapter - a car scanner. These types of devices are widespread and have a wide price range.
We would like to draw your attention to the budget model of Korean production Scan Tool Pro Black Edition
At a cost of about 2 thousand rubles. This scanner is capable of fully diagnosing your car (engine, gearbox, transmission, abs, srs and much more), which will pay for itself in 1-2 trips to the service station. The adapter is quite easy to use, has Russian-language software and is compatible with most cars produced in 1993. The device will also be useful when buying a used car, as it can show its real mileage and VIN.
The fluid brake system consists of many parts that can become unusable: pipes, wheel cylinders, calipers, drums and pads. Typical signs of a faulty master cylinder:
- After pressing the pedal, the car stops slowly. The reason is that the cuffs of one or two pistons have lost their tightness - they have cracked or “floated”.
- To slow down, you need to press the brake pedal hard. The phenomenon occurs due to swelling of the rubber of the piston seals.
- The brake pedal travel is too short. The fluid inside the cylinder has nowhere to go because the compensation hole is clogged. Another option is that the passage is blocked by a swollen rubber seal.
- A common symptom is pedal failure, the brakes coming on at the end of the stroke. This indicates complete wear of the cuffs; as a result, liquid penetrates behind the piston and rushes into the expansion tank - the cylinder “bypasses.”
- The pads do not release the brake discs and drums and get very hot when driving. Options: one of the pistons is jammed or the bypass hole is clogged.
The listed symptoms of a GTZ malfunction are similar to malfunctions of other elements. Pedal failure also occurs when a large amount of air enters the tubes or loss of fluid in one of the working cylinders. Sluggish deceleration and increased force on the pedal are often caused by a breakdown of the vacuum booster - a cracked membrane or a lack of tightness at the joints of the hose that takes off engine vacuum.
There are signs that clearly indicate the performance of the main hydraulic cylinder and the malfunction of other elements:
- during braking, the car pulls to the side - the problem lies in a certain circuit or wheel;
- jamming of the brake mechanisms of one wheel;
- creaking and squeaking when braking;
- heating the discs and pads on one wheel.
If you eliminate these symptoms, it will become easier to check the brake master cylinder in a garage. This also includes obvious brake fluid leaks and the knocking sound of worn calipers.
CHOICE OF GVC FOR VAZ 2107
The best option for replacement is to purchase a GCS designed specifically for classic VAZ models. Clutch master cylinders from UAZ, GAZ and AZLK vehicles are not suitable. The same applies to foreign analogues - foreign cars with rear-wheel drive are equipped with GVCs, which only highly qualified specialists can adapt to the VAZ 2107 (different sizes, different threads for pipelines, different pipe configurations). However, you can easily replace the original cylinder with a GCS from a VAZ 2121 and from a Niva-Chevrolet.
MANUFACTURER CHOICE
When purchasing a new GVC, you should focus on products from trusted Russian manufacturers (AvtoVAZ JSC, Brik LLC, Kedr LLC), the Belarusian company Fenox, which is adapted to our conditions and is affordable. The average cost of GVC is 600–800 rubles.
TABLE: COMPARATIVE CHARACTERISTICS OF GVCs OF DIFFERENT MANUFACTURERS
| Manufacturer, country | Trademark | Cost, rub. | Reviews |
| Russia, Tolyatti | AvtoVAZ | 625 | Original GVCs are made with high quality and are more expensive than analogues |
| Belarus | Fenox | 510 | Original GVCs are inexpensive, made with high quality, and are popular among drivers |
| Russia, Miass | Brick Basalt | 490 | Improved design: the absence of a technological plug at the end of the cylinder and the presence of an anti-vacuum cuff increases the reliability of the product |
| Germany | AND THOSE | 1740 | The originals are of the highest quality. The price is tied to the EURO exchange rate |
| Germany | HORT | 1680 | Original GCS are reliable and durable in operation. The price is tied to the EURO exchange rate |
| Russia, Miass | Cedar | 540 | The original GVCs do not cause any particular complaints |
Recently, there have been many counterfeits of well-known brands on the market. They can be distinguished by their low-quality workmanship and low price relative to their original analogues.
Popular manufacturers
All major car manufacturers equip them with clutch master cylinders of their own production, which are fully compatible with a particular car model and of excellent quality. But the market offers products from third-party manufacturers that are not original spare parts. Among such companies that produce clutch master cylinders for various car models from various manufacturers, the most popular are the following:
- Sachs. A German company that produces products that fully comply with the quality certificates of the following manufacturers: VW, Audi, Volvo, BMW, most domestic cars, and supplies them to Formula 1 cars.
- TRW. World leader in the production of quality clutch cylinders for dozens of different automakers. All products have quality certificates ISO 9002, MIRA, RBA, TUV.
- Metelli. An Italian company that produces products using an automated computer control system and ensures that all parameters of the products comply with the ISO 9002 quality system.
- Febi. Manufacturer of quality products certified ISO 9002.
- Herzog. A German manufacturer that produces clutch cylinders for both passenger cars and trucks, including domestic models.
- Valeo. A French company specializing in the production of high-quality components, including clutch cylinders for BMW, Ford, General Motors, as well as other manufacturers, including domestic ones.
BLEEDING THE CLUTCH
After repairing or replacing the VAZ 2107 GCS, the clutch needs to be pumped. This will require an inspection hole or overpass.
SELECTION AND FILLING OF WORKING FLUID
ROSA DOT-3 or DOT-4 brake fluid is used as the working fluid in the VAZ 2107 hydraulic clutch drive.
The hydraulic clutch system of the VAZ 2107 is filled with ROSA DOT 4 brake fluid.
RJ is poured into the GCS tank, located in the engine compartment on the front bulkhead. To correctly fill the system, before filling, you need to loosen the air bleeder fitting on the working cylinder by one or two turns and tighten it after the liquid begins to flow out without gas bubbles. The tank must be filled to the appropriate level.
BLEEDING THE CLUTCH HYDRAULIC ACTUATOR
It is advisable to use two people to bleed the hydraulic drive - one presses the clutch pedal, the other unscrews and tightens the air bleeder fitting on the working cylinder, having previously put a hose on it. You will need to do the following:
- Press the pedal firmly several times and hold it pressed.
- Unscrew the fitting and drain the liquid along with the air.
Continue the operation until all air has been removed from the clutch hydraulic drive.
VIDEO: REPLACING THE CLUTCH MASTER CYLINDER VAZ 2107
The clutch master cylinder fails quite rarely. The reasons for its malfunction may be dirty or low-quality working fluid, a damaged protective cap, or worn out seals. Repairing and replacing it with minimal plumbing skills is quite simple. You just need to follow the instructions of the professionals exactly.
Repair work
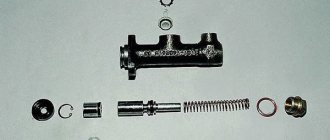
If the pedal fails, in order to avoid unreasonable disassembly of the cylinder, it is worth initially pumping the system and expelling air from there that could get in when the liquid in the tank drops below the minimum permissible level. If this does not help in principle, it is worth starting repairs. For this case, there is a repair kit for the clutch master cylinder on sale, which, depending on the make of the car, contains the main wearing parts: cuffs, return spring, rod, retaining ring, etc.
The master cylinder is located under the clutch pedal. Depending on the car model, dismantling will have to be done either from the engine compartment or from the car interior, having previously dismantled the floor covering in the driver’s area. Having removed the clutch master cylinder, we begin disassembling it, after which we need to wash all the parts
During the subsequent inspection, after disassembly, it is worth paying special attention to the body and the condition of the rod and mirror; if there are visible scuffs, this may indicate the appearance of wear in the cylinder or wear of the rod
In general, experienced craftsmen recommend changing all the parts in the repair kit, especially the cuffs.
When repairing the clutch master cylinder, it is advisable to follow some tips:
- in the event of a malfunction and subsequent repair of the cylinder, it is not possible to completely remove the fluid from the hydraulic drive;
- When washing parts, it is highly not recommended to use kerosene, diesel fuel and gasoline for this; after this, the cuffs and other rubber products may swell; the best option for washing is brake fluid;
- Before assembly, it would be useful to lubricate all parts with brake fluid; only the spherical surface of the rod in contact with the pusher needs to be treated with grease.
If faults are found that cannot be eliminated with the spare parts contained in the repair kit, then a complete replacement of the clutch master cylinder is necessary.
Do-it-yourself replacement of the VAZ-2107 clutch slave cylinder
Today we will look at how to replace a faulty clutch slave cylinder. They change it if a brake fluid leak is detected and, as a result, problems arise with gear shifting.
In our case, the brake fluid was periodically pushed outwards, the rubber cap was torn, dirt and moisture got under it - the clutch was not fully depressed, and jerks were observed when shifting.
To replace it we will need: - A set of wrenches for 7(8), 10,13,17,22 - Pliers - Metal brush - HP-shka or other “liquid wrench” - New working cylinder - Copper O-ring D12 - Brake fluid — Tube and container for bleeding the clutch
To begin, remove the release spring and cotter pin from the hole in the pusher, and loosen the hydraulic hose. We unscrew the two bolts securing the cylinder to the clutch housing.
Remove the tension spring bracket.
There is a hole in it, so we will replace it with a new one.
We remove the pusher from the hole in the clutch release fork and unscrew the cylinder from the hose, drain the brake fluid (the fluid from the reservoir can be pumped out with a syringe first).
Now you need to move the adjusting and lock nut from the pusher of the old cylinder to the pusher of the new one (or move the pusher itself). We first measure the distance from the tip of the pusher to the nut and set it in the same position.
Check for grease under the cap.
Install the new cylinder in reverse order. We fasten the hydraulic drive hose with a new sealing washer.
We insert the pusher into the fork hole and screw the cylinder to the clutch housing.
Then we bleed the clutch.
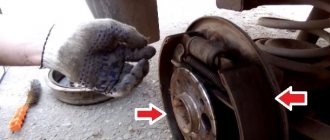
We check the free play of the fork pusher - it should be 4-5 mm. To do this, we lean the ruler against the cylinder mounting bolt parallel to the pusher. By pressing the end of the fork first forward and then back, we determine its free play.
If necessary, adjust by changing the position of the adjusting nut.
We securely lock the nut, put the tension spring and cotter pin in place.
Now we check the operation of the clutch - it should engage approximately in the middle of the full pedal stroke, the gears should engage easily, without any extraneous sounds.
If necessary, repeat the adjustment.
A short video of the process:
Good luck on the roads!
Signs of a GCS malfunction
When problems begin with the master cylinder, it most often manifests itself as a hydraulic fluid leak. When the clutch pedal begins to work poorly, the first stage of diagnosis will be a visual inspection: any leaks on the cylinder and even just slightly moistened seals are a sign of a problem that needs to be solved.
Basically, when there are problems with the cylinder, the clutch pedal begins to sink or move slowly, and the pedal “sticks” in the lower position.
Another problem with the GCS is clogging of the holes in the tank lid. For normal operation, the level in the cylinder reservoir must rise and fall freely, and for this purpose, ventilation holes are provided in the cover. If they become clogged with dirt, the hydraulic drive begins to work with difficulty: the pedal becomes stiffer and does not return well to its original position.
Replacing the VAZ-2107 clutch master cylinder
Even in winter, I began to notice that the clutch master cylinder was leaking from the pedal side through the cuff, and under the hood a wet leak was visible on the engine shield, the level of brake fluid in the reservoir began to drop sharply.
The information content of the pedal dropped a little, and the gears began to engage unstably, as the fluid was being pushed outward - the clutch was not fully depressed. In this case, immediate replacement of the cylinder is required.
So, let's buy a new cylinder.
Next, we need to arm ourselves:
- open-end wrench for 8 and 13
- socket head 13 with extension
- flat and shaped screwdriver
- WD-40 or equivalent, wire brush
- medical dropper or hose for bleeding
- rubber bulb or syringe for pumping out liquid
- small capacity
To begin with, use a bulb or syringe to pump out the liquid from the tank.
Then we disconnect the expansion tank and move it to the side so that it does not interfere. Using a 13mm wrench and a screwdriver, unscrew the pipeline nut, as well as the tank hose, and also move it to the side.
When the nut becomes sour, clean the area with a brush and spray with “liquid wrench.” We remove everything carefully to prevent damage to the pipeline and the plastic fitting of the cylinder.
Now, use a socket head to unscrew the two bolts securing the cylinder to the body and remove it, not forgetting to hold the engraving washers from falling.
This is where the liquid leaked from here.
We remove the old factory sealant from the seat and thoroughly clean the seat.
You can install a new cylinder.
But first we check for the presence of lubricant under its boot, and add it if necessary.
Everything is fine here
From the passenger compartment, we position the piston pusher in the center of the opening; it should fit into the hole in the cylinder cuff without any problems.
The tip of the pusher is visible
We coat the flange of the new cylinder with a thin layer of automotive sealant, let it dry a little and insert the new cylinder into place.
We install new engraving washers and tighten the bolts. We press the clutch pedal and make sure that the pusher is in place and the cylinder is working. We return the pipeline and hose to their place, tighten everything securely.
We fill the reservoir with new brake fluid and begin bleeding the clutch. To do this, it is advisable to have an assistant, although you can do everything alone:
1. We put one end of the dropper or hose on the clutch bleeder fitting of the working cylinder on the box, and lower the other into the jar.
2. An assistant sharply presses the clutch pedal 4-5 times at intervals of 2-3 seconds and holds it pressed. 3. Using a size 8 wrench, unscrew the fitting approximately 3/4 of a turn, liquid with air bubbles will begin to flow into the jar.
4. After the flow of liquid stops, tighten the fitting and repeat operations 2 and 3 until the bubbles stop completely. It is necessary to ensure that the liquid level in the tank is above the minimum and add it in time. 5. Wrap the fitting, remove the hose and put on the protective cap.
When pressing the pedal, we check the operation of the clutch - the moment of pressing the clutch should be clearly felt, the pedal should not “fall through”. The system is pumped similarly when replacing the working cylinder.
If everything is in order, then check the connections between the hoses and the pipeline for leaks, add liquid in the tank to the required level and close the lid. We make sure that the cuff on the lid is intact.
I decided to disassemble the old cylinder and see what was inside. First, use a small screwdriver or special round-nose pliers to remove the retaining ring.
We do this carefully, since the piston inside is spring-loaded and can fly out along with the remaining brake fluid.
We inspect the piston - surface wear and small scuffs are clearly visible, especially at the edges.
The same is true for the pusher piston; accordingly, the “mirror” of the cylinder is also worn out.
Replacing the rubber sealing rings may help, but not for long, so it is recommended to replace the entire cylinder completely, especially since it has already reached the end of its 10 years.
Do-it-yourself replacement of the VAZ-2107 clutch slave cylinder
Today we will look at how to replace a faulty clutch slave cylinder. They change it if a brake fluid leak is detected and, as a result, problems arise with gear shifting.
In our case, the brake fluid was periodically pushed outwards, the rubber cap was torn, dirt and moisture got under it - the clutch was not fully depressed, and jerks were observed when shifting.
To replace it we need:
- Set of wrenches for 7(8),10,13,17,22
- Pliers
- Wire brush
- VD-shka or other “liquid key”
- New slave cylinder
- Copper O-ring D12
- Brake fluid
- Tube and container for bleeding the clutch
To begin, remove the release spring and cotter pin from the hole in the pusher, and loosen the hydraulic hose. We unscrew the two bolts securing the cylinder to the clutch housing.
Remove the tension spring bracket.
There is a hole in it, so we will replace it with a new one.
We remove the pusher from the hole in the clutch release fork and unscrew the cylinder from the hose, drain the brake fluid (the fluid from the reservoir can be pumped out with a syringe first).
Now you need to move the adjusting and lock nut from the pusher of the old cylinder to the pusher of the new one (or move the pusher itself). We first measure the distance from the tip of the pusher to the nut and set it in the same position.
Check for grease under the cap.
Install the new cylinder in reverse order. We fasten the hydraulic drive hose with a new sealing washer.
We insert the pusher into the fork hole and screw the cylinder to the clutch housing.
Then we bleed the clutch.
We check the free play of the fork pusher - it should be 4-5 mm. To do this, we lean the ruler against the cylinder mounting bolt parallel to the pusher. By pressing the end of the fork first forward and then back, we determine its free play.
If necessary, adjust by changing the position of the adjusting nut.
We securely lock the nut, put the tension spring and cotter pin in place.
Now we check the operation of the clutch - it should engage approximately in the middle of the full pedal stroke, the gears should engage easily, without any extraneous sounds.
If necessary, repeat the adjustment.
Subscribe to the blog! Good luck on the roads!
What is a hydraulic drive
The clutch in a car is controlled using a pedal. The force from it to the disk can be transmitted in two ways:
- Using a cable.
- Hydraulic drive.
The simplest and most common is the first method, while the “seven” uses the second. Its essence, without going into details, is as follows.
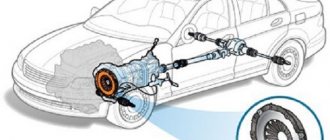
The hydraulic drive consists of two cylinders connected by tubes and hoses. It is designed so that pressing the clutch pedal leads to a significant increase in pressure in the system. It is mechanically transmitted to the driven disk and disconnects the transmission from the engine. The key elements of the system are two VAZ-2107 clutch cylinders: the main and the slave. One of them transforms the force acting on the pedal into excess pressure in the system tubes, the other does the opposite work, acting on the driven disk.
VAZ 2107: CLUTCH REPAIR IN GARAGE CONDITIONS
And again we are repairing the VAZ 2107
Clutch problems? Does it not engage completely, is the clutch pedal “soft” or does it fail altogether? All this will tell us that the time has come to repair the clutch - the master and slave cylinders! How this is done will be discussed in this article. Here you will find: instructions for repairing the clutch on a VAZ 2107 car, a useful video, tips and features of this type of work. Here you will find information on how to change cylinders, repair and bleed them.
Article: 21010-1602610-00, additional articles: 21010160261000, 2101-1602610
Order code: 010771
- You may need
- show more
Buy analogues
- Passenger cars / VAZ / VAZ-21021 drawing
» href=»/catalog/vaz-3/legkovye_avtomobili-30/vaz_2102-4/privod_scepleniya-118/#part7264″>Main cylinder Clutch / Clutch drive - Passenger cars / VAZ / VAZ-21041 drawing
» href=»/catalog/vaz-3/legkovye_avtomobili-30/vaz_2104-5/privod_scepleniya-93/#part14364″>Main cylinder Clutch / Clutch drive - Passenger cars / VAZ / VAZ-21061 drawing
» href=»/catalog/vaz-3/legkovye_avtomobili-30/vaz_2106-7/privod_scepleniya-92/#part20391″>Main cylinder Clutch / Clutch drive - Passenger cars / VAZ / VAZ-21211 drawing
» href=»/catalog/vaz-3/legkovye_avtomobili-30/vaz_2121-13/privod_scepleniya-83/#part59253″>Main cylinder Clutch / Clutch drive - Passenger cars / VAZ / VAZ-212131 drawing
» href=»/catalog/vaz-3/legkovye_avtomobili-30/vaz_21213-731/privod_scepleniya-120/#part2010227″>Main cylinder Clutch / Clutch drive - Passenger cars / Chevrolet / Chevrolet Niva 1.71 drawing
» href=»/catalog/chevrolet-125/legkovye_avtomobili-30/chevrolet_niva_1_7-1233/privod_scepleniya-139/#part2974047″>Main cylinder for clutch drive Clutch / Clutch drive - Passenger cars / VAZ / VAZ-21011 drawing
» href=»/catalog/vaz-3/legkovye_avtomobili-30/vaz_2101-3/privod_scepleniya-118/#part2780″>Main cylinder Clutch / Clutch drive - Passenger cars / VAZ / VAZ-21031 drawing
» href=»/catalog/vaz-3/legkovye_avtomobili-30/vaz_2103-106/privod_scepleniya-88/#part10905″>Main cylinder Clutch / Clutch drive - Passenger cars / VAZ / VAZ-21051 drawing
» href=»/catalog/vaz-3/legkovye_avtomobili-30/vaz_2105-6/privod_scepleniya-93/#part17470″>Main cylinder Clutch / Clutch drive - Passenger cars / VAZ / VAZ-21071 drawing
» href=»/catalog/vaz-3/legkovye_avtomobili-30/vaz_2107-8/privod_scepleniya-132/#part24647″>Main cylinder Clutch / Clutch drive - Passenger cars / VAZ / VAZ-21311 drawing
» href=»/catalog/vaz-3/legkovye_avtomobili-30/vaz_2131-73/privod_scepleniya-161/#part63933″>Main cylinder Clutch / Clutch drive - Passenger cars / VAZ / VAZ-21213-214i1 drawing
» href=»/catalog/vaz-3/legkovye_avtomobili-30/vaz_21213_214i-1240/privod_scepleniya-164/#part2989381″>Main cylinder Clutch / Clutch drive
- There are no reviews for this product yet.
Today, the next article in the series “Crystal VAZs or typical breakdowns of domestic cars” is dedicated to the “classics”: VAZ-2101, 2103, 2104, 2104, 2105, 2106 and 2107. These cars have been driving along our roads for decades and, despite Despite all the shortcomings that we will talk about, their popularity is still high.
PREPARATION FOR CLUTCH REPAIR
What you need to prepare in order to repair the clutch yourself:
- A set of keys
- Screwdriver (preferably thin)
- Special pliers-pullers
- WD-40 or similar rust remover
- Knife
- Brake fluid
- Bleeding hose
- Bleeding container
- Syringe
That's probably all that is needed.
Expanding pliers (circlip pliers)
REPLACING THE CLUTCH
Often, car owners prefer to simply replace clutch parts, since the cost is low and time can be saved significantly. Therefore, you can first consider the process of replacing clutch parts.
Replacing the clutch master cylinder
So:
- First you need to drain the fluid from the clutch reservoir. This can be done using a syringe - select the liquid and pour it into another container.
- You can also remove the hose from the master cylinder fitting and insert it into the same container. Slightly straighten the clamp on the fitting to make it easier to remove the hose. Do whatever is more convenient for you.
- After this, you need to unscrew the pipe fitting that fits the clutch slave cylinder.
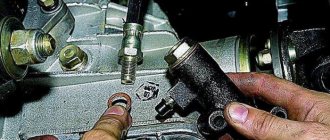
- Then spray the two studs that secure the clutch master cylinder to the car body with WD-40 or an equivalent to prevent breaking them when unscrewing the nuts.
- Take a 13mm wrench or a socket with extensions (whichever is more convenient) and unscrew the two fastening nuts one by one.
Removing the nuts securing the main brake cylinder VAZ 2107
- Remove the clutch master cylinder.
Ready! Withdrawal completed. Now let's install the new cylinder:
Advice! Before installing a new master cylinder, pay attention to the condition of the clutch reservoir flexible hose. It often happens that it cracks at the end. There are two options - either replace the hose or cut it (if the length allows).
- First you need to get the drive rod from the clutch pedal into the hole in the new master cylinder. For convenience, ask a friend to press the clutch pedal a little.
- Then install the clutch master cylinder onto the mounting studs.
- Tighten the fastening nuts with a 13 mm wrench or a socket with extensions.
- Using a 10mm wrench, connect the pipeline from the clutch slave cylinder.
- Install the clutch reservoir flexible hose.
- Fill the reservoir with brake fluid to the filler neck.
The master cylinder has been replaced.
Replacing the clutch slave cylinder
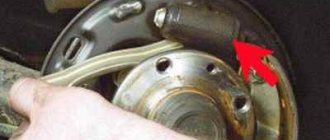
Clutch slave cylinder for VAZ 2107
Now we will change the clutch slave cylinder on a VAZ 2107:
Advice! When unscrewing and tightening the slave cylinder mounting bolts, be careful not to strip the threads in the gearbox housing.
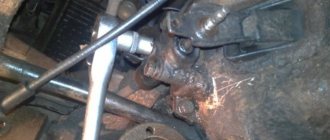
- Remove the spring from the slave cylinder.
- Next, you need to unscrew the tube that connects the main and working cylinders using a 10mm wrench. Brake fluid will flow from it - put the cap on the end of the tube, which is located on the bleeder fitting of the working cylinder.
- Unscrew the two bolts securing the working cylinder using a 13mm wrench and remove them together with the plate.
- Remove the slave cylinder.
Removed. Now we will install a new clutch slave cylinder on the VAZ 2107:
- To begin, unscrew the adjusting nuts in approximately the same way as they were set on the old cylinder. This will help you either avoid clutch adjustments altogether or reduce them to a minimum.
Clutch adjustment VAZ 2107
- Then insert the slave cylinder push rod into the transmission fork.
- Screw the two bolts together with the plate. As practice shows, it is most convenient to tighten the upper bolt first, and then the lower one.
- Connect the fluid supply tube. Screw it into the cylinder with a 10mm wrench.
- Put the spring back on.
After replacing the working cylinder, it must be bled. If both the clutch master and slave cylinders were replaced at the same time, then read the bleeding method below:
- Unscrew the bleeder fitting 1 turn.
- Wait until liquid flows out along with air bubbles.
- When the air bubbles come out, tighten the fitting until it stops.
- Put on the cap.
- The pumping is over!
Technical parameters of the seven clutch, classification and parameters
VAZ models are equipped with a single-disc clutch with a central spring
Motorists interested in which clutch is best to install on a VAZ 2107 should take into account that its type depends on the power of the power unit. The units differ in the parameters of the pressure spring, casing and dimensions of the driven disk, and the entire set consists of three elements:
- Pressure disk.
- Slave disk.
- Release bearing.
Pressure plate
On VAZ classics, two types of such mechanisms are used:
- 2103 – for cars with engines up to 1.5 liters.
- 2121 – for cars with engines up to 1.7 liters.
Externally, they are almost identical, they can easily be confused - the diameter of the disk in both cases is 200 mm. However, there are still distinctive signs:
- On product 2121 there is a mark in the form of a six-millimeter hole in one of the slots in the diaphragm spring blade.
- The width of friction linings 2103 is 29 mm, and 2121 – 35 mm.
Driven disk
To decide which clutch is best to install on a VAZ 2107, it doesn’t hurt to know that a “classic” disc is quite easy to distinguish from a “front-wheel drive” one by the bends that partially cover the damper springs. Driven disks are available in two sizes:
- 200x140 – for engines up to 1.5 liters; There are two brands: 2103 and 2107, the latter has asbestos-free linings.
- 200x130 - according to the documentation, the disk is brand 2121 and is designed for the Niva, but installation on the “seven” is also possible. In addition to its size, it features a reinforced damper with reinforced diaphragm springs.
Another noticeable factor is that the 2121 driven disc has a larger number of rivets on the linings than its 2103 counterpart.
Release bearing
The part is supplied complete and has an additional name - release clutch. For “classics”, its marking also begins with a set of numbers 2101. The bearing is visually distinguished by the presence of wire brackets, which is familiar to car enthusiasts who have replaced the working cylinder on a Lada.
A set of clutch parts for Niva can be installed on any classic car. Such parts are designed to withstand heavy loads, and therefore will last longer. The only inconvenience is that the “Nivov” basket will require a lot of effort on the clutch pedal.
CLUTCH REPAIR
Now let's consider another option - using a repair kit for the clutch cylinders - main and working.
Master cylinder
So, we have removed the main cylinder and now we begin to disassemble it.
VAZ 2107 clutch master cylinder repair
So:
- We start by removing the fitting. Use a screwdriver to remove the retaining ring.
- After which you can easily remove the fitting with the gasket.
- Now remove the rubber boot (protective cap) by simply prying it with a screwdriver or other convenient object.
- Now, using a 22 key on the other side, you need to unscrew the plug of the VAZ 2107 clutch master cylinder.
- You also need to remove the retaining ring from the boot side. This can be done using two screwdrivers, or special pliers. It is more convenient to use expansion pliers.
- Now you can easily remove all the insides of the cylinder.
Now about damaged parts and their replacement:
Clutch master cylinder of VAZ 2107 disassembled
- All rubber seals should be replaced. 2 rubber rings - on the piston and pusher rod, one on the fitting, and we also replace the protective cap if necessary.
- If necessary, replace the spring. If it is deformed or damaged.
- Also pay attention to the internal mirror of the cylinder. It should not have burrs or chips.
- If the piston is damaged or the pusher is bent, then it is better to replace the cylinder with a new one.
Assembly:
- When assembling, all parts should be washed very thoroughly.
Note! Never wash parts in gasoline or oil and do not allow these liquids to get inside the cylinder. Lubrication is carried out only with brake fluid!
- Put all retaining rings back.
- Tighten the clutch master cylinder plug tightly!
Then install the cylinder back on the car. This is how the clutch master cylinder is repaired on a VAZ 2107 car.
Working cylinder
VAZ 2107 clutch slave cylinder repair
So:
- Clamp the VAZ 2107 clutch slave cylinder in a vice and unscrew the rear plug.
- Remove the protective rubber cap.
- Remove the retaining ring from the plug side and remove all internal parts of the working cylinder.
- Using a 10mm wrench, unscrew the bleeder fitting.
About details:
- Check the condition of the spring.
- Replace all rubber seals of the VAZ 2107 working cylinder.
- Check the condition of the working cylinder mirror.
- Wipe the inside with a clean cloth if necessary.
- Clean the bleeder fitting. If the edges on it are “licked”, replace it.
Assembly:
- Wash all parts in brake fluid.
- Lubricate each part with brake fluid during assembly.
- Reassemble all parts in reverse order.
- Install the retaining ring, protective cap and plug.
Install the VAZ 2107 clutch slave cylinder on the car (see above).
Tips and tricks
When purchasing a new part, owners should remember the quality of the unit, since there are often cases when a cheap product suffers from a short service life. There are many fakes of the VAZ 2104 clutch master cylinder on the market, which are characterized by low quality workmanship and a short service life. The optimal solution is to purchase parts from the manufacturer, which in its production complies with strict standards and GOST norms. At the same time, using the identification number, it is always possible to determine the batch number in the event of a manufacturing defect.
Also, when choosing a new part, owners need to pay special attention to the quality of workmanship. There should be no backlash in some of the moving parts; the parts should maintain optimal mobility. The presence of cracks, stains of unspecified liquid, and burrs on the body is unacceptable. Also, the body, like the rest of the parts, must be numbered with the standard stamp of the manufacturer.
During the repair process, you must always keep a drain container for used brake fluid on hand. Also, before repairs, it is necessary to purchase about a liter of such a substance to make up for losses from opening the system. It is also necessary to remember that reassembling the system after repair must be done in exactly the reverse order. Otherwise, new faults may appear. Moreover, during the assembly process, all parts must also fit tightly to each other, in order to avoid breakdowns in the future.
BLEEDING THE CLUTCH FOR A VAZ 2107
For clutch performance, it is very important that there is no air inside the system. To do this, you need to bleed the clutch. This is done on the principle of bleeding the brakes. Two people will be required. So:
- Pour brake fluid into the clutch reservoir.
- Place a hose of suitable diameter onto the bleeder fitting of the working cylinder. Place the other end in a bottle (or other container) with brake fluid.
Important! The second end of the bleeding hose must always be below the liquid level in the container.
- Unscrew the bleeder fitting approximately half a turn.
- At this time, the second person, at the command of the first, presses and releases the clutch pedal.
- Repeat the last step until all the air has left the system and only brake fluid comes out without bubbles.
Important! Maintain the brake fluid level in the expansion tank!
- Next, you need to press the clutch pedal and, without releasing it, tighten the bleeder fitting.
- Put a cap on it.
Thus, we pumped the clutch and completed the repair of the VAZ 2107 clutch. The attached photos clearly show some details of the process. We really hope that this article helped you repair clutches on a VAZ 2107 with your own hands!
What reasons will indicate a malfunction?
The following signs will help you understand that the clutch master cylinder is malfunctioning:
- a sharp decrease in the level of working fluid in the tank;
- traces of leaks in the area where the working and main cylinders are located;
- a kind of “failure” when pressing the clutch pedal;
- inability to fully press the clutch pedal.
Among the main types of malfunctions noted by experts, it is worth highlighting the following:
- malfunction of the cylinder itself;
- worn cuffs or piston;
- filling the system with low-quality brake fluid, which may contain both numerous dust particles and an excess of moisture.
To eliminate the causes of the malfunction of the main element, it is time to use two methods - replace the one that has become unusable with a new one or eliminate a minor breakdown by repairing it yourself. However, it is worth understanding that only rubber cuffs and the body can be repaired, and besides, repairing components will not always give the expected result. It should also be noted that as for the boot, it also needs to be inspected for the presence of large contaminations. According to experts, it is best to completely replace the cylinder, especially since its cost does not exceed 550 rubles.
How to replace the clutch master cylinder on a VAZ 2107 yourself
Cars of the Volzhsky plant models 01-07 have a hydraulic clutch drive. The main actuator of this mechanism of the VAZ 2107 is replaced in the event of its breakdown or failure. The cylinder is secured to the engine compartment shield on the driver's side with two studs and nuts, and a reservoir with brake fluid is installed in the upper part. A pipeline is laid from it to the working unit.
FAULT DIAGNOSIS
Identifying the causes of a clutch drive malfunction begins with an external inspection and check of the master and slave cylinders. The main cause of malfunctions of these components in most cases is wear of the rubber cuffs and wear on the walls of the mechanism. In this case, the main and working drives must be unconditionally replaced; attempts to repair them rarely give a positive result.
DISASSEMBLY OF HYDRAULIC DRIVE
To perform the operation we will need:
- container for operating fluid and a large-volume syringe.
- set of wrenches and sockets;
- screwdriver and pliers.
The order of work is as follows:
- Brake fluid is pumped out from the expansion tank of the master cylinder of a VAZ 2107 car using a syringe. A rubber tube is disconnected from the drive, from which the remains are also poured into the prepared container. If liquid gets on paint surfaces, they must be wiped with a damp cloth.
- Using an open-end wrench set to “10”, unscrew the fitting of the pipeline connecting the main and working hydraulic drives.
- Using a “13” socket and an extension adapter, unscrew the nuts holding the assembly to the engine compartment panel.
- To remove the master cylinder from the studs, simply press the clutch pedal, this will move it out of place, after which you can pull it out by hand.
The work on removing the unit is completed, and you can begin installing the spare part.
INSTALLATION OF HYDRAULIC DRIVE
Replacing a mechanism involves purchasing it in a retail network or via the Internet. Installation work is performed in the following sequence:
- The clutch master cylinder of the VAZ 2107 is put on the studs and pushed all the way to the base.
- The nuts are screwed onto the fasteners and tightened with a wrench to “13”.
- The union nut of the pipeline laid to the working hydraulic drive is screwed into the main cylinder.
- The rubber tube is connected to a plastic connecting element and secured with a clamp.
- The expansion tank is filled with brake fluid, which enters the main and slave cylinders of the clutch through tubes. Replacing the fluid in the system is mandatory due to wear products.
Upon completion of installation of parts, it is necessary to inspect and check the tightness of the nuts. Replacing the main or working clutch drive of a VAZ 2107 car ends with bleeding the system.
Sources
- 7vaz.ru/remont/glavnyj-cilindr-sceplenija.html
- masteravaza.ru/transmisiya-sceplenie/remont-scepleniya-transmisiya-sceplenie/vaz-2107-remont-scepleniya-67
- zen.yandex.ru/media/vaganov/zamena-rabochego-cilindra-scepleniia-vaz2107-svoimi-rukami-5c8507d692cc5e00b42abc29
- zen.yandex.ru/media/vaganov/zamena-glavnogo-cilindra-scepleniia-vaz2107-5cba18e470da470224cb6ba5?utm_source=serp
- drive2.ru/c/509489775007236498/
- umper.guru/klassicheskie-modeli-vaz/stseplenie/glavnyiy-tsilindr-stsepleniya-vaz-2107.html
Adjusting the DAAZ 1107010 carburetor general requirements for the operation
The 2107 carburetor is adjusted according to the same principles as any other carburetor. The adjustment is carried out on the basis of standard calibration data, which contains all the parameters without which high-quality adjustment and tuning of the device is impossible. Experts advise performing these procedures at least once a year (some pros believe that adjustments and tuning should be carried out every six months if the car is used quite intensively).
Qualified carburetor maintenance consists of the following steps:
- thorough inspection of the device from the outside, cleaning and washing it;
- visual inspection of all units and components for wear;
- cleaning and washing the float, the idle system, the strainer (checking it for functionality, by the way, is required at least every 30 thousand kilometers of the “Seven”), the starting mechanism, and the jets.
After this, you can proceed directly to adjusting all of the above components.