Payment for goods and downloading of the book in electronic form (PDF format) is made on the website.
To do this, you need to find the book you are interested in and click on the “Buy” button. The price of the book is indicated on the button.
For convenience, the price on the website for residents of Russia, Belarus and Kazakhstan is presented in rubles.
For residents of Ukraine in hryvnias, and for all other countries - dollars.
After clicking on the “BUY” button, a payment window will open where you can select a payment system with which you can pay for the selected book using any bank card (Visa, MasterCard, MIR, etc.)
When you click on the “Pay by bank card” button, the Portmone payment system will open, which is the easiest way to make a payment.
In addition, the website offers four payment systems for payment:
- Yandex (payment from any bank cards, Yandex Money account, QIWI Wallet, terminals, etc.);
- Portmone (payment from any bank cards, Portmone account);
- PayPal (payment from any bank cards, PayPal account);
- WebMoney (payment from any bank cards, payment from WebMoney wallets).
Payment via Yandex Cashier
After selecting payment via Yandex, the Yandex Cashier payment system will launch, where you need to select a convenient payment method (bank card, QIWI, Yandex Money account, etc.)
After specifying payment details and confirming payment, payment for the goods will occur.
If you have a bank card in a currency other than the ruble, then the money will be debited from the card at the rate of the Central Bank of Russia at the time of the purchase.
This payment method is optimal for residents of Russia, Kazakhstan and Belarus.
Official website of the Yandex Kassa payment system https://kassa.yandex.ru
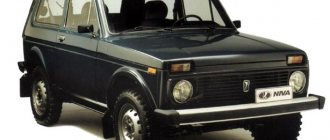
Adjusting the Chevrolet Niva clutch
Chevrolet Niva cars have a dry clutch. It is driven by a hydraulic mechanism. If the clutch malfunctions, it needs to be adjusted. Here are a few signs that require immediate diagnosis:
The appearance of all these signs indicates the presence of problems with pedal adjustment. If they are ignored, this can lead to clutch replacement and costly repairs.
Payment via Portmone
After selecting payment through Portmone, the payment system will launch, where you need to select the payment method: bank card or Portmone account.
The price in the Portmone payment system is converted into dollars at the exchange rate of the Central Bank of the country where you are located.
If you have a bank card in a currency other than the dollar, then the money will be debited from the card at the rate of the Central Bank of your country at the time of the purchase.
After specifying payment details and confirming payment, payment for the goods will occur.
Official website of the Portmone payment system https://www.portmone.com
How to adjust it yourself?
To adjust the mechanism you will need keys 10, 13 and 17, pliers and a pencil. The operation is performed on a lift or inspection pit. The work order is as follows:
- Using a 10mm wrench, unscrew the locknut of the pedal travel limiter.
- By rotating the nut, set the free play within 0.4-2 mm.
- Tighten the locknut.
Then you need to go down under the car and adjust the free play of the pusher within 4-5 mm (to unscrew the nuts, you need wrenches 13 and 17). The check is performed as follows:
- Using pliers, remove the clutch fork release spring.
- Place a pencil against the boss of the lower mounting of the working cylinder.
- Make two marks: opposite the fork and 5 millimeters to the right.
- Pull the fork all the way back, selecting the free stroke of the pusher.
- The fork should stop exactly opposite the mark on the pencil.
If the gap does not correspond to the nominal one, you need to loosen the lock nut and rotate the nut to achieve the required parameters.
When adjusted correctly, the clutch begins to disengage when the pedal travel is 25-35 millimeters.
The final check is performed with the engine running. If everything is done correctly, the gears change easily, and the car starts to move if the pedal is released approximately ⅓ - ⅔ of the stroke.
Payment via PayPal
After selecting payment via PayPal, the PayPal payment system will launch, where you need to select the payment method: bank card or PayPal account.
If you already have a PayPal account, then you need to log into it and make a payment.
If you do not have a PayPal account and you want to pay using a bank card via PayPal, you need to click on the “Create an Account” button - shown with an arrow in the picture.
PayPal will then prompt you to select your country and provide your credit card information.
After specifying the information required to make the payment, you must click on the “Pay Now” button.
Official website of the PayPal payment system https://www.paypal.com
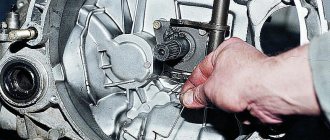
Replacing the master cylinder
New clutch master cylinder under the hood.
- Pumping out brake fluid from the reservoir with a rubber bulb
- Unscrewing the tube, removing the hose from the fitting and unscrewing the fastening nut and removing the cylinder.
- Installing a new one follows the steps in reverse order.
Do not miss the moment of fixing the pedal pusher with a fillet (notch) on the cylinder piston, pumping the hydraulic drive.
Video about clutch problems on a Chevrolet Niva
Source
Payment via WebMoney
After selecting payment via WebMoney, the payment system will launch, where you need to select the payment method: bank card or WebMoney wallet.
If you already have a WebMoney wallet, then you need to log into it and make a payment.
If you do not have a WebMoney wallet and you want to pay in another way, you need to select any of the methods that WebMoney offers and make the payment
After specifying payment details and confirming payment, payment for the goods will occur.
Official website of the WebMoney payment system https://www.webmoney.ru/
Checking clutch performance
Let's start by looking at the concept of cohesion. So, this is a mechanism whose operating principle is based on the force of sliding friction (friction clutch). It is used to transmit torque.
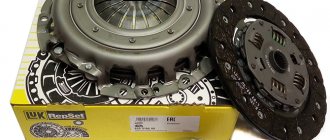
The Chevrolet Niva has a clutch closed with a central diaphragm spring, which is installed using a hydraulic drive. A reinforced clutch is also installed on this car, which has a large diameter and a powerful damper. In addition, this element has a large disk thickness. Over time, on a Chevrolet Niva this mechanism fails, requiring either adjustment or replacement. You can check the functionality in the following ways:
- Engage neutral gear and start the engine. Next, you need to wait a little until the engine warms up and depress the clutch pedal, engaging reverse gear. If the transmission is easily engaged, this means that the system is working properly. It’s another matter if you hear creaks - this indicates the need for repairs.
- An easier way to check is to switch gears in order and check for any extraneous sounds from below. If they are, then you need to immediately go to the service center.
- You can notice a malfunction of the mechanism when it starts to slip while accelerating. This also means that it’s time to show the car to the experts.
Downloading a book
After successfully completing the payment (by any method) and returning to the KrutilVertel store from the payment system website, you will be taken to the successful payment page:
On this page you need to indicate your e-mail, where access to download the book will be sent.
If you are already registered on our website, then simply follow the link to your personal account.
The book you purchased will be in your personal account, from where you can always download it.
Please note that after making the payment, you need to return back from the payment system website to the KrutilVertel website.
If for some reason you did not return back to the site and closed the payment system tab with a message about the successful completion of the payment, please let us know - we will send you a letter indicating access to download the book.
Features of the Chevrolet Niva clutch design
Clutch assembly: 1 — clutch housing; 2 - flywheel; 3 — bolt securing the clutch housing to the flywheel; 4 — driven disk; 5 — pressure disk; 6 — clutch casing; 7 — clutch release; 8 — gearbox input shaft; 9 — clutch release fork; 10 - central pressure spring.
The vehicle has a single-disc, dry, permanently closed clutch with a central diaphragm spring.
Clutch release drive: 1 — tube; 2 - main cylinder; 3 — master cylinder fastening nut; 4 — pedal bracket; 5 — clutch release; 6 — ball joint; 7 — clutch release fork; 8 — clutch release fork cover; 9 — bracket fastening bolt; 10 — bracket; 11 - working cylinder; 12 — valve for removing air; 13 — clutch pedal axis; 14 — clutch pedal; 15 — locking bracket; 16 — master cylinder pusher; 17 — bushing; 18 — locking bracket; 19 — bushing.
The clutch drive is hydraulic, backlash-free, with automatic compensation for wear of the friction linings of the driven disc. The drive consists of 2 main and 11 working cylinders, a clutch pedal, a hydraulic clutch release tube 1 and a hose.
Useful tips: To ensure a long and trouble-free clutch service, do not constantly keep your foot on the clutch pedal. This bad habit is often acquired while learning to drive in driving schools for fear of not having time to disengage the clutch while stopping the car. In addition to the rapid fatigue of the leg, which is always above the pedal, the clutch is depressed at least a little, and the driven disk slips and wears out. In addition, although the release bearing is designed to operate in constant rotation mode, when the pedal is pressed slightly, it is under increased load, and its service life is reduced.
For the same reason, we do not recommend keeping the clutch disengaged for a long time (for example, in traffic jams). If you don’t have to move away right away, it’s better to put the gearbox in neutral and release the pedal.
Clutch slipping can be easily determined using a tachometer. If while driving, when you sharply press the accelerator pedal, the speed rises sharply, and then drops a little and the car begins to accelerate, the clutch requires repair.
Clutch and its hydraulic drive: 1 — clutch release fork; 2 — bracket; 3 — working cylinder of the hydraulic clutch; 4 — fitting for bleeding; 5 — central diaphragm pressure spring; 6 — pressure disk; 7 - flywheel; 8 — damper spring; 9 — driven disk; 10 - tube; 11 — clutch housing; 12 — main cylinder of the clutch hydraulic drive; 13 — hydraulic clutch reservoir; 14 — clutch pedal; 15 — gearbox input shaft; 16 — rear bearing of the input shaft; 17 — guide sleeve; 18 — clutch release bearing; 19 — clutch release bearing; 20 — ball support for clutch release fork; 21 — front bearing of the input shaft; 22 — casing; 23 - pusher.
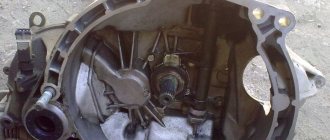
The clutch is single-plate, dry, with a central diaphragm-type pressure spring. It is located in an aluminum crankcase, bolted to the engine block and structurally integrated with the gearbox.
The clutch drive is hydraulic, backlash-free, with automatic compensation for wear of the friction linings of the driven disc. The clutch housing is connected to the flywheel with six bolts. The flywheel is equipped with three pins, which, when installed, fit into the corresponding holes in the casing, centering it. The casing is connected to the pressure plate by three pairs of elastic steel plates with rivets. This assembly (“clutch basket”) is balanced on a stand, so it should be replaced as a whole. Replacement is necessary if the surface of the pressure plate is severely worn or the spring is “settled”.
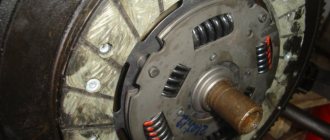
The driven disk, complete with a spring torsional vibration damper, is installed between the flywheel and the “basket” pressure plate and can move along the splines of the gearbox input shaft. The disk is replaced if the axial runout in the area of the linings is more than 0.5 mm, if they are cracked, scuffed or unevenly worn, and also if the distance from the surface of the lining to the rivets is less than 0.2 mm.
The clutch release fork is steel, stamped, located in the clutch housing and swings on a ball joint (there is a recess on the fork for it). The fork is pressed against the ball joint by a leaf spring (riveted in the middle part of the fork). The inner ends of the fork rest against the clutch release bearing and are pressed against it by a figured spring. The pusher of the hydraulic clutch working cylinder enters the hole in the outer end of the fork. The internal spring of the working cylinder constantly presses (through its pusher and the clutch release fork) the clutch release bearing to the petals of the casing diaphragm spring.
The clutch release bearing is mounted on the clutch, which moves along the guide sleeve when the clutch is engaged or disengaged. The bearing does not require maintenance or lubrication. It is replaced if the noise increases when the clutch is disengaged.
The clutch pedal is suspended on an axle in the pedal assembly bracket. A release spring is used to return the pedal to its original position. The pedal is pivotally connected to a pusher, which fits into the recess of the clutch master cylinder piston. The master cylinder is secured in the engine compartment on two studs welded to the pedal assembly bracket. The master cylinder is connected by a steel tube and reinforced rubber hose to the slave cylinder, mounted on the clutch housing using a bracket. When the clutch pedal is depressed, the master cylinder piston moves and transmits pressure through the working fluid to the slave cylinder piston, which acts through the pusher on the fork and clutch release clutch.
The hydraulic clutch uses DOT-4 brake fluid. Its supply is located in the hydraulic drive reservoir, connected to the main cylinder with a rubber hose. Under the tank plug there is a rubber corrugated diaphragm that isolates the tank cavity from atmospheric moisture and dust. To pump the hydraulic drive (when replacing its parts or changing the fluid), a fitting is provided on the working cylinder.
Clutch: 1 — centering sleeve of the clutch housing; 2 — centering pin of the clutch housing; 3 — front bearing of the input shaft; 4 - flywheel; 5 — pressure disk; 6 — diaphragm spring; 7 - casing; 8 — damper spring; 9 — driven disk hub; 10 - spring plate; 11 — overlay; 12 — clutch housing; 13 — gearbox input shaft; 14 — clutch release bearing; 15 — clutch release fork; 16 — clutch release fork cover.
The article is missing:
- High-quality photos
Source: https://manual.x-niva.net/5-transmissiya/5-1-stseplenie/5-1-1-osobennosti-konstruktsii-stsepleniya
Problems when paying with bank cards
Sometimes difficulties may arise when paying with Visa/MasterCard bank cards. The most common of them:
- There is a restriction on the card for paying for online purchases
- A plastic card is not intended for making payments online.
- The plastic card is not activated for making payments online.
- There are not enough funds on the plastic card.
In order to solve these problems, you need to call or write to the technical support of the bank where you are served. Bank specialists will help you resolve them and make payments.
That's basically it. The entire process of paying for a book in PDF format on car repair on our website takes 1-2 minutes.
If you still have any questions, you can ask them using the feedback form, or write us an email at [email protected]
Bleeding and adjusting the Chevrolet Niva clutch: step-by-step instructions
Chevrolet Niva clutch malfunctions are divided into two groups.
Some can be eliminated by adjusting the mechanism, while others require replacement of parts or the entire assembly. At the same time, breakdowns of the first category tend to quickly develop into the second.
Parts of an untimely adjusted clutch wear out quickly and require replacement. An unadjusted clutch drive causes inconvenience when driving a car - difficulties appear when changing gears or jerks when the car starts moving.
This harms the engine and gearbox. Therefore, the driver’s task is to correctly diagnose and eliminate the problem in the clutch operation.
How to replace a Chevrolet Niva clutch
If all of the above operations do not help, then there is a need to replace this device. If the system does not turn on or turns on poorly, then it needs to be replaced. This procedure requires disconnecting the clutch master cylinder from the hose, and repeating all this when installing a new one. To be more precise, the action plan is as follows:
- First the hose relaxes.
- Then the cylinder bracket is removed, then the pusher, and then the working cylinder itself.
- Next, a new unit is installed and the system is pumped.
It is difficult to call this procedure easy, so it is better if it is performed by specialists. Thus, if there is a need to replace the clutch, it is advisable to contact a service station, where this task will be completed promptly and efficiently.
Why does the clutch fail?
The clutch disc is a consumable item and sooner or later still needs to be replaced. It is impossible to repair a worn disk. The fact is that when it comes into contact with the flywheel, it begins to grind down for a while and only then the parts interlock with each other. Thus, the thickness of the clutch decreases and eventually the disc loses its function.
You can also “grind off” the clutch in a quick way. Many drivers, when starting to move, press the gas too hard and at the same moment quickly release the clutch pedal. At these moments, clutch wear increases significantly and then it will need to be replaced quite soon. Rapid disc wear is also achieved by driving quickly in low gears. At that moment, when the speed is high and the gear is selected too low, the clutch does not have time to transmit the required torque to the intermediate shaft and begins to slip. Thus, it receives additional “unnecessary” friction and wears out quickly.
How long does it last and how to extend its service life?
The “life” of the unit greatly depends on the driving style and experience of the driver and can range from 30 to 100 thousand kilometers.
To extend the life of the clutch, you must adhere to the following rules:
- Drive smoothly but confidently. You cannot suddenly release the pedal - this harms the engine, driven disk and transmission of the car. In this case, you need to quickly release the clutch. You cannot keep the pedal in a half-pressed state for a long time, allowing the discs to slip.
- Take your foot off the pedal while driving. If you don't do this, the sole will press slightly on the traction. In this case, the wear of the release bearing will accelerate, the discs will begin to slip, and the friction linings will quickly wear out.
- Try to skid less often. Attempts to get out of mud or snow by “rocking” the car greatly damage the discs and release bearing.
- Do not tow heavy trailers. The clutch of passenger cars is not designed for use as a tractor.
- And avoid a sharp “sports” start - it overloads the discs, contributing to rapid wear of the friction linings.
What actions should be taken if the clutch slips?
First, let's try to extend the life of the disk. To do this, you can adjust the pedal stroke, and accordingly change the position of the disk relative to the flywheel. For this purpose, a special adjustment device is provided in the car interior or under the hood. By tightening the corresponding nuts, we can raise the pedal, thereby pressing the clutch disc harder against the flywheel. This method is recommended only for those who have not yet worn out the friction linings on the working part of the part. Therefore, it is not recommended to use it in all cases.
The most rational and correct solution is to replace the clutch, but before that, you need to get to the garage. This must be done with extreme caution. To avoid problems, you need to drive with the lowest number of revolutions. It is necessary to start moving “under load”. This means that the clutch needs to be released as smoothly as possible, but at the same time add a minimum of gas, or even not at all. Gear shifting should be performed according to the number of revolutions prescribed by the manufacturer.
Common clutch malfunctions - why bleeding is needed
The reasons for wear of the mechanism are varied . If the friction linings are severely worn or burnt, it is recommended to replace the disc. If oil gets on the friction linings of the driven disc, this indicates that the sealing parts are not working properly. The disk is washed and the cause of the leak is removed.
There are malfunctions in which the clutch does not disengage completely . This is observed when:
- Warping or end runout of the driven disk. For minor damage, repairs are carried out. A serious problem requires replacing the drive.
- Loose rivets on friction linings. The driven disk is replaced along with all other parts.
- Warping and distortion of the pressure plate, which requires its replacement.
When air appears in the system, it is pumped . If characteristic noises appear when you press the clutch pedal or when you release it, disassemble the clutch system and repair the damage. If the master or slave cylinder is broken, the pressure fork or return spring breaks, the pedal will fall when pressed. This is observed when the hydraulic drive becomes airy, which requires pumping the system.
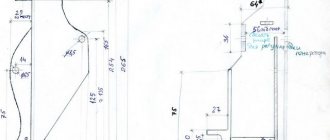
How to make a cabin for a mini tractor
If in the summer you can work on a mini tractor without a cab, then with the onset of the autumn-winter period, using the unit becomes quite uncomfortable or even impossible. Therefore, craftsmen are trying to assemble tractors with cabins in order to use this equipment all year round.
The cabin for homemade equipment is made of sheet steel according to a pre-prepared drawing. You can take the cabin from the MTZ tractor as the basis for the calculations. The following photo shows a drawing, based on which you can make a cabin yourself.
The cabin is manufactured as follows.
- First of all, you need to assemble a frame from wooden blocks according to the dimensions of the drawing.
- Next, a metal profile pipe is cut to the size of the wooden frame parts. All parts are connected by welding.
- The welded structure is placed with the roof on the ground and glass holders are welded inside the cabin.
- The roof is made of 1 mm sheet steel. The fragment can be cut out with a grinder and welded to the top of the cabin.
- The floor and side parts of the cabin are made of 2 mm thick sheet steel.
- The door frame is also welded from a profile pipe. To automatically close the doors, gas elevators can be installed on the frame.
- After installing the glass, the inside of the cabin can be lined with foam rubber and covered with leatherette.
- The cabin is installed on the frame, in a place prepared in advance for it.
In general, to better understand how to make a mini tractor with your own hands, you can watch this video, a kind of guide for beginners.
How to bleed a hydraulic drive
Clutch for Niva
The reason that the clutch does not disengage completely when you press the pedal may be the presence of air in the hydraulic drive. Pumping will help get rid of airiness. It must also be carried out when the hydraulic drive is filled with liquid. For pumping you will need:
- key to 8;
- hose;
- container for liquid;
- brake fluid.
In addition, you will need an assistant. The liquid in the reservoir should reach the bottom edge of the filler neck. Top it up if necessary. After this, a hose is put on the valve of the clutch slave cylinder. The other end of this hose is lowered into the brake fluid reservoir. Have your assistant press the pedal hard and hold it down. This needs to be done five times with an interval of a couple of seconds.
After this, open the bleeder valve to release the air. It will come out of the hose along with the liquid. This procedure must be repeated until liquid without air begins to come out.