Torque from the gearbox is transmitted to the rear wheels of the “seven” through the rear axle gearbox. The gears installed in the gearbox wear out over time and begin to make noise when moving. In this case, you will have to change or repair the rear axle gearbox of the VAZ 2107.
Signs and malfunctions of the classic rear axle gearbox
Replacing a gearbox with your own hands is a labor-intensive process, which includes not only the purchase of a new unit (quite expensive), but also time costs. Therefore, before you start, you need to make sure that the gearbox is faulty. You can define the signs like this:
- gradually accelerating the car, listen carefully and remember at what moment the noise appears;
- while driving, start engine braking (remove your foot from the gas pedal at speed), at this time listen to the gearbox and note the moment the noise appears;
- accelerate the "seven" to hundreds, switch to neutral and turn off the engine - listen to how the gearbox behaves while coasting.
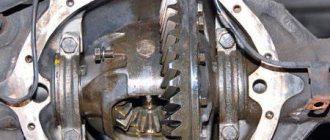
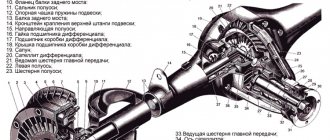
Rear axle gearbox design of a VAZ-2107
If the axle is noisy both in neutral and at speed, the gearbox has nothing to do with it. If the hum occurs only at speed (regardless of the number), repairs, or, as a last resort, replacement of the gearbox are inevitable.
When the signs are identified, it is necessary to carry out another check:
- park the car, secure the front wheels with shoes;
- jack up the rear so that the bridge hangs over (it is necessary that the wheels come off the surface);
- start the engine and accelerate the “seven” to the point at which noise occurs, while the wheels should spin without load.
If the noise has not changed, then the gearbox is clearly in good working order and it is not the cause of the trouble. Here other drive units are checked. Well, if there is no noise when driving without a load, then we are talking about worn gears of the gearbox, which make noise only when driving with a load.
The “seven” gearbox itself is a fairly reliable unit that can withstand a period of 100 to 300 thousand mileage, and there is no need to even look into it. Gears, gear spacer, differential adjustment - all these problems arise during improper operation:
- the use of oil with a low viscosity level, as well as failure to comply with the terms of its replacement;
- operating the “seven” with an amount of oil insufficient for this;
- During movement, the bridge is subject to extreme loads (frequent and unsuccessful slips).
Practical way to determine
The most accurate way to determine the gear ratio is to count the number of teeth on the drive and driven gears. Then the larger number is divided by the smaller number, which gives the desired result. For example, in the domestic model VAZ-2106, the number of teeth on the drive shaft is 41, and the number of teeth on the differential driven gear is 11. As a result, dividing one number by another, we get: 41: 11 = 3.9.
This method of determination is the most accurate, but at the same time not at all practical. Because for this option it is necessary to disassemble the gearbox and get the necessary parts. And this is not only inconvenient, it is always expensive.
Differential device
The planetary gear is mounted on the differential housing. The differential consists of two axle gears, two satellites and a pin. The main, most common differential malfunctions are wear of the pinion pin (play) and wear of the splines on the axle gears.
On a car, the play of the pin of the satellites can be determined by turning the driveshaft by a quarter or more; if there is no play, then the shaft practically remains in place when you try to turn it in one direction or another.
It's also worth noting that there is never any noise coming from the differential. When moving forward (in a straight line), the differential rotates as one unit and it turns out that there is simply nothing to make noise there.
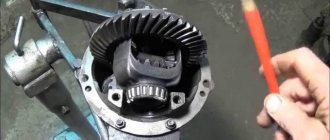
The cause of noise from the rear axle gearbox when gas is added and the noise disappears after releasing gas is (almost 99.9%) wear of the teeth of the main pair. This is clearly visible on the removed gearbox. The forward side of the teeth has significant wear, while the reverse side shows little wear.
If, after disassembling and troubleshooting the parts of the main pair, wear of the teeth is detected, then no repair will help and it will simply be a waste of time and money. Only the main pair needs to be replaced.
How to determine a breakdown
The cost of the VAZ-2107 gearbox is very high, and repairs are difficult. Not every driver can handle servicing this mechanism. Therefore, before starting work, you need to make sure that it is this gearbox that makes the noise. Follow these steps:
- On a flat stretch of road, accelerate from 20 to 90 km/h. Listen for any strange noises coming from the rear of the car. Do this carefully, acceleration should be smooth.
- Then you need to release the gas and apply engine braking. Pay attention to whether any extraneous sounds appear from the rear gearbox.
- After this, accelerate the car to 100 km/h, turn on neutral speed and turn off the engine. At the same time, while the car is moving by inertia, note for yourself whether any extraneous noise occurs.
Adjustment and installation of the VAZ 2107 gearbox
Main pair engagement depth adjustments
In this case, it is necessary to select the thickness of the adjusting washer.
So: Instead of the device, we install the “original” shank and tighten the nut until it stops lightly, leaving a gap. The differential with planetary gear assembly, bearing caps are installed and their mounting bolts are tightened.
When replacing the shank oil seal, a number of incorrect actions are allowed, which ultimately lead to premature failure of the gearbox. Before releasing the shank nut, according to the technology for performing the work of replacing the oil seal, it is necessary to remove the axle shafts (which is almost never done, since the amount of work will increase many times). Although according to the price list, the removal of the axle shafts will most likely be included in the list and a fee will be charged for this, since this is required by the plant’s technology for replacing the oil seal. This is a necessary condition, since the axle shaft will create resistance when tightened and correct adjustment will simply be impossible to achieve.
Before releasing the shank nut, it must be secured against turning and the tightening force of the nut must be checked with a torque wrench, around 12 kgf. Before installing the oil seal, if its outer surface is not rubberized, then you need to use a sealant to guarantee it. Thus, a mark of 0.15 mm on the gearbox stocking will be sufficient to pass oil through the outer surface of the oil seal.
Back to assembly...
The adjusting nuts are installed, and the gap on the main pair is pre-selected (the final working gap is 0.08 to 0.12 mm). Then paint is applied to the teeth of the planetary gear from an aerosol can and, using a shank, it is necessary to make several movements in different directions in order to fix the contact spots in the paint.
Read, it may come in handy: How to independently restore the effectiveness of the handbrake
Now, having turned the planet gear back, you can clearly see the contact patch on its teeth with the teeth of the pin. The contact patch (in this case) shows that the adjusting washer on the shank is thicker than the required thickness. We slightly tighten the shank nut, thereby moving its bearing, which makes it possible to move the gear teeth towards each other, that is, as if “reducing” the thickness of the adjusting washer. Using the differential bearing adjusting nuts, we set the approximate gap (reducing it slightly).
Then we again apply paint to the teeth of the planetary gear and again begin to rotate the shank (or gear) in different directions to print the contact patch between the teeth. It can be seen that the contact patch has risen a little, but still not enough and it is necessary to tighten the shank nut a little again. Similar actions with paint and turning the gear must be carried out until the contact patch is located exactly in the middle of the teeth, and the sound of the turning teeth becomes quieter.
After correct (final) adjustment, the sound will be almost inaudible.
Remember to tighten the differential bearing adjusting nuts every time you tighten the shank nut. As a result, the contact patch was located exactly over the entire surface of the teeth. It should be noted that this is the condition for the location of the contact patch for old (working) pairs. For new main pairs, the contact patch, as mentioned above, should be located in the center of the teeth.
Further. The planetary gear mounting covers are released and the differential is removed. The shank nut is unscrewed and removed. Since the shank was installed only with a bearing without an adjusting washer, there was a gap between the bearing and the shank gear where the washer would fit. This gap is measured with a set of feeler gauges, thereby calculating the required thickness of the adjusting washer.
It turns out, as in the case of using instruments and accessories, the size for the required adjusting washer was also 3.36 mm. The shank bearing is removed, an adjusting washer (3.36mm) is installed, the bearing is put in place and the gearbox is assembled. The shank is installed, the shank nut is tightened, min. 12 kgf. The differential with planetary gear is installed, the covers and bolts are tightened, but not completely.
By the way, the lids should not be mixed up. The adjusting nuts of the differential bearings are installed and the gap on the main pair is pre-set. Then the differential cover bolts are finally tightened. The gap in the main pair is finally adjusted and the adjusting nuts are secured.
The gearbox parts are assembled in the reverse order of disassembly. You can press in the bearing rings using a hammer and a special tool (a socket wrench head will do).
Adjusting the VAZ 2107 gearbox
AUTOFIZIK.RU / auto repair
We assemble the main gear in the reverse order of disassembly, lubricating the bearings and gears with transmission oil.
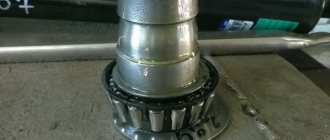
Having installed the drive gear in the gearbox housing,... ...with a torque wrench, tighten the flange nut with a torque of 16–20 kgf.m, while the gear must be rotated for proper installation of the rollers in the bearings.
We install an indicator with a division value of no more than 0.01 mm on a tripod, resting its leg against the end of the flange...
...and moving the shaft by the flange, we measure the axial play of the drive gear.
To eliminate play, remove the spacer ring installed on the gear shaft (see Dismantling the rear axle) and measure its thickness with a micrometer. We select and install a new spacer ring. It should be thinner than the amount of play removed and additionally thinner by 0.05 mm - if the drive gear bearings are new or by 0.01 mm - if the bearings are left the same. If there is no axial play of the drive gear, use a special torque wrench with a scale of up to 0.5 kgf.m to check the moment of resistance to shaft rotation. With proper adjustment, the resistance moment should be 15–20 kgf.cm for new bearings or 7–10 kgf.cm if the bearings are left the same. With sufficient accuracy, the moment of resistance can be measured using a household steelyard...
...hooking its hook onto the hole in the flange.
In this case, the required values will be less - 3.8–5 kgf and 1.8–2.5 kgf, respectively. If the moment of resistance is greater, we change the spacer ring to another one, 0.01–0.02 mm thicker; if it is less, we select a ring of smaller thickness accordingly. Before assembly, the bolts for fastening the parts of the differential box and the bolts for fastening the driven gear, as well as their threaded holes, are degreased and coated with anaerobic sealant. We pay special attention to the cleanliness of the end mounting surfaces of the gears and the gearbox; the slightest contamination or nicks are unacceptable.
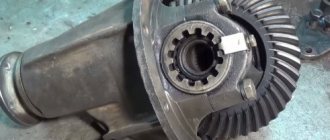
When installing the driven gear on the gearbox, we center it using long M10×1 bolts (you can use bolts from old connecting rods).
When installing the driven gear on the gearbox, we center it using long M10×1 bolts (you can use bolts from old connecting rods). Using adjusting nuts, we tighten the differential bearings with a slight tension, while turning the gear in one direction or the other so that the bearing rollers take the correct position.
To measure the lateral clearance in the meshing of the final drive gears, we attach an indicator to the rear axle housing by moving its probe to the top of the tooth on the outside of the driven gear.
The gap should be 0.15–0.20 mm. Measurements should be repeated on at least six teeth in opposite zones of the crown. To reduce the gap (using a screwdriver or a thin steel rod), loosen the adjusting nut on the side opposite the driven gear and tighten the other. You need to unscrew one nut and tighten the other by the same amount, guided by the grooves of the adjusting nuts. In this case, each unscrewing of the adjusting nut must be completed by tightening it slightly. For example, to loosen a nut by five grooves, unscrew it by six, and then tighten it by one groove. This will ensure that the bearing outer race is in constant contact with the nut and thus ensures that it remains in place during operation. To increase the gap, repeat the entire procedure in reverse order. After adjusting the lateral clearance in the engagement, we check the axial play in the differential bearings, for which:
...we fix the indicator on a tripod, resting its probe against the end of the driven gear. By rocking the gear in the axial direction, we measure the play in the differential bearings.
Using an adjusting nut located on the opposite side of the driven gear, we set the axial play to 0.035–0.055. Next, by tightening the nut, we set the bearing preload: 0.1 – when the bearing mileage is less than 10 thousand km; 0.05 – with a mileage of more than 10 thousand km. Turning the nut one notch corresponds to “compressing” the bearing by 0.03 mm. Once adjusted, tighten the bearing cap bolts and install the locking plates (see Rear Axle Disassembly) and check the side clearance again.
ATTENTION Before final tightening of the cover bolts, turn them out one by one and apply anaerobic sealant to the threaded part.
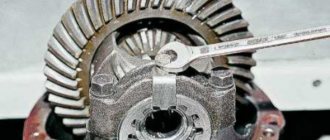
Adjusting the final drive according to the contact patch of the teeth is an effective way to adjust the gear mesh. It also allows you to check the quality of adjustments made by other methods.
Apply paint, preferably bright paint, to the teeth of the driven gear.
We turn the drive gear flange several times in both directions, while simultaneously slowing down the driven gear until the paint wears off at the points where the teeth contact. We inspect the contact spots on the driven gear teeth from the convex and concave sides. If the contact patch is located at the top of the teeth, it is necessary to increase the thickness of the adjusting ring at the drive gear, and if at the base, reduce it. If the contact patch is shifted to the center of the gear, it is necessary to increase the gap between the driven and driving gears, and if outward, reduce it. After adjustment, we install the gearbox in the rear axle, while applying a thin layer of oil-resistant sealant to the mounting bolts and flange. Having assembled the rear axle and filled it with oil (see Changing the oil in the gearbox), we test the gearbox on the move. To do this, we travel at a speed of 60–70 km/h for 20–30 minutes. The temperature of the crankcase neck should not be higher than 95° (water drops should not boil). Otherwise, it is necessary to reduce the preload of the pinion bearings.
Contact patch in final drive gears
A – forward sides; B – reverse sides;
1 – correct location of the contact patch;
2 – the contact patch is located at the top of the tooth – to correct it, move the drive gear towards the driven gear;
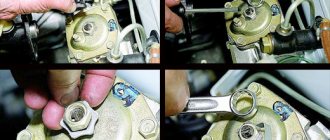
Checking the serviceability of the shank oil seal
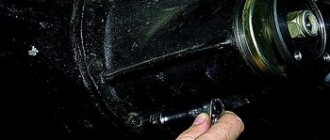
The first sign that it is necessary to replace the shank oil seal on a VAZ 2107 is the presence of traces of lubricant, dust and dirt on the outer part of the rear axle. Determining the presence of leaks on the rear axle is not difficult. To do this, you need to climb under the car and inspect the bridge.
If the oil seal is worn significantly, a puddle of oil may be found under the car. If the problem is not resolved in a timely manner, oil may leak out of the bridge, which will lead to its rapid breakdown. Despite the fact that the cuff is a small part in a car, its serviceability plays a very important role.
Important nuances in work
- When driving the oil seal using a mandrel, do not overdo it. Apply gentle blows and control the depth of the oil seal. If you hit it hard, you can easily damage the oil seal;
- Before installing the oil seal, lubricate the rim and sealing edge with fresh oil;
- Before installation, inspect the flange for wear in the area where the sealing lip of the oil seal meets. If there is a “groove,” the flange must be replaced.
As you can see, the process of replacing the VAZ 2107 gearbox seal is quite simple and does not take much time. The most important thing in this job is to properly tighten the rear axle flange nut.
vote
Article rating
“Quiet, the operation is underway!” or Replacing the rear axle gearbox seal on a VAZ 2107
The sequence of work when replacing the gearbox seal is as follows:
- We measure and record the moment of resistance to rotation of the flange (the axle shafts must be removed!).
- Unscrew the flange nut.
- Remove the flange from the shaft splines.
- Using expansion pliers, remove the oil seal. If you don't have pliers, you can pry it off with a screwdriver. Be careful not to damage the surface of the socket.
- We inspect the flange. If its surface has a pronounced groove in the place where the working edge of the oil seal rubbed, then before installing the new oil seal, insert a washer 1 mm thick into the socket. If the flange is damaged on the working surface, replace it with a new one.
- Lubricate the outer surface of the oil seal with lithol and carefully drive it into the crankcase socket using a mandrel of suitable diameter. If there is no mandrel, press in the oil seal by evenly tapping the end along the circumference of the outer diameter. Make sure that there are no distortions - the working edge should be strictly perpendicular to the shaft axis.
- We inspect the lead-in chamfer on the flange. It should not have defects that could damage the working edge. We install the flange, avoiding sudden movements and impacts, so as not to knock the spring off the oil seal. Before installation, you can lubricate the flange chamfer with transmission oil to make the process easier.
- We tighten the nut, periodically checking the moment of resistance to rotation of the flange. Remember that at the end of the tightening the resistance in the bearings increases much more intensely than at the beginning. The moment of resistance to rotation should be 1–2 kgf.cm greater than what we recorded before unscrewing the nut. In any case, if the moment exceeded 9 kgf.cm, and the bearings in the bridge were still old, remove the flange again, take out the inner ring of the bearing and change the spacer sleeve. If the bearings are new (new means they have not traveled a single kilometer, because after a hundred kilometers they can be considered old for adjustment purposes), then the normal moment of resistance to rotation after tightening the nut for them should be in the range of 16–20 kgf. cm. Replacement of the rear bearing affects gear alignment, so please refer to the appropriate instructions for this procedure.
To prevent self-loosening, the flange nut has a special plastic insert, which, when crushed against the thread, creates additional resistance both when screwing and unscrewing. As a rule, such nuts can withstand up to ten unscrewings without losing their locking properties. If in doubt, get a new nut.
We reinstall the axle shafts and brake drums, screw on the driveshaft, and fill in the oil. We make a test drive and if everything is in order, we enjoy life, until we suddenly find a treacherous spot under the bridge again...
Read, it may come in handy: Replacing rear brake pads: which ones are better, how to open and install the spring, instructions with photos and videos
Video: How to carry out work on a VAZ 2107
What tools are needed for removal
In order to make repairs, you need to remove the rear axle. To do this you will need the following tools:
- Socket and open-end wrenches.
- Punch and chisel.
- Hammer.
- Bearing ring puller.
- A simple pencil (or better yet, a core).
- Torque wrench.
- Set of probes.
- Container for draining lubricant.
- Calipers.
It is advisable to carry out repairs by placing the car on a viewing hole or lift. But if there are no such amenities, you can raise the entire rear part as much as possible above the ground. Just make sure that the front wheels are secured as securely as possible.
Self-locking differential
The most common way to increase a car's cross-country ability is to install a self-locking differential. The main advantage of this device is that it prevents wheel locking “forever”. This is important because preventing lockup from engaging when not required helps protect the axle shafts from critical loads.
There are the following types of differential locks:
- Disc - implemented through the use of friction clutches. These clutches come into action as soon as the wheels begin to rotate at an uneven speed. The disadvantage of this mechanism is that it requires the use of expensive gear oil, and also requires quite frequent adjustment work to set up the unit. This is far from the best mechanism for a VAZ 2107 car.
- Viscous coupling blocking - the operation of such a device is based on the use of sticky discs immersed in a special liquid. It hardens when heated, allowing the gears to engage—that is, the differential locks. The liquid heats up when the angular speed of the wheels on the axle changes (when the speed of rotation of the wheels becomes different). The disadvantage of this mechanism is that they require complete sealing of the assembly, and work effectively only during short-term slipping.
- Screw locking or worm locking is the best option for automatic locking for the VAZ 2107. The mechanism is implemented using worm screws, which rotate when the car drives in a straight line, and when the angular speed of the wheels changes, they shift into grooves, thereby locking the differential. As soon as the car gets out of the mud captivity, the blocked mechanism resumes its normal operation by moving the worm screws to their places.
- Planetary - the operating principle is similar to a worm circuit, only instead of gears, balls are used. Due to the balls, the wheels are blocked, and they come into operation when the traction force between the engines and the axle changes. Compared to a self-locking worm gearbox, a planetary gearbox costs about 2 times less.
In addition to automatic differential locking, there is also a forced one, which is activated if necessary.
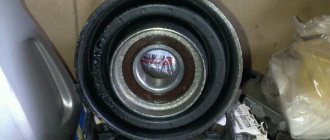
Disassembling the unit
To disassemble the gearbox, you will need to do the following:
- Unscrew the shank securing nut.
- Remove the flange, then remove the drive gear along with the adjusting rings.
- Remove the oil seal, inner race on the bearing and oil deflector.
- Using a puller, remove the outer rings from the bearings.
- Disassemble the drive gear along with the differential mechanism. Subsequently, the spacer sleeve must be replaced.
When disassembling the mechanism, be sure to mark the bearing caps so that they can be installed in the same way during reassembly. It is recommended to use a pencil or core to make marks. Label the right and left covers to avoid confusion during installation. It is advisable to mark these covers using a core.
Using a drift and a hammer, you need to remove the separator and the inner rings. Please note that you should not knock too hard. The rings are knocked out by lightly tapping in a circle. If you hit only one point, the ring will not come out. When repairing a rear gearbox, the bearings or the main pair are usually replaced. These are the most vulnerable elements of the system.
Assembly procedure
After the repair has been completed and all the damaged elements have been replaced, it is necessary to reassemble the rear axle and make sure that the gearbox no longer makes noise when driving.
The process looks like this:
- the new node is fixed in the place intended for it;
- return the axle shafts to the bridge;
- the gear flange is attached to the cardan;
- install wheels and brake drives.
It is necessary to test the car both at low speeds and at high speeds. First of all, leaving the car in neutral gear, press the gas. Then accelerate smoothly, and then turn off the engine. In a situation where the noise is still heard, an unambiguous conclusion should be drawn: you made some mistake or the reason was not in the gearbox.
Replacement procedure
Before proceeding with dismantling the gearbox, drain all oil from it. Remember - never reuse old grease.
In order to free the rear axle, put the car in neutral.
- raise the rear with a jack;
- The cardan joint, carefully held with a pry bar (so that it does not turn during the process), is disconnected from the drive gear;
- unscrew the 4 nuts securing it;
- taking a flat screwdriver, disconnect the flange;
- the cardan is suspended on a rope, secured to the bottom of the car;
- twist the nut that secures the drive gear;
- remove the washer;
- the flange itself is dismantled;
- turn off the brakes and unscrew the wheels.
Since it is impossible to replace the gearbox without removing the axle shafts, dismantle them too.
After this, all that remains is to remove the gearbox itself. It is disconnected from the beam by unscrewing 8 bolts.
Whatever the reason forces you to disassemble the rear axle, always check the condition of other moving elements along the way. As previously noted, oil seals most often become unusable.
The main bearings also often wear out due to high loads. If visible defects are found on these elements, they must be replaced. By the way, this element is designed to ensure the correct gear ratio of the power unit. For those who intend to start tuning their “seven”, it is useful to know that installing a superior gear directly into the gearbox allows you to lower the above-mentioned indicator and, therefore, increase the speed. For 2107, the highest allowed number is 4.4.