Driving at high speeds with broken universal joint crosspieces does not go without consequences. The rear axle gearbox on the classic and Niva is designed in such a way that when the car moves forward, the shank seems to be unscrewed from the engagement of the main pair. The drive gear of the main pair (also known as the shank) rotates on two bearings: front and rear. The distance between them is elastically fixed by the pretension created by the spacer sleeve when the shank nut is tightened. The vibration of the cardan, transmitted to the rear axle gearbox, gradually unscrews the shank nut. Radial play appears in the shank - especially on the front bearing, because When moving forward, the shank is unscrewed from the joint of the main pair and the front bearing is freed for play. Radial play wobbles the unfixed spacer sleeve and oil flinger washer, gnawing out metal fragments that fall into the tapered bearing. After the fragments cut “patterns” on the rollers and bearing race, noise begins, which continues even after the shank nut is tightened or the spacer is replaced. In theory, in such cases, repair of the rear axle gearbox is required. Repair with complete disassembly, troubleshooting and assembly. The last stage is not performed by anyone in a city of millions at a reasonable price. Everyone just replaces the gearbox with a new one and moves on.
Replacing the front shank bearing.
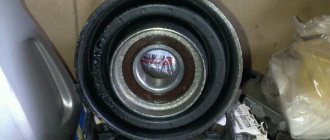
I decided to go a different route. Replace the front tapered shank bearing without disassembling the gearbox. I calculated the distance between the shank and the front bearing race, which was exactly 13 mm. It is necessary to select a puller into this distance, the clamping tab of which can squeeze through. We searched for a long time at the service station, but found a puller with a suitable jaw width size - 13 mm. Only the puller was external, but we managed to twist the legs for internal removal. We started working with this tool.
The flanges were uncoupled. We tightened the nut, took out the bearing, bushing and washer.
Now all that’s left to do is pull out the outer race of the front shank bearing.
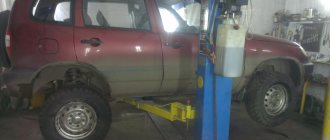
We remove the gearbox to replace it, repair it, or replace the rear axle beam. We hang up the rear axle.
Drain the oil from the rear axle housing (see here).
We remove both axle shafts (see here).
We disconnect the rear propeller shaft from the rear axle gearbox flange (see here).
Holding the gearbox housing, use a 12mm head to unscrew the eight bolts securing it to the rear axle beam.
We remove the gearbox...
...and a sealing gasket. Install the gearbox in reverse order. Before installing the gearbox, clean the mating plane of the beam. Install a new sealing gasket. Before tightening the bolts securing the gearbox to the rear axle beam, apply sealant to the threads of the bolts.
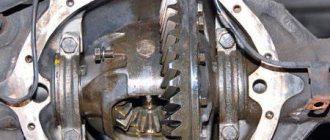
Disassembling the rear axle gearbox
Before removing, clean the gearbox from dirt. We install the dismantled gearbox on a workbench.
Using a 10" wrench, unscrew the bolt securing the locking plate of the adjusting nut of the right bearing of the differential box... |
...and remove the plate. |
Similarly, remove the locking plate of the left bearing adjusting nut.
Using a center punch we mark the location of the differential box bearing caps on the gearbox housing.
Using a 17mm spanner, unscrew the two bolts securing the right bearing cover of the differential box...
...and remove the bolts.
Remove the right bearing cover.
Remove the adjusting nut...
...and remove the outer race of the differential box bearing.
Similarly, remove the cover, remove the adjusting nut and remove the outer ring of the left bearing of the differential box.
If we do not change the differential box bearings, then we mark their outer rings so as not to mix them up during assembly.
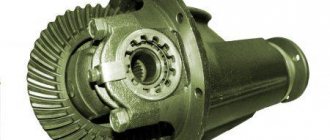
Remove the differential box assembly with the main drive driven gear, inner rings, cages and bearing rollers.
From the gearbox housing we remove the drive gear assembly with the adjusting ring, inner ring, separator and rear bearing rollers and spacer sleeve.
Remove the spacer sleeve.
By striking with a hammer through a drift on the inner ring of the rear gearbox bearing,...
...remove the inner ring with the separator and rollers.
Remove the drive gear adjusting ring.
We remove the oil seal from the gearbox housing socket (see here).
We take out the oil deflector...
...and the front bearing inner ring with cage and rollers.
Use a drift to knock out the outer ring of the front bearing of the drive gear...
...and take it out.
Turning the crankcase over, similarly knock out the outer ring of the rear bearing of the drive gear.
To disassemble the differential…
. Use a puller to compress the inner ring of the differential box bearing.
If there is no puller, insert a chisel between the end of the inner bearing ring and the differential box.
By striking the chisel, we move the inner ring of the bearing.
Insert two powerful screwdrivers (or mounting blades) into the resulting gap and press together...
...inner ring of the bearing with cage and rollers.
Similarly, we press the inner ring of the other bearing.
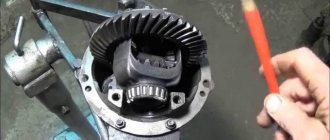
Clamping the differential box in a vice with soft metal jaws,...
...using a 17mm spanner, unscrew the eight bolts securing the driven gear to the differential box.
Using a hammer with a plastic striker, we knock the driven gear off the differential box...
...and remove the gear.
We take out the satellite axis.
By turning the satellites, we remove them from the differential box.
We take out the semi-axial gears.
. and their support washers.
Before assembly, we wash the gearbox parts in kerosene and inspect them. We check the condition of the main gear gear teeth. Damage to at least one tooth (chipping, scuffing of the working surface) is unacceptable. Using fine-grained sandpaper, we eliminate minor damage to the pinion axle, axle gear journals and their mounting holes in the differential box. In case of serious damage to parts, we replace them with new ones. If even minor damage to the surfaces of the axle gear support washers is detected, we replace the washers with new ones (with a selection of washers thickness). The bearings of the drive gear and differential box must be wear-free, with smooth working surfaces. Poor bearing condition causes noise and gear teeth sticking.
Repair
It is not necessary to buy a new unit. You can replace the oil seals or gears yourself, and then adjust the mechanism. It makes sense to repair the mechanism if most of the parts are not worn out. Otherwise, it’s worth overpaying and installing a unit that is known to work, so as not to return to repairs.
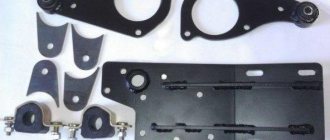
To repair and adjust the front axle gearbox you will need:
- mark;
- hammer;
- spanners for 10 and 17;
- knob with extension;
- end attachments at 10, 17,19;
- punch;
- bearing puller;
- mounting blade;
- caliper;
- pliers;
- dynamometer;
- flat probe;
- level;
- vice.
Possible faults
The need to adjust the elements of the front axle is assessed by the presence of noise and vibrations that occur in various operating modes of the VAZ 21214. Thus, conditionally acoustic signs can be divided into two groups: • Constantly recorded; • Fixed during braking with the help of an internal combustion engine or acceleration.
The nature of the sounds may resemble: • Howling (wear of the main pair); • Crunching, “trolleybus” hum (destruction or overtightening of the shank bearings, unscrewed drive shaft nut, axle bearings, incorrect adjustment of the gearbox gears); • Intermittent “shuffling” (differential bearing). The difficulty of diagnosis lies in the abundance of extraneous noise produced by other components of the car.
Purpose of marking
Each gearbox at NIVU has a specific marking:
- 2101, 2102 (not produced);
- 2103 with gear ratio Z=4.1, which means 10 teeth on the drive gear, 41 teeth are placed on the driven gear;
- 2106 with a gear ratio Z=3.9, i.e. 11 teeth on the drive gear, 43 teeth on the driven gear.
Marking 2103 indicates that these are higher-speed gearboxes, and 2106 are more traction ones.
Gearbox for Niva
When replacing one of the units, you need to pay attention to the meaning of the gear ratios: they must be the same for the front and rear axles. If the gear ratios are different, the wheel axles rotate at different speeds. One gearbox breaks quickly.
The markings of the front and rear components of the NIVA vehicle must match and have the same gear ratios. If units marked 2101, 2102 were previously installed, replacing it with a part with a different marking (2103, 2106), then both gearboxes must be replaced.
Preparation
The main stage is preceded by preparation, which includes: 1. Draining the oil from the RPM through the drain hole;
2. Disconnecting the driveshaft with a 13 key
3. Removing the right wheel drive.
4. Dismantling the lower ball joint on the left side.
5. Removing the suspension extension.
6. Removing the gearbox from the brackets on the right and left, using a stop.
This is followed by disassembling the gearbox, thoroughly cleaning the surfaces from dirt and grease, and troubleshooting the components.
Operating principle
Torque is supplied to the gearbox (Gearbox) and transfer case of an all-wheel drive vehicle. From it, the force is directed to the front and rear axles. The NIVA cardan transmission supplies torque to the axles.
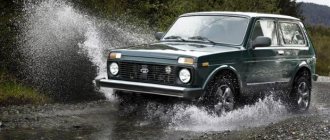
VAZ Niva
Gearboxes are installed on the axles, which translate the movement of the driveshaft into rotation of the wheel axles. Both units of the front and rear Chevrolet axles have a similar design: drive and driven gears located at right angles to each other. The gearbox gears are equipped with specially shaped teeth, and their design facilitates maximum transfer of forces between the shafts.
The gearbox itself is covered with a cast aluminum housing, closed with a metal cover. The gears are placed in a sealed space filled with transmission oil, which provides lubrication to the interacting parts and also dissipates heat.
Gearboxes installed on NIVA vehicles must have markings indicating the gear ratio.
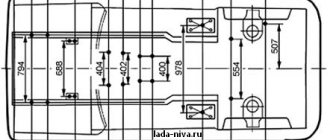
Drive gear adjustment
To carry out the operation, use the original device A.95690, mandrel A.70184 or an analogue made according to the drawing.
The crankcase mating plane is positioned so that it assumes a horizontal position. Then an absolutely flat metal rod is installed on the bearing bed. The distance from the bar to the mandrel is measured by inserting the adjusting rings from the set into the gap under the bar in increments of 0.05. The measured value (crankcase base) is consistent with the correction applied to the drive gear. When assembling the unit, it is recommended to abandon the standard spacer sleeve to prevent repeated repairs. Instead, a non-deformable steel bushing 48 mm long is suitable (with a margin, shorten if necessary).
Change of oil
Depending on the nature of the repair or maintenance, the process is accompanied by removal of the part from the machine or without it. The operation preceding other interventions is an oil change. It is carried out on a warm car that has driven at least 10 km. Regardless of the location of the unit at the front or rear, liquid is removed through the drain hole. So, using the front axle as an example, you should: unscrew the plug using a hex key.
Substituting the container, drain the waste substance.
Filling with fresh oil is carried out with a syringe through the filler hole, previously released from the bolt with a 17 mm wrench.
Lateral clearance in GP and differential bearing preload
In accordance with the instructions, the lateral clearance and preload of the bearings are adjusted using tool A.95688/R.
In its absence, a caliper of a suitable size will perform the specified role.
To ensure the required preload, fix the distance relative to the bearing caps at the beginning of tightening and at the end. The required difference between the values is 0.2 mm.
The side clearance is adjusted by bringing the driven gear closer to the drive gear until it disappears. Initially, one of the nuts is in a loose position, the other (working) is tightened. After eliminating the gap, gradually tighten the attached nut until the jaws of the caliper move apart by 0.1 mm. The backlash adjustment stops when a slight knocking sound of the teeth appears. Next, both nuts are tightened evenly to a distance of 0.2 mm. The correctness of the work is indicated by uniform play in any position of the gears.
Types of differential lock
In the standard configuration of the Chevrolet Niva, only a center differential lock is provided.
To improve the car’s off-road performance, owners install a rear axle with two types of differentials:
- With forced locking, which is actuated by a mechanical, pneumatic or electromagnetic system.
- Self-locking. Various units are used, the differential in which is locked when there is a large difference in the speed of rotation of the axles, or is locked by default, and unlocked when the speed increases.
The differential lock allows you to overcome mud, snow drifts or other difficult sections of the road. However, it must be turned off on asphalt and at high speeds. Otherwise, the load on the axle shafts and gears increases, tire wear accelerates and the likelihood of skidding increases.