In classic cars, such as the VAZ 2107, the main element of the steering mechanism is the gearbox. Thanks to it, the rotational movements of the steering wheel are transmitted through the rod system to the front wheels. Repairing a VAZ 2107 gearbox is a fairly rare occurrence. The only case is the replacement of the steering worm pair due to its significant wear.
In other cases, you can get by with the standard steering system maintenance procedure. These operations are not particularly difficult and can be easily done with your own hands. As part of maintenance, the manufacturer recommends checking the level and periodically changing the steering gear oil. To do this, it is not necessary to remove it from the car; all operations are performed without disassembly.
Level control is carried out using a thin, clean screwdriver. Using a 8 key, unscrew the plug and use a screwdriver to check for the presence of oil. Its level should be just below the filler hole. If the level is less than required, you need to add oil.
To replace, you must first drain the old lubricant. This can be done by removing the steering gearbox cover, which is secured with four bolts. After all the oil has flowed out, the cap is put back in place and new oil is poured through the filler hole. At this point, replacing the lubricant in the steering wheel can be considered complete.
In addition to the issue of oil control, it is periodically recommended to check for play in the VAZ 2107 steering mechanism. If it is present, adjustment is performed. To work, you will need a large flat-head screwdriver and a 19 mm wrench. It is also advisable to involve an assistant; together, the work will be completed much faster.
To adjust, use a 19-mm wrench to loosen the locking nut and use a flat-head screwdriver to gradually tighten the adjusting screw. In this case, the assistant checks the play while inside the car. After completing the adjustment, hold the screw with a screwdriver and fix its position using a locknut.
If adjustment to eliminate backlash does not help, then the worm pair has too much wear and repair is necessary. In this case, only replacing it can solve the problem. This work can also be done with your own hands, without the help of specialists.
Here you will need to completely remove the gearbox from the VAZ 2107:
- Disconnect the rod ends of the steering system - unscrew them and tighten the nuts with a 22mm wrench.
- Release the clamp that secures the column and gearbox.
- Unscrew the three bolts that secure the gearbox to the body.
Further removal and repair will not cause any difficulties. You just need to remember a few basic rules:
- The worm pair is replaced as a set, both elements at the same time.
- After disassembly/assembly, adjustments must be made.
- It is better not to fill in the old lubricant, but to replace it with a new one.
After the repair is completed, the gearbox is assembled and installed in the reverse order.
Hello). If you got an old Zhiguli car from your Father or Grandfather; or maybe you yourself already bought a Zhiguli; then perhaps you are familiar with this problem, which is actually widespread among old VAZ cars.
As you understand, from the title of the page that I visited, I’m talking about an unadjusted steering gearbox. How does this problem manifest itself?
Main syndromes – 2; - this is a very tightly clamped steering wheel (so tightly that some people turn it not only with two hands, but also help themselves in this with the weight of their own body).
Agree, the situation is very unpleasant, especially in the summer, somewhere in a traffic jam). And in winter it’s probably not good either. And if, when the driver turns such a tight steering wheel, he becomes muscular and strong, then a tight steering wheel definitely has a negative effect on the health of the car; — the resource of such a gearbox will be several times less than what is normally adjusted.
Do you think nothing could be worse with the steering gear)? Now imagine that you are turning the steering wheel (and by the way, it rotates very, and even very easily), but the wheels do not turn at all). By the way, I heard stories where the steering gear was so worn out that even when the steering wheel was turned 180 degrees, the wheels did not even think of moving.
Of course, the last case is completely neglected, and here the usual adjustment will certainly not help. But imagine; - you are driving along the highway 80 - 100 km per hour, the steering wheel is at the zero point, you turn it by 10 degrees, and - the car goes straight. Agree, this is also not at all pleasant.
Adjusting the Steering Gear VAZ 2101 – VAZ 2107
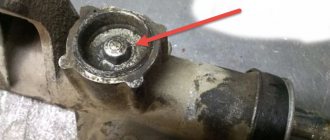
So, take a look at the photo of Rulevogo Reductor - a; - Do you see the nut (by the way, it is 19-size), and the pin with a slot - coming out through exactly that nut? The nut is a lock nut that locks the one we need and directly performs the adjustment - the stud.
Let's assume that the steering gearbox of your VAZ 2101-2107 is too tight. Then, you should take a wrench or a 19-point socket, loosen the nut (which we mentioned above), remove the locking gasket, and Unscrew the Pin with the Slot. This reduces the load on the steering mechanism of the column. Did you unscrew it? — try the steering wheel now.
Malfunction of the steering gearbox.
The VAZ 2107 gearbox does not require excessive intervention. The main condition for normal operation is the presence of lubrication.
Creaks or extraneous sounds in the structure are common damage. Since in this model the steering wheel is attached to the shaft using splines tightened with a nut, if the fastening is loosened, the splines will be most subject to wear, and the steering wheel will dangle. Squeaks may be heard from the driveshaft crosspieces, which appear as a result of wear of the mechanism parts or lack of lubrication.
Also, damage to the steering wheel play is common.
The driveshaft may come off and, as a result, a gap appears. To adjust the steering column, a bolt with a lock nut is provided. The nut is pulled back and the bolt is screwed in until the play returns to normal. This nut is then tightened and secured in position. After this process, the steering wheel will turn much tighter, but the play will be reduced.
Before you start checking the steering mechanism malfunction, subject to the identified symptoms, you need to adjust the gearing. If the adjustment is unsuccessful (for example, the steering wheel rotates tightly, but the play has not disappeared), then you should disassemble the gearbox to find faulty or non-functional parts of the mechanism.
Sounds from the cabin
In modern cars, the steering wheel is not only needed to turn the car. It often houses controls for certain devices, from changing gears to turning on headlights or adjusting the audio system. Therefore, the driver has a natural concern when clicks appear in the steering column when turning the steering wheel. It is typical that the sound comes from inside the cabin from the area of the horn button.
In this case, there is no need to panic. First, you should check the correct installation and condition of the plastic lining of the column. The possibility of plastic deformation cannot be ruled out. A common reason for this phenomenon is a malfunction of individual elements of the steering column switch that produce such sounds. You can check the quality and fastening of the plastic, and replace the faulty switch. Often this is enough so that when you turn the steering wheel you won’t hear a click in the steering column.
Sometimes in the front part of the cabin, when you turn the steering wheel, squeaks are heard, similar to shuffling. Their source is hidden under the beep button on top of the speaker. At the same time, the signal for a problem with the airbag in the steering wheel comes on, and the cruise control buttons do not work.
This means that the steering column cable under the airbag is inoperative. It supplies power to the mechanism of this airbag, the horn and some other devices of the car. It could simply be seriously damaged. Some motorists try to fix such faults on their own. This does not provide any guarantee of reliable operation of the cable. Taking into account the fact that this device affects safety, it is better to replace the steering column cable by experienced car service workers.
Step-by-step adjustment of the worm gear.
In order to independently adjust the steering gear of a VAZ 2107 car, you need a flat screwdriver, a 19mm wrench, the help of another person and follow the step-by-step work:
- In order for the steering mechanism to be adjusted efficiently, the car must be placed on a flat surface, and the wheels must be in a straight position.
- Next, open the hood and clean the gearbox from dirt. Then you need to find the adjusting screw located in the center of the crankcase cover. This screw is covered mostly by a plastic plug. Before removing it, the plug must be pryed off with a flat screwdriver.
- Then you need to use a 19mm wrench to loosen the nut located on the adjusting screw.
- After loosening the nut, the assistant intensively turns the steering wheel in both directions. At this moment, together with it, it is necessary to start rotating the adjusting screw so that the necessary clearance appears in the meshing of the gears. Free play should be minimized and steering wheel rotation should become much easier.
- After the gap is adjusted, it is necessary to tighten the lock nut tightly, while holding the screw with a screwdriver.
Technical specifications of Honda Jazz 2022
two power plant options
- The 1.3-liter gasoline engine is equipped with a distributed fuel injection system with a capacity of 102 “horses” and 123 Nm of peak thrust, available at 6000 and 5000 rpm, respectively. With such an engine, the car accelerates to hundreds in 11.2-12 seconds, develops a maximum of 183-190 km/h and consumes on average about 4.6-5 liters for every 100 km traveled.
- 1.5-liter gasoline unit with a direct fuel supply system, generating 130 hp. and peak thrust of 155 Nm, which are available at 6000 and 4600 rpm. With such an engine, the car owner can count on fuel consumption in the range of 6.5-7.2 l/100 km. Dynamic characteristics: acceleration from 0 to 100 in 9-10 seconds, maximum possible speed – 185-190 km/h.
in other markets where the car is sold under the Honda Fit name, a wider range of power units is offered. Rack and pinion steering
Checking the steering gear.
After adjusting the steering gear of a VAZ 2107 car, axial displacement of the steering wheel is possible. It can be detected if the front wheels are placed in a straight position and at this moment you pull the steering wheel up, in which case the shaft will move.
Increased play in the VAZ 2107 steering wheel is a fairly common problem, characteristic of the entire “classic” family. In most cases, you can fix the problem yourself without resorting to complex, expensive repairs. It is only important to correctly diagnose and localize the causes of play in the steering mechanism.
Replacing the swing arm
If repair is not possible, you can install a new swingarm and secure it. The procedure is the reverse of removing the pendulum from the car body.
Replacing the pendulum on a VAZ 2107 is a fairly simple process. You can make it yourself.
The first signal that needs to be taken into account and the pendulum replaced is a bent bipod of the pendulum arm. It is possible to carry out repairs to replace the pendulum without an overpass. Initially, it is necessary to dismantle the main filter housing so that it does not interfere. Next, you need to unscrew the castle nuts of the tie rods, as well as the ball pin nut. After this, it is necessary to press out the ball pins of both steering rods. To do this, a long steel rod is used, which is struck with a hammer.
Next, you need to remove the samman lever. This procedure is completely simple (you just need to turn two nuts on the lever). This completes the disassembly. Next, you need to replace the pendulum. It is not dismountable, so it must be completely replaced. The parts are assembled in the reverse order. After intervention in the suspension and steering, it is necessary to check the wheel alignment. This completes the replacement of the vehicle's pendulum.
The process of replacing the pendulum is absolutely simple. That is why you don’t have to go to a service station for such “trifles”, but do the repairs yourself. This procedure does not require special devices or tools. To replace the pendulum, you only need a socket wrench and a wrench. For the first time, the process of replacing the pendulum is best carried out under the supervision of an experienced specialist.
More details on how to replace the pendulum on a VAZ 2107 can be found in the following video
.
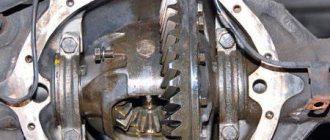
Rods, bipod, hinges - where is it all?
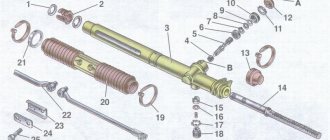
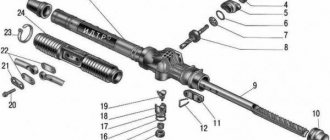
The main parts and steering components of the VAZ-2107 and other rear-wheel drive models are shown in the figure below. To understand what is faulty, let’s remember “who is who”. You also need to remember that breakdowns of steering parts and assemblies are very dangerous and, in most cases, lead to serious accidents! For example, if the steering rod breaks, the front wheels lose contact with the steering wheel and the car flies into a ditch or into oncoming traffic. To prevent this from happening, let's check the condition of the steering of our “classic”.
Steering VAZ-2107
1 – lateral thrust. 2 – bipod. 3 – medium traction. 4 – Pendulum lever. 5 – adjusting clutch. 6- lower ball joint of the front suspension. 7 - right steering knuckle. 8- upper ball joint of the front suspension. 9 - right steering knuckle lever. 10- bracket for the pendulum arm. 11- bearing of the upper steering shaft. 12, 19 - steering shaft mounting bracket. 13- pipe of the steering shaft mounting bracket. 14- Upper steering shaft. 15 - steering gear housing. 16- intermediate shaft. 17- facing casing. 18- steering wheel. 20- fixing plate of the front bracket. Pinch bolt for fastening the universal joint. 22- body spar.
Inspection and testing of the VAZ-2107 steering
You need to check your steering if your car has the following signs: -increased play (free play) of the steering wheel; -knocks in the area of the front wheels; - difficult (tight) rotation of the steering wheel. It is better and more convenient to perform all work in an inspection ditch or on a lift. Be sure to invite an assistant; you can’t handle the check alone. Before work, the car must be thoroughly washed from below. Set the steering wheel to the position for driving in a straight line. Turning the steering wheel left and right, we check one by one: - the play of the steering wheel along the rim is 18 – 20 mm; - there should be no knocking in the hinges and joints; - the fastenings of the steering gear housing and the pendulum lever are not loose; - there is no play in the ball joints of the rods and in the bracket of the pendulum arm, and the bipod does not move in the axial direction; - steering force does not exceed 20 kgf; - the adjusting couplings of the side rods are securely secured with clamps; -all protective caps and rubber covers have no cracks or tears.
Ball joints of steering rods are considered to be in good condition if the axial movement (along the axis of the fingers) is no more than 1.5 mm. When you press the mount on the hinge, you should feel the resistance of the spring.
Trouble-shooting
Loose threaded connections must be tightened, damaged and worn components and parts must be replaced. The most common parts to be replaced are tie rods with joints and a pendulum arm. A stiff steering wheel or knocking noise in the steering mechanism can be eliminated by adjusting the worm gearing. After replacing the rods, you need to adjust the camber and toe angles of the wheels.
Checking the steering play of the VAZ 2107
Large play in the VAZ 2107 steering wheel is a vague concept. Meanwhile, the permissible steering play has established standards. For “classics” it is 5 degrees. To check the play, a special device is used at the service station - a play meter. At home you can do without it. To do this you will need a ruler, chalk (or wire) and the help of a partner. Checking the amount of play is carried out as follows:
- place the machine on a level surface;
- check the tire pressure and inflate them if necessary;
- align the steering wheel so that the wheels are directed parallel to the axis of the car;
Causes of steering play in VAZ 2107
If you notice unacceptable play in the VAZ 2107 steering wheel, the reasons may be as follows:
- The central nut securing the steering wheel to the axle is not tightened;
- the nut securing the steering column to the gearbox is loosened;
- The worm gear of the steering mechanism is not adjusted;
- the steering pendulum bushings are worn out;
- The tie rods are damaged or their ends are worn.
All of these problems require immediate intervention. Otherwise, the steering mechanism may fail and the car will lose control.
Mandatory maintenance of system components
The stability of the front wheels is a prerequisite that affects the stability of the car. Any violation of the settings or failure of one part invariably results in a chain reaction leading to an imbalance of the entire system. That is why the manufacturer provides certain maintenance work
which include:
- cleaning from contaminants;
- wheel alignment;
- worm gear adjustment;
- steering wheel free play control;
- drive check.
How to remove steering play on a VAZ 2107
You should begin work by checking the tightness of the threaded connections of the steering mechanism and the condition of the steering rods (tips). Bent rods or worn tie rod joints must be replaced. To do this, you will have to use a puller and a 22mm wrench. You should not try to align the rods or repair the ends. For safety reasons, these parts should always be replaced with new ones. Next, you should check the condition of the pendulum and the adjustment of the worm gear. Worn pendulum bushings must be replaced with new ones. To do this, you need to unscrew the steering rods from it (use a 22mm wrench and a puller) and remove the pendulum from the car by unscrewing the mounting bolts. Clamp the pendulum in a vice, remove the cotter pin and unscrew the adjusting nut. Once the nut is unscrewed, you can disassemble the pendulum and replace the worn bushings with new ones. When assembling the pendulum, it is necessary to tighten the adjusting nut so that its bipod rotates with a force of 1-2 kilograms. If all parts are replaced or in good condition, and the threaded connections are tightened, the VAZ 2107 steering play is adjusted by adjusting the steering gearbox. To do this, you will need a 19 mm wrench and a powerful slotted screwdriver. The adjustment is carried out as follows:
In this way, you can adjust the play of the VAZ 2107 steering wheel in accordance with the limits established by the manufacturer.
In other cases, it will be enough to carry out maintenance of the steering system. These activities do not cause any particular difficulties and can be done by hand. The manufacturer’s specialists recommend monitoring the oil level and periodically changing it in the steering gearbox. There is no need to remove it from the car for this; all actions are carried out without disassembly.
The level is checked with a clean thin screwdriver. Using an 8 mm wrench, unscrew the plug and measure the presence of oil. Its level should be slightly below the filler hole. If the level is less, you need to add oil.
To replace, you first need to drain the old lubricant. This can be done by removing the gearbox cover, which is secured with four bolts. After the liquid has completely drained out, the lid is put back in place and a new one is added through the filling hole. At this point, the oil change in the steering system is considered complete.
In addition to monitoring lubrication, it is recommended to periodically check for play. If there is one, adjustment is made. For work, use a large flat screwdriver and a 19 mm wrench. It is advisable to find an assistant, as it is much faster to regulate with two people.
To carry out the process, you need to loosen the clamping nut with a wrench and gradually tighten the adjusting screw with a screwdriver. The assistant simultaneously checks the play while inside the car. After completing the adjustment, hold the screw with a screwdriver and fix its position with a lock nut.
If the procedure performed did not help eliminate the backlash, then this indicates that the worm pair is badly worn and requires repair. In such a situation, the problem is solved by replacing it. This work can be done independently, without the help of specialists.
Here it is already necessary to remove the gearbox from the VAZ-2107:
- the tie rod ends of the system are disconnected - they are unpinned, and the nuts are twisted with a 22 mm wrench;
- the clamp that secures the gearbox and column is released;
- Unscrew the three bolts securing the gearbox to the body.
Arrangement of rods and tips
The middle solid element of the trapezoid has the simplest design - an iron rod with two hinges at the ends. The rod fingers are inserted into the second holes of the bipod (counting from the end of the lever), screwed with 22 mm castle nuts and secured with cotter pins.
The middle lever is slightly bent forward so that when the trapezoid moves, the rod does not touch the gearbox
Not all service station mechanics know about the correct installation of the middle trapezoid rod. My friend, who came to the service to change a set of steering rods on a VAZ 2107, was convinced of this. The inexperienced master placed the middle section in a backward bend, so it was not possible to go far - exactly until the first turn.
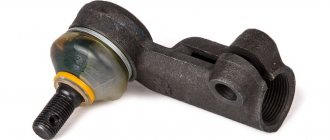
Side rods consist of the following parts:
- short (outer) tip with ball pin;
- long (inner) tip with hinge;
- connecting clamp with 2 bolts and nuts M8 for a 13 mm spanner.
The element is made detachable to adjust the toe angle of the front wheels. The length of the lever can be changed by rotating the threaded clamp and thus adjusting the position of the wheel for straight-line movement. The threads of the tips and inside the clamp are different - right and left, so when rotated, the rod lengthens or shortens.
The hinge pins of the Zhiguli side rods are attached to the outer holes of the bipodThe design of all hinge ends is the same and includes the following parts (the numbering coincides with the diagram):
- Ball pin with M14 x 1.5 thread for a 22 mm castle nut. The radius of the sphere is 11 mm; a hole is made in the threaded part for a cotter pin.
- A rubber (or silicone) dirt-proof cover, also known as a boot;
- Metal body welded to a rod with M16 x 1 thread.
- The support liner is made of a composite material, otherwise - a cracker.
- Spring.
- A cover pressed into the body.
The thrust joint works on the principle of a plain bearing - a metal sphere rotates inside a plastic sleeve
The short outer ends of the side rods are the same, but the long ones are different. You can tell which part belongs to it by its bend—a lever curved to the right is installed on the right side. The ball pins of the side rods are attached to the first holes of the bipod of the pendulum and gearbox.
The identity of long tips is determined by the bend of the rod
A car mechanic I know suggests distinguishing between long tips like this: take the part in your right hand by the hinge, pointing the ball pin downward, as if you were holding a gun. If the “barrel” is curved to the left, you have a left-hand rod tip in front of you.
Further repairs will not be a problem.
You only need to follow a few rules:
- the worm pair is changed simultaneously, as a set;
- after assembly/disassembly, adjustments need to be made;
- Do not use old oil, but replace it with new lubricant.
After the repair is completed, the gearbox is assembled and mounted in the reverse order.
The steering gearbox is a rather old mechanical device that is now used mainly on cars of the classic LADA family. Today you will learn what a steering gearbox is - repair, replacement, adjustment with your own hands.
Video - Steering gear repair
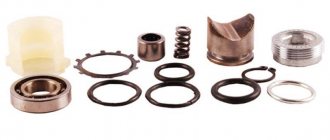
In most cases, this unit is not repairable, since it is relatively inexpensive and consists of only two main parts. However, the manufacturer left the option for car technicians to purchase a repair kit.
Before repairing the steering gear, let's determine the malfunctions.
- Firstly, it can be repaired if the steering wheel rotates but the wheels do not. This means that there are defects on the threaded part of its shafts that prevent the two interacting parts from touching.
- The second type of fault is oil seals. If they have reached critical wear, then the oil from the gearbox will certainly leak, which already leads to its accelerated wear. If there are other mechanical damages, the gearbox must be replaced.
First, remove the faulty unit from the car. After this, press the bipod off its shaft using two hammers. Drain the oil from the gearbox through any technological hole. Now unscrew the four bolts that secure the cover and remove it. To access the worm shaft, you need to unscrew a similar cover on the other side of the mechanism. Pull out the remaining parts and replace the faulty ones. These may include oil seals and damaged shafts. After this, reassemble the gearbox in the reverse order. Don't forget to add oil!
Lada 2107 MORAY › Logbook › Replacing the pendulum arm
The time has come for another replacement of something, and this “something” this time was the pendulum arm. There was a factory lever on bushings, which traveled almost 90,000 km and over 10 years of operation began to wear out. At first I didn’t notice anything, the car steered normally until recently, it didn’t “run” along the road, but recently I began to hear a “knock-knock” when turning the steering wheel, the knock was especially audible when the car was stationary and at the same time you could rock the steering wheel from side to side. Having driven the car into the pit, I asked my father to see where the knocking was coming from, because at first he himself had sinned on the steering ends and rods. Father immediately pointed his finger at the pendulum arm, since the latter was a little loose. Since the “diagnostics” were carried out in the evening, there was no point in going for a spare part, and I just tightened the lever nut a little. After this, the steering wheel became “heavier” and the lever began to creak. Then I somehow forgot something and skated like that for a couple more weeks. The other day I bought a replacement, a pendulum arm on rolling bearings. Now about the replacement. I expected to replace this lever in two hours, but that was not the case) Everything turned out to be much more interesting!) So, first I needed to open access to the lever, because everything up to the box was closed. I did not remove all the protection, only the last sheet under the box.
Here it is, the culprit of the tight and creaky steering wheel.
After removing the protection, an awesome problem arose - it was necessary to remove the rods from the pendulum, which were installed 10 years ago at the manufacturer. Everything was complicated by the fact that I didn’t have a 22 mm spanner or socket wrench to tighten the lug nuts, plus it was difficult to access them - the pendulum “looks” exactly into the transverse beam between the side members, which made it extremely difficult to get to these nuts open-end wrench.
I decided to take a slightly different route. I first tried to unscrew the fastening of the pendulum arm so that I could tilt the whole structure down a little, so that I could twist the rods. Again, not everything is so simple - the top bolt is God knows where (neither from above nor from below you can’t get it with a wrench) + the nuts on the outside of the spar under the fender liner were turning (my father said that they were welded on his old seven, which should have been make the task easier). To unscrew the upper bolt of the arm, I used a 17mm socket with an adapter from the kit, by which I held the head with a 13mm wrench; under the fender liner, I unscrewed the nut with a 17mm socket, without removing the fender liner (I was too lazy), simply unscrewing one of the screws and bending the fender liner to the side. There were no problems with the bottom bolt.
How to change the steering gear on a VAZ 2107
If there is more serious damage, the steering gear must only be replaced. To do this, you need to purchase a new VAZ 2107 gearbox and immediately fill it with transmission oil. Now you need to remove the faulty gearbox from the car.
- Disconnect the tie rod ends from the tie rods. To do this, first unscrew them, and then unscrew the fastening nuts using a 22mm wrench. To pull them out, you need to use a special puller, which is available in any auto parts store.
- Go inside the car and loosen the clamp that secures the steering shaft to the steering gear. Pull the shaft out of engagement with the gearbox.
- All that remains is to unscrew the three bolts that secure the mechanism to the engine compartment of the car.
- Install the new gearbox in reverse order. Before you start operating the car, do not forget to adjust it.
↑ What spare parts will be needed?
In case of replacing the entire assembly, the only thing that needs to be purchased is the original part (part number 21050-3400010-00). If this is not possible, you can buy units with other designations, but it is still better to use original components.
↑ Tools and accessories for repairing the steering gear
- set of wrenches;
- beard;
- screwdriver;
- hammer;
- vice;
- mandrel (you can take a piece of pipe of the appropriate size);
- rags.
The repair sequence for the VAZ 2107 steering gear can be divided into two main stages.
Adjusting the VAZ gearbox
Adjustment of the steering gear is carried out to get rid of play in the steering wheel, as well as all kinds of discrepancies when it rotates with the position of the wheels. The car wheels must first be aligned.
To adjust the steering gear, you need to unscrew the lock nut on its cover from above and loosen the special adjusting screw. Ask your partner to sit behind the wheel and rotate the steering wheel in different directions with energetic, but not wide movements, while you gradually tighten the adjusting screw. As soon as the steering wheel begins to rotate tightly and the wheels move with the slightest movement, the locknut is tightened.
This completes the adjustment of the steering gear. As you can see, this procedure is not long at all and can be performed with just a 19-mm wrench and a regular flat-head screwdriver.
Adjustment of the steering gear mechanism on a VAZ 2107 car is carried out in cases where the steering wheel becomes difficult to rotate, jamming occurs during rotation, or in the case when axial movements of the steering shaft appear when the wheels are in a straight position. To adjust the mechanism, you will need the help of an assistant, a nineteen wrench and a flat-head screwdriver. To obtain a high-quality result, it is necessary to place the car on a flat horizontal plane with the front wheels aligned straight. Open the hood and wipe off any dirt. The adjusting screw is located in the center of the crankcase cover and is closed with a plastic plug, which must be removed by prying it off with a screwdriver.
The adjusting screw is secured against loosening using a locknut. Loosen the locknut with a nineteen wrench. Now ask your assistant to start turning intensively in both directions, and in the meantime you rotate the adjusting screw and achieve the desired clearance in the gear mesh, at which the steering wheel will rotate as easily as possible (as much as possible), and so that the free play decreases . After adjustment, hold the screw with a screwdriver and tighten the locknut. During operation of the steering gear, worm gears wear out and as a result, axial movement may appear, which manifests itself when the wheels are in a straight position. With the wheels straight, pull the steering wheel up; if the shaft moves, it means there is sufficient wear.
You can try to eliminate it by placing additional gaskets under the steering gear cover. To do this, unscrew the four bolts securing the cover and place one or two gaskets, 0.1-0 thick.
How to return the sound signal yourself
Adjusting the doors of the VAZ 2107
If the steering wheel needed to be removed because the sound signal stopped working, then the removal process is carried out in the same sequence as previously described. Next you will need to do the following:
- Be sure to check the steering play, which should not exceed 5 C, and the copper contact of the horn. The contact is located on the steering column; if traces of oxidation or other types of contaminants are noticed on its surface, they are carefully removed;
- Next, the connecting fasteners on the back of the steering wheel are unscrewed so that the entire panel assembly can be removed, including the contact plate;
- The removed steering wheel with the panel should be placed on a table or workbench to find the failed contact. The latter is most often the main reason why the sound signal disappears;
- if the contact is disconnected, you just need to solder it back to its original place and install the panel with the steering wheel.
A car's steering column is a fairly simple element, but like everything else in a car, it wears out over time. In the best case, an unpleasant squeak is heard when turning the steering wheel, and in the worst case, the car does not change its trajectory, which seriously increases the risk of a traffic accident. For this reason, every driver should carefully monitor the condition of his steering column.
VAZ 2107 steering column device
The steering column serves to transmit torque from the steering wheel to the shaft, which is located on the worm of the steering mechanism. The steering column is fastened using a special bracket, which has a rigid coupling to the steering mechanism.
Also, an important element of the steering column are two hinges, which allow the shaft to fold. It is the function of folding the shaft that makes the system safe for the driver, since in the event of an impact from the steering column, it does not enter the car interior, but folds, thereby preserving the life and health of the person driving the car. Please note that after performing repair work on the chassis, you need to do it yourself and you can do it yourself.
Faults in the VAZ 2107 steering column
To understand that the steering column is faulty, you need to pay attention to typical signs, of which there are not many:
1. A creaking sound coming from the steering column when you turn the steering wheel. This signal may indicate that some elements of the steering column have worn out or were deformed for some reason. 2. Play in the steering wheel. This problem indicates that the mounting bracket is worn or loose. 3. Play of the steering column axes. This is clear evidence that the spline joints have become loose.
If you notice the appearance of at least one of the above symptoms, then urgently begin replacing the steering column.
Replacing the steering column of a VAZ 2107 with your own hands
To replace the steering column on the “seven”, you will need some tools:
Socket wrench with a diameter of 17 millimeters; — open-end wrench with a diameter of 17 millimeters; — socket heads for 30 and 17; — handle equipped with a ratchet; - construction hammer; — mount; - high power knob.
Once all the necessary tools have been prepared, you can begin work, the procedure for which is described below:
1. Remove the steering shaft from the steering column.
2. Using a 30mm wrench, remove the steering column mounting nut. It fits very tightly, so this procedure will require a lot of effort.
3. Disconnect the steering column from the car body. To do this, you will need to unscrew the three mounting nuts, holding the bolts from turning from the reverse side. It is best to use a ratchet, as it will simplify the procedure at least a little.
4. Using a pry bar, remove the steering column from the slot and jerk towards yourself, resting your feet, dismantle the steering column.
It is worth noting that the cost of the original steering column for a VAZ 2107 is about 2,000 rubles. Unfortunately, it cannot be repaired, so you will have to fork out some money.
Removing and replacing the steering wheel on classic Zhiguli VAZ 2101–07 models is one of the simplest operations. To complete it, you will need a minimum set of tools and warm garage conditions when work is carried out in winter. In this case, visiting a service station is an unreasonable waste of money. To dismantle or change the steering wheel yourself, you just need to learn a simple procedure and remember a few important points.