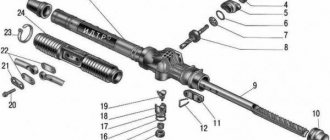
hi all. I searched on the Internet, but couldn’t find anything on this topic. In general, there is play in the bearing (pictured), and the steering wheel vibrates quite noticeably on bumps. Who can tell me how to change it (bearing)? And are there any other steering shaft bearings, besides this one, maybe somewhere at the bottom there is the same one.
Attachments
KrimS08
Experienced
hi all. I searched on the Internet, but couldn’t find anything on this topic. In general, there is play in the bearing (pictured), and the steering wheel vibrates quite noticeably on bumps. Who can tell me how to change it (bearing)? And are there any other steering shaft bearings, besides this one, maybe somewhere at the bottom there is the same one.
Are you sure that the play is in this bearing? He is alone on the shaft. No downstairs. Change bearings as usual. The shaft will have to be removed.
Salaga
Experienced
Don't touch the shaft. You remove the column itself, knock out the bearing, look for the bearing (they are sold), it should have a silicone seal in it.. Then just put the column on the shaft and that’s it.
KrimS08
Experienced
garry20
New guy
Are you sure that the play is in this bearing? He is alone on the shaft. No downstairs. Change bearings as usual. The shaft will have to be removed.
Sure. The steering wheel moves up and down noticeably. I recently removed the steering wheel and without it you can clearly see how the shaft “dangles” in the bearing. How to take it all apart?
Article: 21050-3401120-00, additional articles: 21050340112000, 2105-3401120
Order code: 012585
Hello everyone, dear car enthusiasts, I recently began to notice on my old “bug” that the steering wheel was wobbling up and down a lot, plus the shaft itself was a little loose in the bearings. The main reason for the play was found in cracks in the mounting bracket, however, at the same time I decided to replace the old bearings, which had already been used for 250 thousand km. As always, I ordered everything from a trusted store.
I ordered only one bearing, since I decided to install a ball bearing on the second one. The original one comes from the factory with a needle-shaped one in a rubberized shell - in the photo on the right.
Approximate sizes are below if anyone is interested. The needles are in a plastic separator, lubricated with blue grease.
It is made quite well, differs from the old one only in the smaller number of needles, but this is not critical here, since there is no such load on it.
So, to replace the bearings we need to remove the steering shaft along with the bracket. Bend back the rolled edges and knock out the shaft along with the old bearings.
There was practically no wear on the shaft, the new bearing fits in without problems, we simply hammer it into the pipe with a suitable mandrel until flanging and also fix it in the pipe, bending the edges.
But, since the structurally native bearings sit quite loosely on the shaft, I already installed a suitable ball bearing as the second one in order to completely get rid of the play. And we put everything back together.
After assembly, the steering wheel turns without problems, no noise or play as there were before. Below you can see the entire bearing replacement process:
Backlash should definitely be eliminated at the initial stages of its appearance, since delaying repairs can lead to complete failure and the replacement of the element.
- Steering wheel jamming. Most likely the cause of the problem will be the steering rack. Most often this occurs due to damage to the anthers. Water and dirt begin to enter the mechanism body. The lubricant washes out or thickens, causing the teeth to cling to each other unevenly.
A similar problem also occurs when the element is incorrectly adjusted.
Recommendations
As a rule, steering racks without power steering are simple and reliable. However, to preserve the resource and increase the service life, it is necessary to monitor the condition of the boots at the point where the steering rods are attached to the rack.
- If the boots on the rack are damaged, both the steering rod and the rack fail. Water and dirt wash out the lubricant, destroy the swivel and threaded connections, etc.
- Next, active corrosion begins, which also quickly disables the steering mechanism.
Let’s also add that the steering rack quickly breaks when driving over serious bumps at high speed. It is also not recommended to drive onto curbs; you should avoid driving over obstacles with your wheels turned out, etc.
Source
Typical breakdowns
Torn steering rack boot
There are several most common reasons why a unit may need to be replaced:
- The rail has exhausted its service life;
- The vehicle is regularly driven on uneven roads;
- Having turned the steering wheel to its extreme position, sharp accelerations are often made;
- The presence of mechanical damage due to collisions with potholes, accidents, etc.
Drivers should pay attention to the behavior of their car, which itself may indicate that the steering is out of order. This may manifest itself as follows:
- The rack knocks when turning the steering wheel;
- The steering wheel jams and turns to the sides with some difficulty;
- There is knocking and vibration during travel;
- The play at the steering wheel has increased;
- The wheel alignment is disrupted. This can be determined by uneven wear of the rubber.
Steering rack repair kit for VAZ 2114
When starting to overhaul the mechanism, you need to consider the market for repair kits. There are several types:
- The first consists only of rubber bands, gaskets and dampers. It is suitable for changing the lubricant inside the mechanism and for light maintenance. The price for a set is about 200 rubles.
- The second is complemented by two bearings, which is also suitable for easy maintenance of the mechanism. The cost of the set is about 500 rubles.
- The latest repair kit has almost all internal mechanisms and implies a complete replacement of units. The price is about 2000 rubles.
Before purchasing a kit, check which rack is installed on your car and write down its number. This will help you avoid making mistakes when purchasing.
Signs of failure
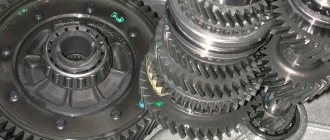
All bearings, of which there are quite a few in a car, have approximately the same signs of failure. But since you know the location of the input shaft bearing, it will not be so difficult to determine that the problem arose with it.
There are several characteristic signs of its breakdown.
| Sign | Peculiarities |
| Howling when the clutch is released in a parking lot | The element has failed and needs to be replaced. The howling is usually caused by the formation of chips, cracks, or the destruction of 1-2 rollers |
| Whistle when driving | The bearing is partially damaged or there is no lubrication. The problem in the absence of lubrication can only be determined by dismantling and visual inspection. To solve the problem, sometimes it is enough to simply lubricate the element and return it to its place |
| Clutch won't engage or disengage | Most likely the bearing is stuck. If the damage is serious, the input shaft may need to be replaced. |
| Knock in the area where the element is located | The bearing knocks only when the part is completely destroyed. If you do not replace it in time, the bearing will be welded to the shaft, so you will also have to replace the shaft itself |
Article on the topic: Why the VAZ 2109 (Carburetor) does not start when hot
If you notice the first signs of a malfunction of the input shaft bearing on your gearbox, you should immediately check the condition of the element and, if necessary, replace it.
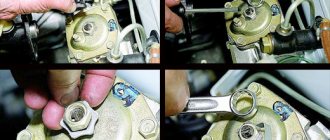
Removing the steering rack
When starting to repair the VAZ 2114 steering rack, first of all we need to remove it. We do this using the following technology:
- We park the car on a level surface. For safety, we put supports under the wheels to prevent them from rolling back.
- Raise the car with a jack, loosen the wheel nuts and remove it. Similar work needs to be done on the other side.
- There is a hole in the arch on the right side that is closed with a plug. Let's take it off.
- When the absorber is installed, it is necessary to loosen the clamp and, without disconnecting the hoses, move it to the side.
- Using a hammer and chisel, we bend the antennae onto the plates that hold the tie rod nuts.
After this, the dismantling is completed and you can begin to repair or replace the mechanism.
Stretch the Lada Largus steering wheel with leather yourself
In order to start reupholstering the Lada Largus steering wheel, we need to remove it from the car. We will also need a steering wheel reupholstery kit, which you can purchase in our Avtotochka online store, it includes:
- Braid
- A thread
- Needle
- Glue
- Instructions
So let's start reupholstering the Lada Largus steering wheel.
- To begin with, we advise you to read the instructions in order to plan the time and the entire reupholstering process.
- On average, an ordinary person without experience takes about 2 hours to complete the entire job.
- Soak the braid in water at room temperature for about 30 minutes.
- While the braid is soaked in water, you need to prepare 6 pieces of thread, 15 centimeters each, from the skein that comes with the kit.
- We take the braid out of the water and check that the braid is completely saturated.
- We put the braid on the steering wheel so that it meets at the welds on the steering wheel and evenly covers the spokes. The front side of the braid is marked with a black dot on the bottom spoke.
- Take 6 pieces of prepared thread and make temporary stitches in the corners of the knitting needles (tie them with a few simple knots), these stitches will later be removed.
Unwind 1.5 meters of thread from the spool and thread it into the upper left joint of the leather. On the side of the knitting needle you need to leave 50 centimeters of thread, and on the other side 150 centimeters. Wrap the short part around the steering wheel and secure it.
Thread the long end of the thread into the needle and begin lacing to the right. We chose the "MACRAME" stitch - the thread is passed through one stitch. Go through a 15-20cm section and then pull the seam together. This is worth repeating until you reach the knitting needle. We tighten the braid so that the edges of the skin meet and the skin wrinkles a little.
Tighten the leather on the right needle and tack the end (pass the thread in the same stitch several times). Move to the left side of the handlebar, releasing the wound thread. Lace the left side of the handlebar and secure the thread at the end in the same way.
- Let's move to the lower left side sector.
- Measure 1.2 meters of thread and insert it into the joint of the leather on the lower left side of the steering wheel. Leave equal lengths of thread on both sides. Wind one end of the thread around the lower part, and with the other end begin to pull the braid towards the side knitting needle. Make a tack at the end of the knitting needle.
Release the secured end of the thread, thread it into the needle and lace the remaining lower segment of the leather.
Lace the lower right part of the handlebar in the same way.
Trim the long remaining threads so that they are approximately 0.5 centimeters long.
In order to prevent the thread from unraveling and unwinding, it is necessary to set it on fire and press it, we do this with a gas lighter.
Then you should dry the trim with a hairdryer or simply leave the steering wheel to dry at room temperature for several hours. We glue the edges of the leather using the glue that comes with the kit. Apply glue to the edges of the steering wheel as shown in the photo and press firmly
ATTENTION!!! THE GLUE SHOULD NOT GET ON THE FRONT SIDE.
Now the Lada Largus steering wheel is completely tightened and ready for further use
Lada Largus steering wheel reupholstery is now available to everyone!
Disassembly
If you decide to carry out maintenance yourself, then you should disassemble it in order:
- We cut off or bite through the plastic clamps that are located on the sides of the protective casing. We remove it and inspect it for breaks or cracks.
- The side protective caps are also attached to the clamps. We carry out a similar procedure and remove them.
- Unscrew the adjusting screw with a 17 octagonal wrench.
- Then we take out the sealing and retaining ring, the spring and the stop. We check the emphasis for scuffs and other damage, since its condition directly affects its performance.
At this point, the disassembly and inspection of elements for damage is completed and you can begin reassembling the mechanism. The video shows a do-it-yourself repair of a VAZ 2114 steering rack:
Removing steering column switches Renault Logan
Remove the upper steering column cover, overcoming the resistance of two clamps. Remove the lower steering column cover. Fastening elements for steering column covers: Therefore, the car uses a device with a so-called spiral cable, which works on the principle of a tape measure.
We first remove the upper part, unfastening the latches along the way. Then remove the lower part of the casing.
Here you should see why we turned the steering wheel 90 degrees. The electric switch itself is attached to the steering column using two Phillips screws. We unscrew them and remove the connector that is attached to the switch.
Having removed the lever assembly, we carefully inspect it, especially paying attention to the wires. I could immediately see that the black and red wires were broken, soldered to the pin, which is located inside the lever itself
This pin rotates when switching lights and dimensions. And the wires are breaking.
Check and replacement
Moreover, they are really rigid and not flexible. Switch Pin To remove the switch pin, you must first disassemble its housing. The figure below shows what needs to be unscrewed and which latches to unfasten: Switch body Then you need to remove the horn button.
Renault Logan replacement, repair (sound signal) of the left steering column lever with your own hands
In the body of the left part itself there is a so-called contact pin with wires, which also needs to be removed after all manipulations. Using a tester, it is necessary to identify an open circuit or other malfunction, and use a soldering iron to eliminate it, thereby bringing the part into working condition without replacing it. Let's summarize: As a result, the process of repair and replacement does not take much time, if you have sufficient skill to carry out repair work.
The simplest thing is to replace a failed Logan part with a working element. In order to remove it, you need to release the fasteners. Then the base of the part must be turned over and the terminal part to which the Renault Logan wires are connected from the lever is removed. There are five castles there. Inside the element there are two small sliders that turn on the turn signals and headlights.
It is secured with two locks. To remove it, you will need a thin object, such as a scalpel or knife, which should be inserted into the groove. Disconnect the negative terminal from the battery.
Remove the steering column cover. Unscrew the steering column switch from the base and disconnect the terminal by pressing the petals from the sides. We inspect the switch, determining the scope of work.
There are several wires coming out of the switch.
We need black and red. Because they most often fail. For example, my black wire broke off right at the switch pin. And it was not possible to solder it right away.
Therefore, we had to completely disassemble everything. In the photo, the wires are already soldered instead of the factory ones - the arrow indicates the location of the breakage.
Steering rack repair
Do-it-yourself repair of the VAZ 2114 steering rack involves installing new parts into the mechanism body. But it is worth paying attention to the lubrication of parts. The manufacturer recommends using FIOL-1.
- First, lubricate the rack and the internal cavity of the housing.
- Then apply a generous amount of plastic bushing and place the needle bearing in place.
- The rail can be installed in the housing.
- Lubricate the steering gear shaft.
- Next, we hammer the material into the bearing.
- Afterwards the stop is lubricated, screws and stoppers are installed, as well as the casing and anthers.
The detailed process is described in the previous paragraph.
What to do
All work with the steering mechanism can be done with your own hands; there is nothing particularly difficult about it. But after work, especially on the steering tips, the toe angles will need to be adjusted, which is best left to specialists.
If a malfunction occurs, you will first need to diagnose the mechanism to identify the unit that caused it. First, the condition of the tips is checked. To do this, they are removed from the support and checked manually. With a working tip, the finger moves in its body with effort, but it should not get wedged to any position; such a tip can be put in place and continue to look for faults. If it moves freely and there is some play, then it is replaced.
Next, the gap between the rack and gear is adjusted. For this, a special 6-sided key is used. With its help, the thrust nut is tightened until it stops, and then loosened by ¼ turn. After this, the nut is fixed using punching. If the adjustment is made correctly, and the condition of the rack is still satisfactory, then the knocking should disappear.
If the adjustment does not help, then most likely the wear of the main components is quite severe and a major overhaul of the mechanism is required with the replacement of the rack, which can also be done with your own hands.
Rail replacement process
Having purchased a working spare part and prepared the car for repair, you can begin to dismantle the faulty element. Let's look at each of the stages:
- Remove the front wheels of the car to gain access to the tips.
Important! When removing the tips from the dismantled part, remember the number of turns in order to adjust the wheel toe when reinstalling. After installing a new spare part, go to the service center and set the alignment correctly.
- On the new part, remove the side plastic covers and add lubricants (litol, fiol or graphite lubricant).
The reverse installation process should be carried out in reverse order. The only difficulty that will arise during reassembly is getting into the driveshaft splines. This work is easier to do with an assistant. In general, you can change the steering rack on a VAZ 2114 with your own hands using the above instructions alone, without the help of a service center. To restore smooth operation, you can purchase a repair kit, but to use it you will have to completely disassemble the structure, which requires experience. It is often easier to replace the entire mechanism assembly, especially since on the VAZ 2114 it is always available for sale
Adjusting the steering rack on a VAZ 2114
To make the adjustment we need a special key. It looks like a hexagon on one side, and on the other side a key for tightening the timing belt.
Next, we need to drive into a hole or overpass to gain full access to the adjusting bolt. If this is not possible, you can jack up the car and crawl under it. Afterwards we need to look under the car on the left side. On the rail we will see a special recess in which the adjustment mechanism is installed. It's better to spray it with WD-40 right away. This will help clean the threads from rust. If the adjustment occurs for the first time, the bolt will be very difficult to turn, since it is cored at the factory so that it does not unscrew due to vibration.
After tightening, you need to conduct a small test, turn the steering wheel in motion. If it turns too tightly, then you have overtightened the nut; you need to loosen it a little. When the work is done correctly, vibration during movement, play and knocking should go away.
What to do
All work with the steering mechanism can be done with your own hands; there is nothing particularly difficult about it. But after work, especially on the steering tips, the toe angles will need to be adjusted, which is best left to specialists.
If a malfunction occurs, you will first need to diagnose the mechanism to identify the unit that caused it. First, the condition of the tips is checked. To do this, they are removed from the support and checked manually. With a working tip, the finger moves in its body with effort, but it should not get wedged to any position; such a tip can be put in place and continue to look for faults. If it moves freely and there is some play, then it is replaced.
Next, the gap between the rack and gear is adjusted. For this, a special 6-sided key is used. With its help, the thrust nut is tightened until it stops, and then loosened by ¼ turn. After this, the nut is fixed using punching. If the adjustment is made correctly, and the condition of the rack is still satisfactory, then the knocking should disappear.
If the adjustment does not help, then most likely the wear of the main components is quite severe and a major overhaul of the mechanism is required with the replacement of the rack, which can also be done with your own hands.
The cost of this repair at a car service
In car services, the average price for repairs depends on the complexity of the repair. Approximate cost of work:
- Steering diagnostics - about 300 rubles;
- Adjusting the mechanism costs about 500 rubles;
- Replacing the steering rack costs about 3,000 rubles.
Most services will not undertake to rebuild your rack. If you contact services that do this, prices start from 500 rubles, depending on what you need to replace. The cost, of course, is indicated without withdrawal. Repairing the steering rack on a VAZ 2114 is not as difficult as it might seem at first glance, especially if you are guided by the information from the article. This will help you save half of your budget from spending on repairs at car services.
Replacing bearings in the steering mechanism of a VAZ 2114
Replacement of VAZ 2112 steering shaft bearings Read more
Steering column. How to remove it correctly. VAZ 2110-2112. More details
Replacing the steering column bearing on a VAZ 2114, I can’t do it alone Read more
replacement of the steering shaft coupling VAZ 2113 2114 2115 Read more
Repair of steering rack VAZ 2108, 2109, 2113, 2114, 2115 2 Read more
Replacing the bearing on the steering wheel of a VAZ 2109, etc. Read more
Easy replacement of steering column bearings 2110 Read more
Replacement of the VAZ 1118 Kalina steering rack bushing Read more
WE ELIMINATE STEERING RACK ROUND ON A VAZ 2110 FOR 80 RUBLES. REPLACEMENT OF SS-20 DISC SPRING More details
how to eliminate a knock in the steering rack of a VAZ 2109 Read more
Adjusting the VAZ steering rack! (how to tighten the rack) More details
Replacing the VAZ 2112 steering rack repair kit Read more
Repair and modification of the VAZ 2109 steering rack Read more
Repair of VAZ steering rack with modification Read more
How to Simply Eliminate Knocking in the VAZ Steering Rack Read more
The gearshift lever is loose. How to quickly repair? More details
Replacing the steering shaft bearings on a Priora with electric throttle Read more
The procedure for replacing steering shaft bearings on a VAZ 2110-2111-2112 car in pictures and videos on the topic.
Installation procedure
- We put the coupling flange on the drive gear shaft in a position where the slot of the coupling tip coincides with the central longitudinal line of the flat.
- We tighten the coupling flange bolt without tightening it completely.
- We put the steering column on the studs and tighten the nuts securing the bracket.
- We tighten special bolts with tear-off heads together with the fixing plates. Let's not delay them.
- Tighten the coupling flange coupling bolt, two bolts (until the heads break off) and two nuts securing the steering column bracket.
- Connect the ignition switch wires.
- We install steering column switches.
- Installing the steering wheel
- Reinstall the covers.
- We check the functionality of all mechanisms on the steering column.
Video on replacing the steering shaft coupling:
Source