How to correctly and accurately set the timing marks of a VAZ 2114 with an eight-valve engine will be discussed in this article. In fact, the engines on the 14th Lada model are installed the same as on the eights, nines, and tens. There are minor differences. Therefore, this guide will also be useful to owners of these models. Let's look at the most important questions that a motorist asks himself.
How to change it yourself?
You can replace the belt on an 8-valve VAZ 2114 with an injector engine yourself or by ordering the appropriate service at a service station. During the shift process, there are nuances that must be taken into account when performing the task. If you make mistakes and do not change the strap correctly, this can lead to rapid wear and breakage. Below are instructions for replacing the belt in a VAZ 2114 8 valve.
Tools
If you change the belt yourself, prepare the following:
- a set of open-end wrenches, you will need tools for 13 and 17;
- long flat blade screwdriver;
- 10mm ring wrench, you can use a ratchet head;
- key for installing the tension roller;
- wheel wrench;
- jack.
User Pro Remont shared a video that describes in detail the procedure for replacing the timing belt pulley and timing belt in a VAZ 2114 car.
Algorithm of actions
How to change a belt correctly:
- Drive the car into a garage with a pit. The surface on which work is performed must be level. Switch the gear selector to neutral position.
- Loosen the bolts on the front right wheel. Place this part of the car on a jack so that the wheel can be rotated.
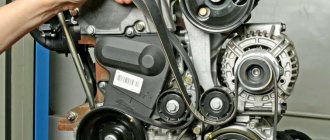
- Open the hood of the car. Using a 10mm wrench, remove the three screws that secure the plastic strap protector.
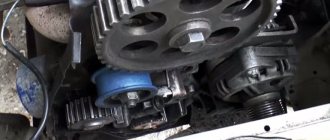
- Using a 13mm wrench, you need to loosen the bolt that secures the tension roller. Remove the device.
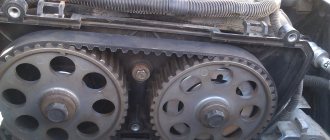
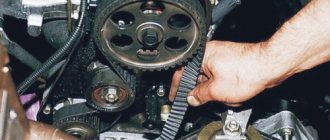
- You can see a mark on the camshaft gear; it is made in the form of a rectangular protrusion on the edge. When performing work, it is necessary that this mark coincides with the protrusion located on the fastening of the strap casing. If these marks do not match, you need to turn the wheel until they match.
- Then find the rubberized plug installed on the top of the clutch housing; it is located to the right of the power unit’s BC. The part is carefully pryed off with a screwdriver and removed from the seat. Under the plug you can see the flywheel crown; there is a mark on this device. It should be opposite the triangular protrusion located on the left. If the marks do not match, then take a 17mm wrench and loosen the tensioner. Using a pulley removal wrench, turn the device counterclockwise to loosen the timing belt.
- When the upper part of the belt is removed from the gear assembly, take a 17mm wrench and turn the crankshaft until the flywheel marks are opposite each other. The flywheel itself must be secured in this position; to secure it, use a screwdriver and install it between the teeth. If you have an assistant, ask him to hold the tool to prevent it from turning.
- Now you can remove the right wheel. Unscrew the screws that secure the arch protection and dismantle it.
- Using a 17 mm wrench, unscrew the nut securing the generator set pulley. When unscrewing, make sure that the flywheel does not turn.
- Dismantle the generator pulley and remove it from its seat.
- Remove the timing belt from the crankshaft disc.
- Using a 17mm wrench, completely unscrew the tensioner pulley lock and remove it from its seat. If you loosen the fastening, the belt can be removed.
- Install the new product onto the crankshaft disc. When installing, make sure that the marks are not broken. Install the generator set drive pulley by first placing a strap on it.
- Place the product on the gear of the mechanism. Install the tension roller.
- The strap is being installed. During installation, the tension roller must be turned with a special tool purchased in advance at the store. If you don't have one, you can use two self-tapping screws and a screwdriver. Self-tapping screws are installed in the grooves, and a screwdriver secures them. Turning is done counterclockwise. Tension the belt using the tension roller and tighten the screw that secures the roller.
- It is necessary to set marks if they are lost during the work process. The installation procedure for all components is performed in reverse order.
Photo gallery
Photos of belt replacement are shown below.
Remove the screws securing the timing belt guard.
The mark on the camshaft gear must coincide with the mark on the housing mount
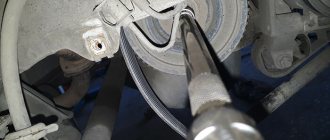
Loosen the strap tension roller by turning it counterclockwise
Remove the belt from the pulleys and install a new product
Unscrew the nut securing the generator shaft
Put on the new belt and tighten the roller
Preparatory operations
Open the hood.))
It's immediately obvious that the owner loves his car.
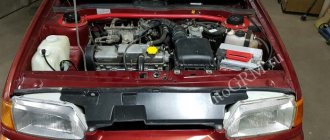
VAZ engine 8 valves.
If you plan to replace the pump, then let the engine cool, remove the protection and then drain the antifreeze. It is enough to drain only from the cylinder block.
Plug on the cylinder block.
Jack up the car and remove the front right wheel and plastic mudguard.
Why does the timing belt slip?
Water pump The cause may be one or several in combination. Let's look at them in order.
1. The belt itself may be to blame, or rather, the faulty manufacturer. A belt that has different rigidity across widths begins to float towards less rigidity almost immediately after installation. Diagnostics in this case is simple, remove it, turn it the other way, install it, and if it starts to creep in the other direction, then the culprit has been found. This belt is definitely for scrap. To be fair, this is much less common now. Tip: Always keep timing belts and alternator belts in your trunk.
What to do with engine 11183?
It is clear that a mandatory step in tuning the 11183 engine will be replacing the ECU. It’s simple: the standard M74 block cannot be flashed, but “January 7.2” is a good and time-tested solution. You will also have to abandon the “E-Gas” option, which means replacing the throttle assembly and receiver.
Everything I had to throw away
The intake tract parts were borrowed from the 2111 engine. A cable pedal was installed, and the engine began to look human.
Everything works well with the “January” controller, but standard firmware is not an option if the camshaft has been replaced. And it, in turn, has the following parameters:
- Release phase width – 104;
- Intake phase width – 109;
- The opening angle at the outlet is 272;
- Inlet opening angle – 268;
- Valve travel (exhaust/intake) – 9.5/10.1 mm.
After installing the new shaft, the motor became plug-in. However, on the 2114 hatchback, increasing power almost always comes with a compromise. In this case, we had to sacrifice reliability. What's improved:
- Maximum torque increased by 14 N*m;
- The power also increased – the limit of “90 horsepower” was passed.
By the way, any tuning leads to a decrease in durability. Make a choice.
Choosing a quality timing belt
Often the problem of a belt coming off is associated with the poor quality of the product itself. For this reason, knowledge on choosing the right belt will be of great benefit.
First of all, it should be noted that today there are several popular belt manufacturers. Their products are worth buying, but again not thoughtlessly, but carefully checking, since no one has ruled out fakes and defects.
So, let's move on to choosing a good timing belt.
Conteg
Belts are supplied to almost all countries of the world, and the main consumers of this company’s products are such automotive industry giants as Volkswagen, Fiat, Opel and others.
Contitech timing belt
As you know, Contitech has recently purchased several subsidiaries in the Middle Kingdom, which indicates an expansion of its sphere of influence in Asia and throughout the world. Today, almost everything is done in China, you just need to be able to distinguish between official Chinese ones.
So, Kontiteg products with a Chinese logo are expected to appear on the market soon, but this is unlikely to affect the quality.
Today, timing belts from Kontiteg are considered the best for installation not only in foreign cars, but also in domestic cars. They are reliable, rarely break, and last a long time.
This does not mean at all that by installing a belt from Koniteteg, you can forget about service life and proper care. Despite the high reliability of products of this brand, if operating instructions are not followed, problems cannot be avoided.
Main reasons for installing a split gear
Engine tuning specialists identify two reasons why many install this part. It is worth considering that a sports camshaft will not give anything unless a split camshaft gear is additionally installed (the VAZ will not go faster). During assembly work at the factory, the manufacturer often deviates from the data specified in the drawings. Therefore, the parameters of motors designed for one car model differ from the original ones. These errors are no more than ten degrees in each direction. Naturally, this affects the power characteristics of the motors. By installing a split gear, the car owner has the opportunity to adjust and optimize torque as needed.
Installing tuned camshafts allows you to significantly increase the torque of the power unit. VAZ split gear – another +5% to power characteristics. That's pretty good.
Installation process
The timing belt itself is a rubber product closed with teeth inward, which synchronizes the torque between the camshaft and crankshaft. Ignoring its wear will not lead to anything good, because in the best case, your engine will stall while driving, and in the worst case, the entire wheelbase will jam, which can lead to the most unpredictable incidents on the road.
The replacement and debugging itself is carried out in two stages, in the first stage the main repair and debugging work is carried out, and the second stage carries the function of monitoring the work done.
First stage
- The assistant gets into the car and puts 5th gear in the gearbox, and at this time you remove the front belt protection.
- Insert the ratchet into the place allocated for it and begin to turn the crankshaft, you need to do this until you see that the mark located on the camshaft has not moved to remove several teeth from the control antenna of the rear cover. (this action is necessary to reduce the degree of belt tension).
- We dismantle the drive pulley on the crankshaft and return the mounting bolt to its place.
- The assistant switches the gearbox to “neutral”.
- Again, we begin to carefully turn the crankshaft until the mark on the VAZ 2114 flywheel is in the central position.
Coincidence of the mark on the flywheel with the slot in the bar
- We check that the installation mark of the rear cover matches the mark located on the camshaft pulley; if they match, then you can unscrew the roller nut, then remove the belt itself.
- We install a new belt - we start with the roller, then we put it on the pump pulley and lastly on the crankshaft pulley.
- We adjust the tension by turning the adjusting roller counterclockwise.
- Carefully turn the crankshaft again so that the marks are in their previous position (they will 100% go astray when putting on a new belt and adjusting the tension).
Mark on the crankshaft pulley
Second stage (control-final)
- Before checking the timing marks on the VAZ 2114, you need to fix the pulley on the generator and tension the belt with a roller to the maximum.
- Now we check all the matches, if nothing is wrong anywhere, then we install the protection back and clean the workplace.
Looking under the hood of your car, with knowledge of this information, you will understand that there is nothing difficult in this procedure, but its success is quite dependent on the skill of the performer. Therefore, if something doesn’t work out the first time, just repeat the operation, you may even need to do it twice. Don’t be discouraged, because after the difficult first time it will only take you a few minutes, like a seasoned professional.
Video on the topic:
Design, principle of operation and adjustment of the engine valve mechanism
On a VAZ 2114 car, the camshaft sensor is necessary for the normal functioning of the fuel injection system. It is also called a phase sensor. The reason is that it is he who shows the on-board computer what phase the gas distribution system is in (intake, exhaust). Thanks to this simple device, it is possible to achieve the most accurate supply of the air-fuel mixture into the combustion chambers. The optimal ratio of gasoline and air in the mixture, as well as the ignition timing, depends on how the sensor works. Let's take a closer look at the VAZ 2114 camshaft position sensor, learn about typical breakdowns and methods for correcting them.
Signs and causes of timing belt eating
It is very easy to find out that the timing belt has begun to be “eaten up.” Upon visual inspection, it will immediately become clear that it (and most often one of its sides) has become thinner and turned into rags. For obvious reasons, it is simply unacceptable to continue to use such a belt, since due to severe wear, it can break at any time.
But there is also no need to rush to install a new belt, since in a short time it will come to exactly the same condition as the old one. First, you need to figure out why the timing belt on the VAZ-2114 is eating.
In most cases, such severe belt wear is preceded by the replacement of components that directly affect its tension and operation, namely:
- pulleys;
- tension roller;
- pump
If you carried out a timing belt repair, and immediately after that the belt started “eating,” then the very first thing you should check is whether the indicated elements are installed correctly (for example, when turning the roller and pulleys there should be no crunching or other extraneous sounds, but they themselves should rotate softly and smoothly).
The next thing to pay attention to is the tension of the belt. If it is weaker than required, then there is a high probability of the belt periodically slipping through several teeth, which can cause it to quickly be eaten
Otherwise (if the tension is excessive), there is a possibility of it breaking due to excessive load.
Checking whether the belt is tensioned correctly is very simple. It is enough to take it with two fingers and try to twist it (turn it in the transverse direction). If the belt has the correct tension, it can be turned no more than halfway. Otherwise (if the belt rotates more than 180 degrees or vice versa - it almost does not change its position, its tension should be adjusted).
This is done as follows (along with installing a new belt):
- Using a 17 key, turn the crankshaft until the marks on the engine and on the upper pulley match.
- After removing the plug, check the coincidence of similar marks in the crankcase.
- If there is a coincidence, immediately secure the flywheel with a screwdriver.
- Loosen the mounting screws and unscrew the alternator belt tension adjusting screw by 80%.
- Unscrew the generator pulley fixing screw.
- Loosen the nut on the timing belt tension pulley.
- Remove the old belt and install a new one.
- Having fixed the tension roller motionless using a fork wrench (or a lock ring remover), tighten the adjusting nut with a wrench until the desired timing belt tension is obtained (how to measure it was described above).
If the already installed timing belt is in good condition and you only need to adjust its tension, you only need to follow the last point of the instructions. In most cases, after correctly tensioning the belt, the problem with it “eating” disappears, but not always
In this situation, you should pay close attention to the condition of the gear teeth.
You can determine the wear of the gears by eye - if some teeth are ground down, broken off, or missing altogether, then this is a direct indication for their replacement; there are no other options. In some cases, the situation can be aggravated by an oil leak - when it gets on the belt, it (like many other petroleum products) causes it to corrode and quickly peel off the teeth.
Stories from our readers
“Fucking basin. "
Hi all! My name is Mikhail, now I’ll tell you a story about how I managed to exchange my two-wheeler for a 2010 Camry. It all started with the fact that I began to be wildly irritated by the breakdowns of the two-wheeler, it seemed like nothing serious was broken, but damn it, there were so many little things that really started to irritate me. This is where the idea arose that it was time to change the car to a foreign car. The choice fell on the melting Camry of the tenth years.
Yes, I had matured morally, but financially I just couldn’t handle it. I’ll say right away that I am against loans and taking a car, especially not a new one, on credit is unreasonable. My salary is 24k a month, so collecting 600-700 thousand is almost impossible for me. I started looking for different ways to make money on the Internet. You can’t imagine how many scams there are, what I haven’t tried: sports betting, network marketing, and even the volcano casino, where I successfully lost about 10 thousand ((The only direction in which it seemed to me that I could make money was currency trading on the stock exchange, they call it Forex. But when I started delving into it, I realized that it was very difficult for me. I continued to dig further and came across binary options. The essence is the same as in Forex, but it’s much easier to understand. I started reading forums, studying trading strategies. I tried it on a demo account, then opened a real account. To be honest, I didn’t manage to start earning money right away, until I understood all the mechanics of options, I lost about 3,000 rubles, but as it turned out, it was a precious experience. Now I earn 5-7 thousand rubles a day. I managed to get the car buy after half a year, but in my opinion this is a good result, and it’s not about the car, my life has changed, I naturally quit my job, I have more free time for myself and my family. You’ll laugh, but I work directly on the phone)) If If you want to change your life like me, then here’s what I advise you to do right now: 1. Register on the site 2. Practice on a Demo account (it’s free). 3. As soon as you get something on the Demo account, top up your REAL ACCOUNT and go to REAL MONEY! I also advise you to download the application to your phone, it’s much more convenient to work from your phone. Download here.
By moving the right gear clockwise and the left one counterclockwise, the overlap becomes larger than standard. This is to increase the torque at high speeds. Flaws:
- deterioration of low-end dynamics
- Fuel consumption increases at high speeds
- idle speed is less stable
- In winter, the engine warms up more slowly
Advantages
- fuel consumption at idle speed decreases (by approximately 0.1-0.2 l/100 km). Good for cities with traffic jams.
- good pickup at high speeds (from 3000 rpm to 6000 rpm), increase in power by about 4%.
By moving the right gear counterclockwise and the left gear clockwise, we reduce the overlap, which allows us to increase torque at low speeds. The pros and cons are reversed.
To summarize, we can say that using the settings of the split gears, you can shift the valve timing, changing the characteristics of the engine under certain conditions. Have you done this type of engine tuning? What adjustments do you recommend?
Let us remind you that adjustable gears are often installed together with sports camshafts and a zero-resistance filter. Taken together, such improvements provide a noticeable increase in power.
What is the best way to shift the valve timing?
We recommend watching:
- Intake camshaft VAZ 2112 16 valves
- Camshaft Lada Kalina 8 valves
- Valve timing diagram of a 4-stroke engine
- Sports camshaft for VAZ 2107 price
- How to set up a split gear
- Installing a split gear on a VAZ 2114
Timing belt VAZ 2114 8 valves: functions, location and signs of malfunctions
So, the belt is under a protective cover on the crankshaft pulley side. The belt itself is a ring structure, made of reinforced rubber, and has an internal tooth structure so that the teeth on the crankshaft pulley and timing gear can engage with the belt.
Engaging with the crankshaft and camshaft with its toothed side, the belt ensures synchronous rotation of the shafts, and with its smooth side it drives the water pump shaft of the internal combustion engine cooling system. The required timing belt tension is maintained by a tension roller.
If the timing belt is torn or has become dislodged/flipped off or jumped, the vehicle’s internal combustion engine stalls or operates extremely unstably. Possible signs of timing belt failure:
- the engine stalls;
- the car does not start;
- “phase sensor error” lights up - failure of the timing belt (displacement or slippage of the belt).
It is important to understand that, subject to constant wear and various loads (including temperature), the timing belt 2114 may fail ahead of schedule
For this reason, it is important to pay attention to signs of problems with this element.
For example, the timing belt on a VAZ 2114 “chews”. There may be several reasons why the timing belt is chewing. This is either mechanical damage to the teeth of the crankshaft or pulley, sagging of the belt, displacement of the axes of the pump roller and tension roller, etc.
Another such reason may be the belt slipping or moving to the side relative to its working position. This can lead to damage to the timing belt structure (contact with metal parts, abrasion on the edge of the tension roller) and, accordingly, disruption of the car engine.
The main reasons for belt displacement can be:
- manufacturing defect of the product (different rigidity across the width);
- failure of the water pump bearings (play, lack of lubrication, poor cleaning of the seat);
- deformation of the tension roller mounting pin (improper tightening or errors when replacing elements).
Which timing belt to choose
To make it easier for you to find the answer to your questions about which belt to choose or which belt is suitable, we have prepared a table for selecting timing belts for different brands and models of cars:
| Brand, model | Original code | Code analogue |
| Renault timing belt | ||
| Timing belt Logan | 7701477024 130C17480R 130C10178R | K015662XS 130C17529R |
| Timing belt Logan 2 | 130C17480R 130C10178R | K015662XS 130C17529R |
| Timing belt Largus | 130C17480R 130C10178R | K015662XS 130C17529R |
| Timing belt Duster | 130C11551R 7701477028 130C13130R 130C10178R | 130C17529R |
| Timing belt Renault Clio | 7701469776 7701472726 130C10178R | 130C17529R |
| Timing belt Sandero | 130C17480R 130C10178R | K015662XS 130C17529R |
| Timing belt Sandero 2 | 130C17480R | K015662XS |
| Timing belt Sandero Stepway | 130C10178R | 130C17529R |
| Timing belt Sandero Stepway 2 | 130C10178R | 130C17529R |
| Timing belt Symbol | 7701477024 | |
| Timing belt Megan | 7701469776 7701472726 130C10178R | 130C17529R |
| Timing belt Megan 2 | 130284231R 7701063999 130C13130R 130C13191R | CT977 |
| Timing belt Megan 3 | 130C13191R 7701477028 | |
| Ford timing belt | ||
| Timing belt Focus 2 | 1672144 | VKMA04226 |
| Timing belt Focus 3 | 2045356 | KTB764 CT881K5 VKMA04226 530049510 KD452.24 |
| Fusion Timing Belt | 1672144 1672143 | |
| Daewoo timing belt | ||
| Timing belt Nexia | 1987948226 530 0332 10 5900270 | |
| Timing belt Opel | ||
| Timing belt Opel | 95516740 | |
| Chevrolet timing belt | ||
| Timing belt Lacetti | 93185845 93746917 | |
| Timing belt Cruz | 95516740 | |
| Hyundai timing belt | ||
| Timing belt Accent | 24312-26001 | |
| Solaris timing belt | 24321-2B200 | |
| Timing belt Elantra | 24321-2B200 | |
| Timing belt Skoda | ||
| Timing belt Octavia | 06A198119D | |
| Timing belt Fabia | K035565XS | |
| Kia timing belt | ||
| Rio timing belt | 24321-2B200 | |
| Timing belt Soul | 24321-2B200 | |
| Timing belt LED | 24321-2B200 |
Timing belt options for VAZ
- Timing belt VAZ-2110, VAZ-2112
- Priora timing belt
- Granta timing belt
- Timing belt VAZ-2108, VAZ-2109
- Timing belt VAZ-2105, VAZ-2106, VAZ-2107
If you can’t decide where to buy a timing belt in Volgograd, Volzhsky or another city in the region, contact us, you can’t go wrong.
Pay special attention to how to set the timing marks
. We suggest taking a little more time to watch the video of replacing the timing belt on a VAZ with a 16-valve engine.
Replacement frequency
Natural wear, improper operation or other reasons lead to failure of the timing belt and the need to replace it. At the same time, there is no need to take the situation to the extreme: it is enough to carry out regular diagnostics and visual assessment of the part. Such a check will help to avoid a break at the wrong moment.
Abrasions indicate obvious wear on the timing belt.
The frequency of replacing the timing belt depends on the specific brand of car and is indicated in the vehicle’s operating manual. Despite the standards established by automakers, many experts advise changing the spare part every 50 thousand kilometers.
When buying a used car, you will have to check the condition of the timing belt yourself - a visual inspection of it for wear is enough. Clear signs of wear are abrasions or cracks on the surface of the belt. However, the presence of such defects does not mean that the belt will immediately fail, since inside it there is a base consisting of metal rods. Thanks to them, the part can withstand shock loads and maintain its working condition throughout its entire service life.
A cracking timing belt is another clear sign of wear.
Some cars are equipped with timing belts with reinforced metal cord, which affects their service life, increasing it by an average of 30%. Modern car models are equipped with belts made of rubber and metal, which have a limited shelf life.
Such parts cannot be repaired; if they fail, they are simply replaced. The decision to replace the belt is made not only if it breaks, but also if it sag, stretches or reduces the tightness of the fit, which negatively affects the synchronous operation of the valves. As a result, this can lead to malfunctions in the functioning of the entire car, the main symptom of which is engine malfunction.
Visible traces of belt stretching, as well as abrasion along with cracks, indicate that it has worn out
Almost always, the water pump or water pump is replaced along with the timing belt. On most cars, this device copes with its duties perfectly until the car dies, however, in some situations it needs to be changed ahead of schedule. For this reason, experts advise changing the pump at the same time as the timing belt.
The water pump is a part that is replaced along with the belt
All the steps to replacing the timing belt “from start to finish”
Before replacing, you need to make sure that: neutral gear is engaged, the car is stopped, the minus terminal is removed from the battery (key “10”). The plastic cover is removed from engine 11183 and the part is carefully pulled up. Then remove the drive casing:
- Unscrew the three fastening screws and remove the plastic part (see photo).
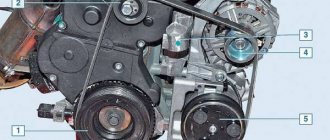
Timing casing on motor 2111 and 11183
Using the “17” key, rotate the crankshaft and see when the marks on the upper pulley and on the engine coincide. Then, opening the plug, we check the alignment of the marks in the clutch housing. Immediately fix the flywheel with a screwdriver.
Marks on the pulley and flywheel
An alternative way to “break” the timing belt
It is impossible to replace the timing belt on a VAZ-2114 without removing the alternator belt. loosen the upper and lower fastening screws, mark the position of the adjusting screw and unscrew it by 80%.
How to move the generator to the engine
Using a 17mm wrench, unscrew the screw securing the generator drive pulley. During installation, you will need to ensure that the marks match (see photo). The screw tightening torque is 99-110 N*m.
Generator pulley on engine
Loosen the nut on the roller, turn it and remove the belt. Now you can replace the roller itself.
The final step for dismantling
When installing a new belt, the upper pulley is once again aligned according to the marks (see above). The locking screwdriver is removed after installation.
New timing belt installed
How to adjust tension?
If everything was done correctly, it means that the belt can be turned half a turn with two fingers, but no more (as in the photo).
Correct tension setting
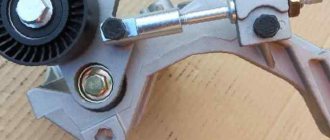
A fork wrench is used to make adjustments. If you don't have such a wrench, circlip pliers will do. Hold the roller with a wrench and tighten the nut.
The holes for the key should be located under the nut from below. This is the correct position of the roller.
Recommendations
- Before installing a new belt, wipe all pulleys, that is, the teeth on them, with white spirit. And the adjusting screw can be treated with a rust solvent.
- There is no point in protecting a new belt with silicone lubricant. By the way, according to the regulations provided for the VAZ-2114, the timing belt must be replaced every 60,000 km or if necessary. And the need can even be caused by oil products getting on the rubber.
Apparently, an assistant must fix the flywheel: the clutch housing and timing drive are located on two different sides.
2108-1006120 – roller
Attention. parts 2108-1006120 and 2112-1006120 are not interchangeable!
2108-1006129 – pin for the roller;
2108-1006040-10 – belt;
2108-1006149 – seal under the casing;
2108-1006146 – plastic casing.
Analogs of belts
- GATES 5521 or 5521XS (heavy duty), recommended
- FINWHALE BD-111
- BOSCH 1 987 949 559
- LEMFORDER 58-111-19 or 14458 01
- CONTITECH ST-527
- GOOD YEAR G1474 (semicircular tooth) or G1485 (trapezoid tooth)
- DAYCO 111x190/1
- HANSE HZ 011 008
- BRTI 21080-1006040-10
- TOYOTA 13568-19035
- RENAULT 7701462019
- OPEL 636359
- ROVER GTB1124
- AYWIPARTS AW2110560
- PROCODIS FRANCE 05CD27
- FAI 40305
- GK 791170
- MAGNETI MARELLI 340018181434
- MAPCO 43080
- HEPU 29-0165
- OPTIMAL R-1113
- SCT G124
- WILMINK WG1151273
- VEYANCE G1474
- OPTIBELT ZRK 1123 (3 pcs.)
- TRISCAN 8645 5521 (2 pcs.) or 8645 5124 (2 pcs.)
- FLENNOR 4410 (2 pcs.) or F904410 (belt + roller)
- LYNXauto 111CL19 (1 piece) or PK-1236 (belt + roller)
Analogues of the video
- GATES T42042 or T42042A (2 pcs.)
- MAPCO 23081
- FLENNOR FS99018
- LUK 531 0671 20
- OPTIMAL 0N1917
- BREDA LORETT TDI3009
- TORQUE 830900AE2
- ESPRA 2108-1006120/ES0108
- INA 531075010
- CORAM C747
- VPZ-23 830900AE1
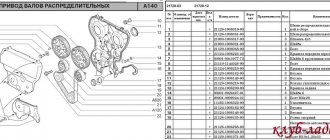
Sequence of operations for removing the camshaft gear:
- Unscrew bolt 3 and remove washers 4 and 2, securing gear 1 axially to the toe of the camshaft.
- Press the gear off the camshaft nose using a special puller (Fig. a and c).
The support flange 5 of the device is put on the camshaft until it stops against the gear. Pins 3, fixed in the flange, are threaded through the holes in the gear disk. At the free ends of the studs there is a cross member 2, into the threaded hole of which a thrust screw 1 is screwed. The thread-free end of this screw fits into the recess of the thrust sleeve 4. To reduce friction between the ends of the thrust screw and the sleeve, a hardened steel ball is installed. The bushing is held on the screw by a pin that fits into a ring groove at the end of the screw. By rotating the screw, bushing 4 is pressed against the center of the camshaft end and the gear is pressed off the shaft. - Remove the thrust flange 6, remove the key 5 and the thrust ring 7.
Install the gear on the camshaft in reverse order. In this case, it is necessary to additionally take into account the following:
- Carefully inspect thrust flange 6. If cracks or significant wear is detected (which may be accidental, since the flange is sulfinized), replace the flange with a new one.
- To press the camshaft gear onto the camshaft nose, use the tool shown in the figure.
The support flange 3, which has a rectangular cutout, is placed on the first cam of the camshaft and rests against the camshaft support journal. Studs 5, screwed into the flange, are threaded into the holes of the timing gear disk. The gear should face the block with the side that has the deeper recess. A cross member 2 is put on the studs 5, into the threaded hole of which a screw 1 is screwed. When this screw rotates, the pressure sleeve 4 feeds the gear onto the toe of the camshaft and, with further pressure, presses it onto the shaft. When pressing the gear, it is necessary to simultaneously center the thrust flange 6 on the thrust ring 7 to prevent damage to the edge of the flange hole by the protruding part of the key. Before pressing the gear, the camshaft nose must be lubricated with engine oil. - Tighten bolt 3 with a torque wrench to a torque of 5-6 kgm.
- Check the end runout of the gear in relation to the surface of the camshaft journals. It is allowed no more than 0.06 mm at a radius of 62 mm. This amount of runout ensures silent operation of the timing gears.
How to change the timing belt yourself
You can replace it in a VAZ-2114 car (8 valves) yourself if you read the operating instructions, in which everything is clearly described. It is recommended to change this element no less than after 35-45 thousand km, but it is better to be guided by the situation. After all, replacement may be needed earlier, and if you wait for the “recommended kilometers” to run, you can only wait for the belt to slip off the gears, fray, burst, or even break completely. In the VAZ-2114 car, you can install a special injector that will notify you when the timing belt comes off or breaks. Before deciding whether it needs to be replaced, it is necessary to inspect it, and if it is in poor condition, then it is not recommended to delay replacement. Information on which belt is best to choose can be found in the instructions for the VAZ-2114.
To change the belt yourself, you must have:
- new belt;
- a set of keys;
- new tension roller.
Replacement instructions are as follows:
- The car is put on the handbrake in fourth or fifth gear.
- Next, the cover protecting the camshaft drive is unscrewed and removed.
- The next step is to loosen the generator drive belt, and then it is removed from the crankshaft along with the pulley. The bolt holding it in place must be left in place.
- Afterwards the car can be put into neutral gear.
- Now we need to do the labels. The crankshaft rotates clockwise, while you need to observe the marks and the flywheel. The shaft should be turned until the mark stops parallel to the middle division on the scale.
- When the mark on the pulley is exactly opposite the mark on the protected cover, you need to slightly loosen the fastening nut on the tension roller. If the need arises, the roller must be changed.
- Next, using a roller, you need to loosen the belt, which will make it possible to remove it.
- Afterwards, install a new part on the crankshaft pulley, then pull the leading branch of the product onto the camshaft pulley to avoid sagging.
- Then the crankshaft is turned one and a half to two turns, and the marks are set. If they do not match, the belt is removed again and reinstalled.
- After the marks are set, the bolt on the crankshaft is unscrewed, and the generator pulley returns to its place, secured with the bolt.
- In order to adjust the timing belt and put on the alternator belt, you need to turn the tension roller counterclockwise.
- Upon completion of the replacement, you will need to turn on the engine and, based on the sound, determine whether it is necessary to adjust the tension of the timing belt. Also, if all repairs have been carried out correctly, there should be no noise. If it is pulled too tight, a hum will be heard from the roller. It is necessary to loosen it and turn it about 15 degrees to the left, and then fasten it again.
Install a new belt and tension it
Work order
1. We put on the belt, starting with the crankshaft gear.
2.Having passed the belt through the fluid pump gear and tension roller, we put it on the timing shaft gear.
3. To tension the belt, a special key is usually used to rotate the tension roller. If you do not have such a tool, you can use ordinary self-tapping screws, screws or bolts. We insert them into the holes in the roller body (2 pieces), and by passing a screwdriver between them, rotate the roller counterclockwise, tensioning the belt. Periodically check the belt tension.
4. The belt tension, without using a special tool called a strain gauge tester, can be checked by rotating it around its vertical axis. To do this, grasp its surface with two fingers (thumb and forefinger) at the point between the timing camshaft sprocket and the fluid pump gear, and rotate the belt around its vertical axis. If its plane rotates more than 90 degrees, tighten it further. The tension can be considered optimal when the belt rotates 80-90 degrees. But do not overdo it: too much tension will wear out both the belt and the pump bearing.
5.If the timing belt tension is normal, tighten the nut securing the tensioner pulley (13 wrench). We pull out the screws (screws, bolts) from the roller body.
6. Throwing a 19mm wrench onto the crankshaft pulley mounting bolt, turn the shaft 2 turns. Check to see if the marks have gone astray. If everything is normal, we continue installation. If the marks are lost, you will have to remove the belt and repeat everything again.
7. On the crankshaft, unscrew the generator drive pulley bolt again (19mm wrench). Install the previously removed pulley onto the crankshaft. Fix the flywheel with a screwdriver and tighten the bolt.
8. We put on the generator belt and tension it.
9. We check the results of the work done. We start the engine and listen to its operation. If the engine runs normally, then you have done everything correctly.
10.Put the protective cover of the timing drive in place, tighten the 3 bolts securing it (10mm wrench).
11. Bend the engine protection and use the same wrench to tighten the 2 bolts securing it to the body.
12.Mount the right front wheel.
13. We lower the car, do not forget to securely tighten the bolts securing it.
This, in principle, is the entire algorithm for replacing the timing belt. As you can see, it is not as complicated as it might seem at first glance. Of course, it is impossible to foresee all the nuances that may arise during the replacement process, but the information provided should be sufficient to cope with this task. Moreover, in the event of an error, the engine will not be damaged in any way.
If you still have questions or need more detailed information, watch a video about how the process of replacing the timing belt on a VAZ 2115 car takes place
A broken timing belt while on the road can cause a lot of inconvenience. On a VAZ-2115, this breakdown can lead to bending of the valves, which can lead to more expensive repairs. An unpleasant situation can also arise if a breakdown occurs on the road. Below we will look at the causes of this malfunction and provide instructions for eliminating it.
Signs of a faulty timing belt and their causes
Some experts say that belt replacement is required after approximately 75,000 km under standard vehicle operating conditions, or after 60,000 km under heavy-duty conditions. At the same time, experts often recommend periodically diagnosing the car anyway, since in fact, replacing it with a VAZ-2114 may be necessary earlier due to the following defects:
- The appearance of swelling;
- Cracks;
- Various structural defects due to constant corrosion by oil;
- Fraying the ends.
If any of these defects appear, we can confidently say that an urgent replacement of the timing belt in the VAZ-2114 is necessary. When it finally breaks while driving along a highway or road, this can ultimately cause very serious consequences, since the valves collide with the pistons and, accordingly, become deformed, which will require extremely expensive repair work.
In the vast majority of cases, this all arises due to:
- Unskillful or aggressive driving;
- Purchase of low-quality consumables;
- Operation of transport in rather specific climatic conditions;
- Incorrect installation of the belt during the previous replacement.
Noticing that the engine has stopped starting normally, stalls during operation, or a phase sensor error appears, all this indicates a malfunction with the timing belt. If you plan to replace the timing belt in a VAZ-2114 yourself, there will be no difficulties if you follow simple instructions.
Special attention should be paid to the fact that often the cause of belt chafing is the rollers, and this is quite easy to determine, since it has noticeable damage on one side, which is why it eventually breaks. To avoid such troubles, it is recommended to check the condition of the rollers from time to time.
What's the result?
As you can see, the timing belt is an important part of the car, on which the entire operation of the internal combustion engine depends. Like all elements, the timing belt has its own resource, which, as a rule, is limited to 60 thousand kilometers of the vehicle.
We also recommend reading the article about which timing belt is best to choose. From this article you will learn about the leading manufacturers of timing belts, as well as what to look for when choosing such products.
At the same time, it is important to constantly monitor the condition of the timing belt (every 10 thousand km) or during scheduled maintenance, and also periodically check its tension.
If signs of wear are noticeable ahead of schedule, the belt still needs to be replaced. At the same time, the rollers must also be replaced, since jamming can cause a break.
When is it necessary to replace the timing belt and set the marks?
Without exaggeration, a worn timing belt can be called a “ticking time bomb.”
The importance of this element in the car system is difficult to overestimate. Usually it is made of high-quality rubber, the service life of which is designed for 50-60 thousand kilometers.
But, if the vehicle is operated in unfavorable conditions, the replacement interval will be different.
In most cases, the replacement interval is indicated by the manufacturer in the documentation for the vehicle. In addition to the resource built into the belt, it is worth considering the following factors that shorten the service life of the rubber element:
Related article: Error P0171 – mixture too lean
- Engine oil getting on the surface of the timing belt
- Leakage of the front crankshaft oil seal
- Tension roller malfunction
- Pump jamming
As you can see, there can be a sufficient number of breakdowns in the car system that directly affect the service life of the belt. If the scheduled replacement time has come, or its resource has been prematurely exhausted, it is not enough to simply replace the old mechanism with a new one - you also need to take care of the correct installation. To successfully do all the work, it is enough to arm yourself with the necessary tools and know how to align the belt with the marks.
Why install a split gear
There are two main reasons why it is advisable to replace the standard gear with a split gear.
First of all, during the manufacturing and assembly of parts at the VAZ plant, some deviations from the design dimensions are allowed. As a result, even in engines of the same series (for example, VAZ-2108 or VAZ-2112), the position of the camshaft relative to the crankshaft can fluctuate within 10 degrees (this corresponds to one tooth on a standard gear) both towards the earlier and towards the later ignition As a result, the power and dynamic characteristics of the power unit suffer.
In addition, installing a split gear is highly desirable when replacing standard camshafts with sports camshafts, with increased cam lift and a modified profile. Installing more efficient valve timing allows you to get an additional increase in power from 3 to 5 percent.
Other causes of timing belt wear
One of the camshaft teeth is broken.
As a rule, such a problem can be noticed with the naked eye, and belt failure begins with the peeling of the teeth themselves from the belt.
A more significant cause of such a malfunction can be oil leakage from the engine, which gets onto the belt during operation, thereby wearing it out faster. An oil leak is also easy to notice, but eliminating it will require certain skills.
Such problems in the form of oil leaks can damage the timing belt.
It also happens that the cause of a belt rupture may be poor-quality material from which it is made. It often happens that when producing belts from reputable manufacturers, fakes are encountered.
Consequences of incorrectly setting timing marks
If the ignition is set incorrectly, the following negative aspects are possible:
- If the engine has 16 valves, then they become deformed or bent during operation, accumulating damage.
- The previous problem causes damage to the cylinder head.
- The guide bushings may also become unusable.
- Cracks may appear in other engine components.
Crack in the cylinder block
- The motor overheats.
- The engine piston mechanism can burn out.
- Oil residue may appear on the spark plugs.
Oil deposits on spark plugs
- The fuel mixture loses its ignition moment.
Note! If the engine has 8 valves, then the consequences are not so critical - traction disappears, the belt quickly wears out and breaks.
After repairs, the following factors most often indicate an incorrectly set ignition:
- The car accelerates worse.
- Frequent overheating of the motor.
- The craving became much worse.
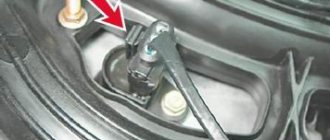
How to replace the tension roller on a VAZ 2113-VAZ 2115?
Removal: 1) At the beginning of the operation, install the entire timing mechanism according to the marks, detailed information in details and pictures on how to do this is explained in the article called “Setting the valve timing according to marks” so go to this article and do everything as described in it , by the way, just above we indicated in this article about the cover that will need to be removed in order to get to the timing mechanism, so read about how to remove this cover in the same article to which the link is given in this paragraph.
2) Go ahead and move on to point 2, now you will need to remove the tension roller itself from the car, but before removing it, remove the timing belt from the camshaft and from the tension roller itself, to do this, slightly loosen the nut that secures this roller (This nut in the photo above is indicated by a blue arrow, by the way, we’ll run straight ahead behind it, there will also be a washer located behind this nut, so don’t lose it when you completely unscrew the nut) and turn the roller by hand so that the belt loosens (the roller itself is made in the form of an oval, that’s why he regulates the belt tension, that is, at some point he strongly pulls the belt, and at some point he doesn’t pull it at all), after which remove the belt from the camshaft as shown in the photo below (Just do everything carefully), and well also remove it from the roller itself and let it hang (To completely remove the belt, you need to unscrew the bolt that secures the generator drive pulley, you also need to remove the belt itself from the generator, in general there are a lot of brands and so as not to completely remove it, just like we already indicated a little higher, remove it from the camshaft pulley, from the tension roller and let it hang from you).
3) Well, at the end of the operation, when the belt is no longer in the way, completely unscrew the nut that secures the tension roller, remove the nut and the washer located behind it, and then remove the roller itself along the shaft as shown in the photo below, after the roller will be removed, check its bearing, to do this, grab the central part of the roller with your hand and rotate the outer part of the roller, it should not jam and should spin normally, there should be no play, and grease should not leak from the bearing (B In this case, the roller will be contaminated with grease).
Note! When the roller is removed, a spacer ring will be installed behind it, which we also recommend that you remove and check for defects. If it is in good condition, that is, not crimped or cracked, then you can not replace this ring with a new one and install it on your place again, by the way, due to this ring, as you already understood, the fact how the tension roller will stand depends, for example, if the ring is installed large, then the roller will come out a little and the belt will not stand straight, but at an angle, so if The belt doesn’t eat you up, and if it doesn’t fly off while driving, then you don’t even have to touch this roller, since it does its job, as they say, with a bang!
Installation: The new roller is installed in its place in the same way as it was removed, but only the entire operation is performed in the reverse order of removal, in addition, the roller must also be installed in such a way that the two holes that are on it (see photo below) are directed not inwards, but outwards, by the way, if you look closely at the tension roller which is shown in the photo below, you can even notice with the naked eye that it is covered in lubricant, such a roller needs to be replaced and cannot be reused, because there is a possibility that it will soon time, the bearing will jam, but a jammed tension roller will not lead to good things (Either the timing belt will fly off in this case, or it will break), after you install the new roller and secure it with a nut, be sure to put on the timing belt and adjust it, in more detail For information on how to do this, read the article: “Replacing the timing belt,” point 1.
Additional video clip: We have attached a very interesting and visual video clip for you just below, so that you can watch it and see in more detail how the process of replacing this tension roller is carried out, so watch this video clip and delve into it.
- Electrical equipment
- Engine
- Brake system
- Other
- Steering
- Transmission
- Suspension
- Tuning
- VAZ 2110 Other
- Engine
- Steering
- Electrical equipment
- Transmission
- Brake system
- Suspension
- Tuning
- Electrical equipment
- Steering
- Video publications
- VAZ tuning photo stream
- Operation and repair manuals
How to set it up correctly
What a split camshaft gear does and how to set it correctly - you can find out in this section.
Its setting is carried out using a dial indicator, which is used to shut off the valve system. The piston part must be moved upward. Adjustment actions are carried out to stretch and shift the amplitude value of the torque at average speed or, in a simple way, to achieve maximum values at the bottom of the torque. On different brands of cars, the settings may have slight differences. But it should be borne in mind that the actions follow similar scenarios.
How to configure
- On the pulley part of the camshaft, align the special marks on both parts of the gear (moving and fixed).
- Return the timing belt part to its place. Additionally, check the placement of all parts relative to the marks.
- Open the intake and exhaust valves to the single-phase position. They are located in the fourth cylinder. If their positions are not the same, you need to use a special screwdriver to lower the bolt on each part.
- Rotate the camshaft, making sure that the moving part of the gear remains in its original position.
How the timing chain drive of the VAZ 2106 car works: review and replacement
The popular VAZ 2106 car, whose production began during the Soviet era, was equipped with three types of engines - with a displacement of 1300, 1500 and 1600 cm3. The design of the listed motors is the same, the difference is only in the sizes of the cylinder-piston group, crankshaft and connecting rods. On all power units, the timing gears are driven by a double-row chain. The latter gradually stretches out and needs periodic tightening; the minimum service life of the part is 100 thousand kilometers. When tensioning does not produce results, the entire chain drive is changed - along with the gears.
Replacing a chain drive - step-by-step instructions
Some of the repair work is carried out from the inspection ditch. You will have to loosen the generator axle, remove the protection and unscrew the ratchet nut - the above operations are performed from below the car. To completely replace the drive, it is better to purchase a ready-made timing repair kit for the VAZ 2106, consisting of the following spare parts:
Consumables you will need are silicone high-temperature sealant, rags and fabric gloves. Before disassembling, pay attention to the appearance of the front part of the engine - it happens that the front crankshaft oil seal leaks lubricant, and the engine becomes covered with a layer of oily dirt. Since the oil seal is installed inside the timing cover, it is easy to change during repairs.
Preparation of tools
To successfully disassemble and change the chain along with sprockets, prepare the following working tools:
To loosen the large ratchet nut, find a special 36mm socket wrench with a long handle. It is also used when combining marks by manually turning the crankshaft. As a last resort, take a spanner wrench with a handle bent at 90° like a wheel “balloon”.
Pre-disassembly stage
It is impossible to immediately get to the timing assembly - the generator drive belt, crankshaft pulley and electric fan are in the way. In older VAZ 2106 models, the impeller is attached to the pump shaft, so it is not necessary to remove it. To remove the chain drive, follow these steps:
During disassembly, check the condition of the valve cover gasket - it may be swollen and leaking oil. Then buy and install a new seal.
Before removing the aluminum cover that hides the timing assembly, it is recommended to remove all dirt from the front end of the engine. When you remove the cover, a small gap will open between the block and the oil pan. You should not allow foreign particles to get in there, especially after a recent oil change.
On a car equipped with an electronic fuel injection system (injector), disassembly is carried out in the same order. Only here the adsorber hose is disconnected, and the air filter box is removed along with the corrugation connected to the throttle valve block.
Why is it difficult to remove the pulley?
No. 1. Depending on the engine design, make and model of the car, the difficulty of removing the pulley varies. Some machines have a lot of space to comfortably carry out repair work, while others have very little free space. The pulley design elements cover the pulley.
The structure of pulleys is also different, there are 2 types:
- ordinary;
- damper
Damper pulleys have an additional outer ring with an elastic band in their design, which absorbs vibrations and micro-vibrations.
Before you start removing the pulley, you need to loosen the tension nuts and bolts, remove the generator and power steering belt.
No. 2. In the factory assembly, the pulley is seated on the engine crankshaft, pressed with a bolt or nut and tightened with high compression force. Thus, the factory assembly is very strong. Therefore, if you have never removed the pulley, it will be more difficult to dismantle it the first time.
In addition to tightening with the maximum permissible force with a special torque wrench, during operation, the engine becomes very hot, the threaded connection is tightened even more and sticks. And external factors influence the outside, due to which the threaded connection may be subject to corrosion.
Some engine models cannot be repaired; they are disposable. These are, for example: 1AZ-FSE, 3UZ-FSE. Each power unit was examined in detail.
No. 3. If you disengage the clutch, the engine crankshaft can be freely turned with a wrench. Therefore, in order to unscrew the crankshaft pulley nut, you need to stop the shaft from turning. If, when you press the clutch, the speeds do not change, then it is not working. Air may have entered the system. In this case, you need to bleed the clutch.
Why are special technological holes made in pulleys? In auto repair shops, there is a special device for fixing the shaft, which must be bolted to the pulley and the shaft locked.
If there is no special device for fixing the shaft, which is screwed to the pulley, then you need to install good anti-roll devices under the wheels of the car and put 4th gear on the gearbox.
Or, the third option is to rest a pry bar against the flywheel teeth and fix the crankshaft from turning while unscrewing the pulley nut.
Another option is to insert a pin into the pulley hole, and install a pry bar around the pin and the second stop, as in this figure.
Purpose and design of the drive
The gas distribution mechanism is responsible for supplying the fuel mixture to the cylinders and releasing exhaust gases. To ensure timely opening of the intake and exhaust valves, the camshaft must rotate synchronously with the crankshaft. In the Zhiguli, this function is assigned to a chain drive installed in the front of the engine.
Replacing the timing chain and gears cannot be classified as complex operations, but the procedure is quite labor-intensive. To do the work yourself, you need to understand the operating principle and design of the drive, which consists of the following elements:
The gear size ratio is approximately 1:2. That is, while the crankshaft drive sprocket makes 2 revolutions, the camshaft gear rotates 1 time.
The required tension of the VAZ 2106 timing drive is provided by a plunger device supporting a semicircular shoe. Older cars were equipped with a purely mechanical plunger - a retractable rod with a powerful spring, which had to be tightened manually. Later models received a hydraulic chain tensioner that operates automatically.
Unknowingly, I once found myself in a stupid situation. A friend’s chain on the “six” was stretched out and began to make a lot of noise, I advised it to be tightened. On site it turned out that the plunger fixing bolt was missing; the advice turned out to be useless. Later it turned out that the car has an automatic tensioner that is activated by oil pressure. The stretched chain had to be replaced.
The timing drive is lubricated by engine oil coming from the camshaft. To prevent lubricant from splashing, the mechanism is hidden behind a sealed aluminum cover, screwed to the end of the cylinder block with 9 M6 bolts. Another 3 screws connect the protective casing to the oil pan.
So, the chain drive performs 3 functions:
Diagnostics
Diagnostics must be carried out every 20,000 km of the vehicle. To do this, remove the protective cover and inspect the belt. The belt should not have chips, tears or cracks. Also, it should not have unraveling threads, etc. After inspecting the belt, it is necessary to inspect the rollers and listen to them with the engine running for noise.
Old cracked timing belt
It is necessary to inspect the alignment of the belt relative to the camshaft pulley, crankshaft, pump and rollers.
Why do you need to twist the crankshaft pulley?
Removing the crankshaft pulley is performed for various reasons.
Crankshaft pulley
Most often it has to be removed when replacing the timing belt or replacing crankshaft seals. Usually the belt is changed either according to the regulations, or when defects are identified that require its replacement. Oil seals are replaced when oil leaks occur due to product wear.
On a VAZ 2114, the crankshaft pulley is secured with a bolt. During removal, a problem arises when unscrewing the mounting bolt. Firstly, it is inconvenient to get to. Secondly, at the factory they always tighten it very tightly so that it does not unscrew on the road. If a fastener comes loose while driving, it can result in costly repairs. During operation, thanks to the right-hand thread, the tightening is enhanced. In addition, coking and sticking of the part occurs. Thus, sometimes the bolt is very difficult to remove.
Tools
To successfully dismantle the VAZ 2114 crankshaft pulley and replace consumables, you should prepare the following tools:
- standard set of keys;
- jack;
- support or stump;
- socket head;
- extension;
- pulley puller;
- pry bar, screwdrivers.
It is more convenient to carry out work on a lift or ditch for inspection.
Stages of work
In order to remove the crankshaft pulley on a VAZ 2114, you need to dismantle some parts and components. The entire process of removing the crankshaft disc consists of the following steps:
- First, to dismantle the generator belt, you need to unscrew the locking bolt and loosen the tension bolt.
- Next, you need to lift the front of the car and remove the right front wheel.
- In the upper part of the engine compartment of the VAZ 2114, remove the air filter and the engine mud shield.
- Next, remove the alternator belt.
- To secure the flywheel from turning, you need to open the plug on the side of the VAZ 2114 clutch. Then insert a screwdriver or pry bar into the opened opening between the flywheel teeth.
Fix the flywheel and unscrew the bolt
- Next we move on to unscrewing the fastener. To make it easier to unscrew, you need to apply special liquids to the threaded connection that corrode corrosion. For this purpose, special WD lubricant, brake fluid, and vinegar essence are suitable.
- Then the head of the key is put on and, using a lever, it is turned counterclockwise so as to tear the bolt from its original position.
- Place the lever coming from the head against the spar or the floor in the direction of the shaft movement, and then turn the starter several times, giving the crankshaft a rotational impulse.
- After unscrewing the fastening element, you need to remove the crankshaft pulley. It is held in place by a key and is difficult to remove easily. You can use a special device with paws that cover the edges of the disk.
- If you don’t have a puller, you can use pry bars or screwdrivers by inserting them between the crankshaft and the pulley on each side, gradually moving the part to be removed away from the shaft. The touch point should be chosen closer to the crankshaft.
- Before removing the disk, it is advisable to tap it with a wooden hammer to avoid possible distortion. The part should be dismantled carefully so as not to damage the key and groove.
We put the head on the bolt. If you are unable to unscrew the fastening element by hand, you can use the starter.
Unscrew the fastening bolt
After completing the necessary replacement, when reinstalling the crankshaft pulley, the seats should be treated with grease so that the parts fit without effort. In this way, distortions can be avoided.